This will be a full tutorial on installing OpenStack (minimal config). I would very much like to try open-source cloud OS, and OpenStack is one of the serious solutions, used by many institutions and businesses. Cern is one among the users, and Red Hat is strong supporter of OpenStack.
Be aware: Even after this “ironed out” tutorial, you will be greeted with errors after you set everything up, and you will need to research more to get your OpenStack to work ok. I will write about some of the problems in a few more quick guides.
OpenStack also has reputation of being complicated to install and maintain and not very stable. I read a lot on the OpenStack topic, went through a lot of documentation and this is the result. This will cover manual installation of Train release, and this extensive series will cover every component of Minimal OpenStack install (don’t let this minimal fool you, there is plenty to do).
There are a few differences between OpenStack official documentation and deployment itself, so this tutorial should also help you save countless hours of looking for mistakes and deciphering errors through way.
Procedure is tedious, but I would highly recommend it, since at the end of it, you will have a good understanding of the basic principles of OpenStack.
More on the subject next time, let’s get to work.
There is a learning curve, and from what I read I believe that OpenStack is at this moment a stable solution for your cloud needs.
But, we’ll see along the way, lets dive in.
Prerequisites
I will be using CentOS 7 for my installations (v.1908). I will be creating my LAB in VMware Fusion/Workstation. CentOS initial installation is minimal without GUI or any additions.
All of my VMs will have 4CPU cores and 8GB of RAM with minimum of 120GB hard drive.You can find minimum requirements here – https://docs.openstack.org/install-guide/overview.html
Take note about additional requirements from network and drive components and add accordingly to your LAB.
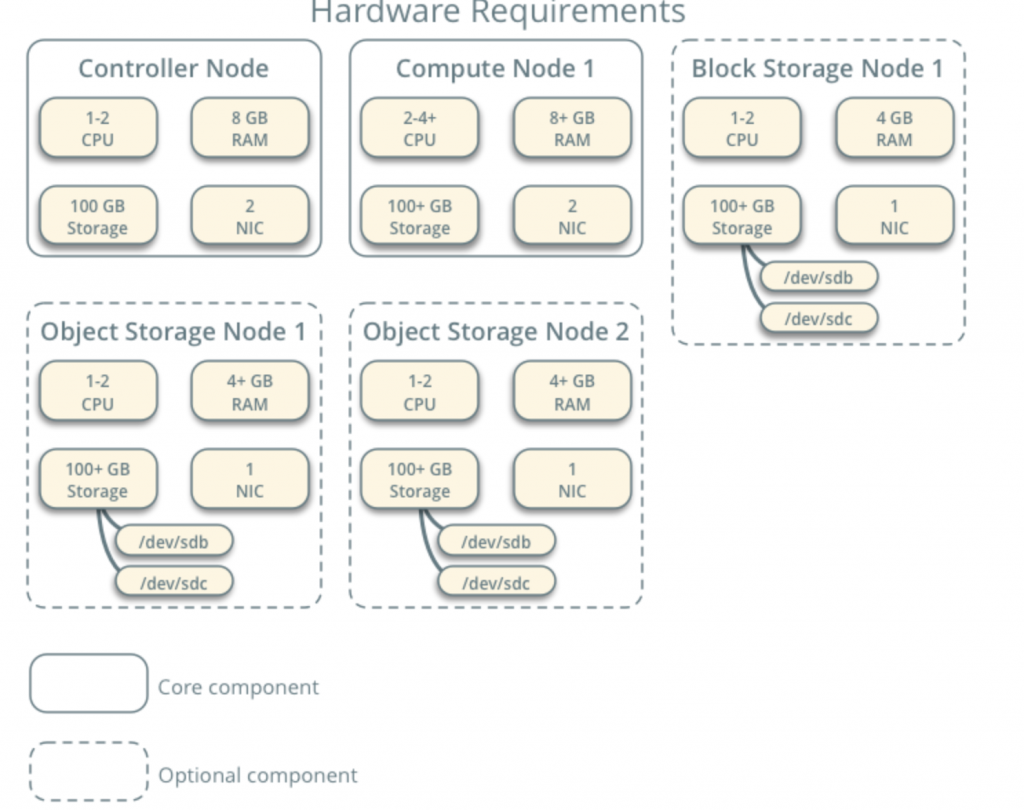
My LAB has internet access.
I will be following OpenStack documentation along the way – https://docs.openstack.org/install-guide/common/conventions.html
I will install Train build, which is the current one. I will start with Controller Node 1 and Compute Node 1.
Provider Network will be as follows (you need internet access for this configuration):
10.0.0.1/24 – gateway
10.0.0.11/24 – Controller Node 1
10.0.0.31/24 – Compute Node 1
10.0.0.41/24 – Block Storage Node 1
10.0.0.51/24 – Object Storage Node 1
10.0.0.52/24 – Object Storage Node 2
I will also later create network in range 203.0.113.0/24, that will be management network.
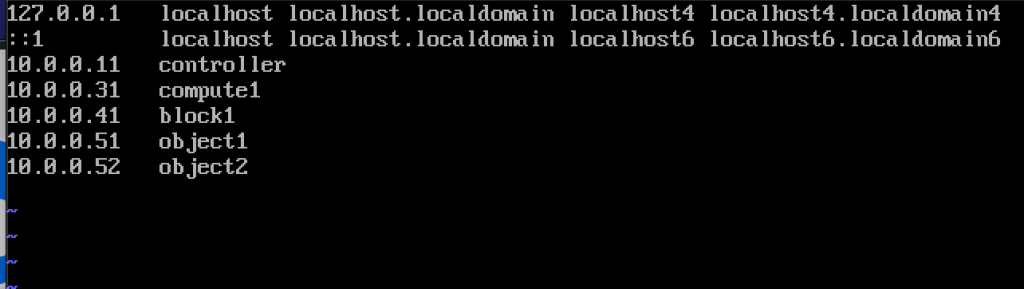
Here are also the names and IP addresses of the machines (you will also need them in hosts file):
10.0.0.11 controller
10.0.0.31 compute1
10.0.0.41 block1
10.0.0.51 object1
10.0.0.52 object2
Change Machine Hostname
For every machine in the lab change hostname. I will change my hostnames to the names I specifed just above this.
Command is below, controller is the name of one of the machines, change it to what you see fit.
sudo hostnamectl set-hostname controller
Here is what the change looks after reboot.

I named my machines – controller, compute1, block1, object1, object2.
Configure Name Resolution
Edit your network interface located in /etc/sysconfig/network-scripts
In my case, I have interface ifcfg-ens33
sudo vi /etc/sysconfig/network-scripts/ifcfg-ens33I edited following lines (controller machine example):
BOOTPROTO=none
IPADDR=10.0.0.11
PREFIX=24
GATEWAY=10.0.0.1
DNS1=10.0.0.1
DNS2=8.8.8.8
ONBOOT=yes
IPV6INIT=no
Here is how it looks like

Reboot machine after you set ip configuration. Repeat these steps for all machines in the lab (of course set different IP address for each).
Update CentOS installation
Before we go any further, we will update our CentOS installations. This way we will also confirm our internet connectivity.
sudo yum update -yEdit Hosts file
Again, we have to do that on each machine. We will edit hosts file, so that machines can see each other by the name.
sudo vi /etc/hosts/This is what we need to enter
10.0.0.11       controller
10.0.0.31       compute1
10.0.0.41       block1
10.0.0.51       object1
10.0.0.52       object2
Here is how my file looks like
If we done everything ok, we should now be able to ping from controller to compute1 and vice versa by the name. (Make sure your ping is available through firewall)
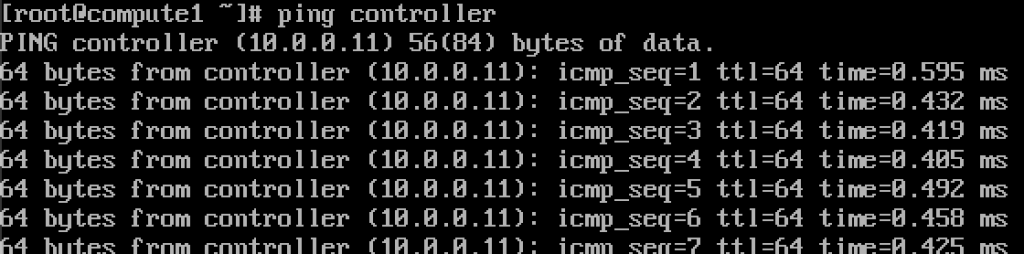
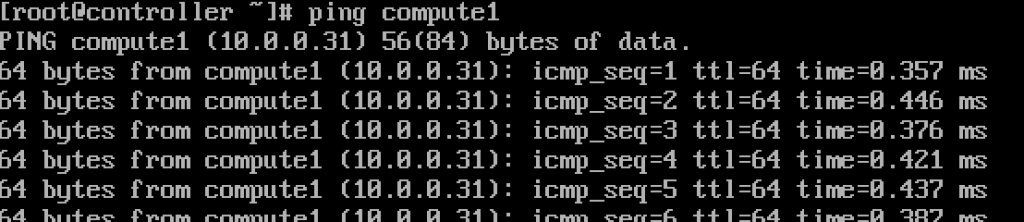
Works.Enter these values into every hosts file on every machine and make sure you can ping each machine, and test from every machine.
Setup NTP service
Precise time measurement is important so we will set time server and attach clients to it. Time server will be our controller server and client all the other machines.
NTP server setup
We will do this on our controller server.
sudo yum install chrony -yEnable and start service by running
sudo systemctl start chronyd
sudo systemctl enable chronyd
You can also check status of service by running
systemctl status chronydNext, we will edit /etc/chrony.conf file
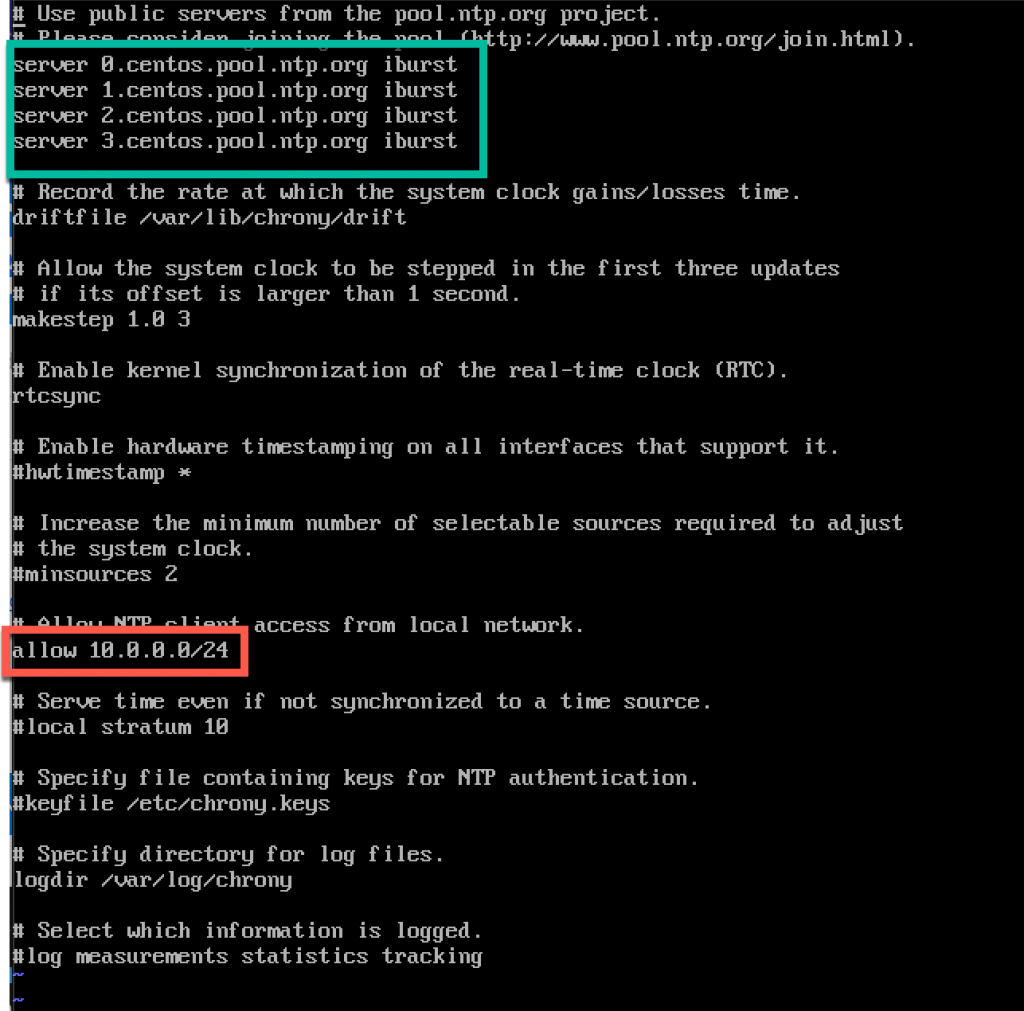
sudo vi /etc/chrony.confFor this tutorial I will leave default centos NTP servers. Otherwise if you want to edit NTP servers, you can, by adding command below (Replace NTP_SERVER with NTP server name)
server NTP_SERVER iburstAlso we will need to enable access for our NTP clients from local network by uncommenting and editing following line
allow 10.0.0.0/24Here is my config. Green part is where you will enter your NTP servers, and red part is enabled access from our local network for time sync.
Restart server or chrony service by typing in
sudo systemctl restart chronydWe will check if our server is syncing time by typing in
chronyc sources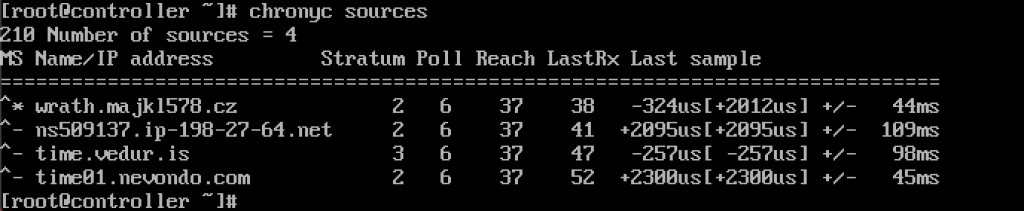
Service works for me.
We will also enable it through firewall
sudo firewall-cmd --permanent --add-service=ntp
sudo firewall-cmd --reload
NTP clients setup
These steps need to be done on the rest of the machines.
Again, we need to install chrony
sudo yum install chronyEnable and start NTP service
sudo systemctl start chronyd
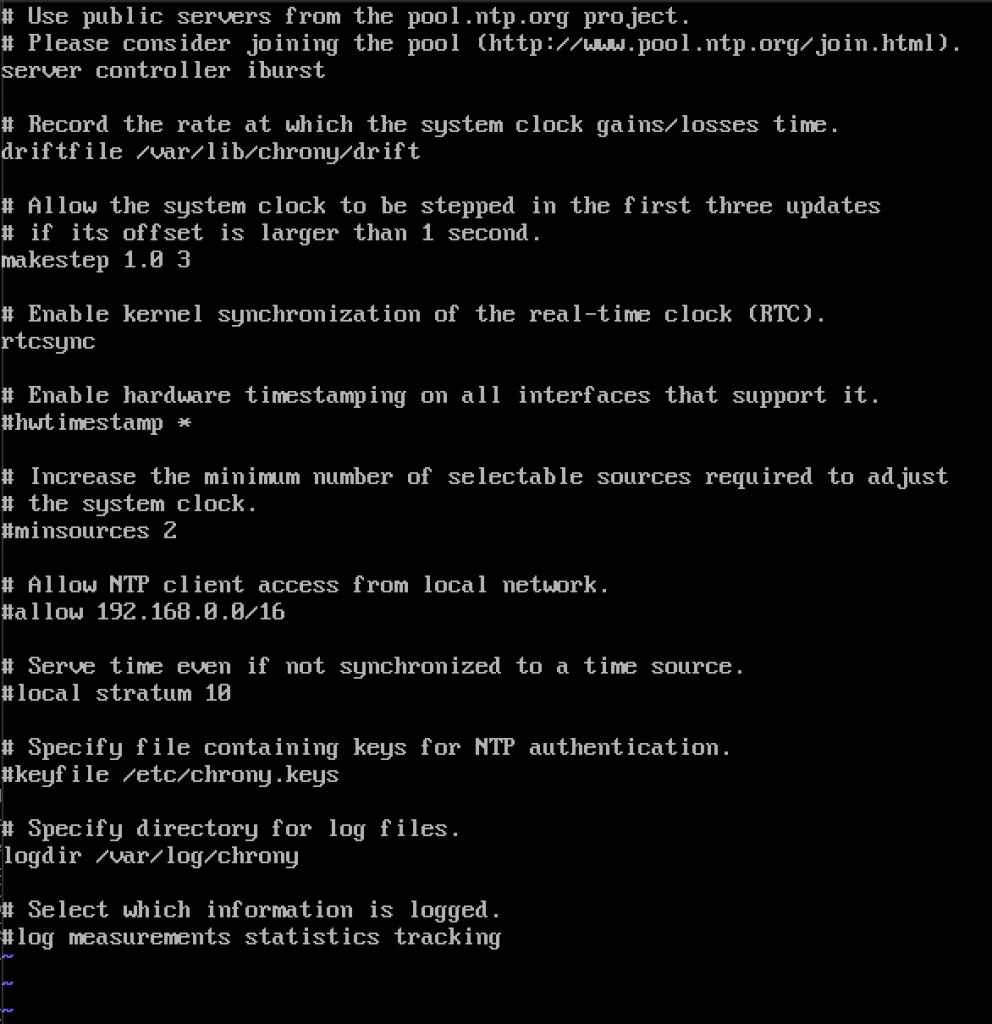
sudo systemctl enable chronydAfter that we again need to edit /etc/chrony.conf
sudo vi /etc/chrony.confYou will need to delete all coment out all NTP servers and enter following
server controller iburstLeave everything as is, and close file. This is how mine looks like.
Again, restart NTP service
sudo systemctl restart chronydAnd lets check if it works
chronyc sources
It works, client is communicating with NTP server.
And, on NTP server if we enter command
chronyc clientsWe will se that compute1 is NTP client

Repeat the step on the rest of the machines.
OpenStack Packages
These steps must be done on all nodes. If you haven’t update your CentOS installation, and also disable EPEL Repo.
_________________
!!!///ONLY FOR RED HAT INSTALLS, CENTOS SKIP THIS
subscription-manager repos --enable=rhel-7-server-optional-rpms \
  --enable=rhel-7-server-extras-rpms --enable=rhel-7-server-rh-common-rpms
////
________________
Run following command (we are installing Train release)
sudo yum install centos-release-openstack-train
Next command we will run is
sudo yum upgradeReboot after it, and select new kernel to activate it.
Next command will be
sudo yum install python-openstackclientAnd at last, we need integrate our OpenStack install into SELinux
sudo yum install openstack-selinuxSQL Database
Database will be installed on controller node.We will install MariaDB.
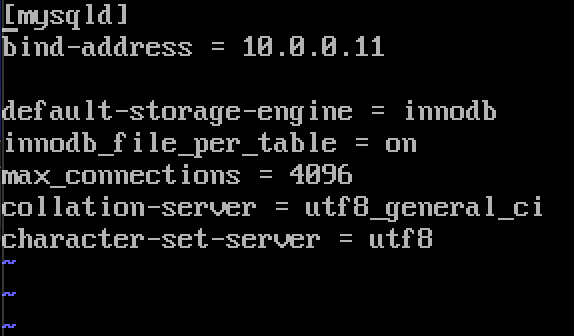
sudo yum install mariadb mariadb-server python2-PyMySQLAfter installation is done, we will need to edit a openstack.conf located in /etc/my.cnf.d
sudo vi /etc/my.cnf.d/openstack.confWe will create mysqld section with following info (make sure bind-address is address of your controller)
[mysqld]
bind-address = 10.0.0.11

default-storage-engine = innodb
innodb_file_per_table = on
max_connections = 4096
collation-server = utf8_general_ci
character-set-server = utf8
Here is how it looks like in my case
Enable and start MariaDB
sudo systemctl enable mariadb.service
sudo systemctl start mariadb.service
We will also add firewall exception
sudo firewall-cmd --permanent --add-service=mysql
sudo firewall-cmd --reload
Finally we will secure our installation and set password for root sql user
sudo mysql_secure_installationMessage Queue
OpenStack uses message queue to coordinate operations and status between services. It usually runs on controller, so we will install it on controller. We will install RabbitMQ
Installation
sudo yum install rabbitmq-serverStart and enable service
sudo systemctl enable rabbitmq-server.service
sudo systemctl start rabbitmq-server.service
Add openstack user to it. Replace RABBIT_PASS with your password.
sudo rabbitmqctl add_user openstack RABBIT_PASSSet permissions
rabbitmqctl set_permissions openstack ".*" ".*" ".*"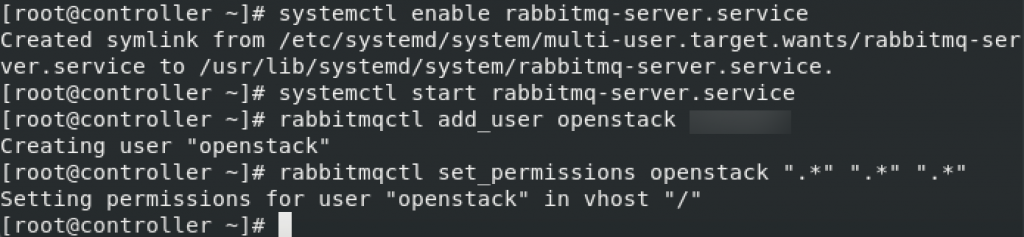
These are firewall settings for RabbitMQ
sudo firewall-cmd --zone=public --permanent --add-port=4369/tcp --add-port=25672/tcp --add-port=5671-5672/tcp --add-port=15672/tcp  --add-port=61613-61614/tcp --add-port=1883/tcp --add-port=8883/tcp
sudo firewall-cmd --reload
Optional SELinux command
setsebool -P nis_enabled 1Memcached
The Identity service authentication mechanism for services uses Memcached to cache tokens. The memcached service typically runs on the controller node, so I will install it on controller node.
Installation
sudo yum install memcached python-memcachedNext, we will edit /etc/sysconfig/memcached
sudo vi /etc/sysconfig/memcachedcontroller should be added to OPTIONS line, like this
OPTIONS="-l 127.0.0.1,::1,controller"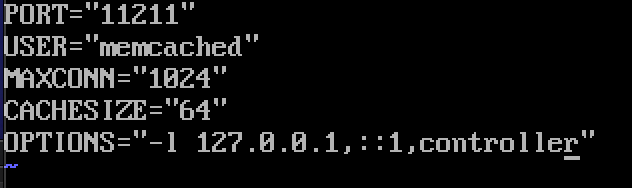
At last, we will enable and start service
sudo systemctl enable memcached.service
sudo systemctl start memcached.service
Optional firewall settings for memcached
sudo firewall-cmd --new-zone=memcached --permanent
sudo firewall-cmd --zone=memcached --add-port=11211/udp --permanent
sudo firewall-cmd --zone=memcached --add-port=11211/tcp --permanent
sudo firewall-cmd --zone=memcached --add-source=10.0.0.0/24 --permanent
sudo firewall-cmd --reload
Etcd
Short explanation from docs.openstack.org – OpenStack services may use Etcd, a distributed reliable key-value store for distributed key locking, storing configuration, keeping track of service live-ness and other scenarios.
Etcd should be installed on controller node.
Installation
sudo yum install etcdNext we will edit /etc/etcd/etcd.conf
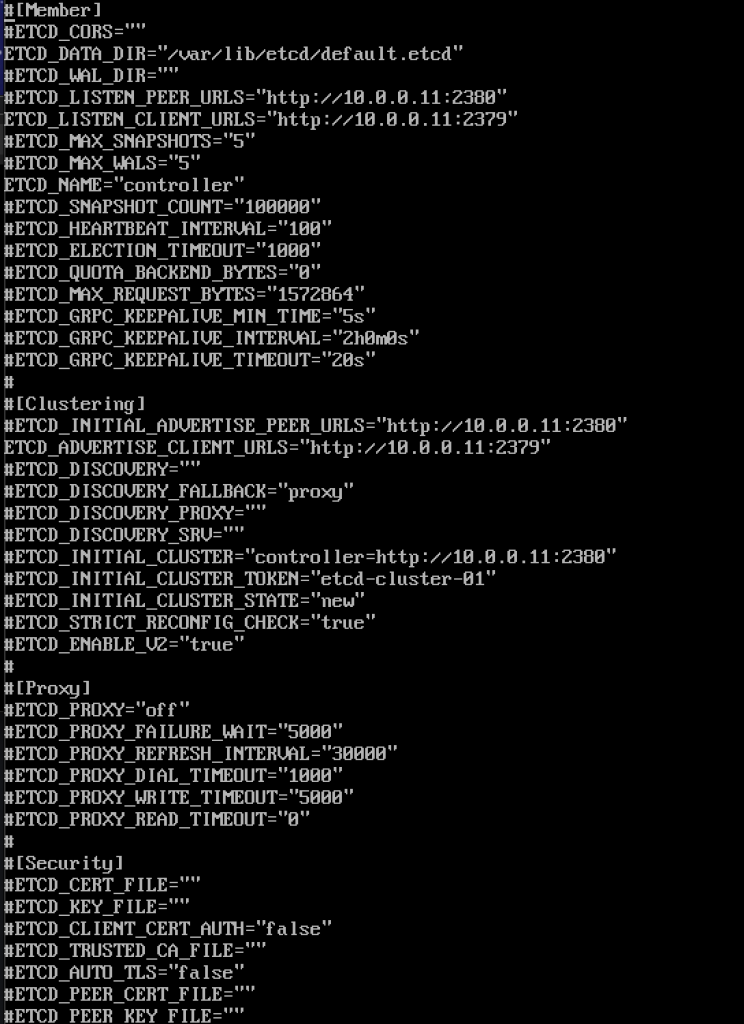
sudo vi /etc/etcd/etcd.confYou should edit file like this and change values below to match your controller IP or name.
#[Member]
ETCD_DATA_DIR="/var/lib/etcd/default.etcd"
ETCD_LISTEN_PEER_URLS="http://10.0.0.11:2380"
ETCD_LISTEN_CLIENT_URLS="http://10.0.0.11:2379"
ETCD_NAME="controller"
#[Clustering]
ETCD_INITIAL_ADVERTISE_PEER_URLS="http://10.0.0.11:2380"
ETCD_ADVERTISE_CLIENT_URLS="http://10.0.0.11:2379"
ETCD_INITIAL_CLUSTER="controller=http://10.0.0.11:2380"
ETCD_INITIAL_CLUSTER_TOKEN="etcd-cluster-01"
ETCD_INITIAL_CLUSTER_STATE="new"
This is how my file looks like
Enable and start service
sudo systemctl enable etcd
sudo systemctl start etcd
Additional firewall settings
sudo firewall-cmd --add-port={2379,2380}/tcp --permanent
sudo firewall-cmd --reload
So, we are more or less “done” with initiall part, we will now be doing Minimal deployment for Train.
Minimal Deployment for Train
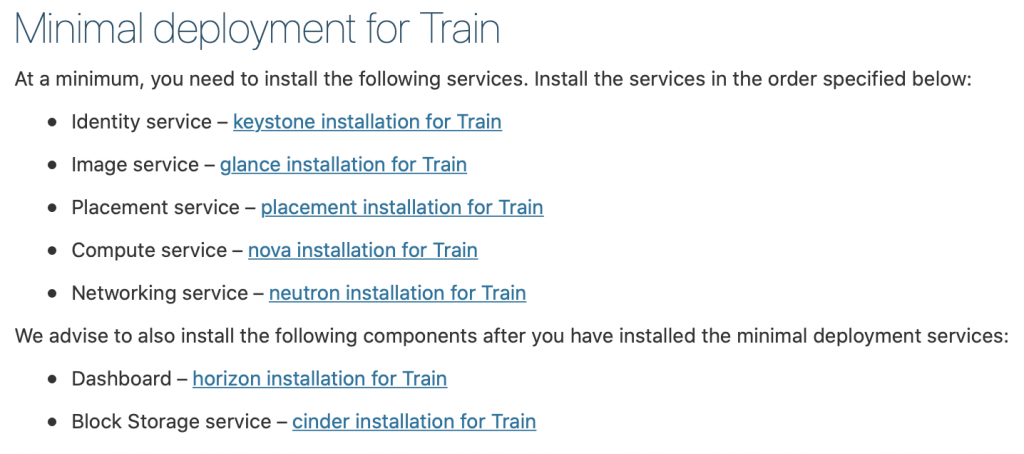
Ok, so we were successfull so far. We will now be doing minimal service deployment for Train. More details can be found here – https://docs.openstack.org/install-guide/openstack-services.html
Services need to be installed in specified order, like depicted below
Since this tutorial is going a bit long already, I’m going to finish it here, and cover each of the services above in separate tutorial.
Important thing is to do all the services in exact order as they are below.
Here are the links
- Identity service – keystone installation for Train
2. Image service – glance installation for Train
3. Placement service – placement installation for Train
4. Compute service – nova installation for Train
5. Networking service – neutron installation for Train
We advise to also install the following components after you have installed the minimal deployment services:
6. Dashboard – horizon installation for Train
7. Block Storage service – cinder installation for Train
8. Object Storage service – swift installation for Train
Additional links for after installation for errors you may encounter: