In order to install object storage, you need functional OpenStack installation. Prior to this, we installed block storage, and now we will install and configure object storage.
The Object Storage services (swift) work together to provide object storage and retrieval through a REST API.
There are few disk/network prerequisites to prepare before starting this tutorial, so make sure you have them done. I covered it in my initial tutorial on OpenStack installation.
Here is the OpenStack documentation on this topic – https://docs.openstack.org/swift/latest/install/
Install and configure the controller node
This part is done on the controller node.
Object storage unlike other services will not use MariaDB which is installed on controller node. Instead it will use SQLite on each of the object nodes.
Source admin to gain access to admin only cli commands
. admin-openrc

or if you done previos parts with my tutorials

. admin-openrc.sh
We will create identity service credentials
Create swift user
openstack user create --domain default --password-prompt swift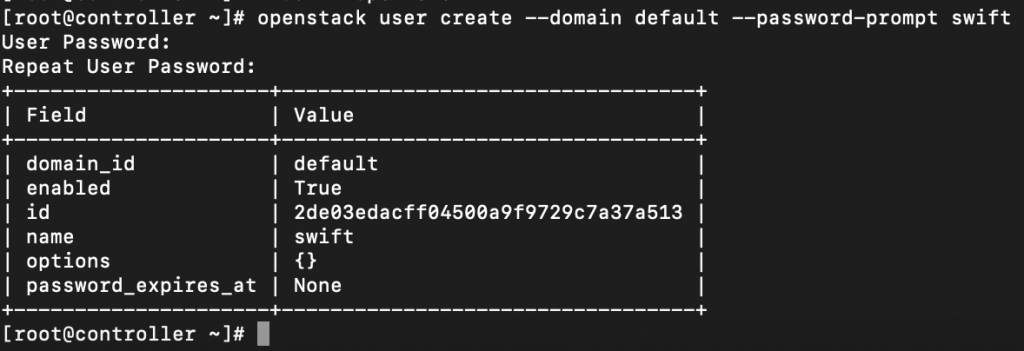
Add admin role to swift user
openstack role add --project service --user swift admin
Create swift service entity
openstack service create --name swift \
  --description "OpenStack Object Storage" object-store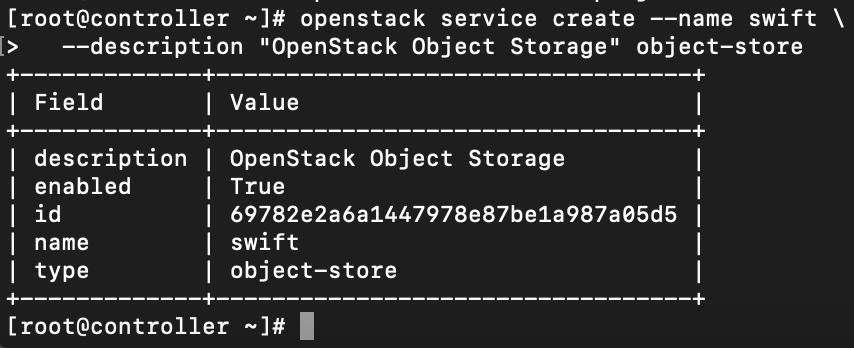
Create Object Storage API endpoints
openstack endpoint create --region RegionOne \
  object-store public http://controller:8080/v1/AUTH_%\(project_id\)s
openstack endpoint create --region RegionOne \
object-store internal http://controller:8080/v1/AUTH_%\(project_id\)sopenstack endpoint create --region RegionOne \
object-store admin http://controller:8080/v1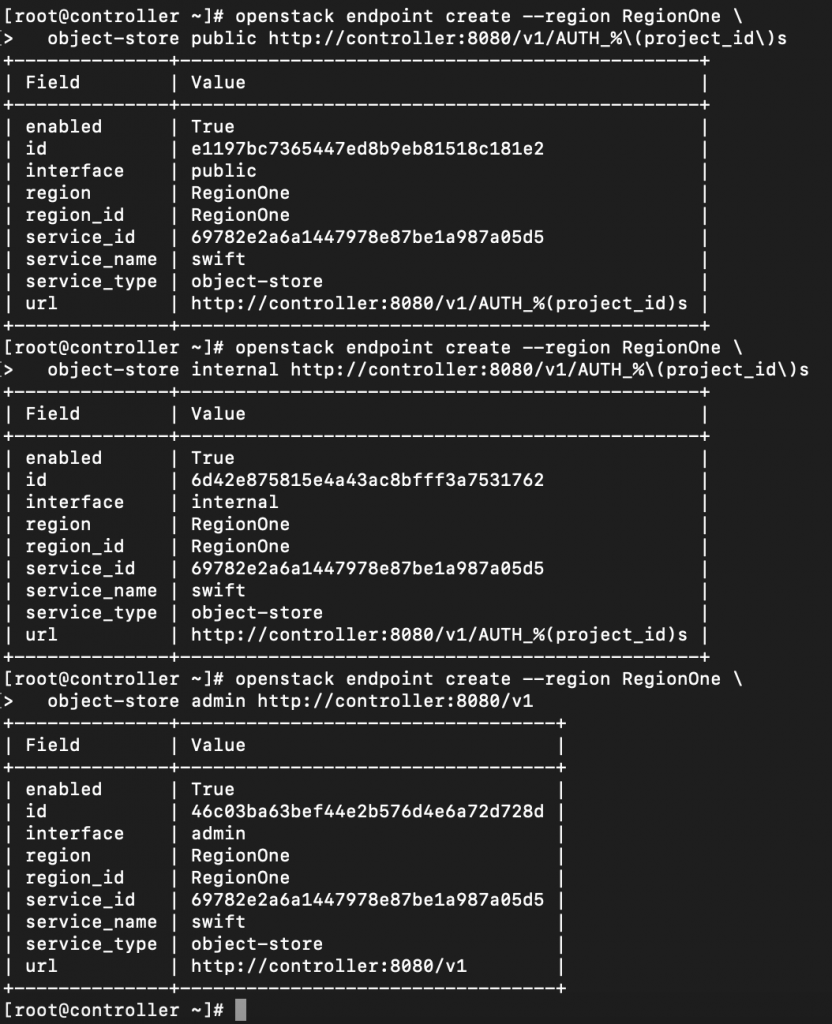
Additional firewall settings
sudo firewall-cmd --add-port=8080/tcp --permanent
sudo firewall-cmd --reload
Install and configure
yum install openstack-swift-proxy python-swiftclient \
  python-keystoneclient python-keystonemiddleware \
  memcached
There is already some of these components installed if you have complete lab.
Obtain the proxy service configuration file from the Object Storage source repo
curl -o /etc/swift/proxy-server.conf https://opendev.org/openstack/swift/raw/branch/master/etc/proxy-server.conf-sample
Edit
sudo vi /etc/swift/proxy-server.confDefault section
[DEFAULT]
...
bind_port = 8080
user = swift
swift_dir = /etc/swift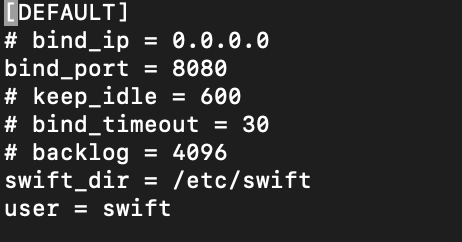
In the [pipeline:main] section, remove the tempurl and tempauth modules and add the authtoken and keystoneauth modules
!Do not change order of modules
Be sure to edit second pipeline, which is keystone pipeline. Check screenshot below.
[pipeline:main]
pipeline = catch_errors gatekeeper healthcheck proxy-logging cache container_sync bulk ratelimit authtoken keystoneauth container-quotas account-quotas slo dlo versioned_writes proxy-logging proxy-server
app:proxy-server section
[app:proxy-server]
use = egg:swift#proxy
...
account_autocreate = True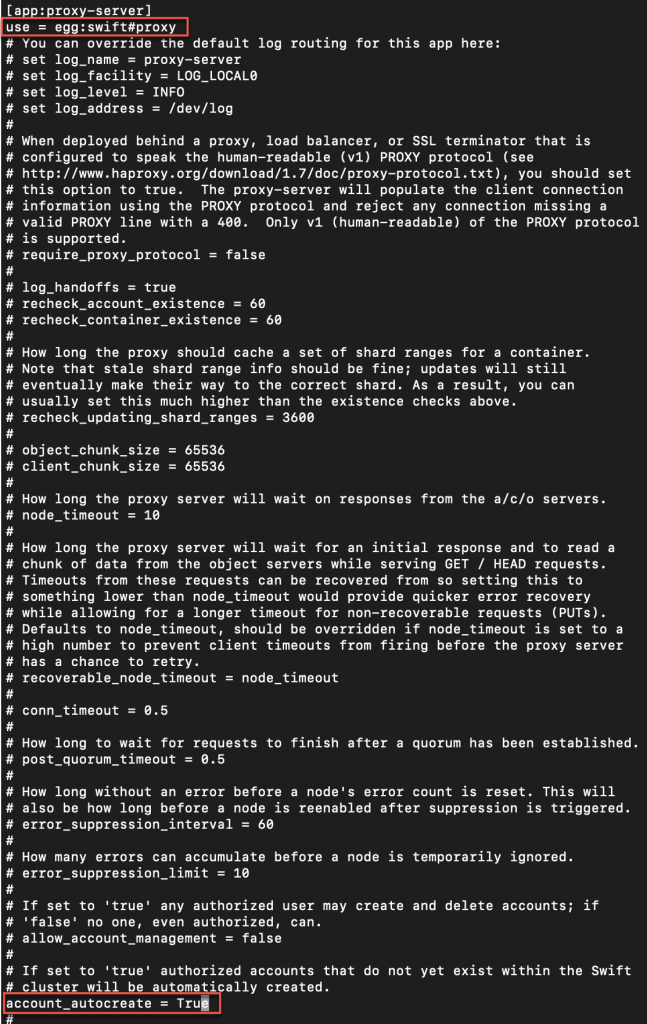
filter: keystoneauth
UNCOMMENT top section line #[filter:keystoneauth].
Remove #
filter:keystoneauth]
use = egg:swift#keystoneauth
...
operator_roles = admin,user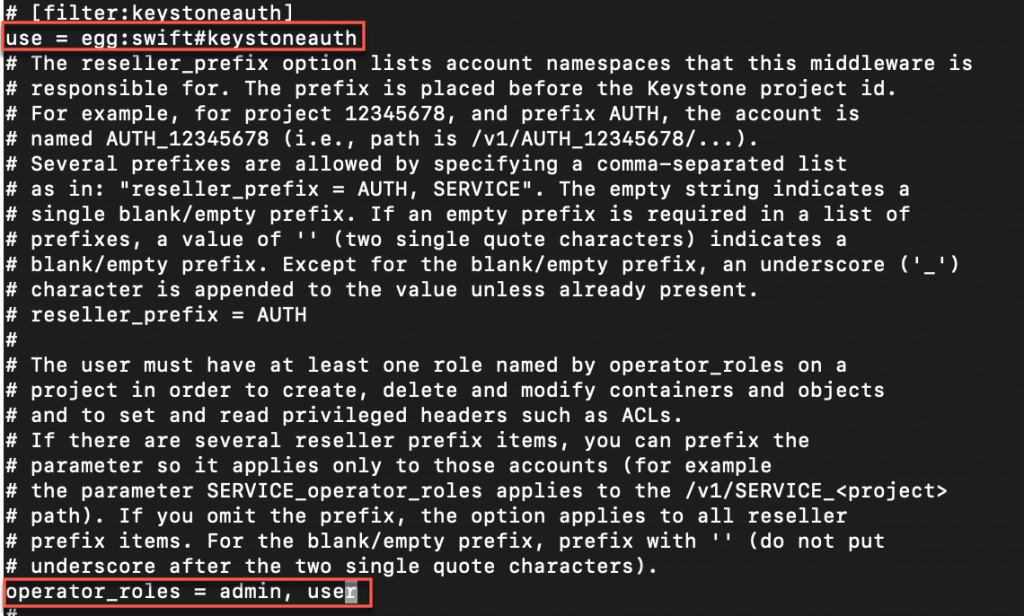
filter:authtoken. Replace SWIFT_PASS with swift service password.
UNCOMMENT top section line #[filter:authtoken]
Remove #
[filter:authtoken]
paste.filter_factory = keystonemiddleware.auth_token:filter_factory
...
www_authenticate_uri = http://controller:5000
auth_url = http://controller:5000
memcached_servers = controller:11211
auth_type = password
project_domain_id = default
user_domain_id = default
project_name = service
username = swift
password = SWIFT_PASS
delay_auth_decision = True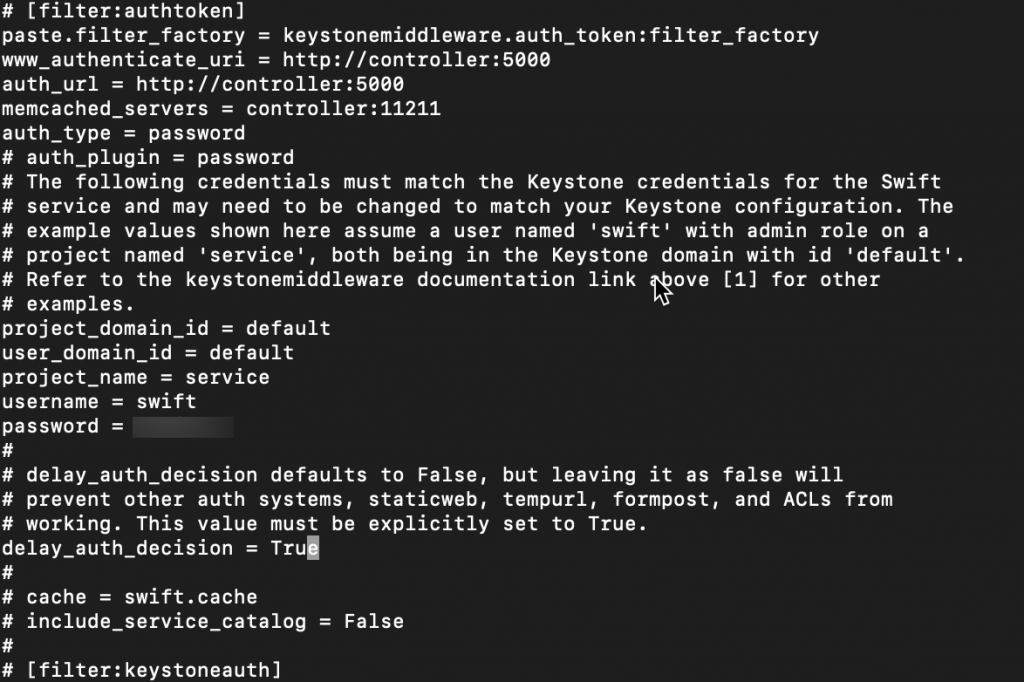
filter:cache section
[filter:cache]
use = egg:swift#memcache
...
memcache_servers = controller:11211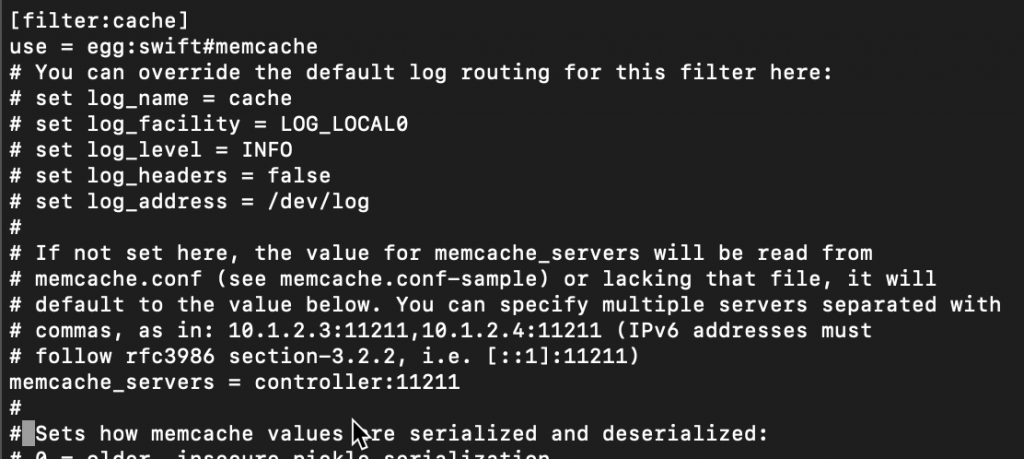
Install and configure object storage nodes
This part is done on the object storage nodes. In the initial tutorial of the OpenStack install there are some prerequisites you need to do on the VM – one is network IPs (fixed IPs) and the other one is just attach multiple disks to your VMs (or partition a disk). /dev/sdb and /dev/sdc will be used. All will be formated as XFS.
Prerequisites
There are two object storage nodes. Do these steps on both of them.
Install
sudo yum install xfsprogs rsyncFormat /dev/sdb /dev/sdc to XFS
sudo mkfs.xfs /dev/sdb
sudo mkfs.xfs /dev/sdc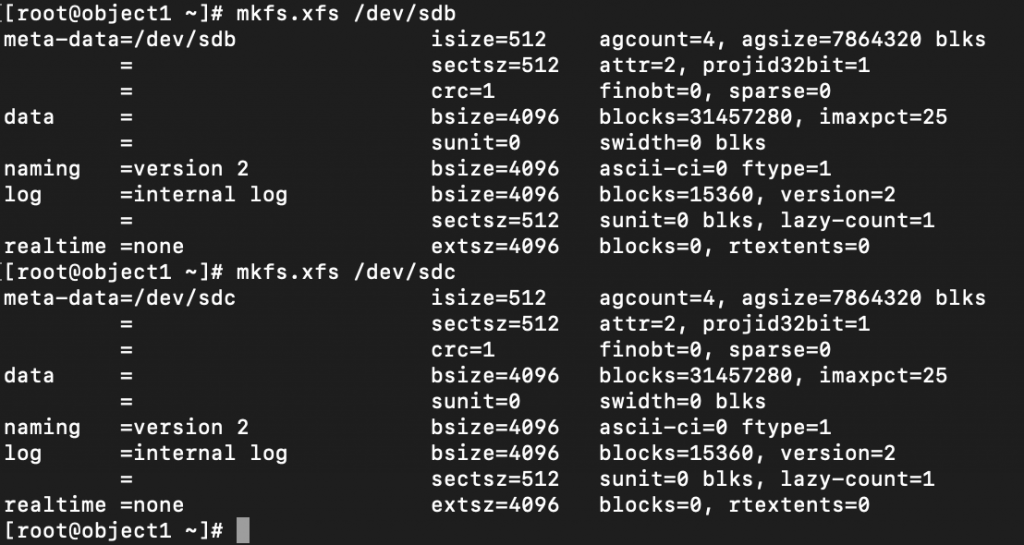
Create mount point structure
sudo mkdir -p /srv/node/sdb
sudo mkdir -p /srv/node/sdc
Find UUID of the new partitions
blkid
Edit /etc/fstab and add following to it
sudo vi /etc/fstabUUID="<UUID-from-output-above>" /srv/node/sdb xfs noatime,nodiratime,logbufs=8 0 2
UUID="<UUID-from-output-above>" /srv/node/sdc xfs noatime,nodiratime,logbufs=8 0 2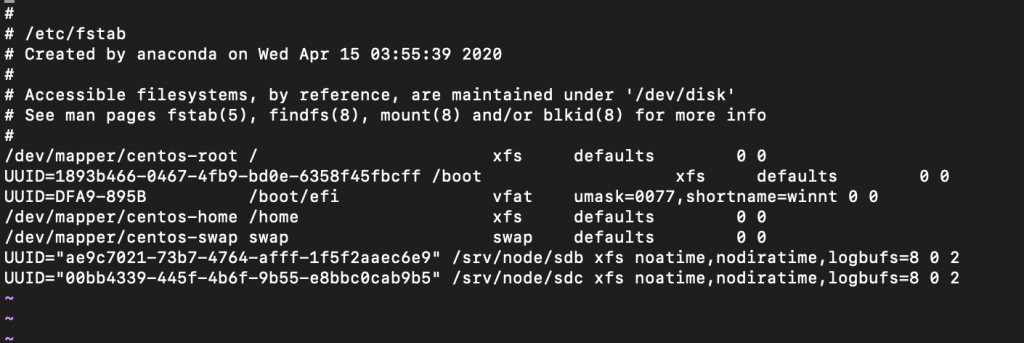
Mount the devices
mount /srv/node/sdb
mount /srv/node/sdc
edit
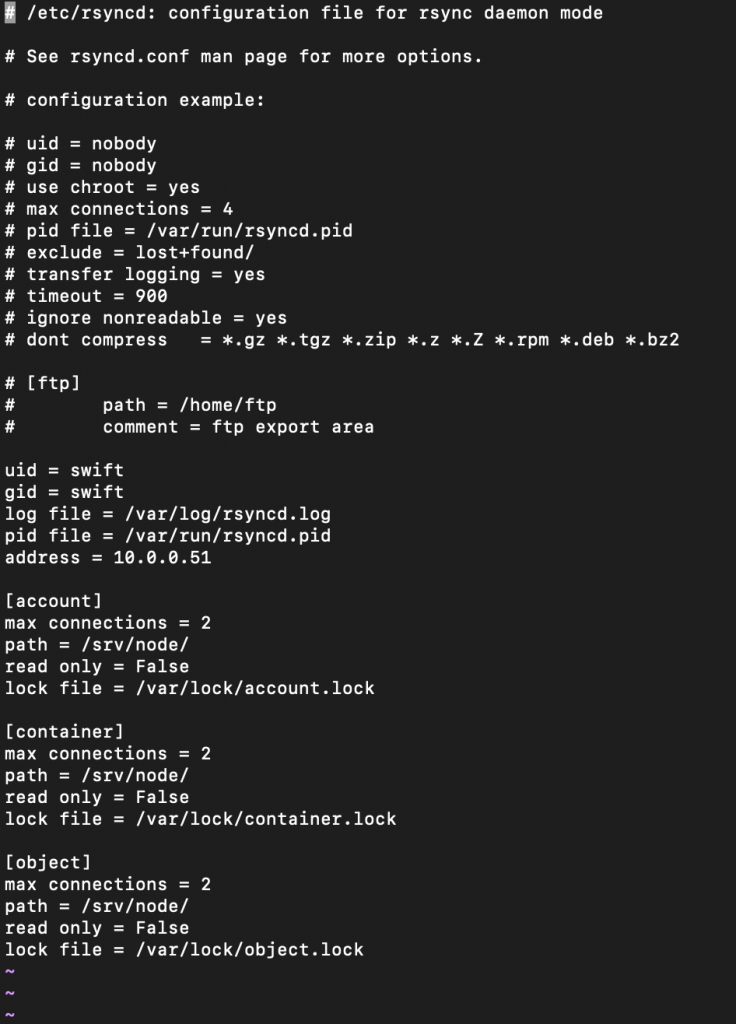
sudo vi /etc/rsyncd.confReplace MANAGEMENT_INTERFACE_IP with management interface of the object storage node (object1 10.0.0.51, object2 10.0.0.52)
uid = swift
gid = swift
log file = /var/log/rsyncd.log
pid file = /var/run/rsyncd.pid
address = MANAGEMENT_INTERFACE_IP_ADDRESS

[account]
max connections = 2
path = /srv/node/
read only = False
lock file = /var/lock/account.lock

[container]
max connections = 2
path = /srv/node/
read only = False
lock file = /var/lock/container.lock

[object]
max connections = 2
path = /srv/node/
read only = False
lock file = /var/lock/object.lock
Enable and start rsyncd service
sudo systemctl enable rsyncd.service
sudo systemctl start rsyncd.service
Install and configure components (object storage nodes)
We are still on object storage nodes, and the steps below have to be done on both object storage nodes.
Install
sudo yum install openstack-swift-account openstack-swift-container \
  openstack-swift-object
Obtain the accounting, container, and object service configuration files from the Object Storage source repo
curl -o /etc/swift/account-server.conf https://opendev.org/openstack/swift/raw/branch/master/etc/account-server.conf-sample

curl -o /etc/swift/container-server.conf https://opendev.org/openstack/swift/raw/branch/master/etc/container-server.conf-sample

curl -o /etc/swift/object-server.conf https://opendev.org/openstack/swift/raw/branch/master/etc/object-server.conf-sample
Edit following
sudo vi /etc/swift/account-server.confDefault section. MANAGEMENT_INTERFACE_IP_ADDRESS change with the management IP of the object storage node – 10.0.0.51/52.
[DEFAULT]
...
bind_ip = MANAGEMENT_INTERFACE_IP_ADDRESS
bind_port = 6202
user = swift
swift_dir = /etc/swift
devices = /srv/node
mount_check = True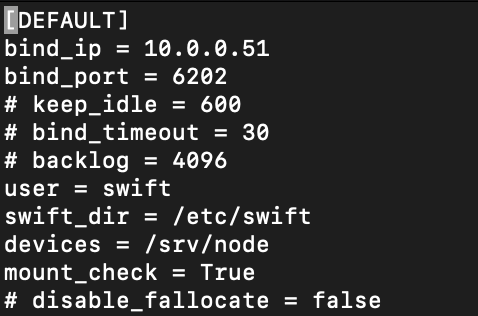
pipeline:main
[pipeline:main]
pipeline = healthcheck recon account-server
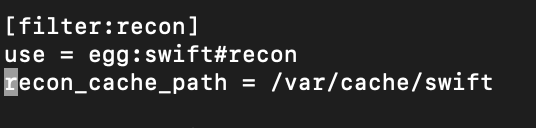
filter:recon
[filter:recon]
use = egg:swift#recon
...
recon_cache_path = /var/cache/swift
We are done with this file.
I will not screenshot each config of the remaining files, since it is more or less the same. Only difference is port config.
Edit
sudo vi /etc/swift/container-server.confDefault section. MANAGEMENT_INTERFACE_IP_ADDRESS – again, change with management IP of the objest storage node. In my case 10.0.0.51/52
[DEFAULT]
...
bind_ip = MANAGEMENT_INTERFACE_IP_ADDRESS
bind_port = 6201
user = swift
swift_dir = /etc/swift
devices = /srv/node
mount_check = True
pipeline:main
[pipeline:main]
pipeline = healthcheck recon container-server
filter:recon
[filter:recon]
use = egg:swift#recon
...
recon_cache_path = /var/cache/swift
And we are done with the container-server.conf
Edit
sudo vi /etc/swift/object-server.confDefault section. Again, same procedure as in the two files above for the MANAGEMENT_INTERFACE_IP_ADDRESS
[DEFAULT]
...
bind_ip = MANAGEMENT_INTERFACE_IP_ADDRESS
bind_port = 6200
user = swift
swift_dir = /etc/swift
devices = /srv/node
mount_check = True
pipeline:main
[pipeline:main]
pipeline = healthcheck recon object-server
filter:recon
[filter:recon]
use = egg:swift#recon
...
recon_cache_path = /var/cache/swift
recon_lock_path = /var/lock
Ensure proper ownership of mount point dir structure
sudo chown -R swift:swift /srv/nodeCreate recon directory, and ensure proper ownership
sudo mkdir -p /var/cache/swift
sudo chown -R root:swift /var/cache/swift
sudo chmod -R 775 /var/cache/swift
Additional firewall rules
sudo firewall-cmd --add-port=6202/tcp --permanent
sudo firewall-cmd --add-port=6201/tcp --permanent
sudo firewall-cmd --add-port=6200/tcp --permanent
sudo firewall-cmd --reload
We are done (for the moment) with object storage node configuration.
Create and distribute initial rings
Short c/p from OpenStack documentation
Before starting the Object Storage services, you must create the initial account, container, and object rings. The ring builder creates configuration files that each node uses to determine and deploy the storage architecture. For simplicity, this guide uses one region and two zones with 2^10 (1024) maximum partitions, 3 replicas of each object, and 1 hour minimum time between moving a partition more than once. For Object Storage, a partition indicates a directory on a storage device rather than a conventional partition table.
We will perform these steps on controller node
Navigate to /etc/swift directory
cd /etc/swiftCreate Account ring
Create base account.builder file
swift-ring-builder account.builder create 10 3 1
Add each storage node to the ring
swift-ring-builder account.builder \
  add --region 1 --zone 1 --ip STORAGE_NODE_MANAGEMENT_INTERFACE_IP_ADDRESS --port 6202 \
  --device DEVICE_NAME --weight DEVICE_WEIGHT
Replace STORAGE_NODE_MANAGEMENT_INTERFACE_IP_ADDRESS with the IP address of the management network on the storage node. Replace DEVICE_NAME with a storage device name on the same storage node. For example, using the first storage node in Install and configure the storage nodes with the /dev/sdb storage device and weight of 100
Here is how the commands should look like (if you followed my tutorials from beginning, you will understand values:
swift-ring-builder account.builder add \
  --region 1 --zone 1 --ip 10.0.0.51 --port 6202 --device sdb --weight 100

swift-ring-builder account.builder add \
  --region 1 --zone 1 --ip 10.0.0.51 --port 6202 --device sdc --weight 100

swift-ring-builder account.builder add \
  --region 1 --zone 2 --ip 10.0.0.52 --port 6202 --device sdb --weight 100

swift-ring-builder account.builder add \
  --region 1 --zone 2 --ip 10.0.0.52 --port 6202 --device sdc --weight 100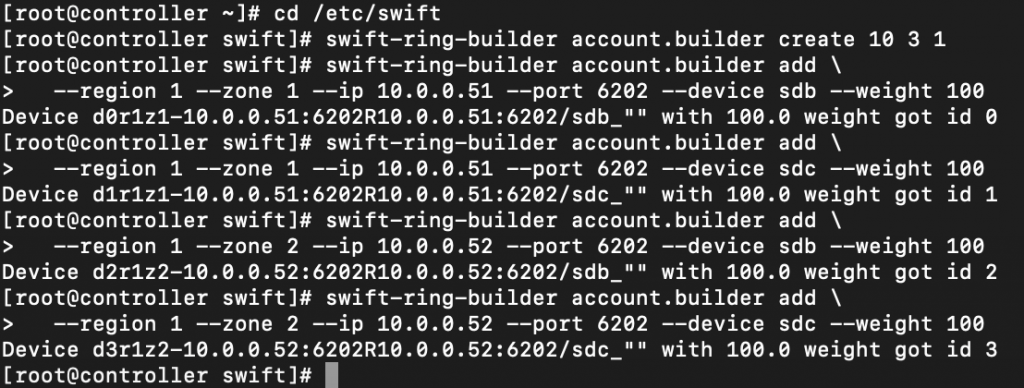
Verify ring contents
swift-ring-builder account.builder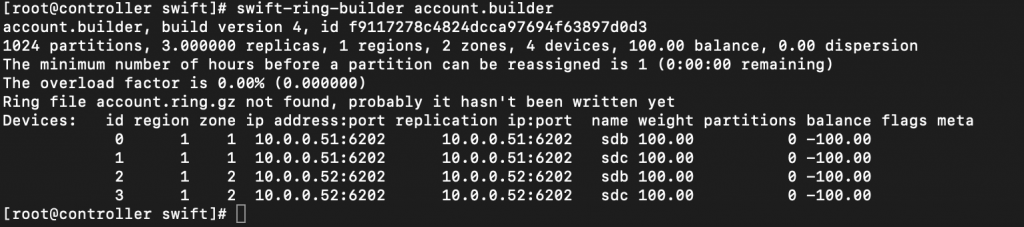
Rebalance the ring
swift-ring-builder account.builder rebalance
Create container ring
Navigate to /etc/swift directory
cd /etc/swiftCreate the base container.builder file
swift-ring-builder container.builder create 10 3 1Add each store node to the ring
swift-ring-builder container.builder \
  add --region 1 --zone 1 --ip STORAGE_NODE_MANAGEMENT_INTERFACE_IP_ADDRESS --port 6201 \
  --device DEVICE_NAME --weight DEVICE_WEIGHT
Again, very similar story to the commands above, just port is 6201
Replace STORAGE_NODE_MANAGEMENT_INTERFACE_IP_ADDRESS with the IP address of the management network on the storage node. Replace DEVICE_NAME with a storage device name on the same storage node. For example, using the first storage node in Install and configure the storage nodes with the /dev/sdb storage device and weight of 100
swift-ring-builder container.builder add \
  --region 1 --zone 1 --ip 10.0.0.51 --port 6201 --device sdb --weight 100

swift-ring-builder container.builder add \
  --region 1 --zone 1 --ip 10.0.0.51 --port 6201 --device sdc --weight 100

swift-ring-builder container.builder add \
  --region 1 --zone 2 --ip 10.0.0.52 --port 6201 --device sdb --weight 100

swift-ring-builder container.builder add \
  --region 1 --zone 2 --ip 10.0.0.52 --port 6201 --device sdc --weight 100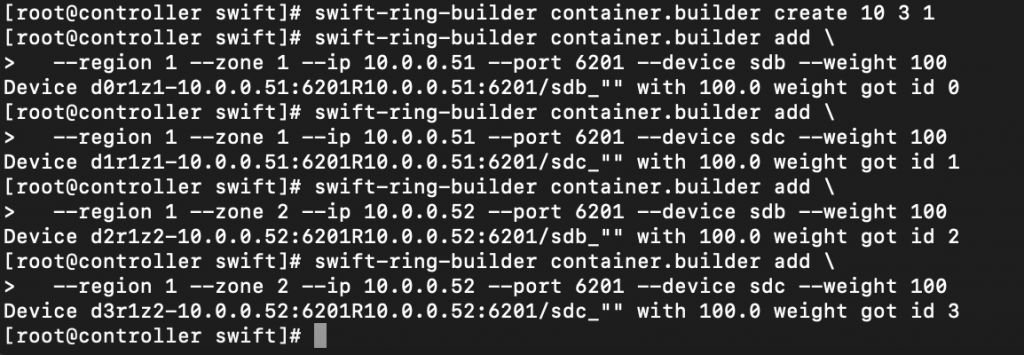
Verify ring content
swift-ring-builder container.builder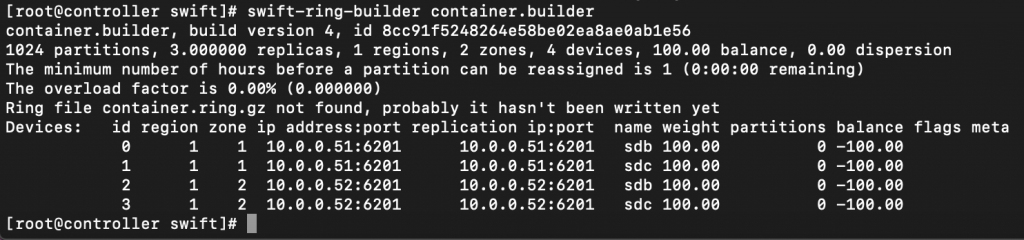
Rebalance ring
swift-ring-builder container.builder rebalance
Create object ring
Ok, so by now, you understand the procedure. Same will be for object ring, so I will not screenshot it, just write down do commands, and it should be the same as for the above two rings.
Navigate to
cd /etc/swiftCreate the base object.builder file
swift-ring-builder object.builder create 10 3 1Add each storage node to the ring
swift-ring-builder object.builder \
  add --region 1 --zone 1 --ip STORAGE_NODE_MANAGEMENT_INTERFACE_IP_ADDRESS --port 6200 \
  --device DEVICE_NAME --weight DEVICE_WEIGHT
How it will look like for our example
swift-ring-builder object.builder add \
  --region 1 --zone 1 --ip 10.0.0.51 --port 6200 --device sdb --weight 100

swift-ring-builder object.builder add \
  --region 1 --zone 1 --ip 10.0.0.51 --port 6200 --device sdc --weight 100

swift-ring-builder object.builder add \
  --region 1 --zone 2 --ip 10.0.0.52 --port 6200 --device sdb --weight 100

swift-ring-builder object.builder add \
  --region 1 --zone 2 --ip 10.0.0.52 --port 6200 --device sdc --weight 100
Verify ring content
swift-ring-builder object.builderRebalance the ring
swift-ring-builder object.builder rebalanceDistribute ring config files
Copy the account.ring.gz, container.ring.gz, and object.ring.gz files to the /etc/swift directory on each storage node and any additional nodes running the proxy service
Here are the files on the controller node

I will copy files using scp service.
scp /etc/swift/object.ring.gz root@10.0.0.51:/etc/swift

scp /etc/swift/account.ring.gz root@10.0.0.51:/etc/swift

scp /etc/swift/container.ring.gz root@10.0.0.51:/etc/swift
Repeat the procedure for 10.0.0.52 object storage node.
Finalize installation
This section have some steps that are configured on controller and some on the object storage nodes.
Controller node
Obtain the /etc/swift/swift.conf file from the Object Storage source repo
curl -o /etc/swift/swift.conf \
  https://opendev.org/openstack/swift/raw/branch/master/etc/swift.conf-sample
Edit
sudo vi /etc/swift/swift.confswift-hash section. Replace HASH_PATH_PREFIX and HASH_PATH_SUFFIX with unique values. These values need to be secret, do not lose or change them.
[swift-hash]
...
swift_hash_path_suffix = HASH_PATH_SUFFIX
swift_hash_path_prefix = HASH_PATH_PREFIX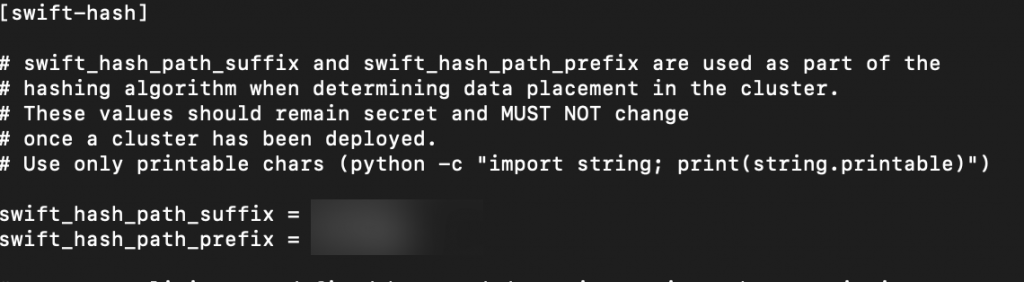
storage-policy:0 section
[storage-policy:0]
...
name = Policy-0
default = yes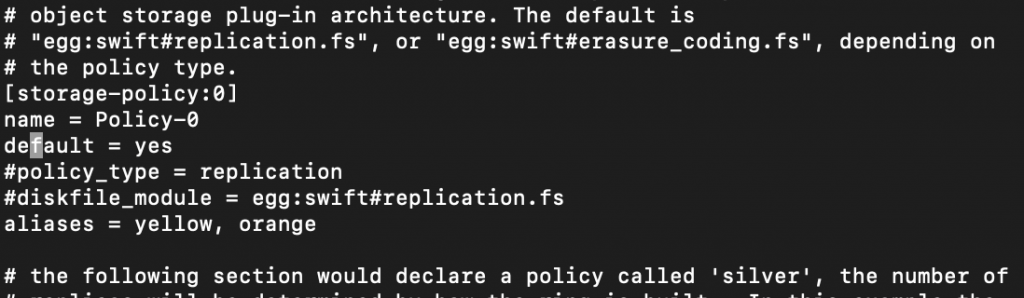
Copy swift.conf to the /etc/swift on the each object storage node, and proxy nodes if you have them.
scp /etc/swift/swift.conf root@10.0.0.51:/etc/swift
scp /etc/swift/swift.conf root@10.0.0.52:/etc/swift
On each object storage node ensure proper ownership
chown -R root:swift /etc/swiftOn controller node enable and start following services
sudo systemctl enable openstack-swift-proxy.service memcached.service
sudo systemctl start openstack-swift-proxy.service memcached.service
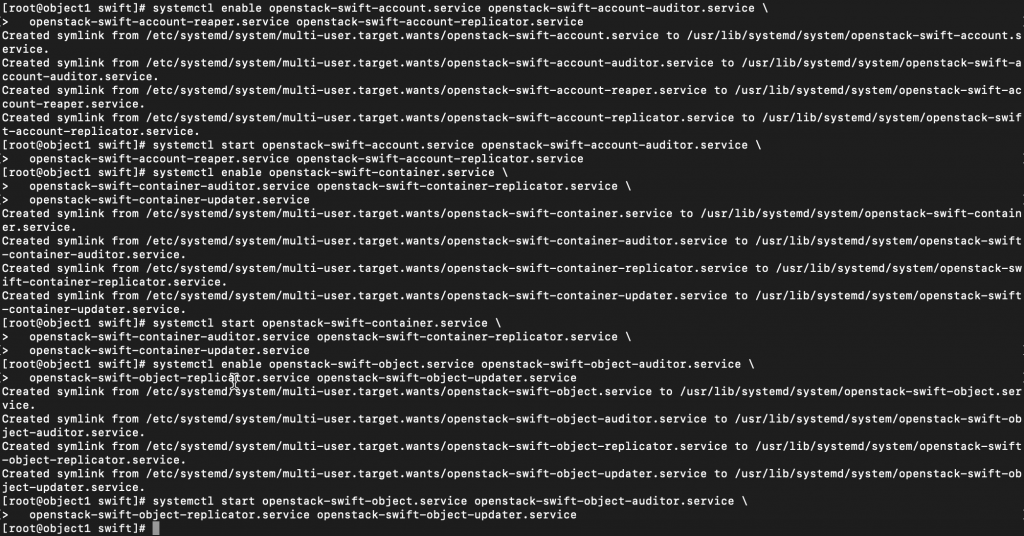
On each of the object storage nodes run following to enable and start services
sudo systemctl enable openstack-swift-account.service openstack-swift-account-auditor.service \
  openstack-swift-account-reaper.service openstack-swift-account-replicator.service

sudo systemctl start openstack-swift-account.service openstack-swift-account-auditor.service \
  openstack-swift-account-reaper.service openstack-swift-account-replicator.service

sudo systemctl enable openstack-swift-container.service \
  openstack-swift-container-auditor.service openstack-swift-container-replicator.service \
  openstack-swift-container-updater.service

sudo systemctl start openstack-swift-container.service \
  openstack-swift-container-auditor.service openstack-swift-container-replicator.service \
  openstack-swift-container-updater.service

sudo systemctl enable openstack-swift-object.service openstack-swift-object-auditor.service \
  openstack-swift-object-replicator.service openstack-swift-object-updater.service

sudo systemctl start openstack-swift-object.service openstack-swift-object-auditor.service \
  openstack-swift-object-replicator.service openstack-swift-object-updater.service
Verify
c/p from OpenStack documentation – If you are using Red Hat Enterprise Linux 7 or CentOS 7 and one or more of these steps do not work, check the /var/log/audit/audit.log file for SELinux messages indicating denial of actions for the swift processes. If present, change the security context of the /srv/node directory to the lowest security level (s0) for the swift_data_t type, object_r role and the system_u user:
chcon -R system_u:object_r:swift_data_t:s0 /srv/nodeRun these on controller node.
Run following command first
. demo-openrc

or in my case, my command resides in root and will run as

. demo-openrc.sh
Show swift service status
swift statI got following error
HTTPConnectionPool(host=’controller’, port=8080): Max retries exceeded with url: /v1/AUTH_d… : Failed to establish a new connection: [Errno 111] Connection refused’,))

I want to see openstack-swift-proxy.service status
sudo systemctl status openstack-swift-proxy.serviceStatus is failed
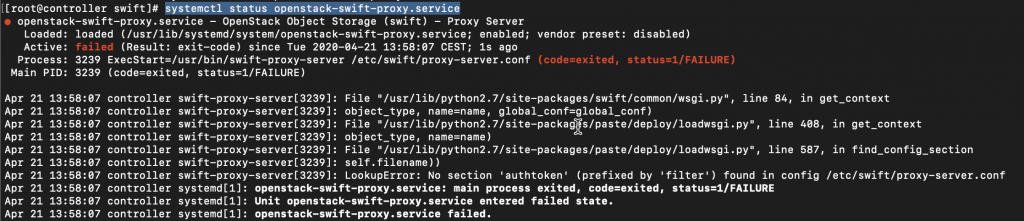
Error is
LookupError: No section ‘authtoken’ (prefixed by ‘filter’) found in config /etc/swift/proxy-server.conf
I definitely did everything by the OpenStack documentation, and still I have error.
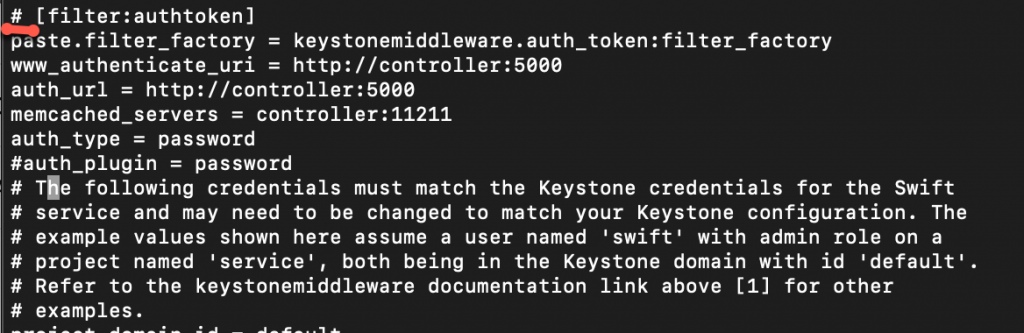
Lets check /etc/swift/proxy-server.cionf
sudo vi /etc/swift/proxy-server.conffilter:authtoken section
The line is commented in the file by default!!!!
I have to say I really missed this, and I somehow think that it should be uncommented by default in proxy-server.conf file.
Here is how it should be
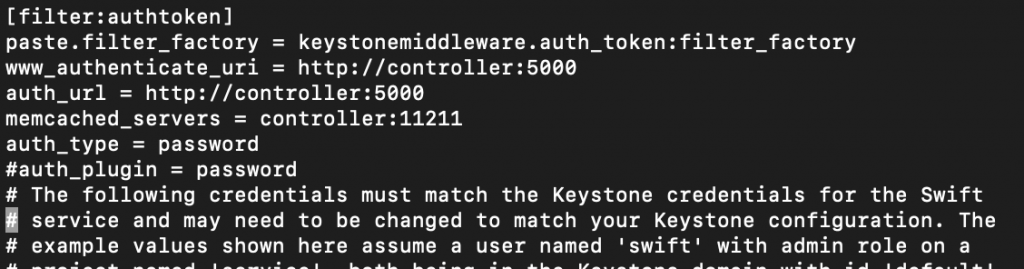
Line [filter:keystoneauth] has also comment on it, so uncomment it, remove #.
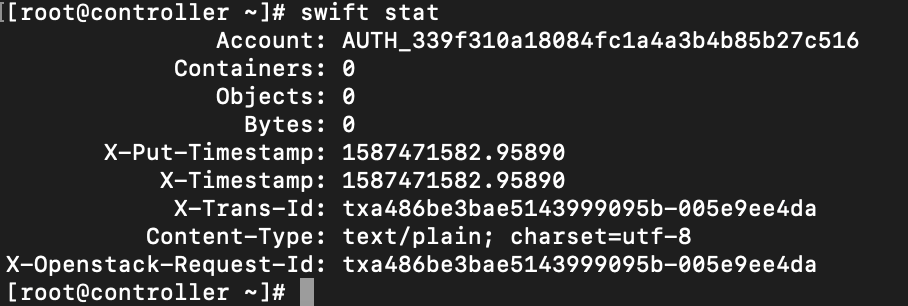
I rebooted controller node and after reboot

Service is up
Lets try the swift stat command again (I run it in . admin context!)
swift statIt is ok now
We will now create container named – container 1
openstack container create container1
I wasn’t successful at first with this. I tried running it as admin and demo user, but I would get errors forbidden 403 or service unavailable 503.
____________________________________
Errors
openstack container create container1
Service Unavailable (HTTP 503) (Request-ID: tx837c28e8b8814546b5700-005e9f05e0)
openstack container create container2
Forbidden (HTTP 403) (Request-ID: tx7e31c490187c4ab3ad423-005e9f091a)


The first part of solution was to run the command mentioned above
chcon -R system_u:object_r:swift_data_t:s0 /srv/nodeon both object storage nodes.


The second part of the solution is to edit /etc/swift/proxy-server.conf file
sudo vi /etc/swift/proxy-server.confModify pipeline:main differently then official OpenStack documentation. Remember to modify second pipeline value!
[pipeline:main]
#pipeline
pipeline = catch_errors healthcheck cache authtoken proxy-logging proxy-server

Only after these steps I managed to create container1 as demo. I’m not sure how these settings will work when I start testing, or will it give me other errors, but without these I could not pass verification.
If you get into some other problems, you can use
swift –debug list
to see what is happening with swift and troubleshoot it.
Lets go further with our final testing
Upload a test file to container1. Replace FILE with the filename you wish to upload
openstack object create container1 FILEList files in container1
openstack object list container1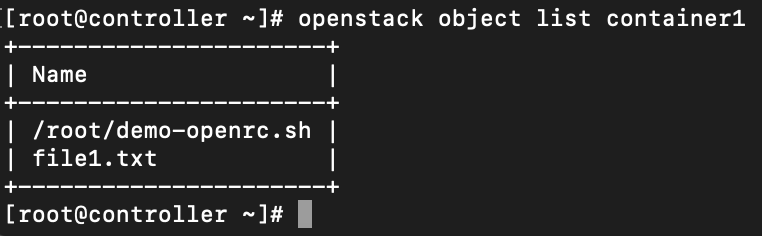
Download file from container1. Again, replace FILE with your filename
openstack object save container1 FILE
That would be it, not the cleanest tutorial, many fixes during the way, although I went exclusively through OpenStack documentation.
Congrats, you have functional OpenStack cloud if you went through complete tutorial I set.
There are a few bugs still, and you have a lot to do to make it fully functional, but this is a start.