We started our OpenStack installation here and stopped at minimal deployment.
Keystone is the first installation you should do in minimal (or any OpenStack) installation scenario. It is identity provider for OpenStack. Visit my Openstack installation tutorial to see my lab settings if someting is not clear.
Here is the link on OpenStack on which you can always find fresh info about Keystone deployment. https://docs.openstack.org/keystone/train/install/index-rdo.html
Prerequsites
Keystone will be installed on controller machine.
We need to create database named keystone, here are the steps
mysql -u root -pCREATE DATABASE keystone;We will create user keystone and exchange password – pass for your password.
CREATE USER `keystone`@`localhost` IDENTIFIED BY 'pass';Grant priviledges on keystone DB to keystone user
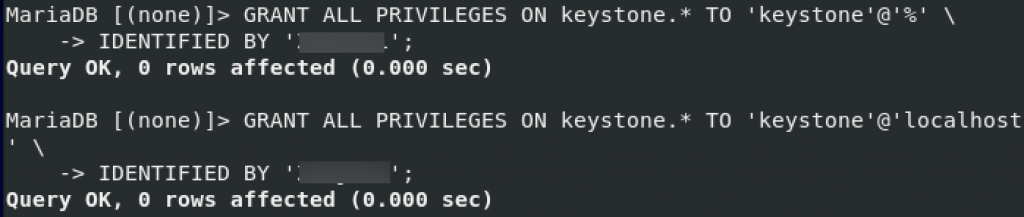
GRANT ALL ON keystone.* TO `keystone`@`localhost`;GRANT ALL PRIVILEGES ON keystone.* TO 'keystone'@'%' \
IDENTIFIED BY 'pass';GRANT ALL PRIVILEGES ON keystone.* TO 'keystone'@'localhost' \
IDENTIFIED BY 'pass';exit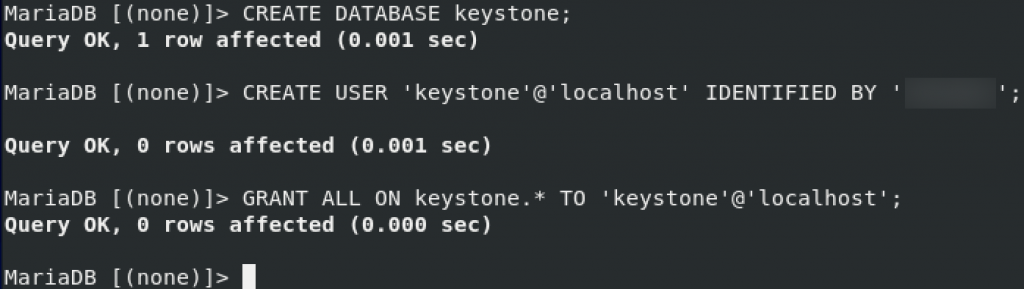
Installation
Start installation by typing in
sudo yum install openstack-keystone httpd mod_wsgiEdit the /etc/keystone/keystone.conf
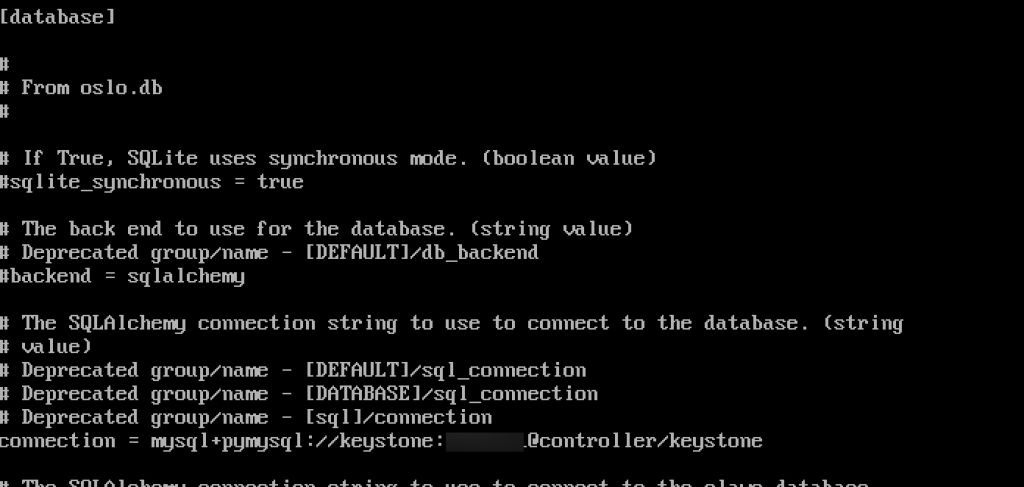
sudo vi /etc/keystone/keystone.conf In database section configure following (replace pass with your password.)
[database]
# ...
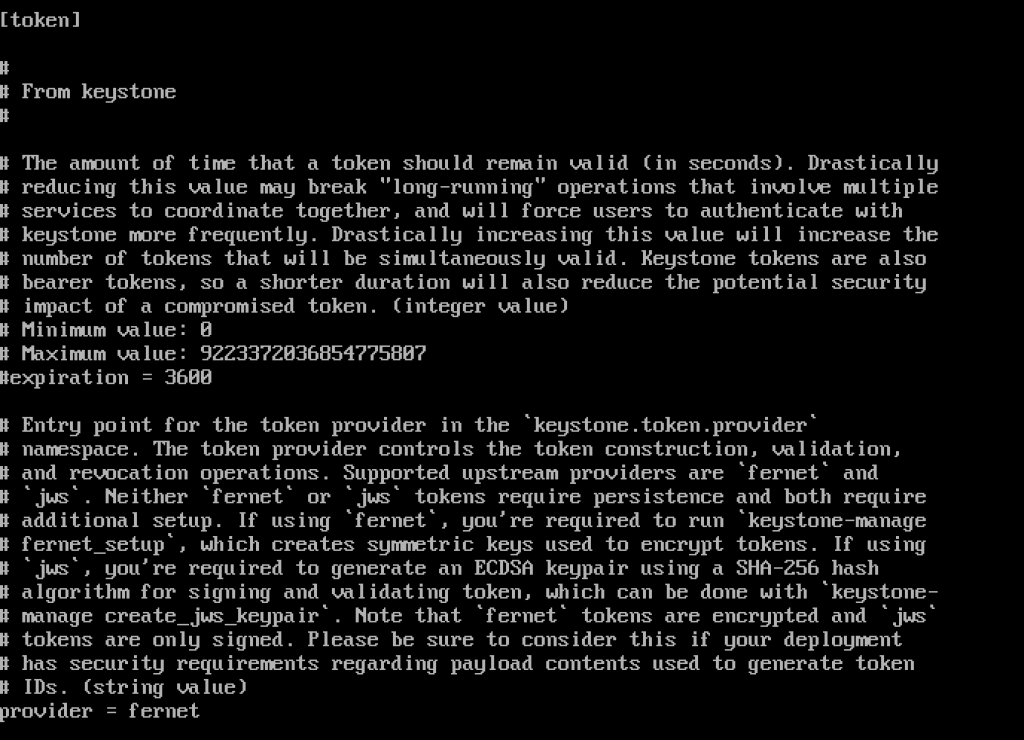
connection = mysql+pymysql://keystone:pass@controller/keystoneIn the token section configure following
[token]
# ...
provider = fernet
Here is how it looks like in my config
Next, we need to run
su -s /bin/sh -c "keystone-manage db_sync" keystone
Initialize Fernet key repos
sudo keystone-manage fernet_setup --keystone-user keystone --keystone-group keystone
sudo keystone-manage credential_setup --keystone-user keystone --keystone-group keystone
Bootstrap identity service. Change ADMIN_PASS for your password suitable for admin user
keystone-manage bootstrap --bootstrap-password ADMIN_PASS \
  --bootstrap-admin-url http://controller:5000/v3/ \
  --bootstrap-internal-url http://controller:5000/v3/ \
  --bootstrap-public-url http://controller:5000/v3/ \
  --bootstrap-region-id RegionOne
Configure Apache HTTP server
We need to change server name
sudo vi /etc/httpd/conf/httpd.confEdit servername to controller and uncomment it
ServerName controller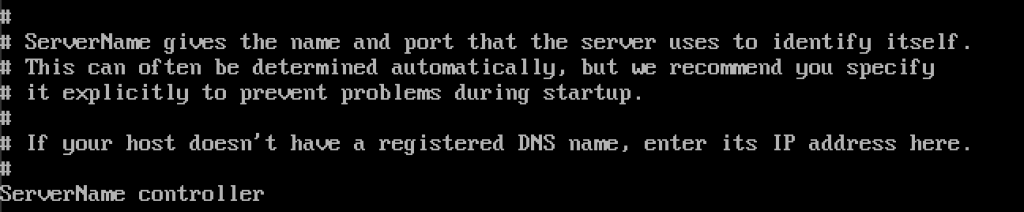
Create a link to wsgi-keystone.conf
ln -s /usr/share/keystone/wsgi-keystone.conf /etc/httpd/conf.d/SSL
In production, you should secure your installation with SSL.
Finalization
We should enable and start service
sudo systemctl enable httpd.service
sudo systemctl start httpd.service
Next we should set environment variables. Values shown are from keystone-manager bootstrap.
Be sure to replace ADMIN_PASS with the password you set in earlier step.
$ export OS_USERNAME=admin
$ export OS_PASSWORD=ADMIN_PASS
$ export OS_PROJECT_NAME=admin
$ export OS_USER_DOMAIN_NAME=Default
$ export OS_PROJECT_DOMAIN_NAME=Default
$ export OS_AUTH_URL=http://controller:5000/v3
$ export OS_IDENTITY_API_VERSION=3
______________
OPTIONALLY – NOT PART OF TUTORIAL!!
If you wish to make these changes permanent, you can do following, this way, these values will be loaded on every system startup.
#vi ~/keystonerc

export OS_PROJECT_DOMAIN_NAME=default
export OS_USER_DOMAIN_NAME=default
export OS_PROJECT_NAME=admin
export OS_USERNAME=admin
export OS_PASSWORD=adminpassword
export OS_AUTH_URL=http://10.0.0.30:5000/v3
export OS_IDENTITY_API_VERSION=3
export OS_IMAGE_API_VERSION=2
export PS1='[\u@\h \W(keystone)]\$ '

# chmod 600 ~/keystonerc
# source ~/keystonerc
# echo "source ~/keystonerc " >> ~/.bash_profile
END OF OPTIONALLY PART
__________________________________

We will also open few ports in firewall (optional)
sudo firewall-cmd --zone=public --add-port=5000/tcp --permanent
sudo firewall-cmd --permanent --zone=public --add-service=http
sudo firewall-cmd --permanent --zone=public --add-service=https
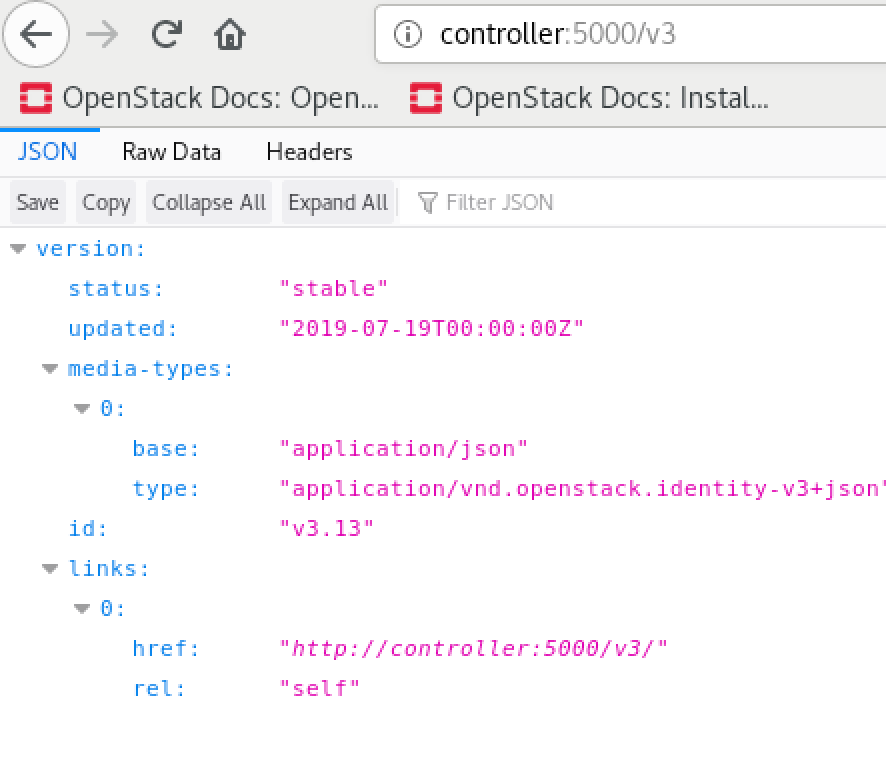
sudo firewall-cmd --reloadAfter that, if you try link from the client in your network
Creating Domain, Project, Users, Roles
In the steps above, we created default domain, so we don’t need to do it now.
Domain creation
openstack domain create --description "An Example Domain" exampleWe will create other details…
Service Project creation
openstack project create --domain default \
  --description "Service Project" service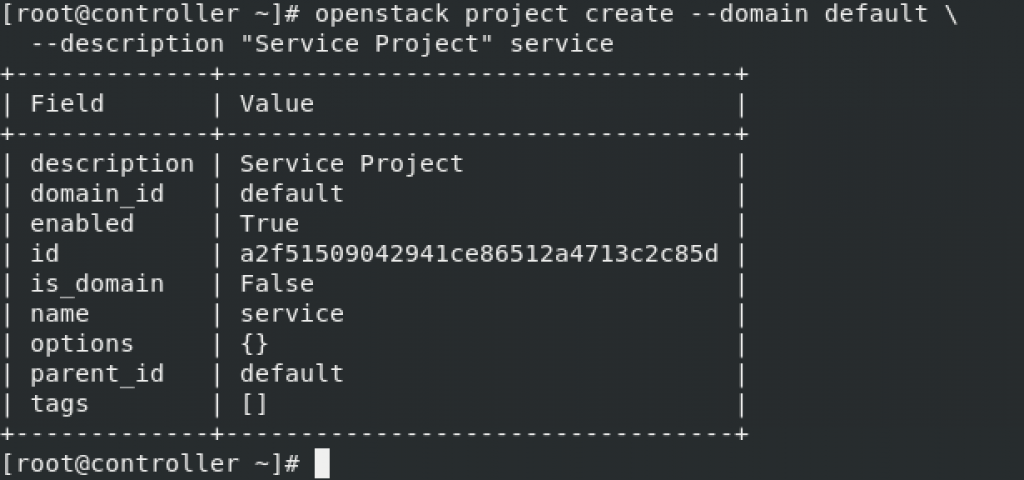
If you get “Missing value auth-url required for auth plugin password” check back and see part where we exported environment variables and check if they are loaded. If you rebooted server in the meantime, you will probably need to export all the values again. Later on, we will create files that we can call when needed.
Project creation
openstack project create --domain default \
  --description "Demo Project" myproject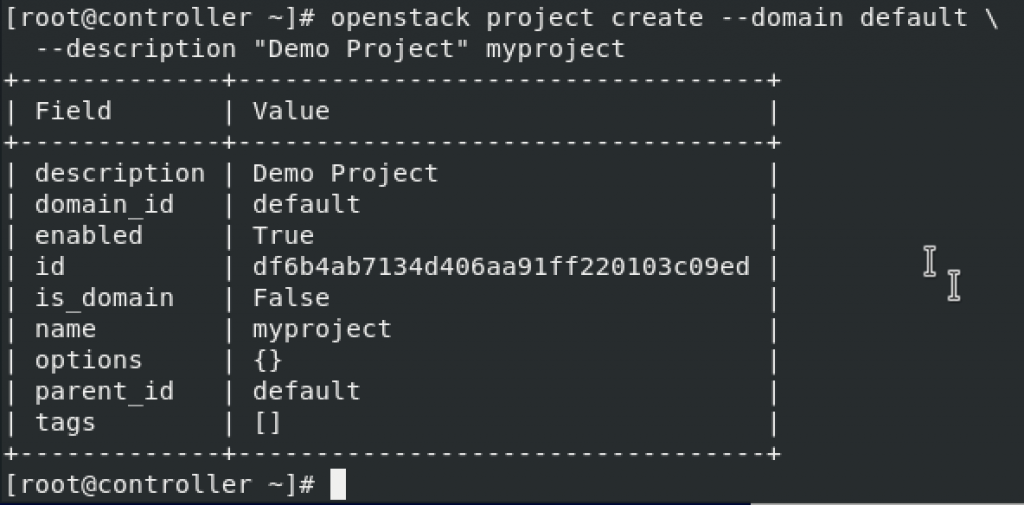
User creation
openstack user create --domain default \
  --password-prompt myuser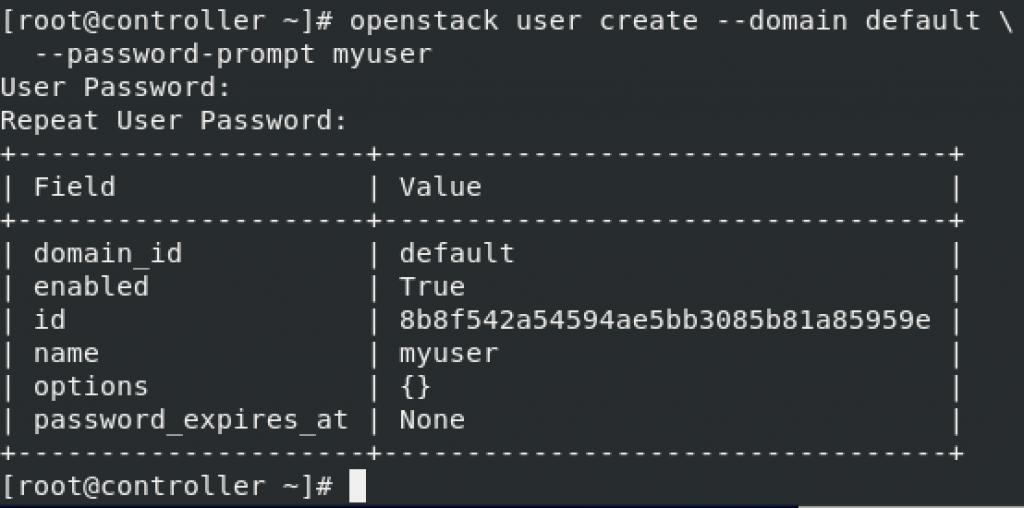
Role creation
openstack role create myrole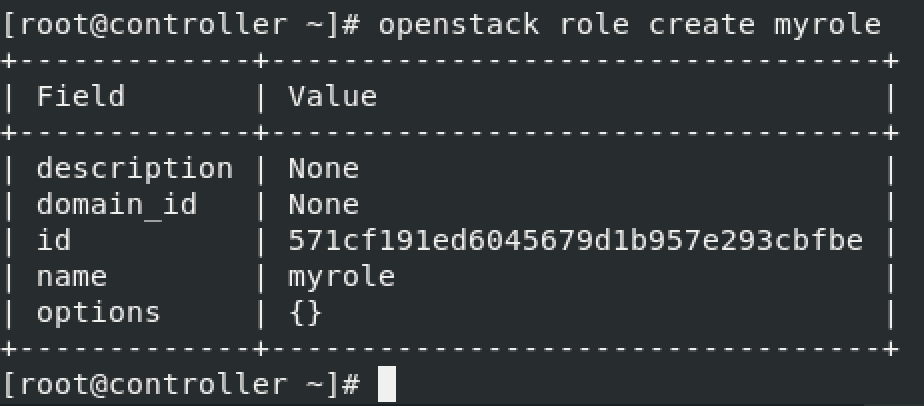
Add role “myrole” to project “myproject” with user “myuser”
openstack role add --project myproject --user myuser myrole
Verify operation
Before we go any further, we have to verify that all is working as expected, because this is the foundation for everything we will add later.
We will temporary unset OS_AUTH_URL and OS_PASSWORD
unset OS_AUTH_URL OS_PASSWORD
We will now request auth. token as admin user (we will need password we set earlier for admin user)
openstack --os-auth-url http://controller:5000/v3 \
  --os-project-domain-name Default --os-user-domain-name Default \
  --os-project-name admin --os-username admin token issue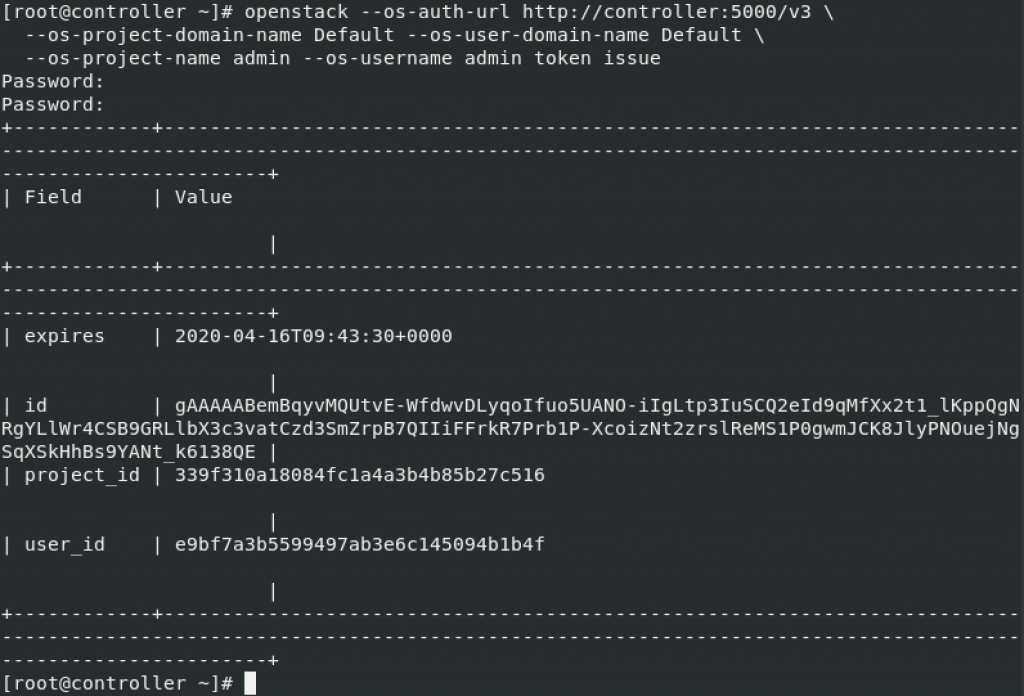
We will now also request auth token as myuser – user we created step earlier
openstack --os-auth-url http://controller:5000/v3 \
  --os-project-domain-name Default --os-user-domain-name Default \
  --os-project-name myproject --os-username myuser token issue
Ok, both screens and info I got are ok, and valid.
OpenStack client environment scripts
You can read more on topic here – https://docs.openstack.org/keystone/train/install/keystone-openrc-rdo.html
I will go through creating client environment scripts for the admin and demo projects and users. Future portions of OpenStack guide reference these scripts to load appropriate credentials for client operations.
One more notice from OpenStack:
The paths of the client environment scripts are unrestricted. For convenience, you can place the scripts in any location, however ensure that they are accessible and located in a secure place appropriate for your deployment, as they do contain sensitive credentials.
OpenStack does not specify locations of admin-openrc and demo-openrc, so I will put them in my “home” directory.
sudo vi admin-openrc.sh
You will enter following. Change ADMIN_PASS to your password.
export OS_PROJECT_DOMAIN_NAME=Default
export OS_USER_DOMAIN_NAME=Default
export OS_PROJECT_NAME=admin
export OS_USERNAME=admin
export OS_PASSWORD=ADMIN_PASS
export OS_AUTH_URL=http://controller:5000/v3
export OS_IDENTITY_API_VERSION=3
export OS_IMAGE_API_VERSION=2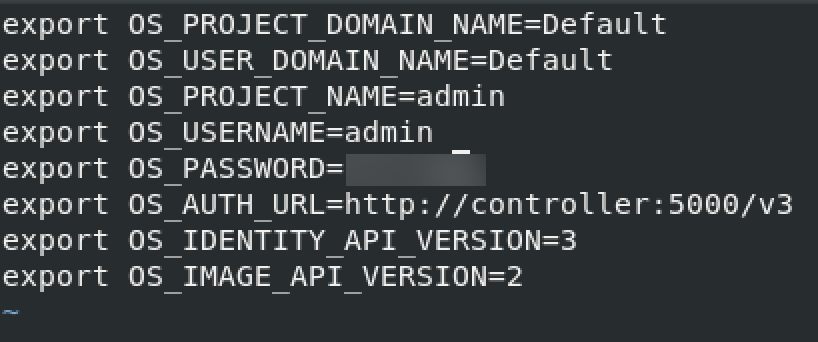
Now, to the demo-openrpc
sudo vi demo-openrc.shReplace DEMO_PASS with the pass you created for “myuser” user.
export OS_PROJECT_DOMAIN_NAME=Default
export OS_USER_DOMAIN_NAME=Default
export OS_PROJECT_NAME=myproject
export OS_USERNAME=myuser
export OS_PASSWORD=DEMO_PASS
export OS_AUTH_URL=http://controller:5000/v3
export OS_IDENTITY_API_VERSION=3
export OS_IMAGE_API_VERSION=2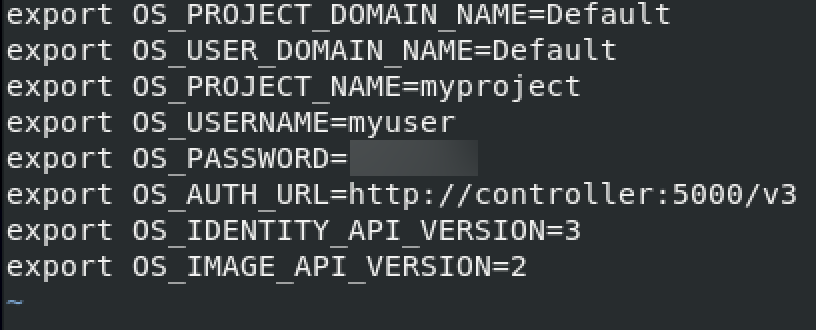
Stay in the same directory where you created scripts and execute
sudo chmod +x admin-openrc.sh
sudo chmod +x demo-openrc.sh
Using the scripts
Citing the OpenStack Documentation –
To run clients as a specific project and user, you can simply load the associated client environment script prior to running them. For example:
Load the admin-openrc file to populate environment variables with the location of the Identity service and the admin project and user credentials:
. admin-openrc
Request auth token
openstack token issue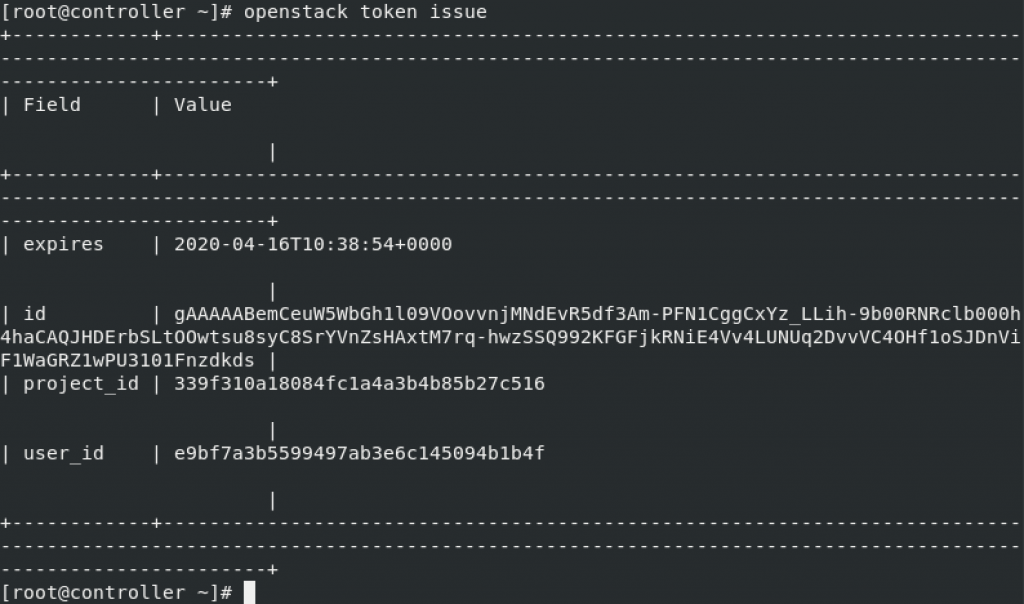
Next step is Image service install – Glance