In modern environment everything is more or less dependent on certificates, we have more and more web based apps, that need some kind of certificates. On the other hand, web browsers are getting stricter and it is not easy anymore to get by with self signed certificates. Also, certificates for public certificate authorities are not appropriate for local domains. So, what should we do? We should create our own PKI infrastructure. I will try to explain how to do it in a series of articles…
Intro – an important one
If you are set on implementing your own PKI infrastructure, be aware, THIS BLOG SHOULD NOT BE YOUR ONLY RESOURCE. Be aware that PKI infrastructure is serious and complicated topic, and doing or selecting something wrong can do damage to your domain environment that cannot be easily (or at all) reversible. So, kind warning, this series of articles is for your testing LAB only, use additional resources to expand your knowledge about the topic, because here we will cover only basics – and if you are not sure about PKI, consult experts from PKI field to help you build your PKI infrastructure.
Here are additional resources (some older, some newer):
Matthew Burr also has excellent book on the topic, which could be used as a great reference for starting your PKI – Practical Guide to PKI with Windows Server (link is not afiliate, you just get a great book).
After you went through documentation and books – you are then ready to use my steps for bringing up PKI infrastructure, only as a help.
As always, mistakes are possible in this series, if you notice something, or have some details you would like to share, please be free to do so.
Short intro about PKI
Public Key Infrastructure (PKI) is collection of roles and policies which are used to create and maintain certificates.
Some of the usage of the PKI is:
Replace self-signed certs for internal network resources, using certificates for internal services and apps, file/system encryption, email encryption, RDP security…
What does PKI and CA mean?
PKI – Public Key Infrastructure (solution for providing certs)
CA – Certificate Authority – component that provides certificate services
Why do you need your own PKI?
As I said in the beginning – commercial CAs will not publish certs for internal domains in non-routable internal networks.
Why I’m finally writing about this? Because I’m looking at environments that are no longer working well with self-signed certificates and have many problems with internal services because of certificates. In modern environments with internal web-based apps it is getting harder and harder to get them to work, because web-browsers are so strict about certificates.
What we need?
We need Active Directory Certificate Services (AD CS) role – it will allow us creation of PKI and CA in Windows environment. We can use this infrastructure with or without Active Directory (AD).
AD CS can be used for SSL, Digital Signatures, VPN access, MDM, LDAPs (secure AD), smartcards…
I won’t get into any more AD CS details, because this is meant to be on point guide, not a detailed book – if you need more details, resources are at the top.
Options for deploying CA?
As I mentioned, certificate authority can be in domain or workgroup, online or offline. Offline is much better security practice.
We have One-Tier CA, Two-Tier CA, and Three-Tier CA.
One-Tier CA
HAs one root and issuing CA that issues certificates. Should only be used in testing environment because it can be huge security risk, one point of failure or bottleneck if you have large network.
Two-Tier CA
Has Root CA (which is offline), Subordinate Certificate Authority which will be online, and if compromised can be revoked and replaced. Subordinate CA will issue certificates. Tow-Tier CA can be scaled up if necessary. Root CA will be down – I would advise you a reminder to bring Root CA up every 50 weeks (we have 52 weeks, but this way you have still a little time if you forget to do it) You will need to update CDP and AIA records, and Root CA will do that. You just want to make sure that everything is ok. This is also a recommendation from Microsoft as a best practice.
Three-Tier CA
HAs Root CA (Offline), Intermediate Certificate Authority (sometimes offline), Subordinate Issuing Certificate Authority that issues certificates. Three-Tier CA is most complex one, but has most flexibility. It is used usually in huge organizations.
In this guide we will be using Two-Tier CA. Three-Tier is a complex beast that often needs dedicated team for support.
Meaning of few words we used above:
Root CA – top of the CA. In One-Tier topology it does everything.
Intermediate and Subordinate CA – in Microsoft world – same thing. Intermediate exists in Three-Tier topology between Root and Subordinate CA. Subordinate CA handles issuing certificates in Two-Tier topology.
CRL – Certificate Revocation List – list of revoked certificates we wish to put out of use.
Authority Information Acces (AIA) – provides URLs for certificate revocation.
CRL Distribution Points (CDP) / provides URLs or locations where a client can retrieve CRL list to see if cert is valid or not.
Certificate Types we will be using:
We will be using X.509 certificate standard. Common formats used in Windows environments are:
.cer, .p7b, .pfx, .sst. You can of course manipulate extensions and use .crt, convert .pfx to .key and .crt/pem…
I did short guide of converting pfx recently – https://www.informaticar.net/convert-pfx-certificate-to-key-and-crt/
When exporting certs always use very strong passwords – stronger than 16 chars.
Private Enterprise Number (PEN)
Not needed if you are going to use your CA only internally. But it should be nice to have your PEN and procedure is quick and free on IANA website (Internet Assigned Numbers Authority). I did it couple of times and got number ranging within hours to a few days – quick and easy.
You can request your number here: https://www.iana.org/assignments/enterprise-numbers/assignment/apply/
During deployment in files we use we will define OID number. It can be generic Microsoft OID (1.2.3.4.1455.67.89.5) or you can assign your unique PEN number. Since it is easy to obtain PEN number, I can recommend getting one before production deployment. In test environment we will use Microsoft provided OID.
These are super condensed information – again, before doing this in production, do your homework properly.
Prerequisites / LAB config
Before you begin deploying PKI in production, check if there was already Root CA in that domain, how to find that out can be found here
We will use four machines for a start. I won’t be going through details of setting up VMs, networking and domains. I assume you know how to do that. Below are details of the lab.
Domain: test.local
All machines will have 2CPUs, 8GB of RAM (if your LAB is short on RAM, give 4GB as minimum), 60GB of disk.
OS: Servers – Windows Server 2022 Standard (DTCNTR does not have extra features for CA), Client – Windows 11 Enterprise 23H2.
IP range: 192.168.44.0/24
Domain controller:
Test-DC1.test.local – 192.168.44.10
Windows Server 2022 Standard Desktop Edition
DNS Server is also integrated into DC
I have Domain Users OU which has Linuser1, Winuser1 and Winuser2 users
Computers OU which has Test-Client1 inside it.
Servers OU which has Test-CA1 inside it.
Root-CA:
Test-RootCA – 192.168.44.20
Workgroup: Test-CA
Local Administrator: certadmin (Administrator account is disabled)
Create folder: C:\RootCA
CA Name: Test-RootCA-CA
This machine won’t be in domain, will be Bitlocker protected, turned off after configuration. It also will not have ethernet connection to the rest of the network. No additional services or apps except CA should be installed. When you need to bring it online – you can use network (only if the are no other means), or better something like virtual floppy (if you are using Hyper-V).
Windows Server 2022 Standard Desktop Edition
I did full Windows update on the machine. Since machine is offline – there will be no windows updates for it. There are methods for offline updating, but are beyond scope of this article.
You should also do security hardening of this machine (pass lockout policy, password policy, disabling unused accounts…)
Subordinate CA:
Test-CA1.test.local – 192.168.44.30
CA Name: Test-CA1-CA
Domain OU for Test-CA1 – Servers
Login: we will use domain administrator account
Bitlocker disk encryption is also something that should strongly be considered.
Subordinate CA will be used to issue certificates, for CRLs, and is domain member.
Windows Server 2022 Standard Desktop Edition
Client:
Test-Client1.test.local – 192.168.44.30
Client machine on Windows 11 Enterprise joined to domain.
Certificate Prerequisites:
Root CA cert will be SHA256 with 4096bits length (that only makes sense at this point in time). Root certificate will be 10 years valid, subordinate certificate 5, and issued certs 1 year. You can modify these how you like, just have in mind that security, especially browsers are getting stricter, and maybe certs with huge validity range (I’m talking about client certs) won’t be valid and work properly.
Internal Links
In the end of deployment links will point as follows (all of the links will point to Test-CA1.test.local.
Web instance – http://test-ca1.test.local
Root CA CRL – http://pki.test.local/CertData/
Enterprise CA CRL – http://pki.test.local/CertEnroll/
Active Directory Web Entrollment Service – https://pki.test.local/CertSrv/
Certificate Practice Statement – http://pki.test.local/cps.html
You can notice that there are a lot of http links -this is because when device connects, especially new device, it maybe doesn’t have you internal root and subordinate certs – so, it would anyway appear as untrusted. Exception is AD, since it is used to submit certificate requests to Enterprise CA.
Configuration
All of the steps will be done through Powershell – at this moment I don’t have much time to do GUI deployment as well, but Powershell is much faster for this anyway. We will now begin with our PKI infrastructure preparation, first, we will configure Root CA
Root CA
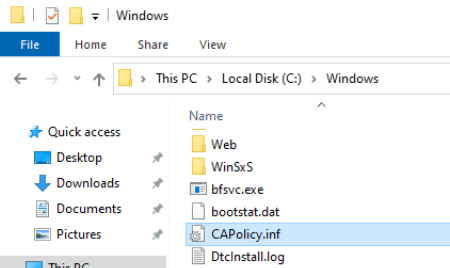
In the C:\Windows we need to create CAPolicy.inf file it will add configuration details to CA at the time of creation.
Here is how my file looks like (mostly based on https://learn.microsoft.com/en-us/windows-server/networking/core-network-guide/cncg/server-certs/prepare-the-capolicy-inf-file)
Please change test.local for you data
If you have your PEN number, modify OID line in InternalPolicy section to OID=1.3.6.1.4.1.XX (XX being your PEN number)
[Version]
Signature = "$Windows NT$"
[PolicyStatementExtension]
Policies = AllIssuancePolicy, InternalPolicy
Critical = FALSE

[AllIssuancePolicy]
OID = 2.5.29.32.0
[InternalPolicy]
OID = 1.2.3.4.1455.67.89.5
Notice = "The Test.local Certification Authority is an internal resource only."
URL = http:∕∕pki.test.local∕cps.html
[Certsrv_Server]

RenewalKeyLength = 4096
RenewalValidityPeriod = Years
RenewalValidityPeriodUnits = 10

AlternateSignatureAlgorithm = 0

CRLPeriod = Years
CRLPeriodUnits = 10

CRLDeltaPeriod = Days
CRLDeltaPeriodUnits = 0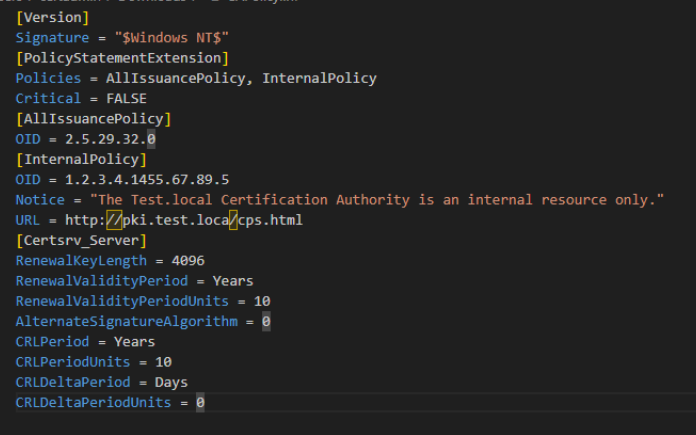
I usually create file in Documents folder and after I wrote it I copy it to C:\Windows
We did a few things with file above – we defined renewal info for RootCA, disabled support for issuing certs using RSASSA-PSS (AlternateSignatureAlgorithm), we defined CRL lifetime to be equal to lifetime of Root CA, and disabled option for Delta CRL, since it won’t be needed in this config.
Installing Root CA AD CS Role
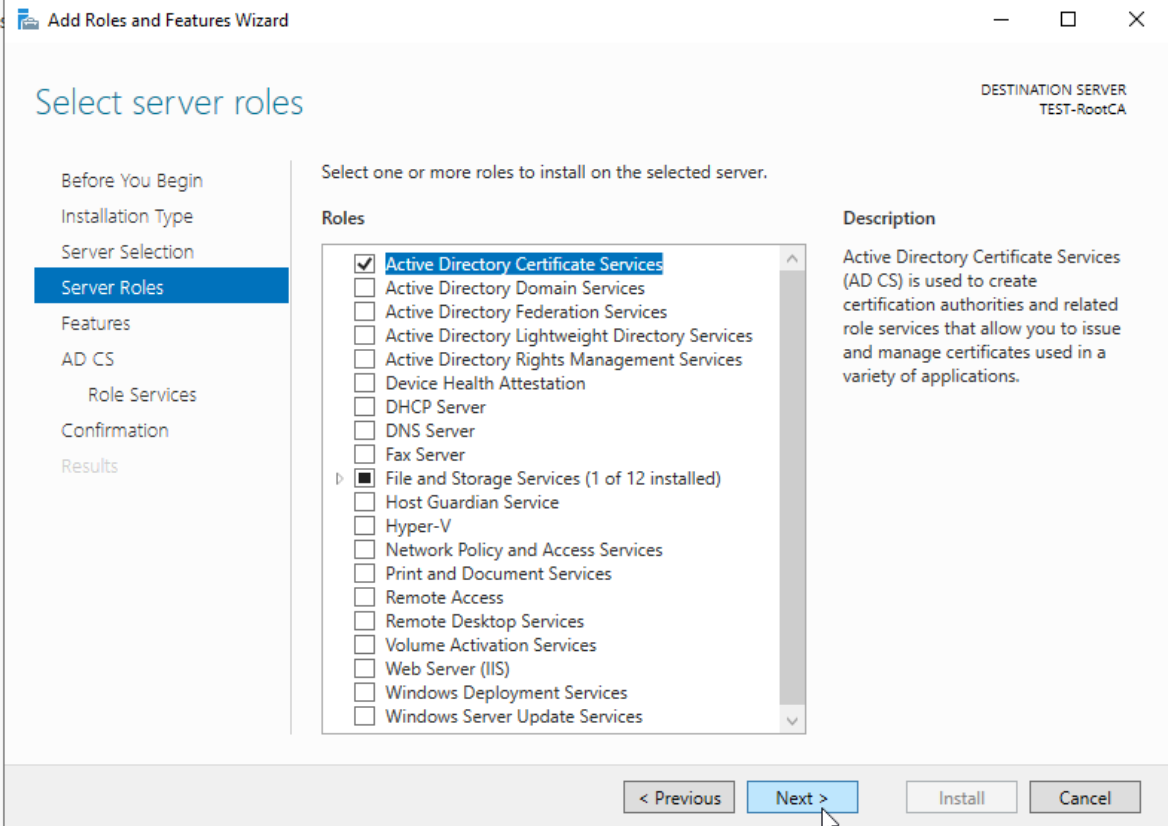
Ok, we did all the preparations for the Root CA, CAPolicy.inf is in place, so we can start Active Directory Certification Services Role installation. I assume that you are skilled enough for this tutorial so I don’t have to go step by step with every screenshot in Server Manager. We will now install AC DS with Server Manager – Manage – Add Roles and Features
We are logged in as certadmin user (local Administrator is disabled) and there is no network connection on the RootCA machine.
We will select Active Directory Certificate Services
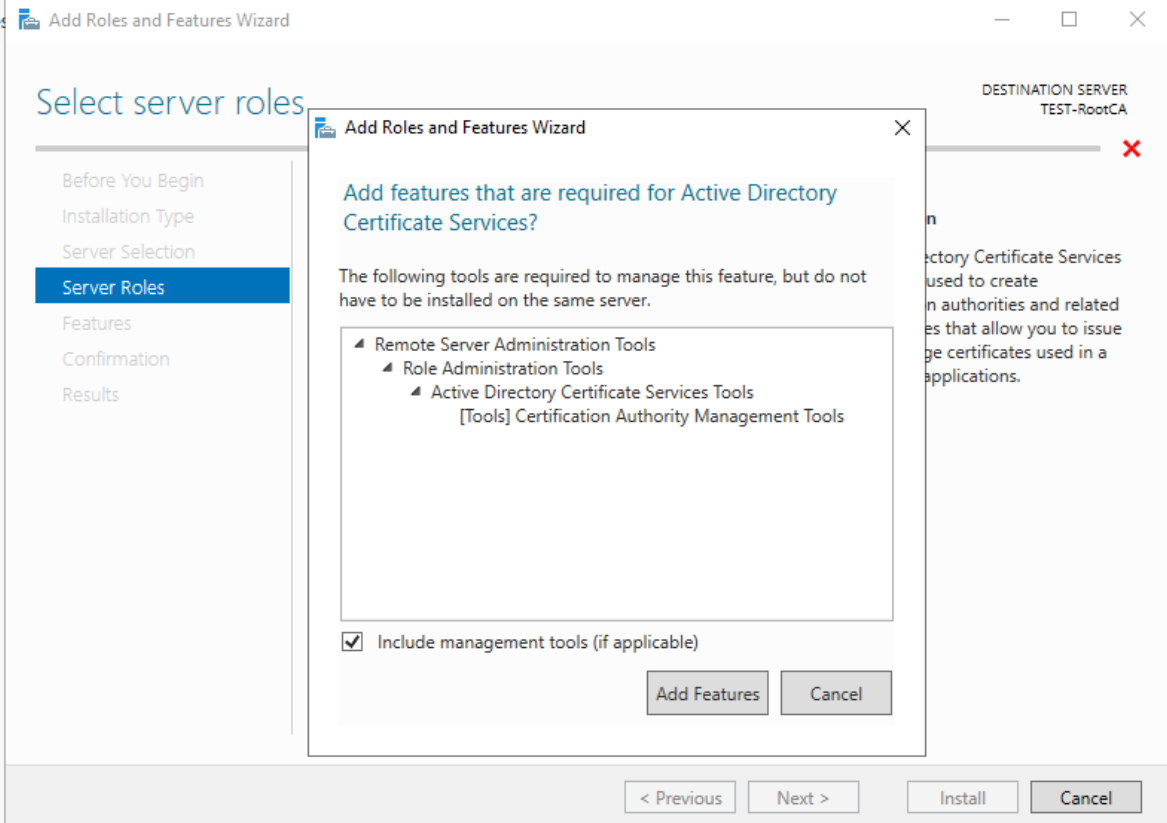
Confirm additional pop-up
On the Role Services screen select Certification Authority
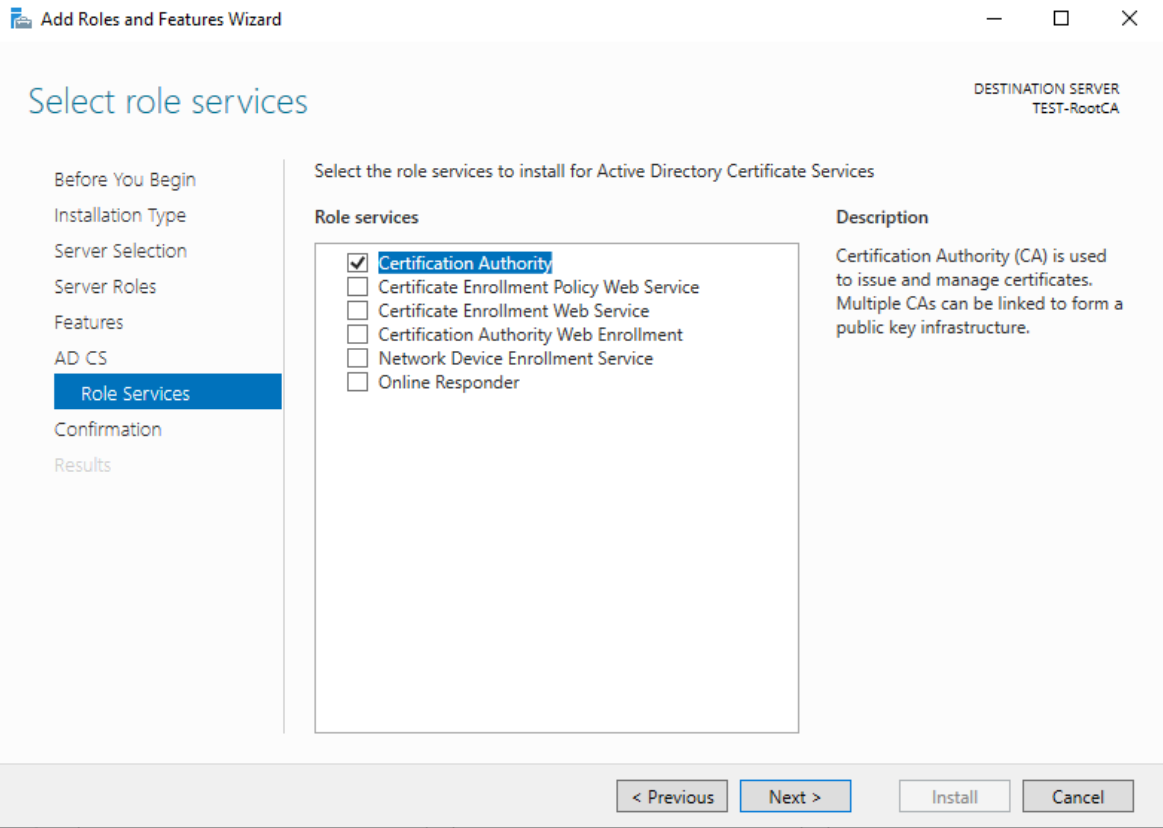
Install

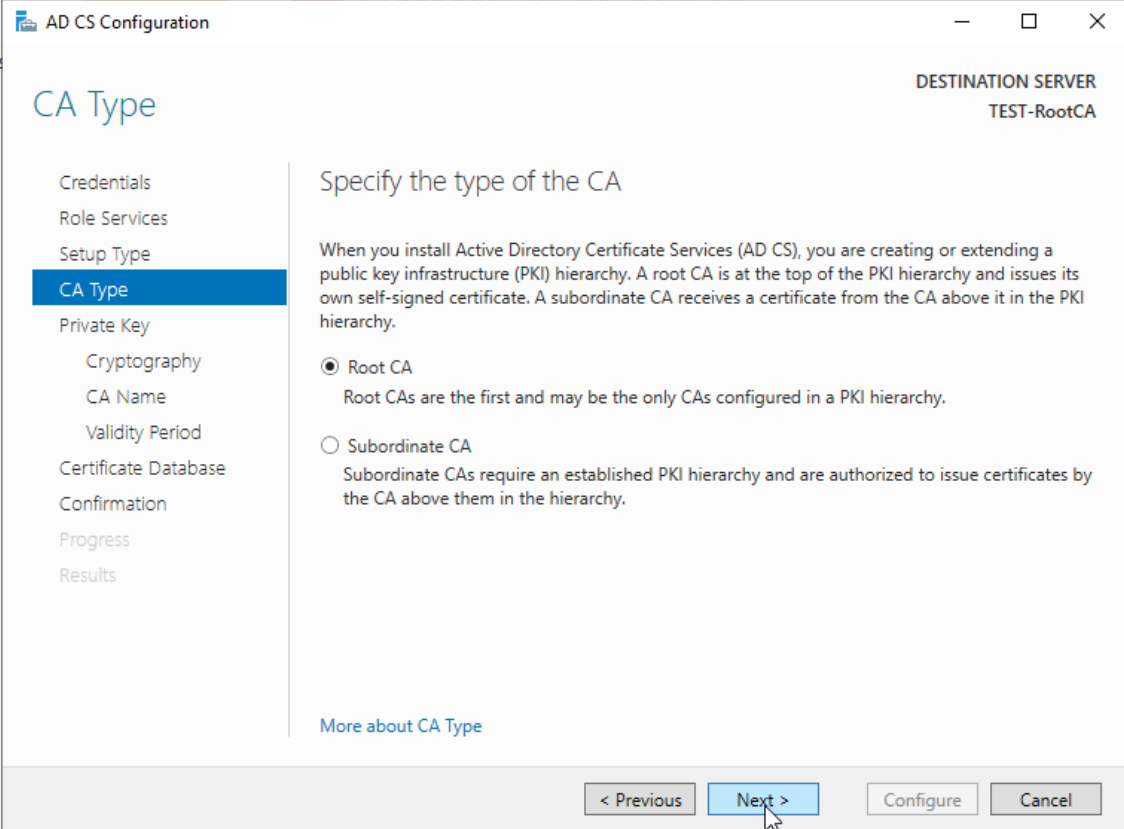
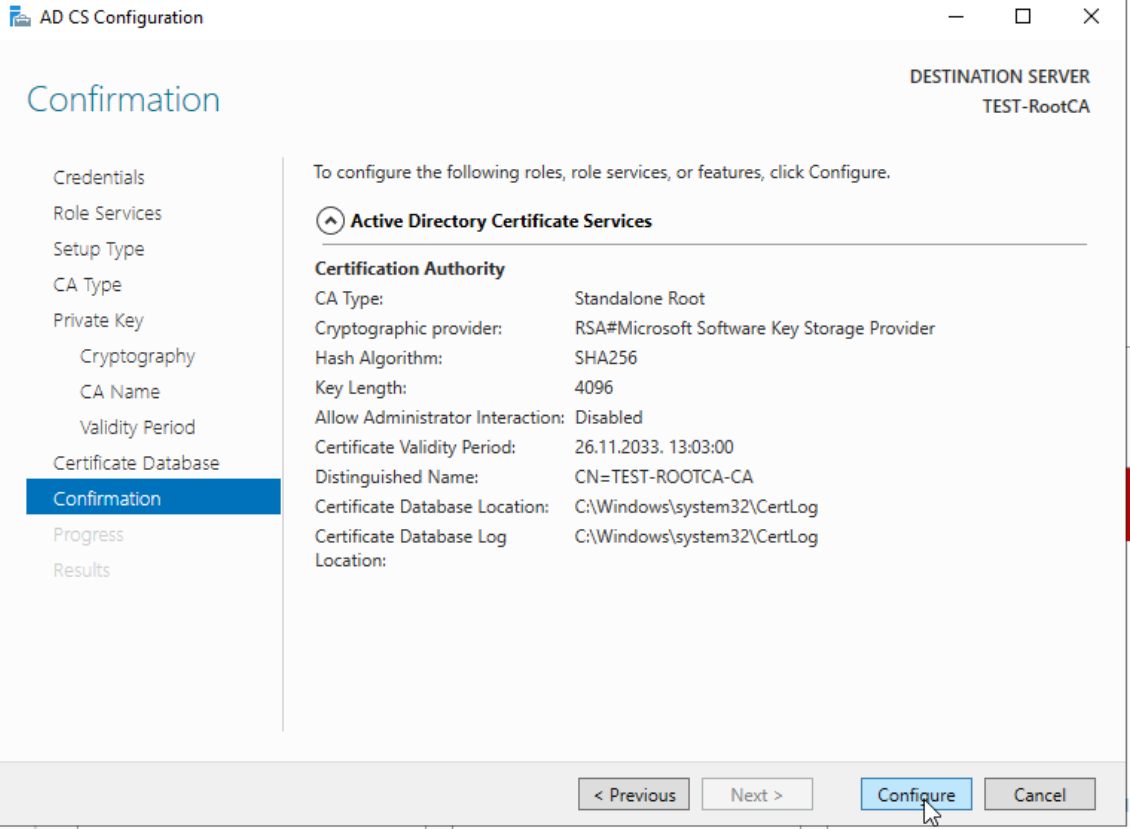
We will now setup Root Certificate with following details
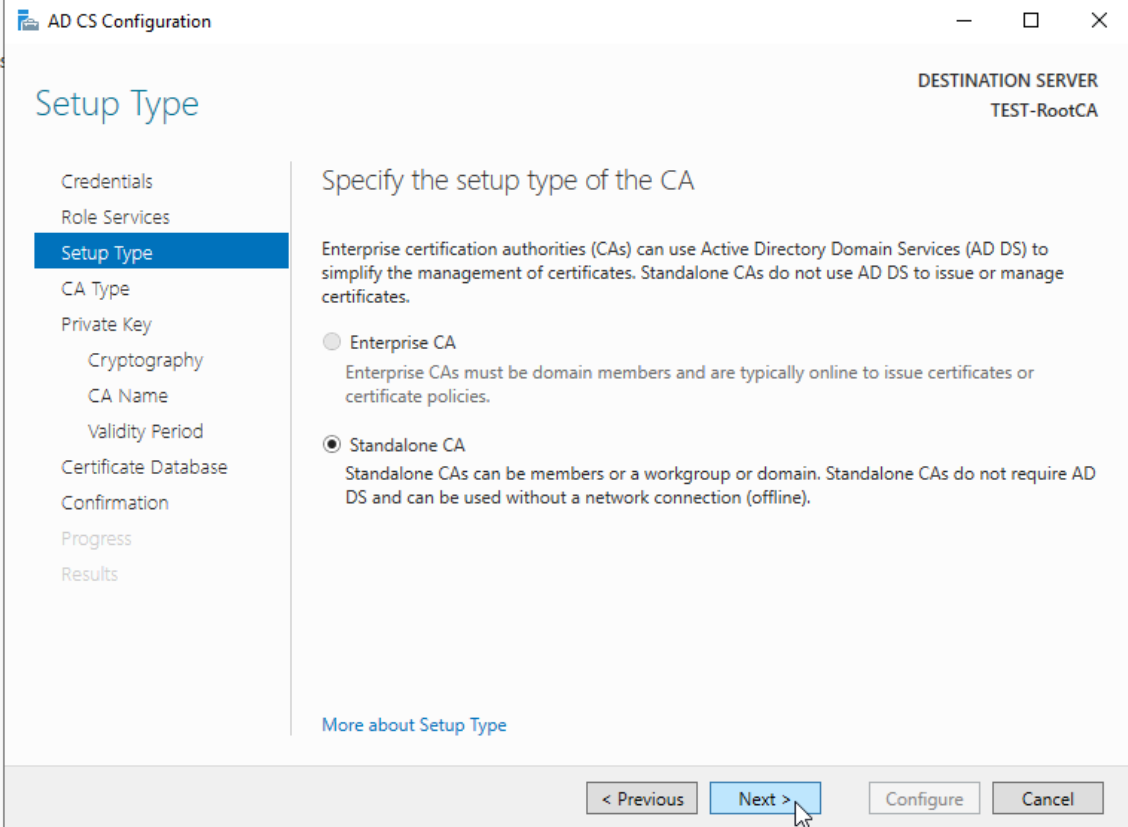
Certificate Authority Setup Type Standalone CA
Certificate Authority Type: Root CA
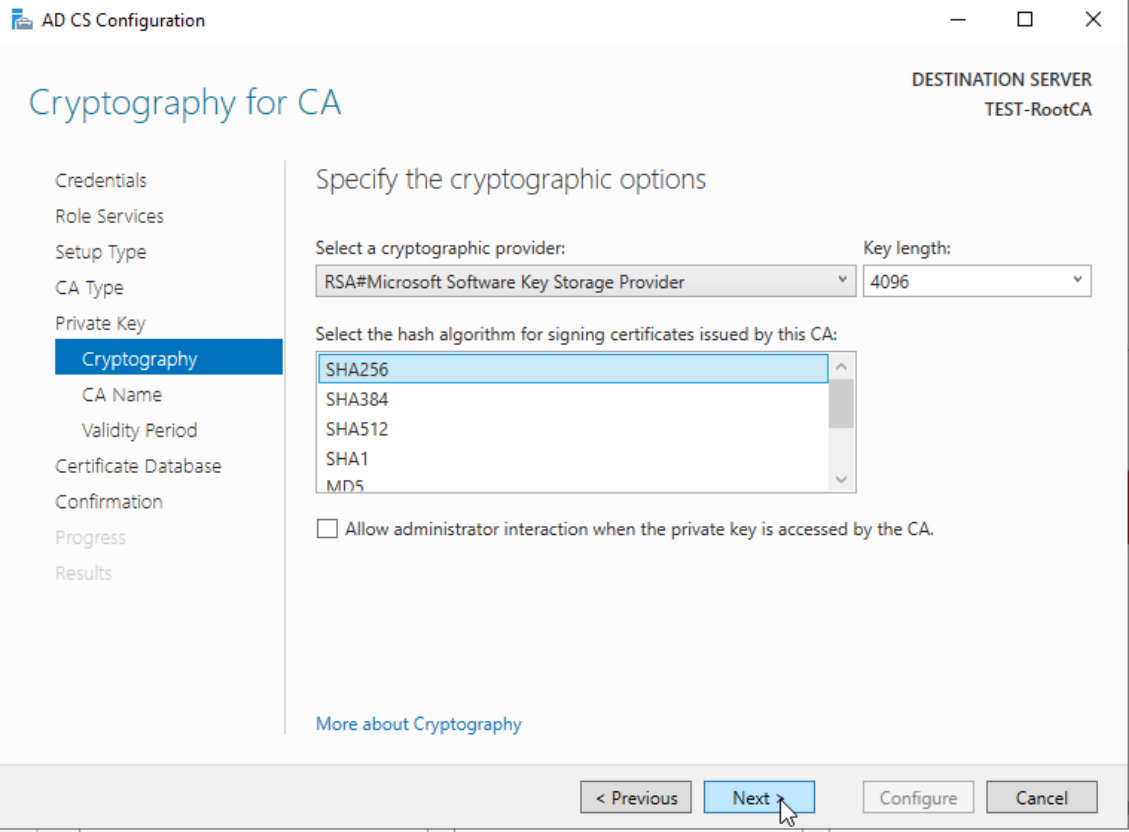
Cryptographic Provider: RSA#Microsoft Software Key Storage Provider
Key Length: 4096 Bits
Signature Hash Algorithm: SHA256
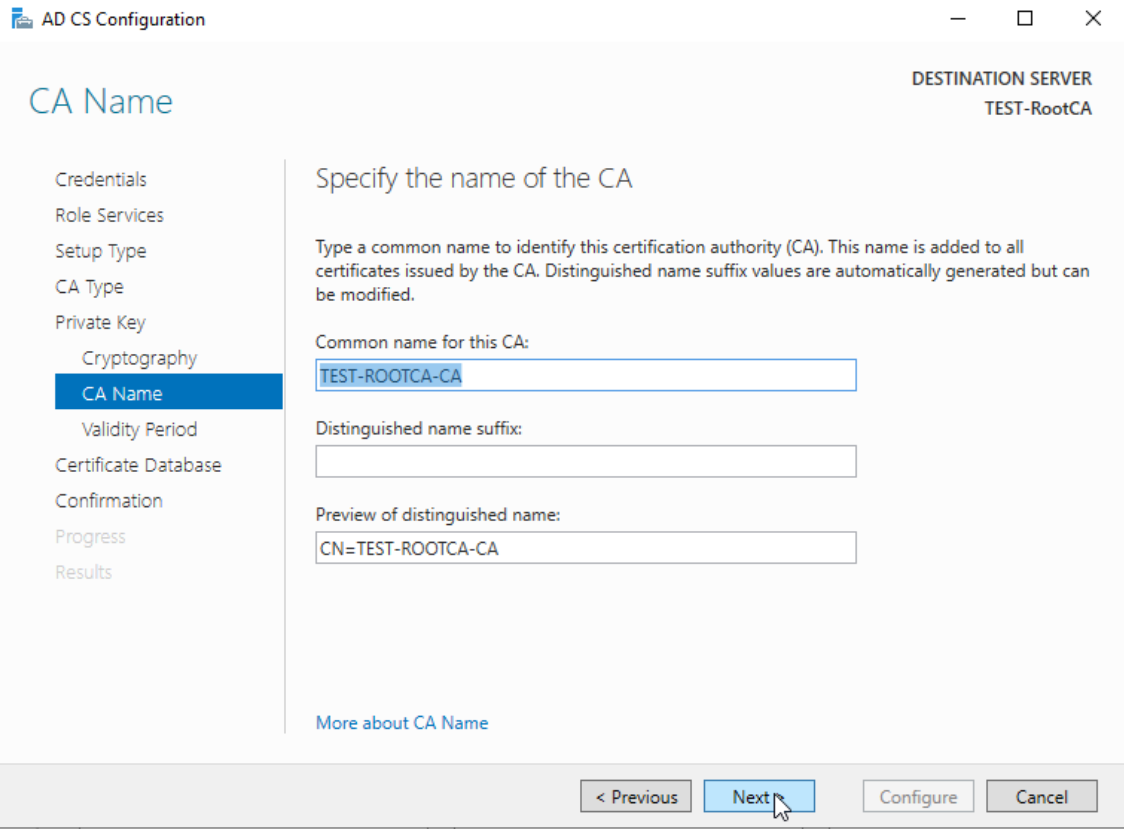
CA Common Name: Test-RootCA-CA
Validity Period: 10 years
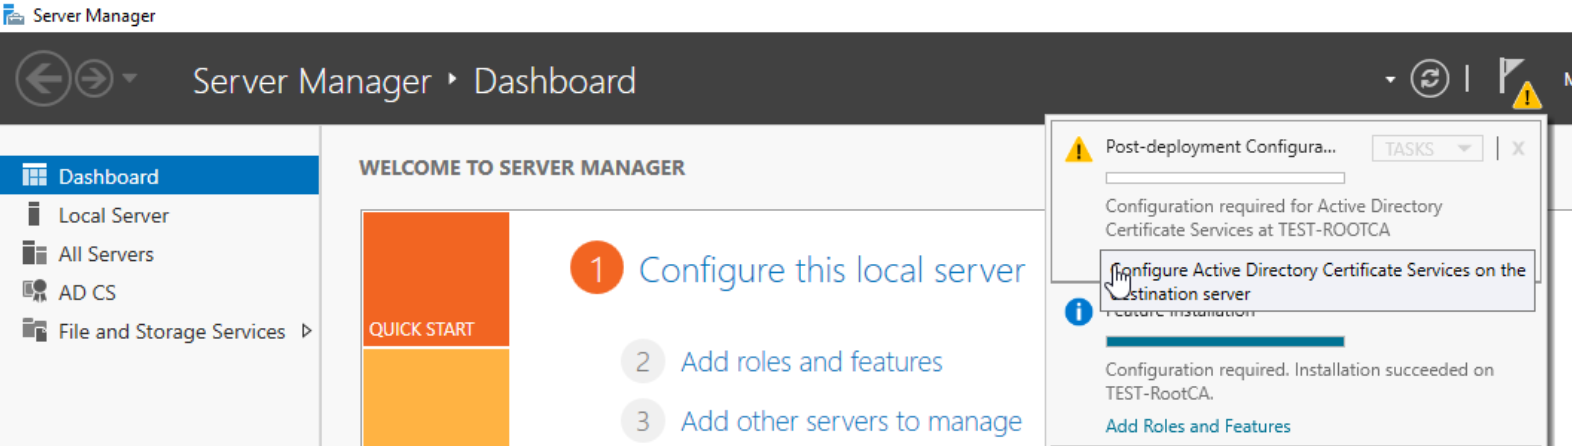
We will do this also via GUI, since I had some issues with Powershell commands. In Server Manager we will now have “Configure Active Directory Certificate Services on the destination server. Again, netowrk is offline and we are doing this with certadmin account.
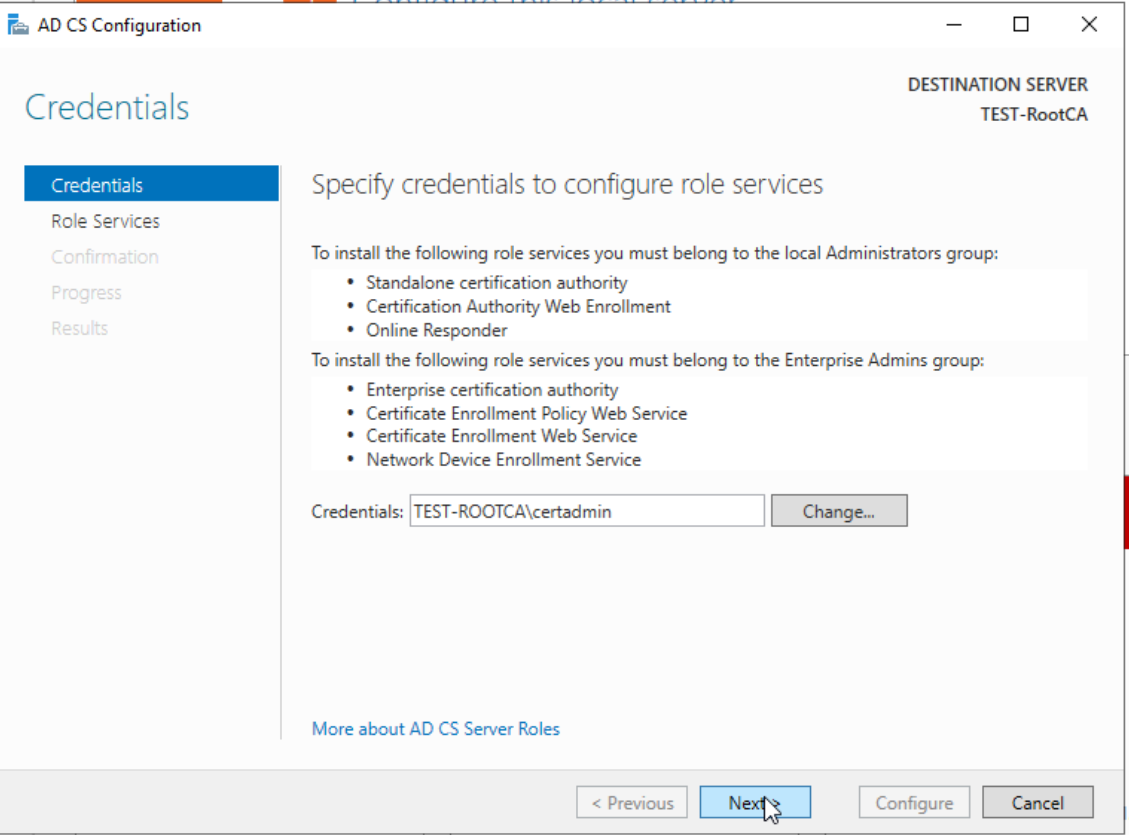
We will do this as local certadmin – Next
We will select Certification Authority and click on Next

Standalone CA
This will be Root CA
We will create new private key
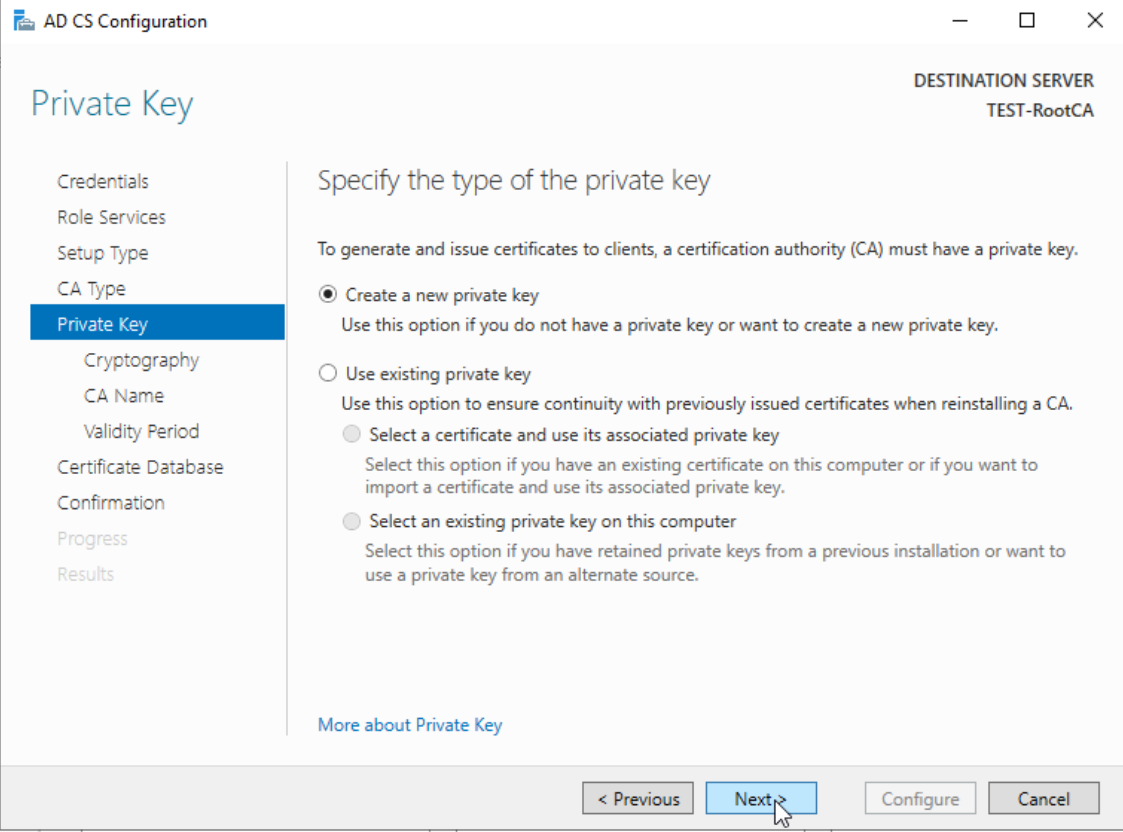
RSA#Microsoft Software Key Storage Provider , 4096 Key length and SHA256. Next
I will leave eveything as is, because it is descriptive enough.
Validity – 10 years
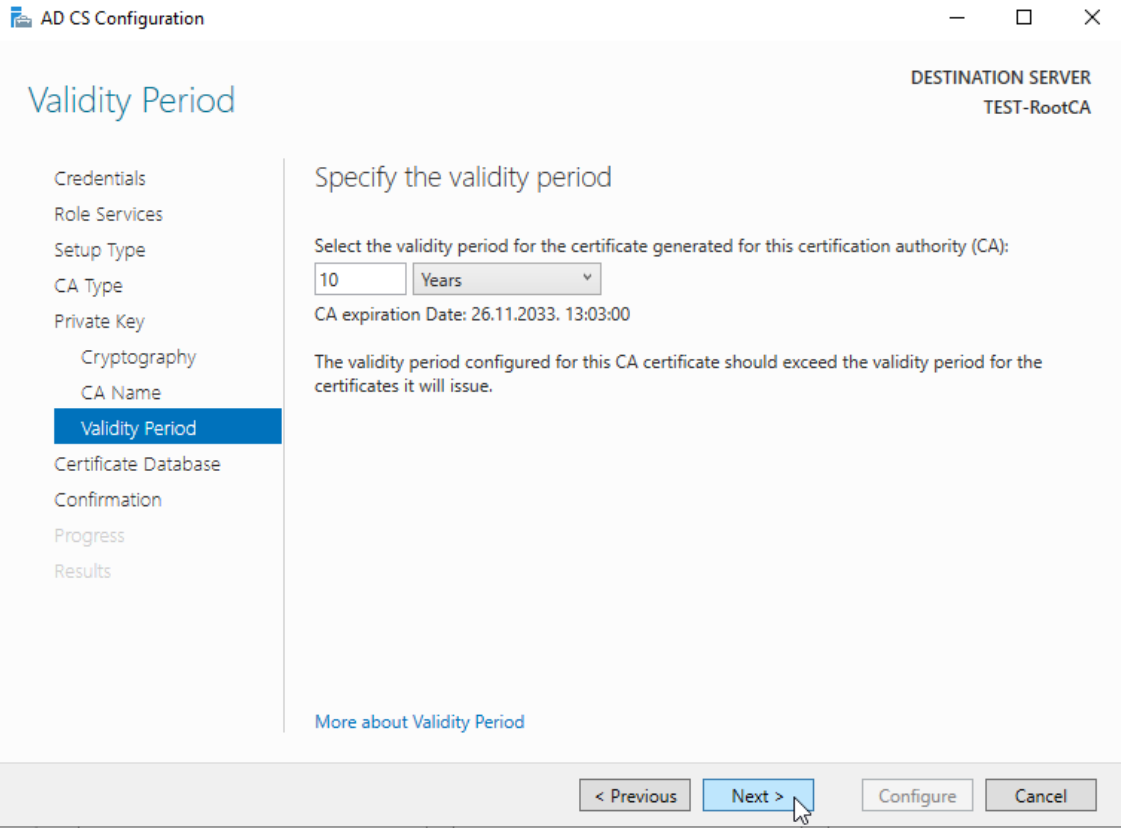
Next

Configure
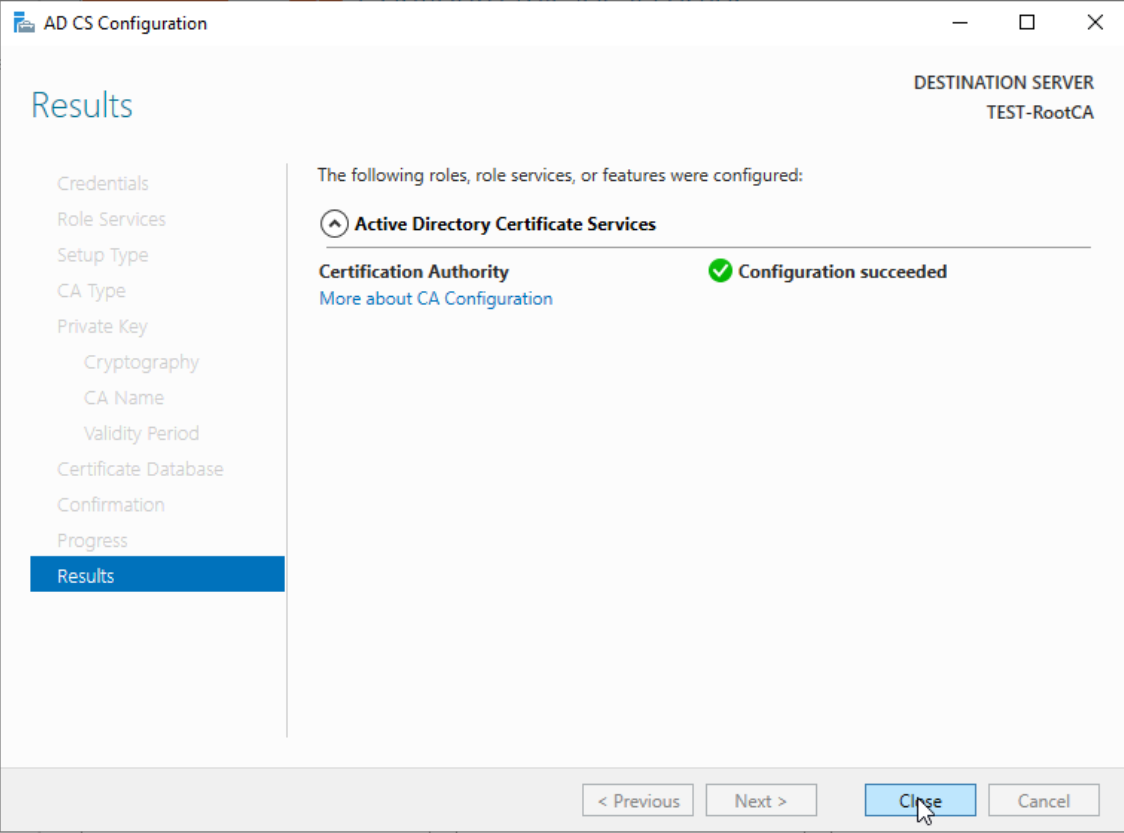
Success
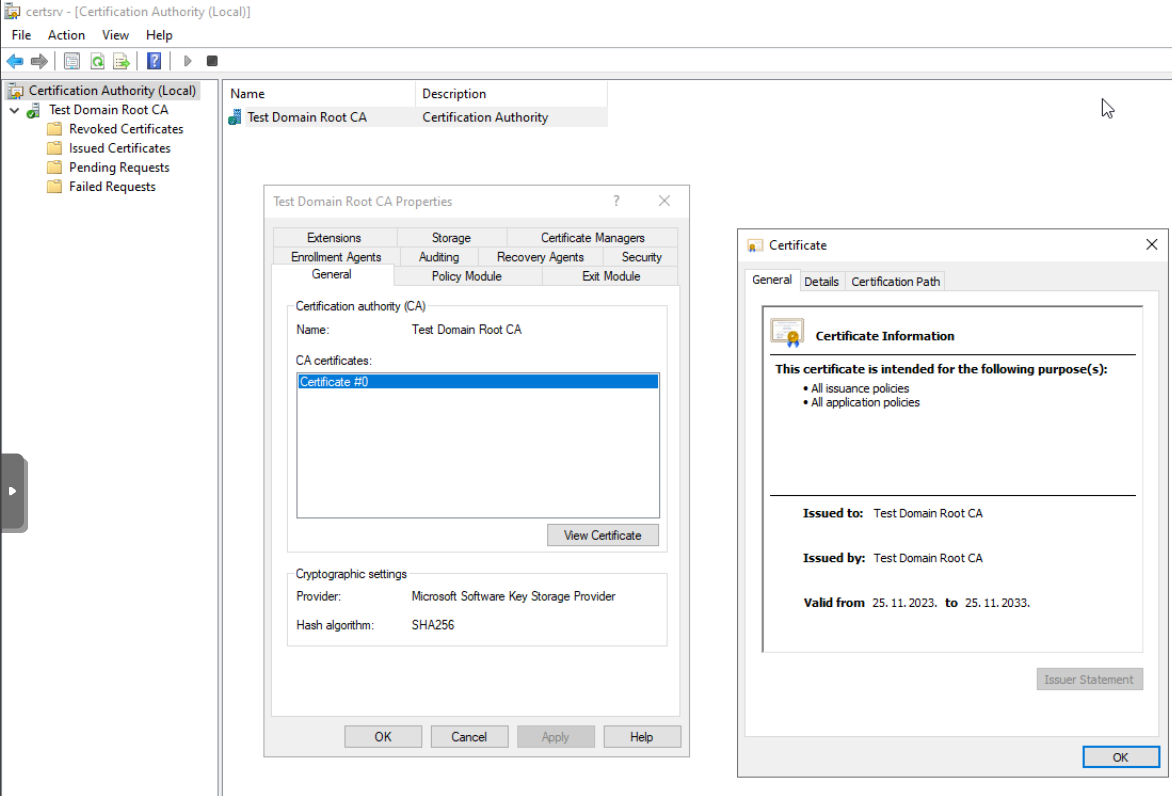
Root CA Validation
We now have to check that the thing we done is working. On Root CA server in search type certsrv.msc and Certification Authority console is displayed. Under Certification Authority we can see Test Domain Root CA we created, and if we right click on it, select Properties, and then in General tab of the new window select View Certificate – we will see that we have successfully created new certificate.
Setup CRL on Root CA
With few registry tweak we will make sure that our CRL is valid for 52 weeks, we will also extend our Subordinate CA from 1 to 5 years.
We will also configure DCConfig so that Root CA knows structure of the domain (remember, Root CA is not domain member).
Everything we will set you can find in HKLM\SYSTEM\CurrentControlSet\Services\CertSvc\Configuration
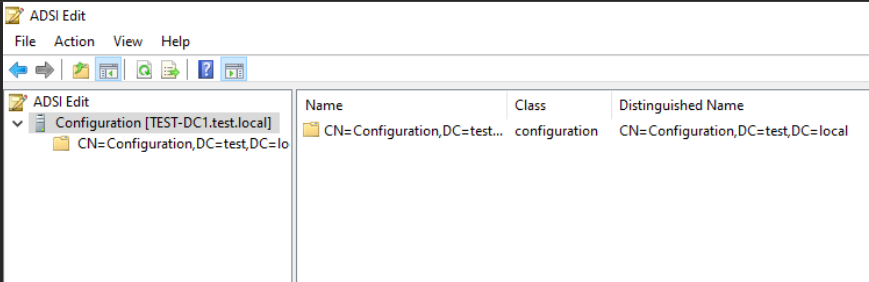
DSConfigDN values you can check with ADSIedit in Configuration view. You can also on your Domain Controller go to Active Directory Users and Computers – click on View and Select Advanced Features. Then right click on your domain (mine is test.local) select Properties and in Attribute Editor tab look into distinguishedName field – there you will find DC values for DSCConfigDN line.
We are going to use following commands in Powershell (as admin) with certutil.exe:
certutil.exe -setreg `
CA\DSConfigDN "CN=Configuration,DC=test,DC=local"
certutil.exe -setreg CA\ValidityPeriodUnits 5
certutil.exe -setreg CA\ValidityPeriod "Years"
certutil.exe -setreg CA\CRLPeriodUnits 52
certutil.exe -setreg CA\CRLPeriod "Weeks"
certutil.exe -setreg CA\CRLOverlapPeriodUnits 12
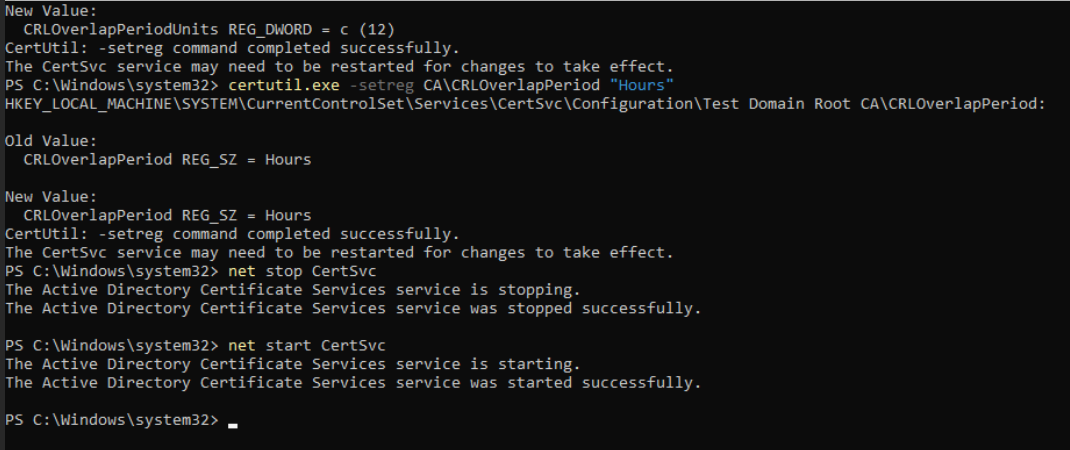
certutil.exe -setreg CA\CRLOverlapPeriod "Hours"
net stop CertSvc
net start CertSvc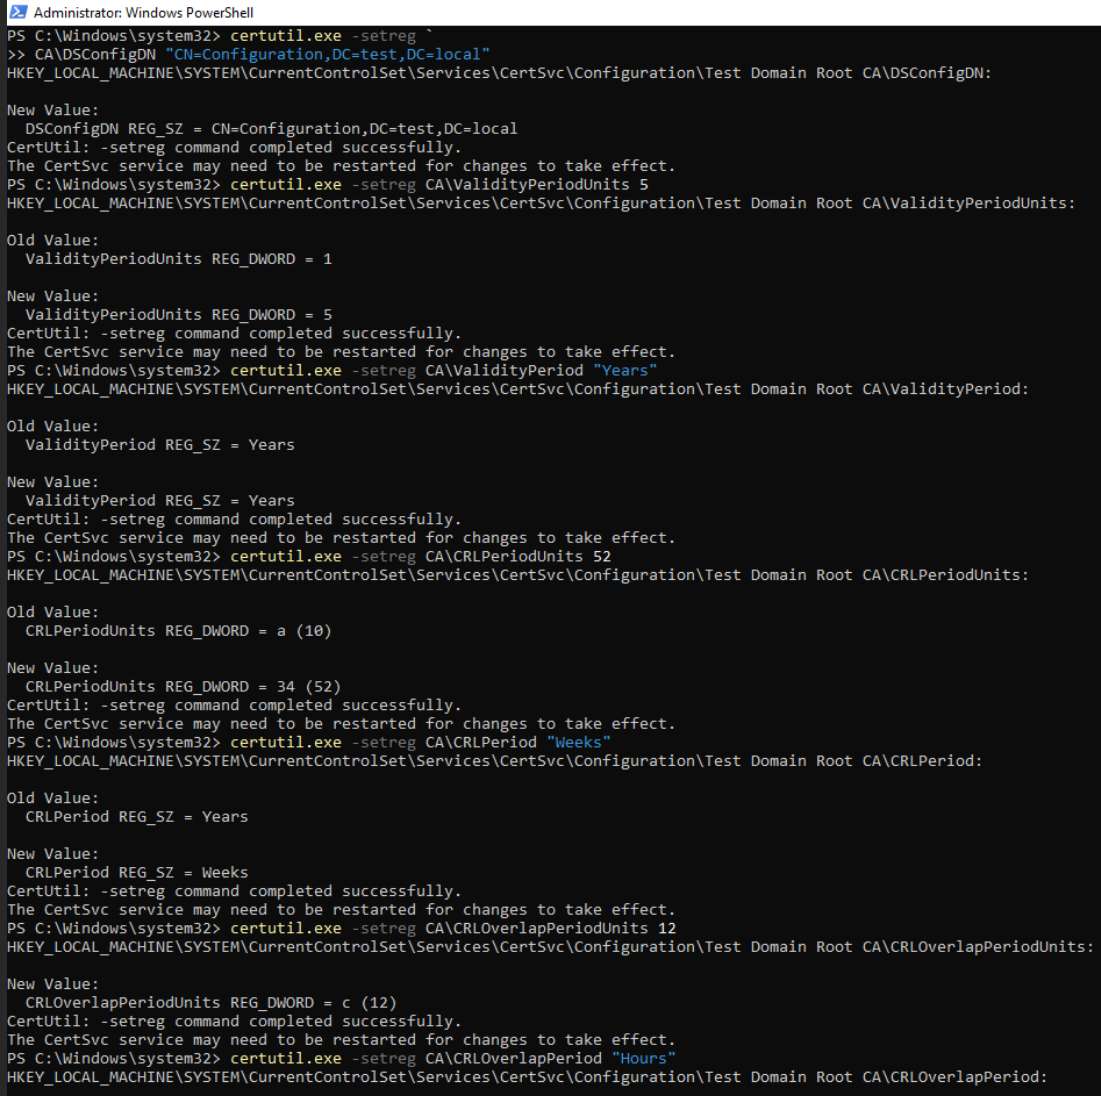
REMEMBER TO POWER UP YOUR ROOT CA EVERY 52 WEEKS, SET REMINDER TO 50 WEEKS!!
Enable Auditing on Root CA
Not necessary but good step for visibility
Local Security Policy – Local Policies – Audit Policy – Audit object Access – set both true and false.
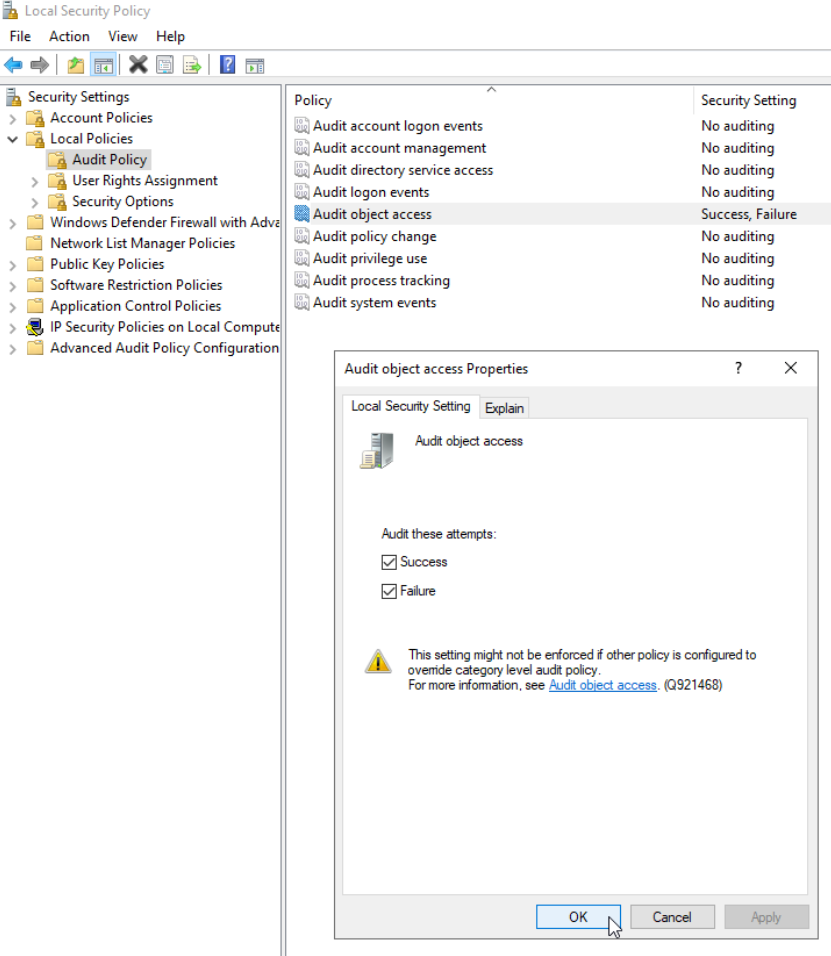
We will also enable auditing for all events on Certificate Authority by running:
certutil.exe -setreg CA\AuditFilter 127
net stop CertSvc
net start CertSvc
Ok, we are done with that. If we type certsrv.msc and Certification Authority console is displayed. Under Certification Authority we can see Test Domain Root CA we created, and if we right click on it, select Properties, and then in Auditing tab – everything should be checked.
Root CA – CDP and AIA config
Let’s continue with CDP and AIA configuration on Root CA.
We will need to copy these commands to Command Prompt in one line. So, copy these to Notepad, on Visual Studio Code or whatever and make them in one line – then transfer them into COMMAND PROMPT and execute. Through Powershell I was lossing some of the signs…
Run COMMAND PROMPT as admin and execute following (copy commands to notepad and make them one line):
certutil -setreg CA\CRLPublicationURLs “1:C:\Windows\system32\CertSrv\CertEnroll\%3%8%9.crl\n10:ldap:///CN=%7%8,CN=%2,CN=CDP,CN=Public Key Services,CN=Services,%6%10\n2:http://pki.test.local/CertEnroll/%3%8%9.crl”After that command type in following
certutil -setreg CA\CACertPublicationURLs “1:C:\Windows\system32\CertSrv\CertEnroll\%1_%3%4.crt\n2:ldap:///CN=%7,CN=AIA,CN=Public Key Services,CN=Services,%6%11\n2:http://pki.test.local/CertEnroll/%1_%3%4.crt”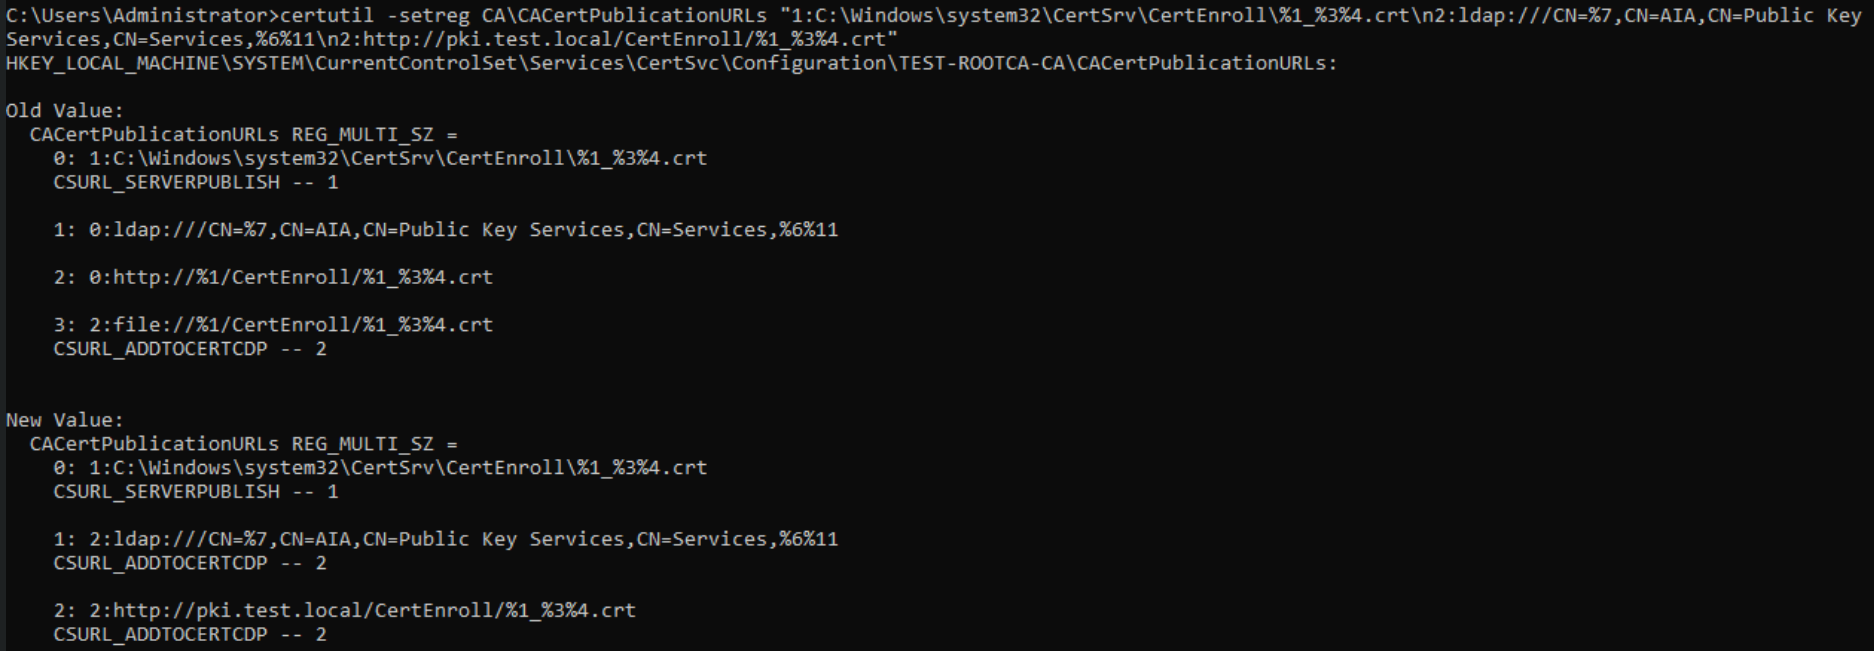
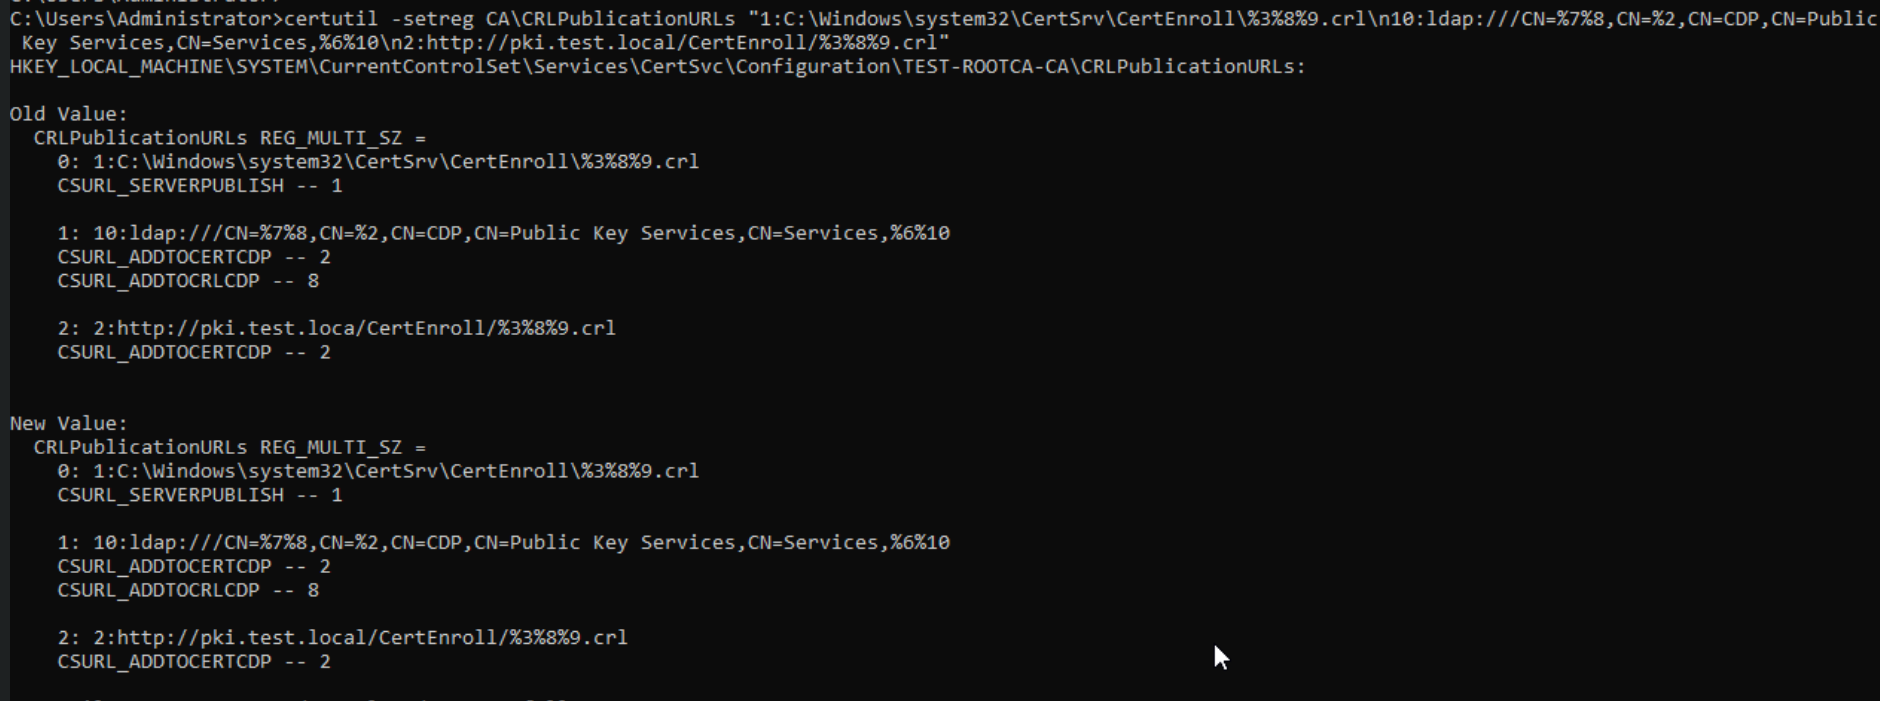
After you are done execute
net stop CertSvc
net start CertSvc
At last, we will publish our crl
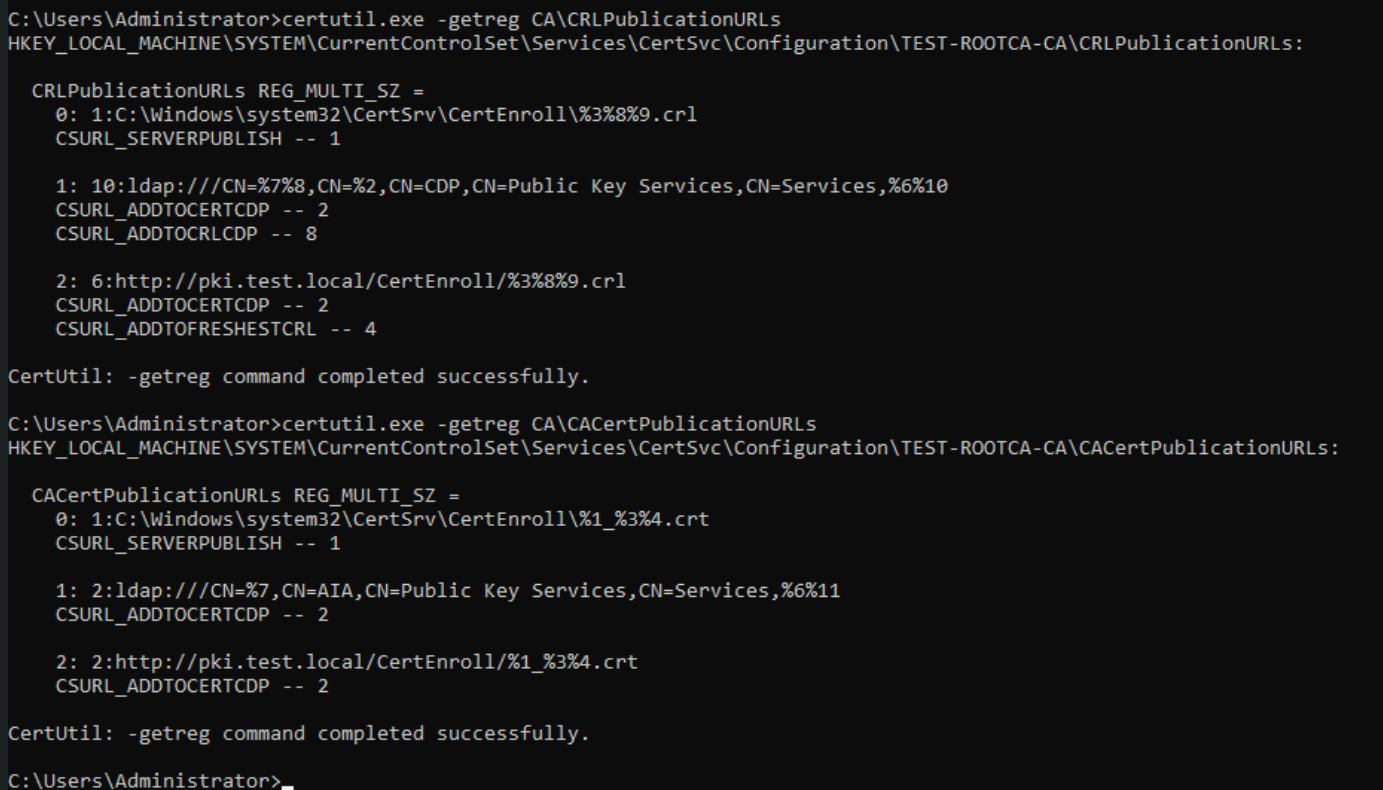
certutil.exe -crlLet’s now verify CDP and AIA settings (from Powershell as admin)
For CDP
certutil.exe -getreg CA\CRLPublicationURLsFor AIA
certutil.exe -getreg CA\CACertPublicationURLsThat should be ok
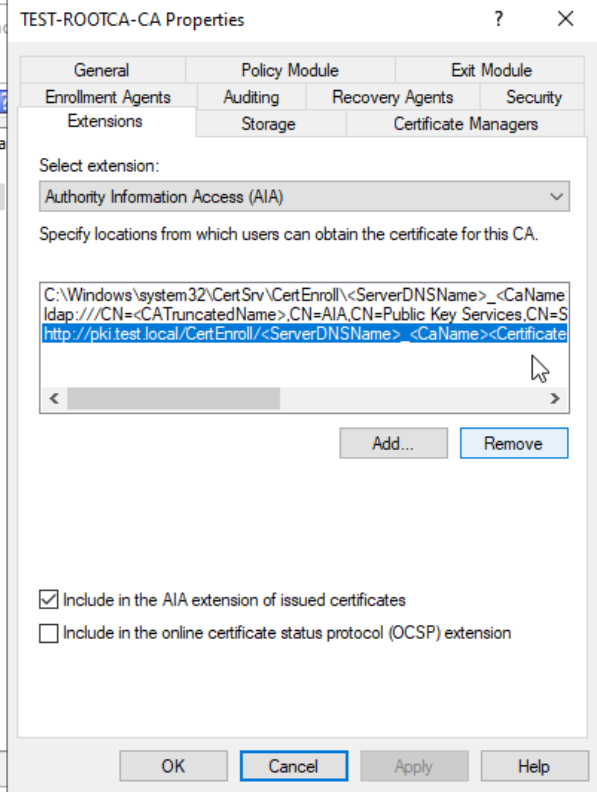
Last but not least – open certsrv.msc, right click on your server – Properties – Extension tab – make sure that http://pki.test.local… has Include in CRLs. Clients use this to find Delta CRL locations, and Include in the CDP extension of issued certificates.
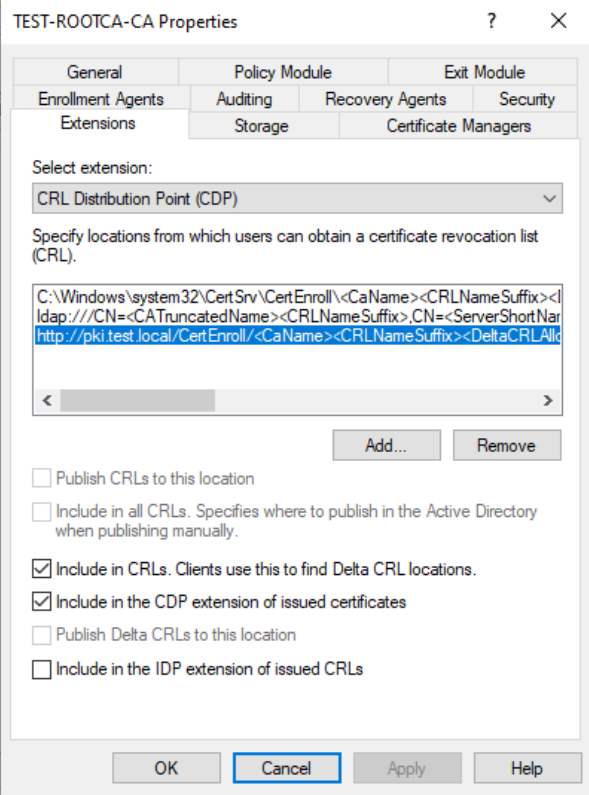
For AIA, when you click on HTTP link make sure that “Include in the AIA extension of issued certificates” is selected.
Ok, now final step, we need to prepare files for the Subordinate CA.
Root CA cert and CRL Export
I will do this in test environment via file share. But I repeat, that is not best practice in production. Root CA should be offline and WITHOUT NETWORK CONNECTION. You should use sanitized USB stick, or virtual floppy (if you are using Hyper-V) for this.
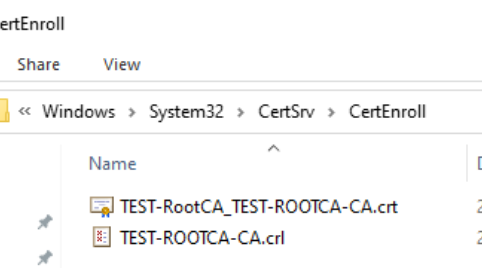
You should copy contents of C:\Windows\System32\CertSrv\CertEnroll to C:\RootCA folder
So, in C:\RootCA folder you should have Test-ROOTCA-CA.crl and Test-RootCA_TEST-ROOTCA-CA.crt file. If you plan to use Bitlocker on your Root CA, now is the chance to copy file with recovery key also. Copy RootCA folder on USB, or VirtualFloppy, or if you are feeling risky – via network to your Subordinate CA. If you are using network – disconnect it now.
Reboot your Root CA for a good measure. At this point I don’t have any connection with network from Root CA.
Ok, this is it for part 1, we are already too long with this. In next part we will configure Subordinate CA, which will be domain member and always online.
Please do not turn of Root CA until you are done with entire PKI implementation!
Implementing Two-Tier PKI on Windows Server 2022 – Part 1 – you are here
Implementing Two-Tier PKI on Windows Server 2022 – Part 2
Implementing Two-Tier PKI on Windows Server 2022 – Part 3
Implementing Two-Tier PKI on Windows Server 2022 – Part 4
Implementing Two-Tier PKI on Windows Server 2022 – Part 5
Implementing Two-Tier PKI on Windows Server 2022 – Part 6
Implementing Two-Tier PKI on Windows Server 2022 – Part 7