There was some confusion on how to generate Web Certificates via internal PKI for Web Services. If created through web enroll, web certificates will still give errors in browsers inside domain environment. In this extra part I will show how I enroll web certificates for Windows Server and Linux Web servers.
This guide is part of my Two-Tier PKI series. You can find settings for the lab in the first part of PKI series.
For this lab I added two servers:
Windows Server 2022 STD – Test-WebServer1 – IIS web server
Ubuntu 22.04.3 server – Test-LinWeb1 – Apache Web Server
Both machines are part of the domain.
Domain: test.local
DC: DC1
Certificate Authority: Test-CA1
Let’s start with Windows Server
For this to work, you need to modify your Web server template. On CA1 server open Certification Authority console (certsrv.msc) and under Certificate Templates delete Web Server template you are currently using.
Nex, right click on Certificate Templates – select Manage – select your Web Server template (we created one in Part 6)- right click on it and select Properties. On Security tab add Domain Computers (or you can for security add only certain computers on which you will generate web certificates) and select Read, Enroll and Autoenroll permissions. Apply | OK
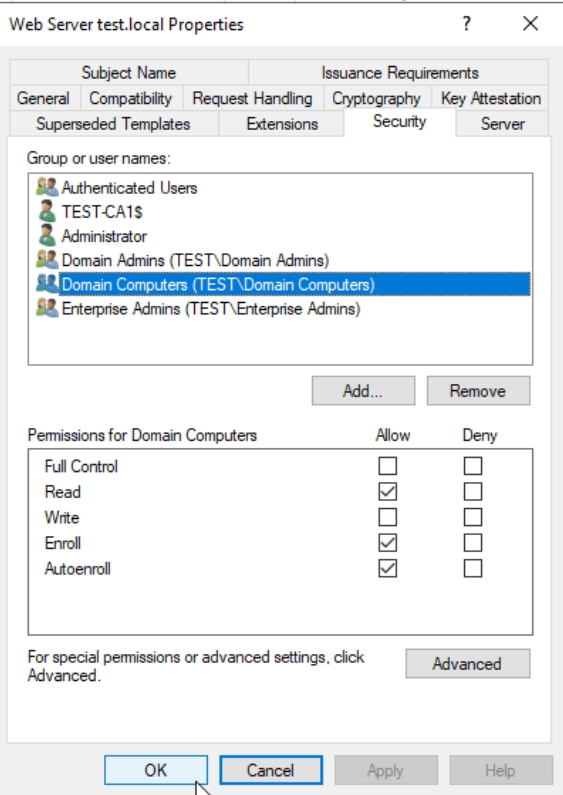
Then after you are done – right click on Certificate Templates – New – Certificate Template to Issue – add select modified Web Server Template. For good measure restart CA1 server.
Creating certificate for IIS Web Server
I did mention Web Enrollment service in part 7 of the PKI series, but more or less I don’t use it, because it can be problematic.
So, I will show you another method for generating web certificate.
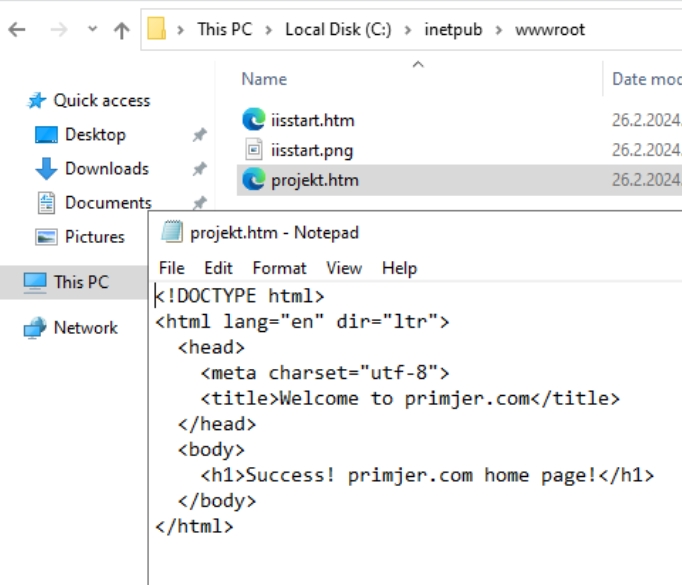
We will do this on Test-WebServer1 machine which has installed IIS and simple page I put into C:\intepub\wwwroot named projekt.htm
On port 80 it work, http is available
Ok, let’s now create certificate to make our website available through https
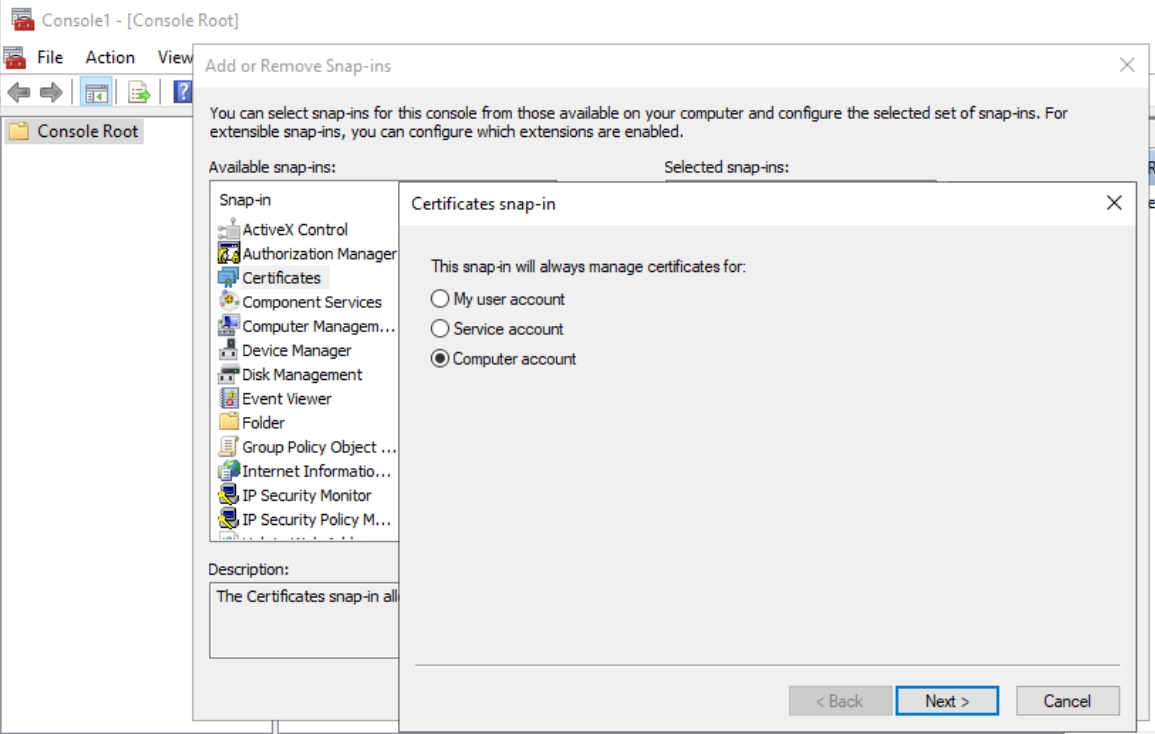
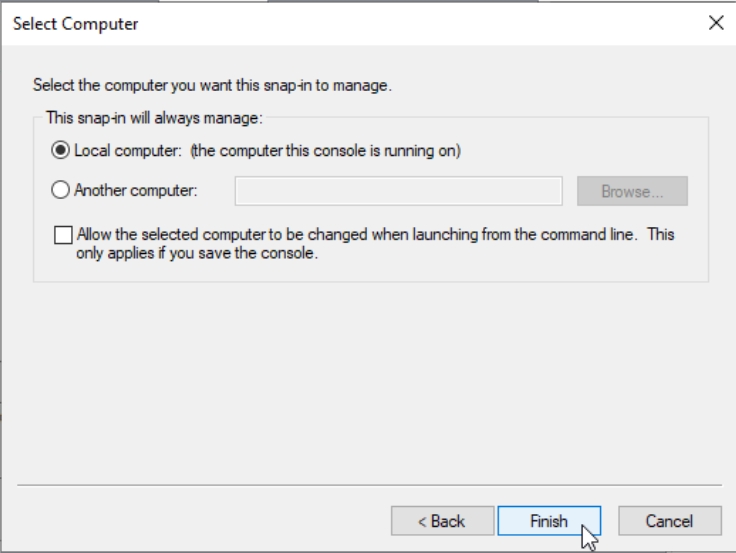
On Test-WebServer1 in search type in mmc – when console opens select File – Add/Remove Snap In – select Certificates – Computer account – Local Computer – Finish – OK
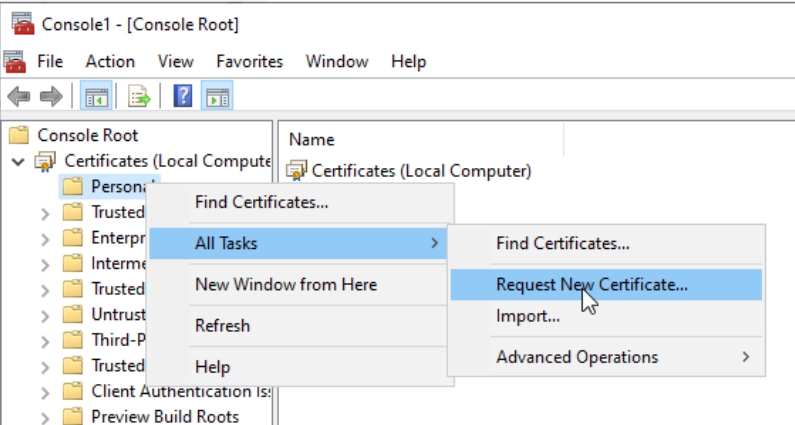
Now, Certificates console will open – right click on Personal folder – All Tasks – Request New Certificate…
On initial windows just confirm with Next. On next, select Active Directory Enrollment Policy – Next

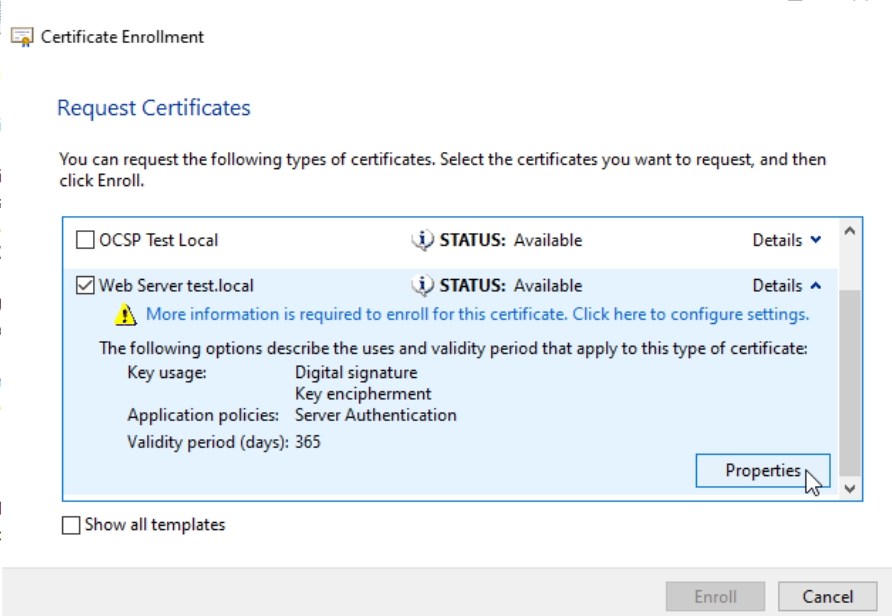
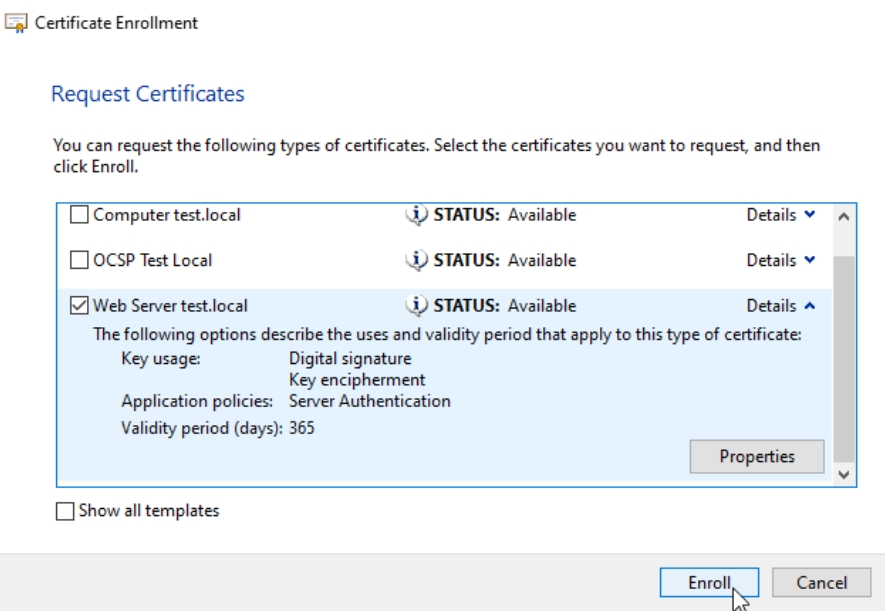
On Next screen select your Web Server template – click on Details and select Properties. If you are missing Web Server template – please go back to the beginning of this guide and edit your Web Server template.
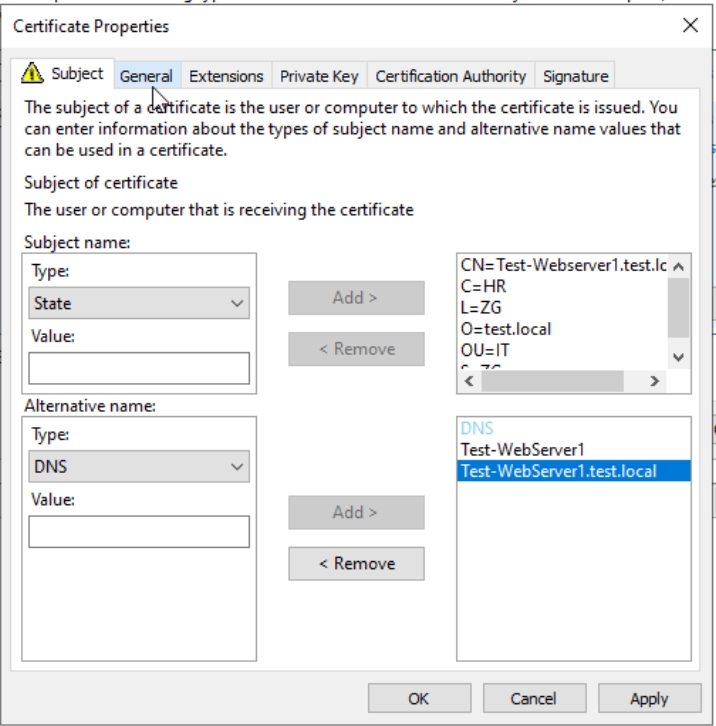
On Subject tab under Subject name: part we will add following:
Common name – Test-WebServer1.test.local ( FQDN of your web server)
Country – HR (select your country)
Locality – ZG
Organization – test.local
Organizational Unit – IT
State – ZG
Alternative name part:
DNS – Test-WebServer1
DNS – Test-WebServer1.test.local
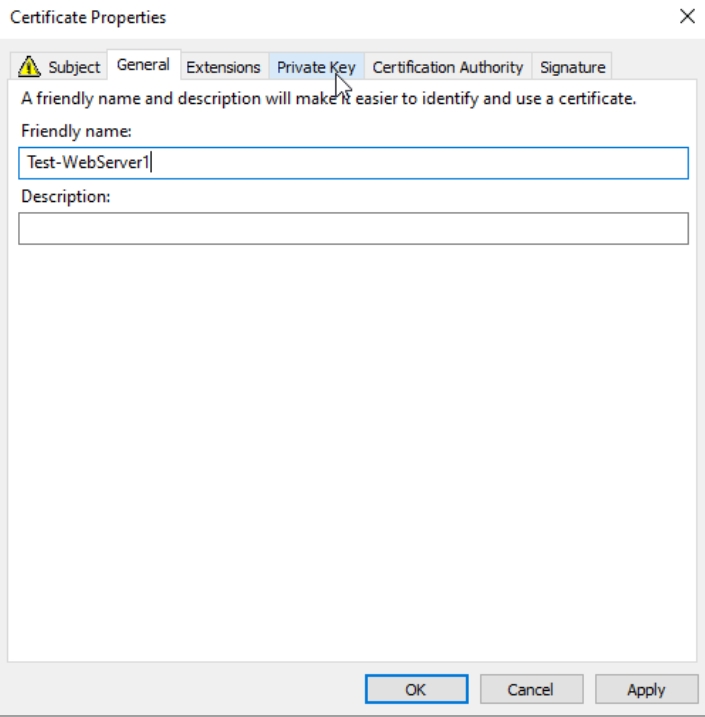
This is how it should look like. Before we close this, we will go to General tab
On General tab, in Friendly name I will enter FQDN of my web server (Test-WebServer1).
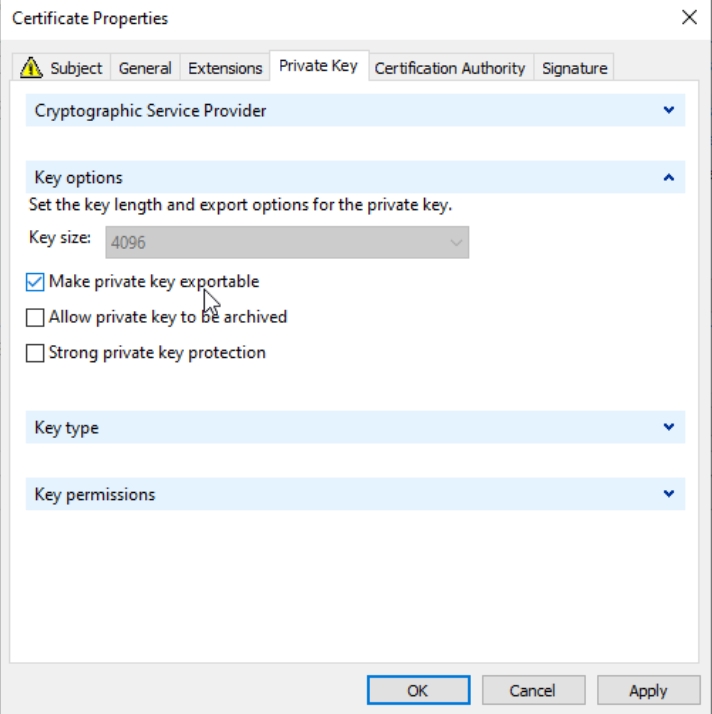
Next we will go to Private Key tab.
On Private Key tab under Key options, select Make private key exportable. Apply | OK
Press Enroll
Finish – we succedded.
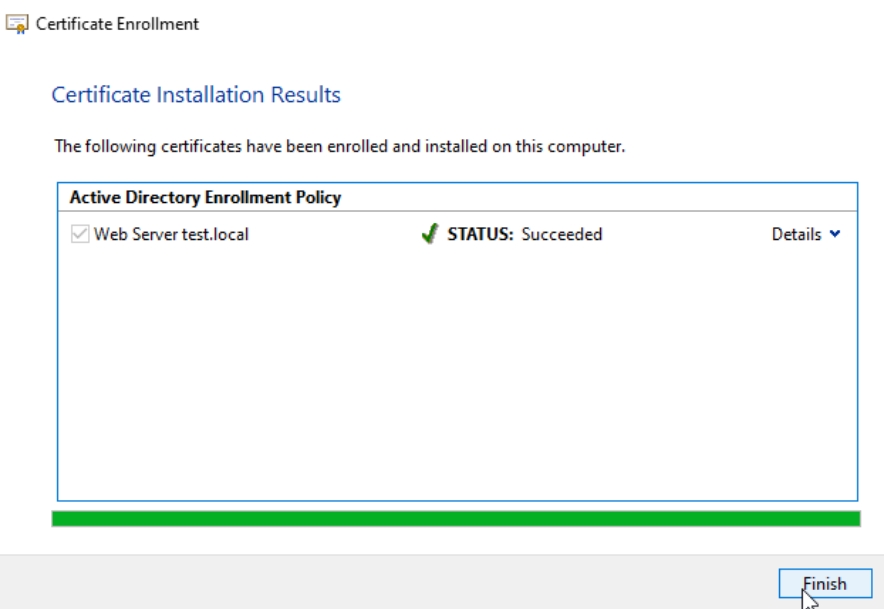
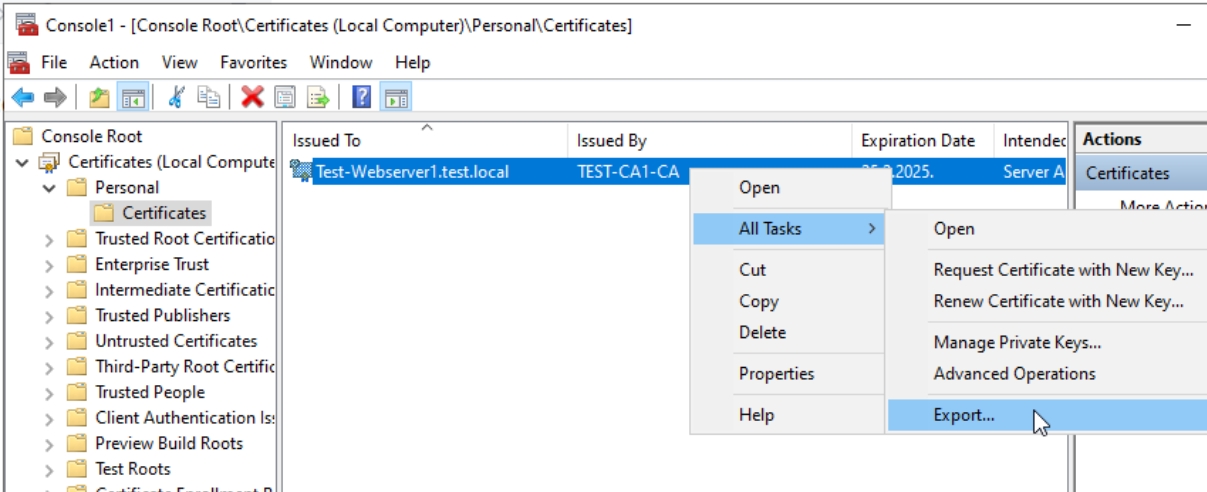
Now, we will have new certificate in Personal folder created since I have Auto Enroll enabled and I don’t have to go to CA1 to confirm certificate and issue it manually (you can do that for security, but since this is lab, I went with auto enroll). Right click on issued certificate and select All Tasks – Export
Select – Yes, export the private key
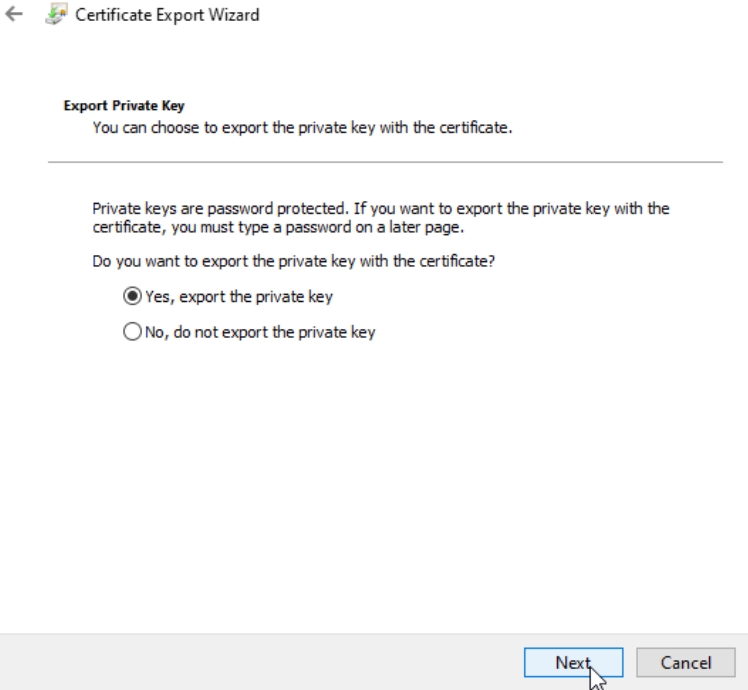
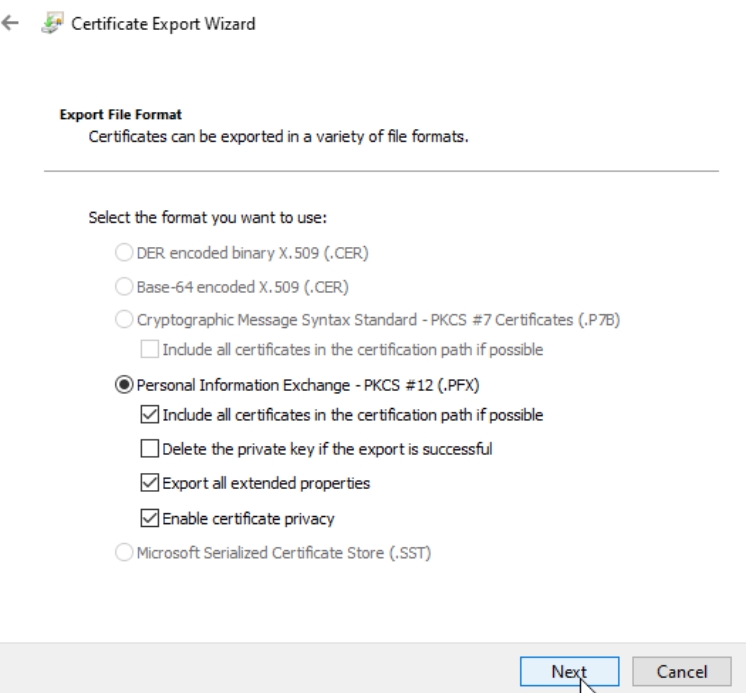
Leave unchecked only Delete the private key if export is successful. Next
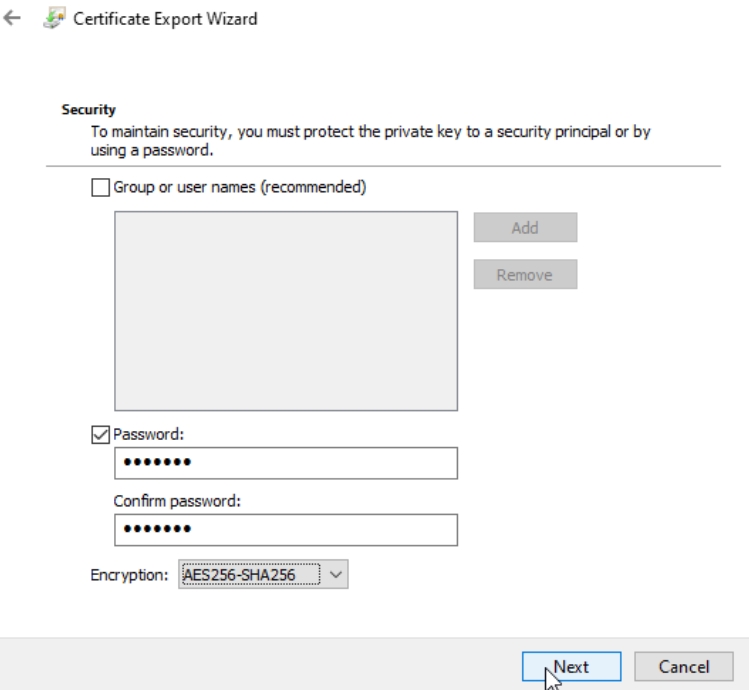
Enter password to protect your certificate and click Next
Select place where certificate will be exported.
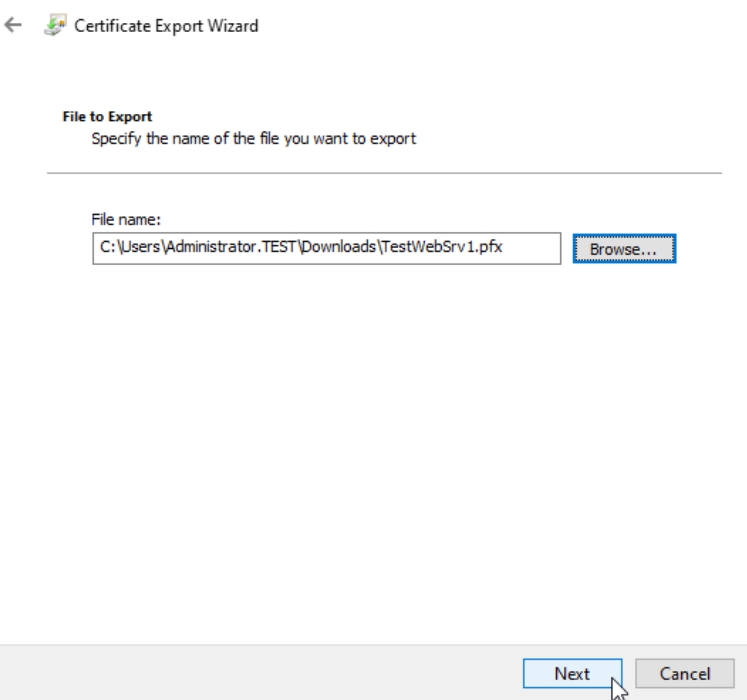
Finish
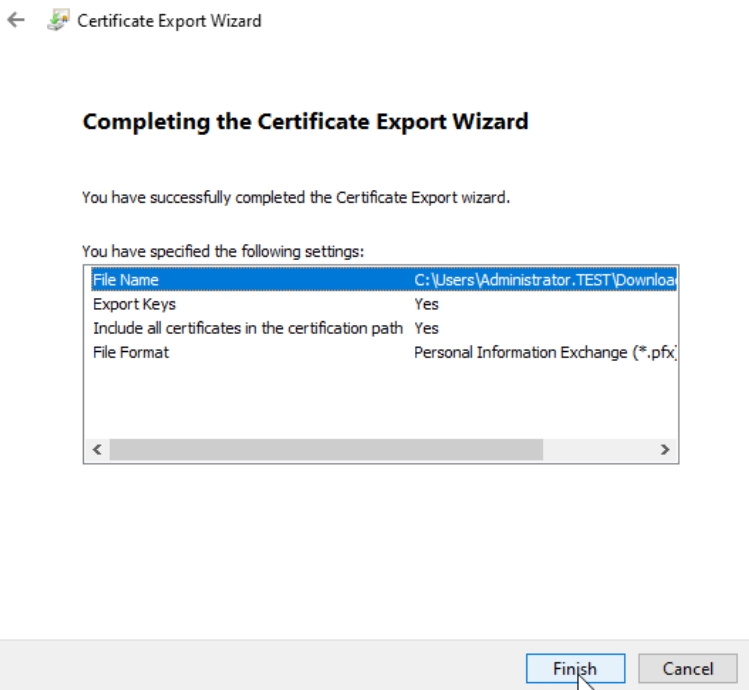
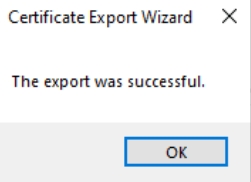
We were successful.
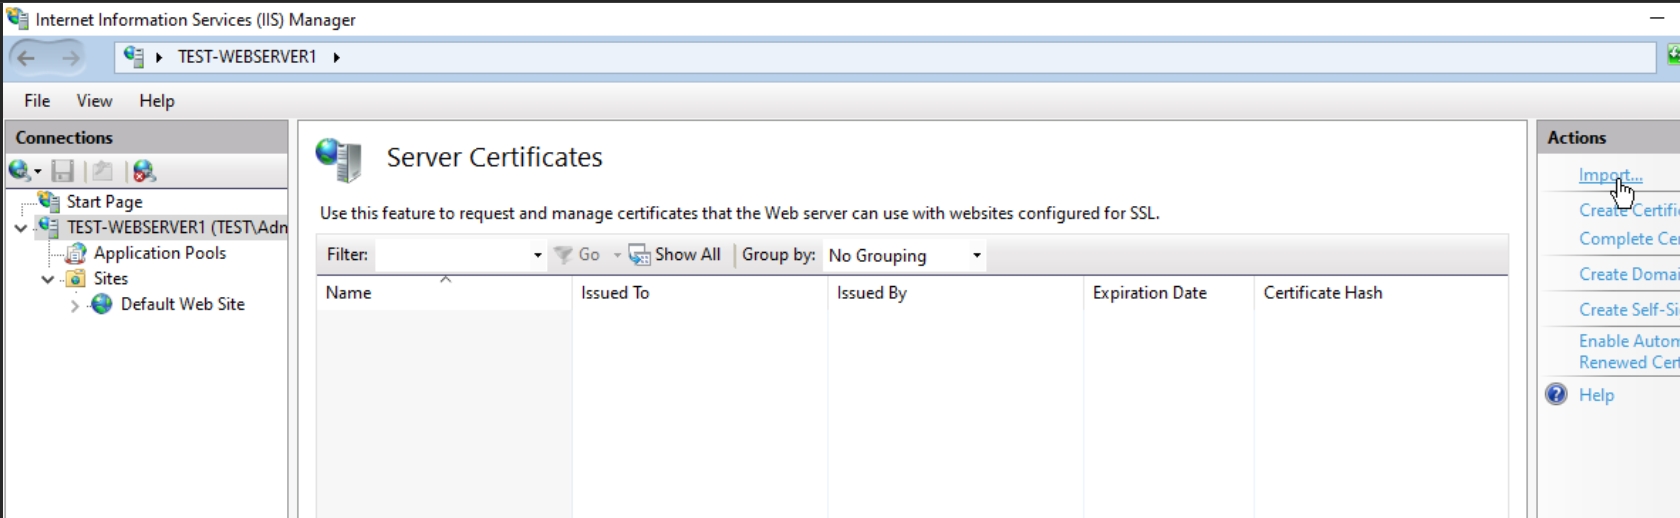
Now, I will open IIS web server (also on Test-WebServer1) and navigate to server – in the middle pane I will select Server Certificates – and under Actions I will select Import
Navigate to the location you saved certificate to, enter password you created above for the certificate and select OK. Allow this certificate to be exported has to be selected.
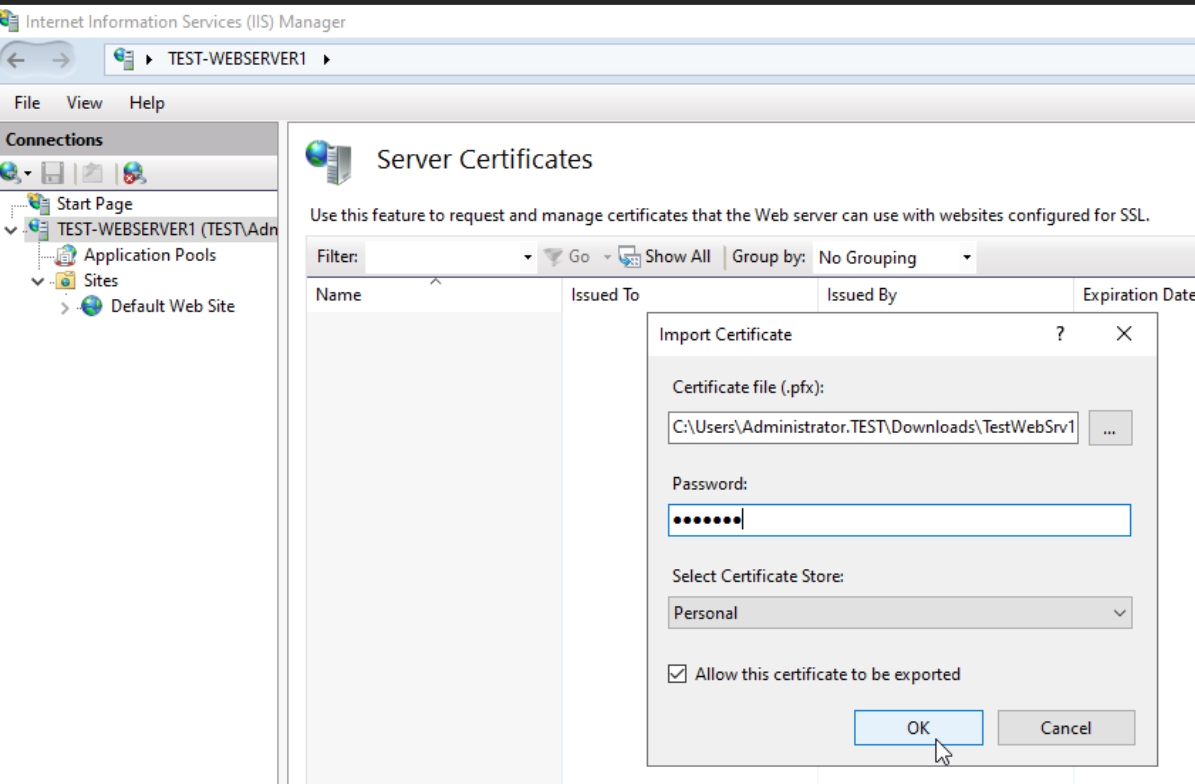
Certificate is impored.

I will now create new https Binding for Default Web Site and select certificate we just imported – OK Reboot IIS for a good measure
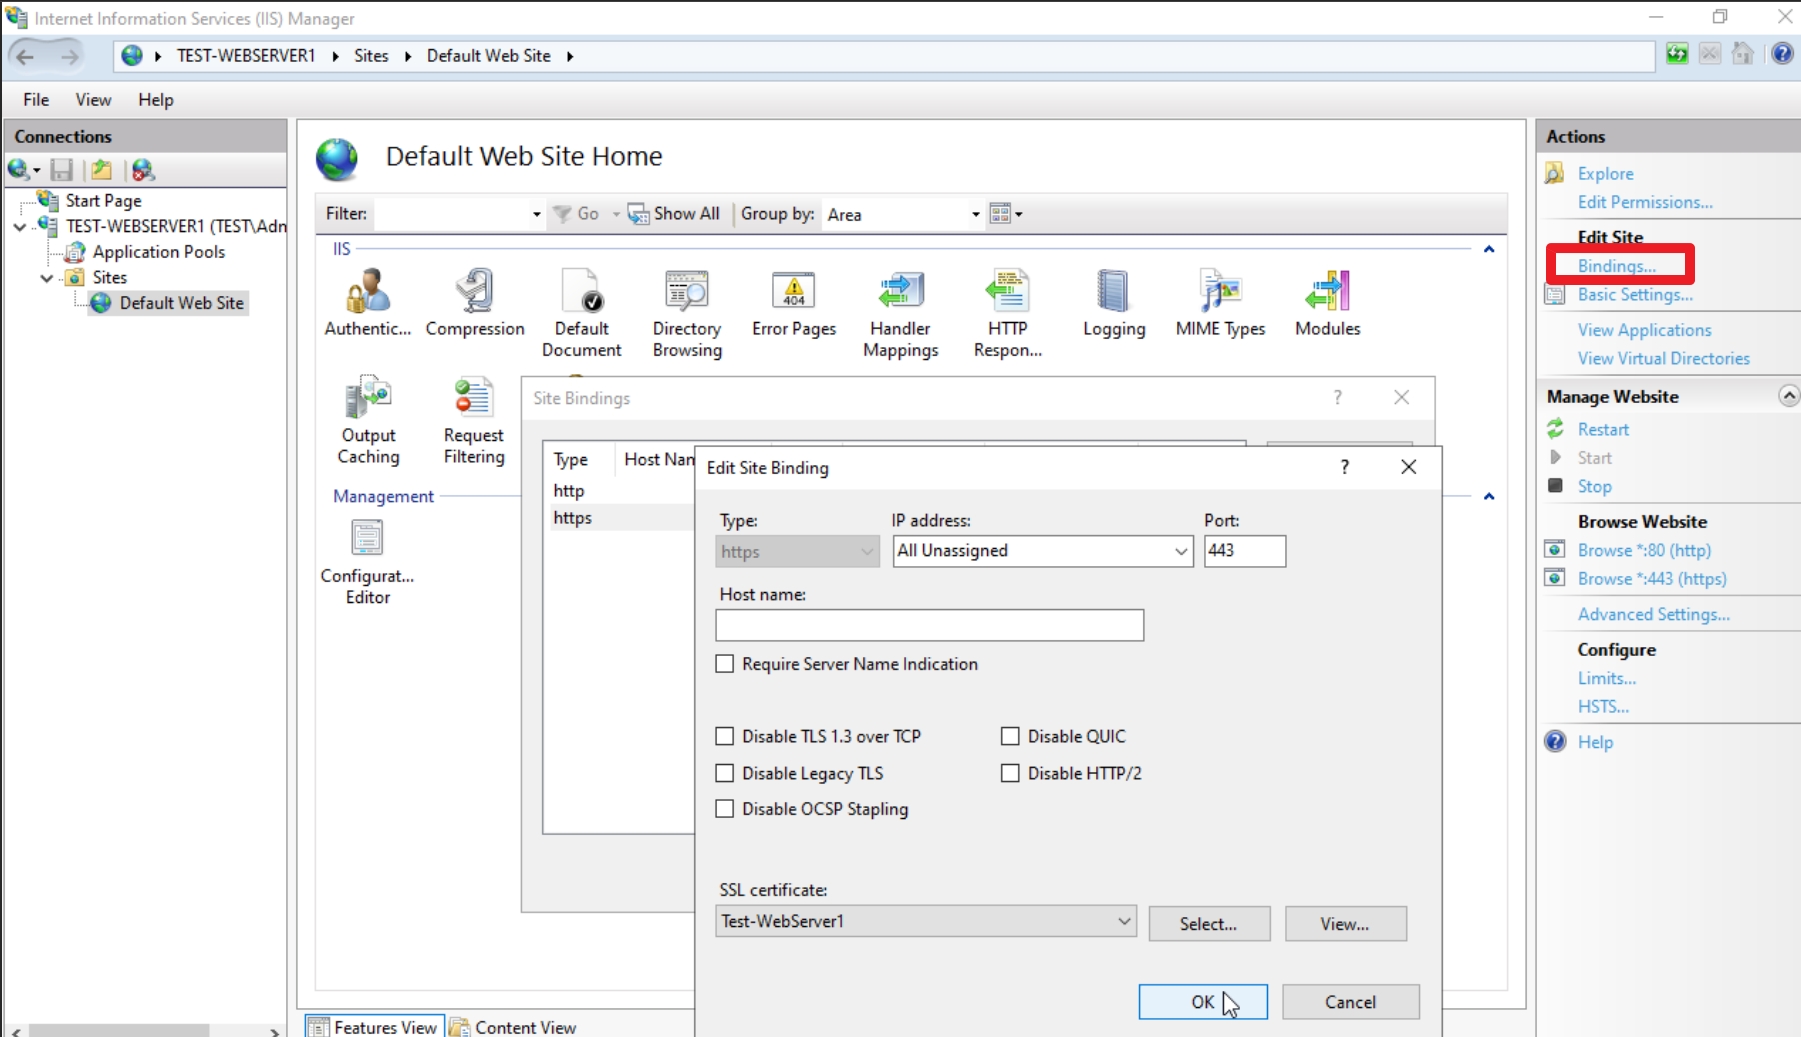
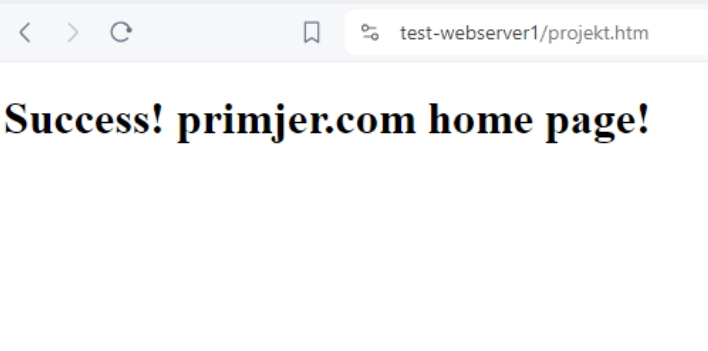
IF we now type in https://test-webserver1.test.local/projekt.htm we will get https site without errors.
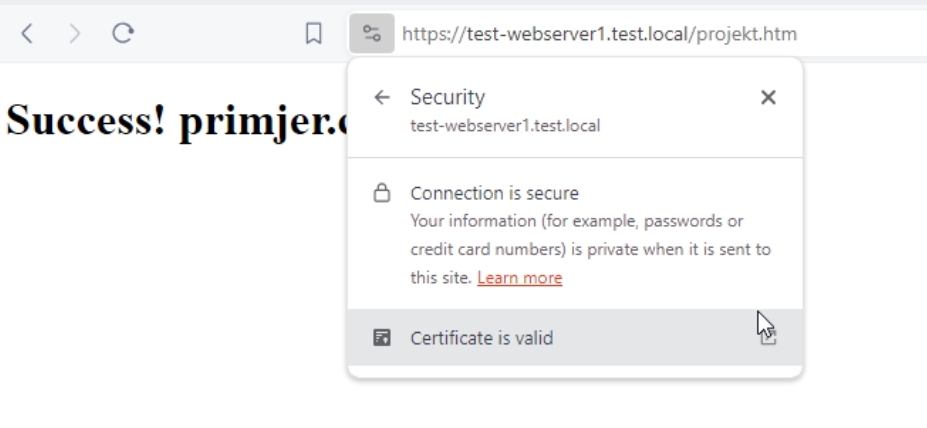
I tried from Windows Client machine inside domain with three browsers – Edge, Brave and Firefox, all accepted website without certificate errors

Ok, success for IIS. If you have Ubuntu client machines in domain, chances are you will get certificate errors – CA chain will be missing – but that is a story for some other time.
Creating Certificate for Apache Linux Web Server
I wont be covering whole Apache install procedure, I done it a couple of times on the blog.
Here is how to install LAMP Stack on Ubuntu – https://www.informaticar.net/install-lamp-stack-on-ubuntu-server-20-04/
Here is how to enable SSL for Ubuntu – https://www.informaticar.net/enable-https-on-ubuntu-web-server-20-04/
Here you will find configuration file for HTTPS for Apache – https://www.informaticar.net/enable-https-on-ubuntu-web-server-20-04/
and here you will find how to create certificate request on Ubuntu – https://www.informaticar.net/how-to-renew-certificate-on-ubuntu/
Remember – copying certificates and request back and forth like I’m doing it here, isn’t safe for production environment, use safe method that will keep integrity of your environment.
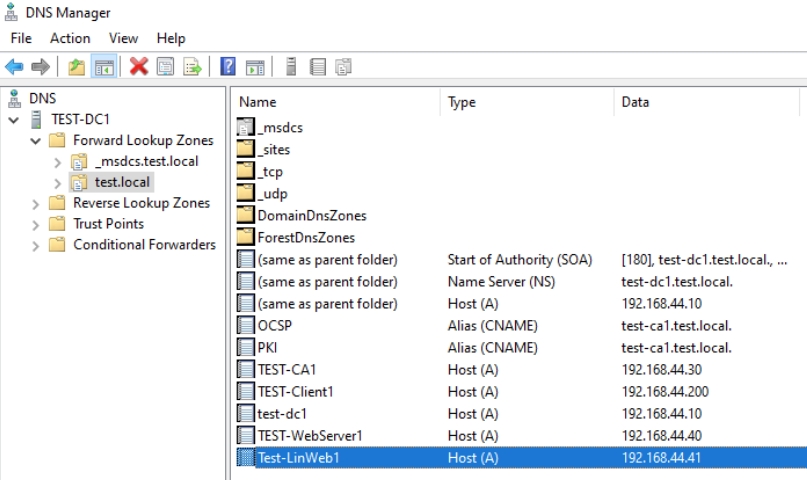
I added my Ubuntu Test-LinWeb1 machine to domain, I also checked on domain controller if DNS entry exists for that machine – it didn’t, so I added A record
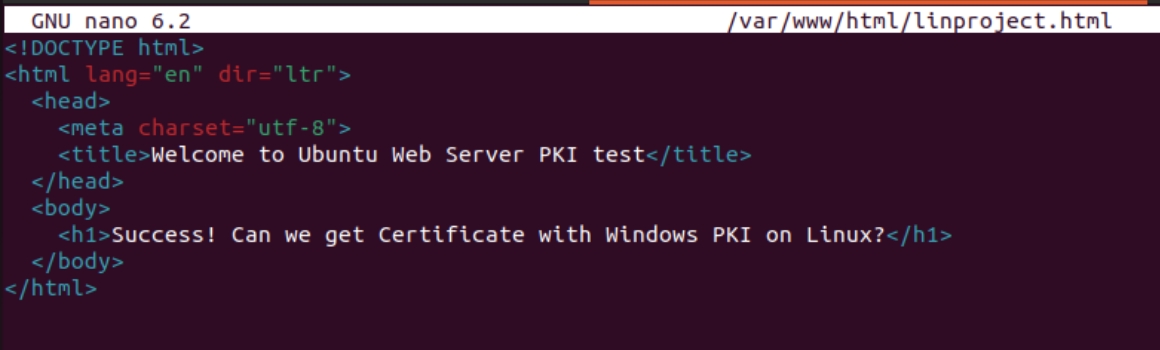
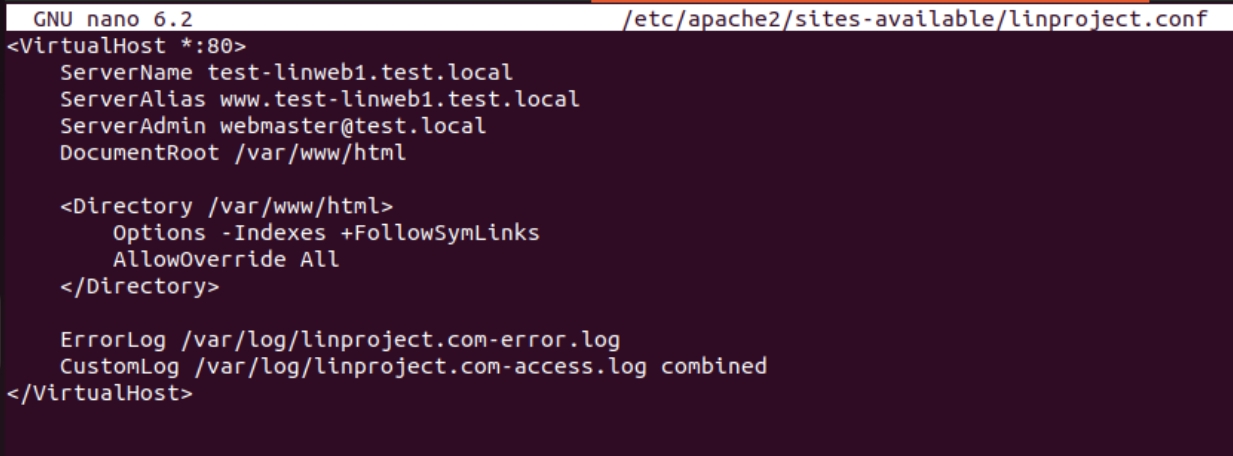
I installed Apache, created simple linproject.html file inside /var/www/html directory
I also created simple config file inside Apache that will make this site work via http
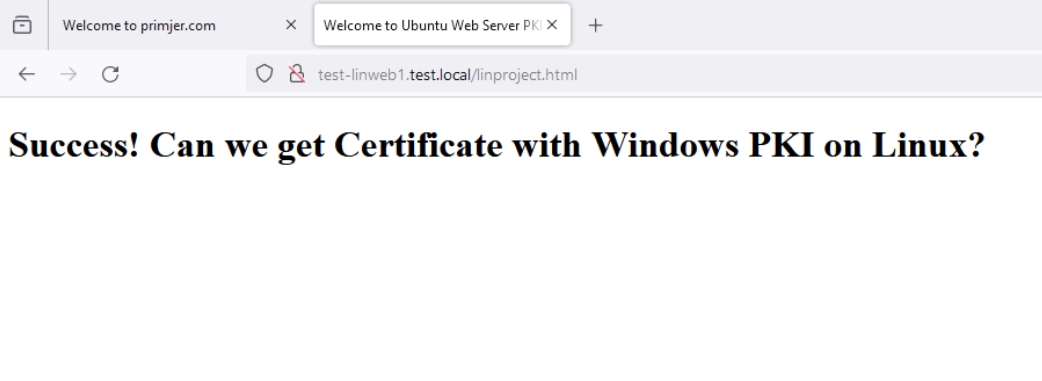
Site is accessible on Windows Clients in test.local domain via http. So, far, so good.
Ok, let’s create certificate for our Linux Web Server.
Method through Web Enrollment won’t work anymore for Web Servers, so we will apply another method.
On our Ubuntu server we first need to edit openssl.cnf file
sudo nano /etc/ssl/openssl.cnf
Couple interesting points – first we need to uncomment – req_extensions = v3_req
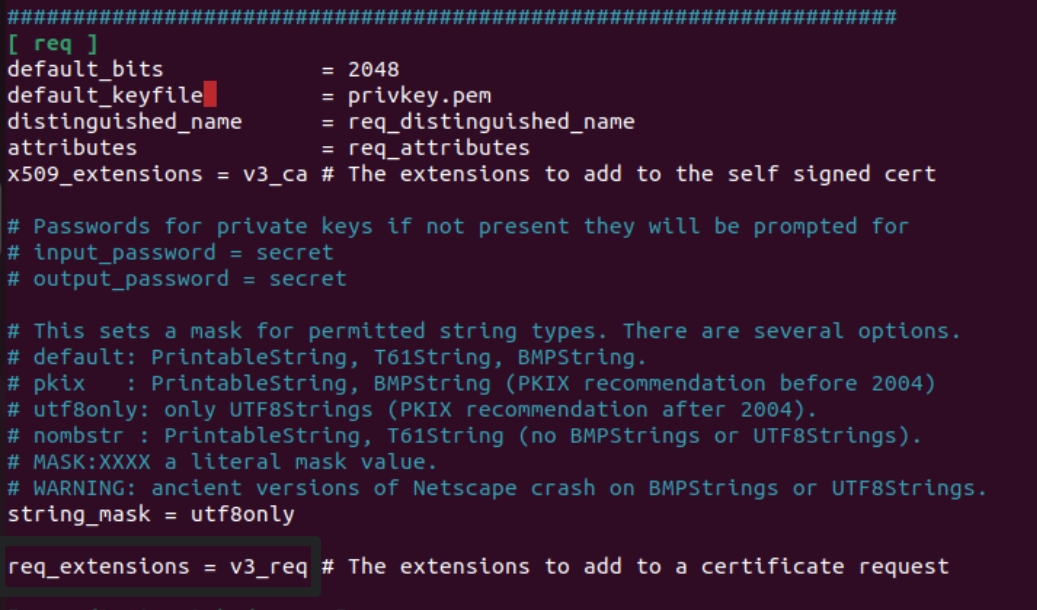
Next, we need to add under [ v3_req ] section following line
subjectAltName = @alt_names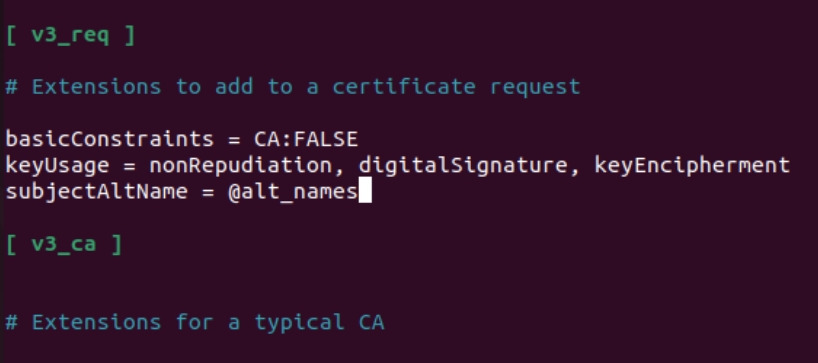
At the bottom of the file we will add [ alt_names ] section and make it look like this (please change my names to the ones of your server, also change the IP addresses). You can add as many values as you like in this section. This part is extremely important, missing alternative names will result in SAN errors in browsers
[ alt_names ]
DNS.1 = test-linweb1.test.local
DNS.2 = test-linweb1
IP.1 = 192.168.44.41
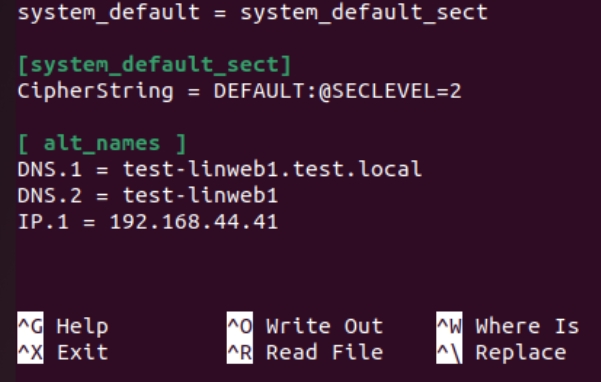
Save and exit.
Now, we will finally create our certificate request
openssl req -newkey rsa:4096 -nodes -keyout YOURDOMAINNAME.key -out YOURDOMAINNAME.csrThis is how it looks in my case. You will be asked for a few details, common name being most important, I entered FQDN of my linux machine and domain.
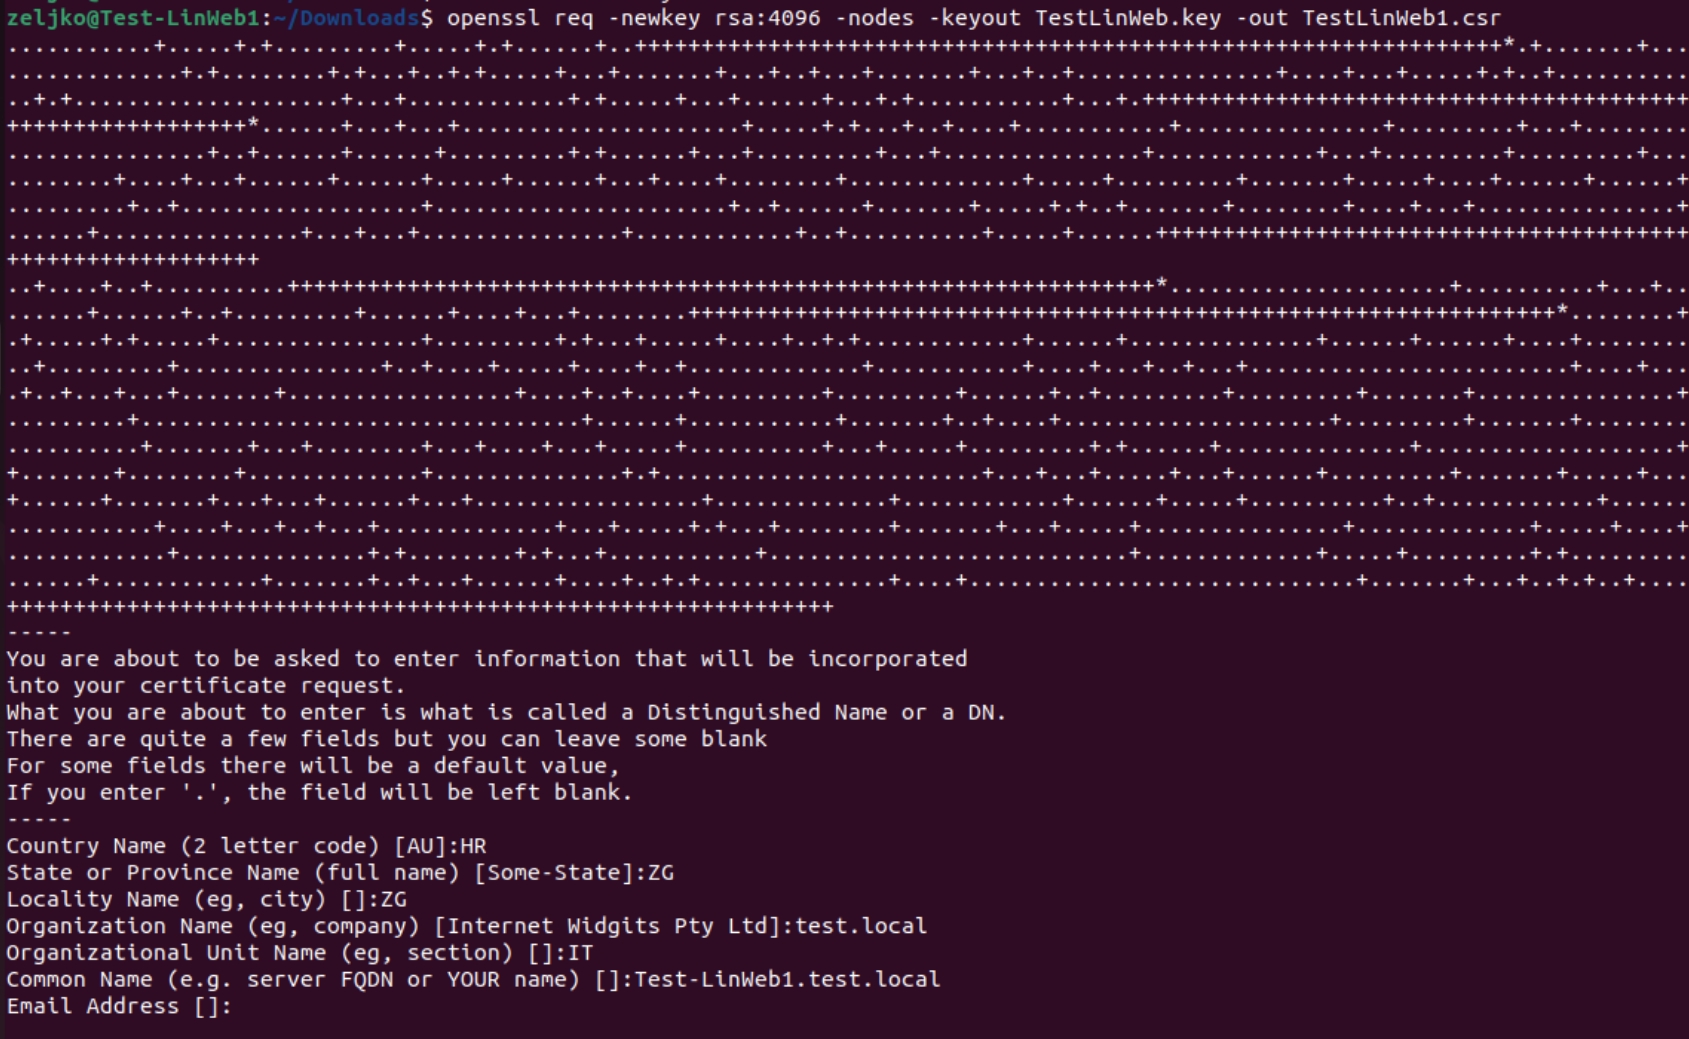
My TestLinWeb.key and TestLinWeb1.csr is saved inside Downloads folder on my Linux machine. Don’t copy .key file anywhere!!! Take TestLinWeb1.csr and copy it to you CA or some other Windows machine.
On that Windows machine – I copied it to my CA1 server, start cmd as admin and type in following
certreq -submit -attrib "CertificateTemplate:WebServer.test.local"You need your Web Server Template (we created it in earlier part of PKI series).

If you don’t know how you named your template you can start powershell as admin on your CA1 and type in following – you will get template you need for command we type in above this.
Get-CATemplate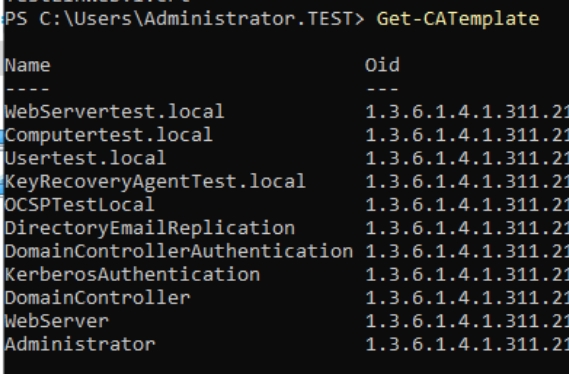
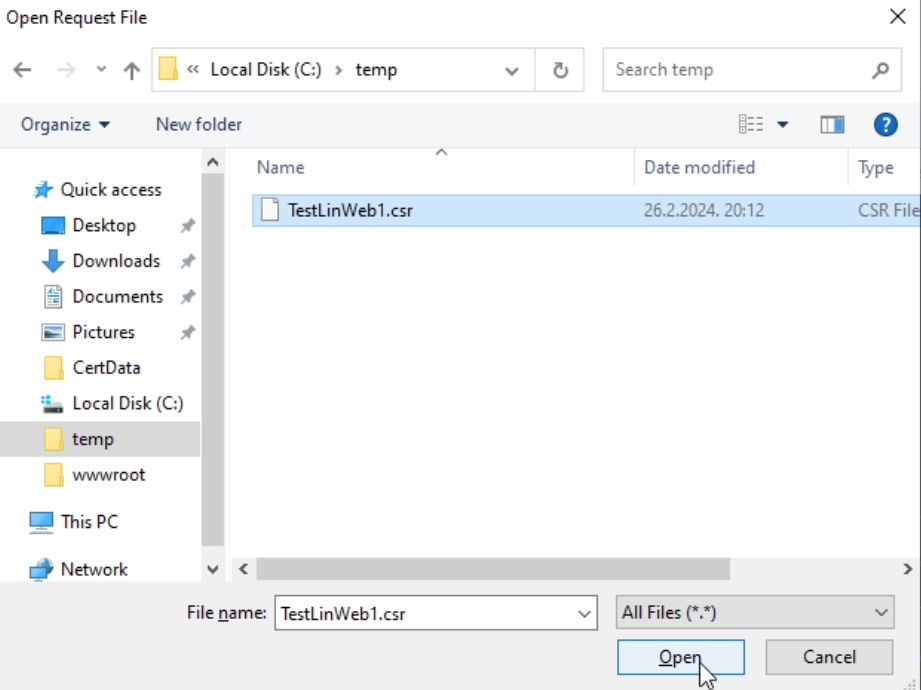
After you execute certreq command, you will first be asked for your csr file. I copied it from Ubuntu to C:\temp on my CA1. Select it
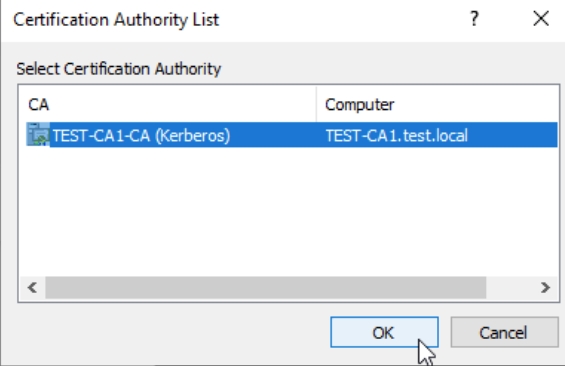
Next, you will confirm your CA in pop-up
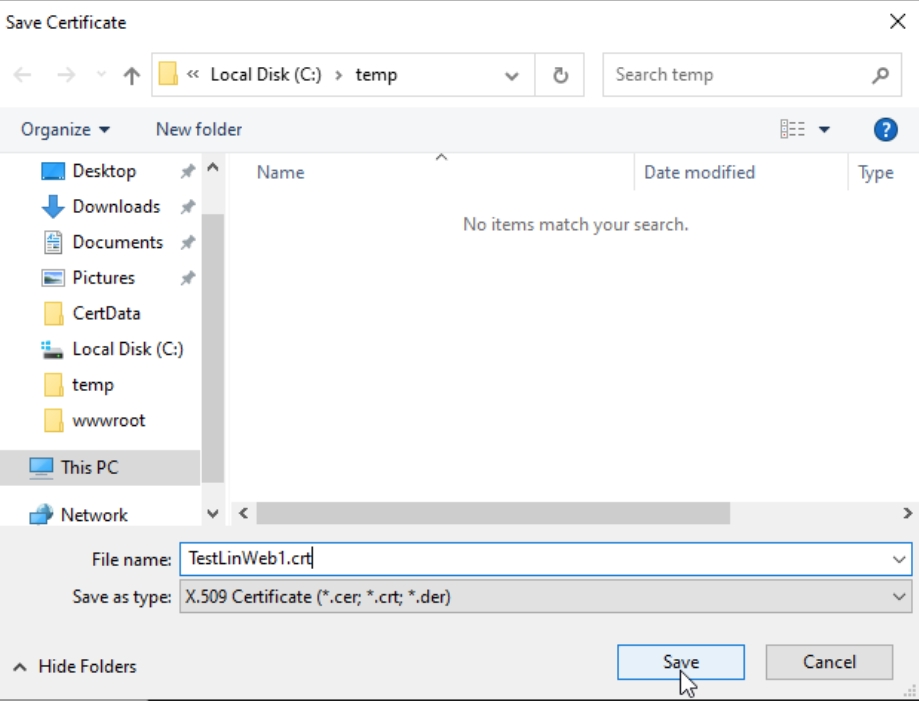
And in the last step you will need to save certificate you got as a response from CA1. I saved it as TestLinWeb1.crt.
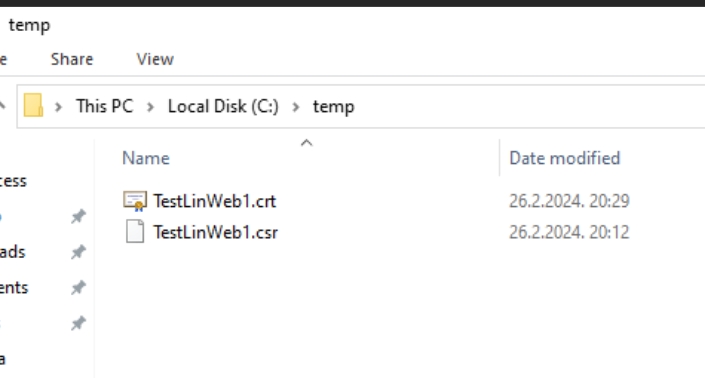
Now, I got my request and response cert in temp folder. We need to copy crt back to Linux
We will now copy .crt back to our Linux Web Server. Open Powershell and type in following
scp C:\locationofcrtfile username@linuxmachinename:/directoryonlinuxwhereyouwishtocopyYou can see how that looks in my example.

Now, let’s finish up on our Linux machine
To see how I enabled HTTPS and where I got my HTTPS .conf file for our Apache on Ubuntu you can follow that guide here
We will now copy .key file to /etc/ssl/private and .crt to /etc/ssl/certs directory

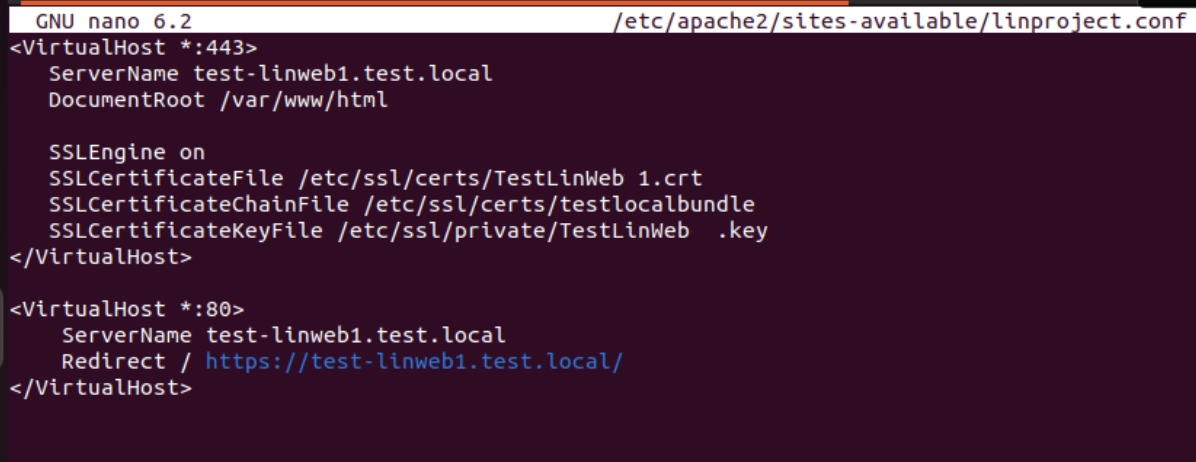
We will now edit our Apache configuration for web I created – We will configure it as HTTPS with HTTP redirection
sudo nano /etc/apache2/sites-available/yoursitename.conf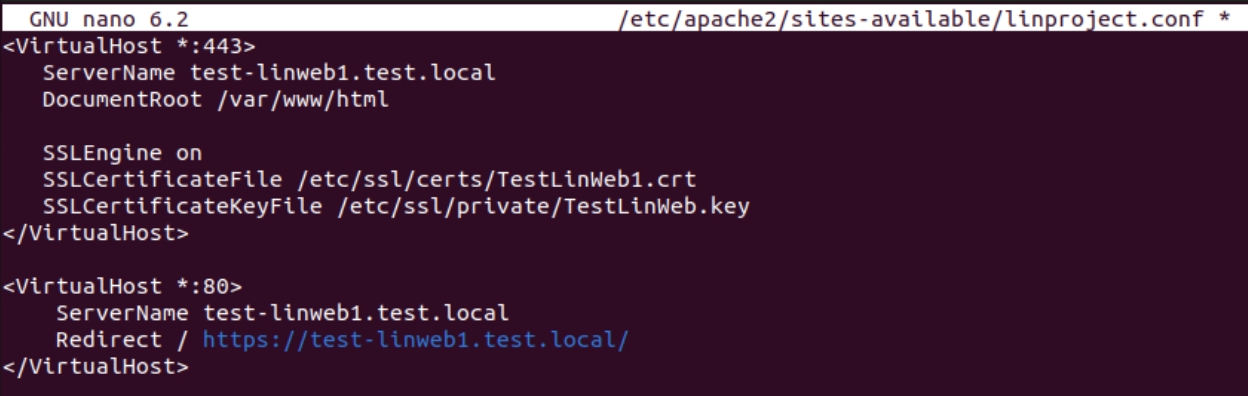
In that file specify locations of key and crt files
After you save that file you will need to do a couple of steps on Apache (sudo a2ensite, sudo apache2ctl configtest, sudo systemctl reload apache2 are commands you need) – follow that guide here
Before we leave – go to your web enroll website (usually at certsrv) – select Download a CA Certificate… Select Base 64 and download CA certificate chain
You can do that on Windows machine and copy certnew.p7b to Linux, or you can open this web directly on Linux.
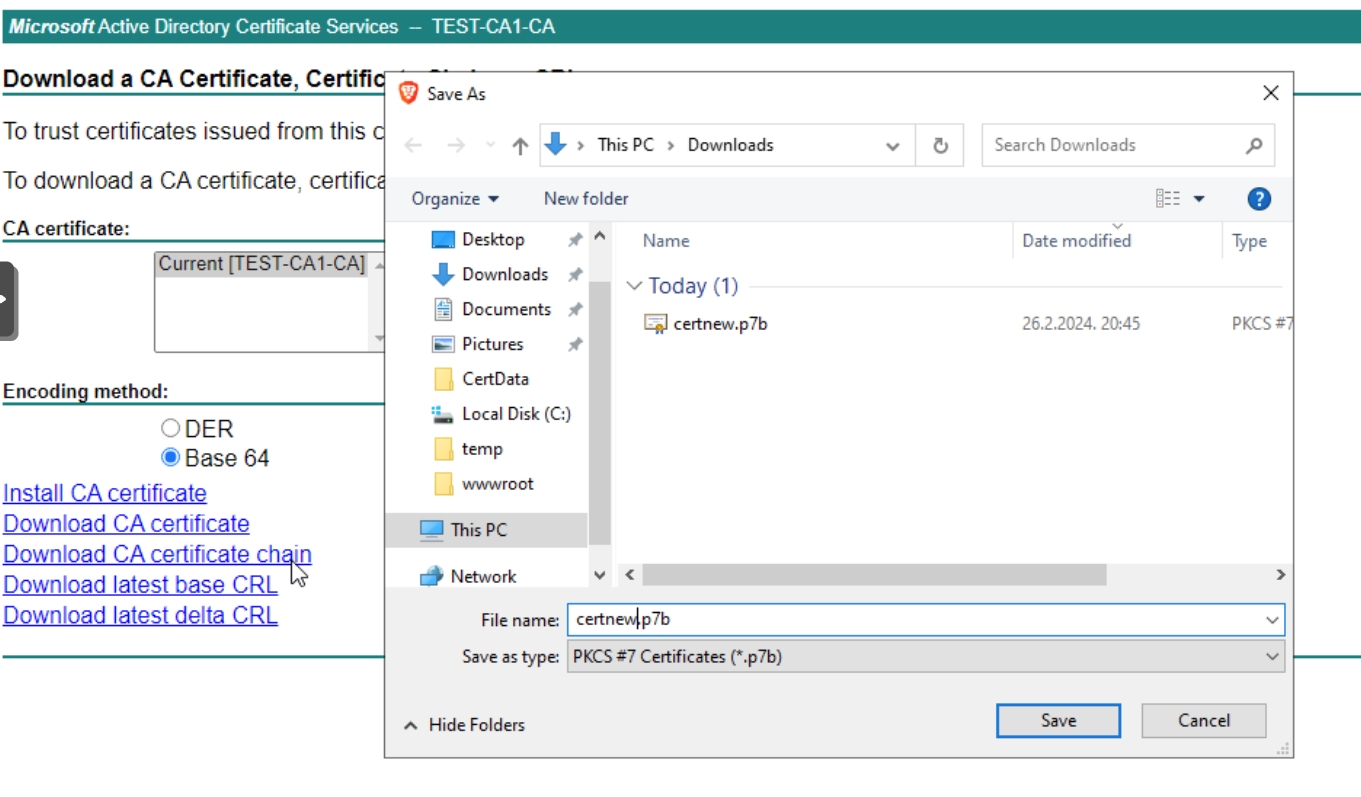
We will now convert .p7b to our bundle file
openssl pkcs7 -print_certs -in certnew.p7b -out nameyourcertbundle
We will now copy converted chain to /etc/ssl/certs and then again edit our Apache website configuration

We will add another line SSLCertificateChainFile and specify location of our certificate chain file.
Save and run sudo apache2ctl configtest, sudo systemctl reload apache2 … commands
Ok, finally moment of truth, will our certificates work in browser, without errors. I tried on Windows Client machine through Brave and Firefox… Everything works without errors
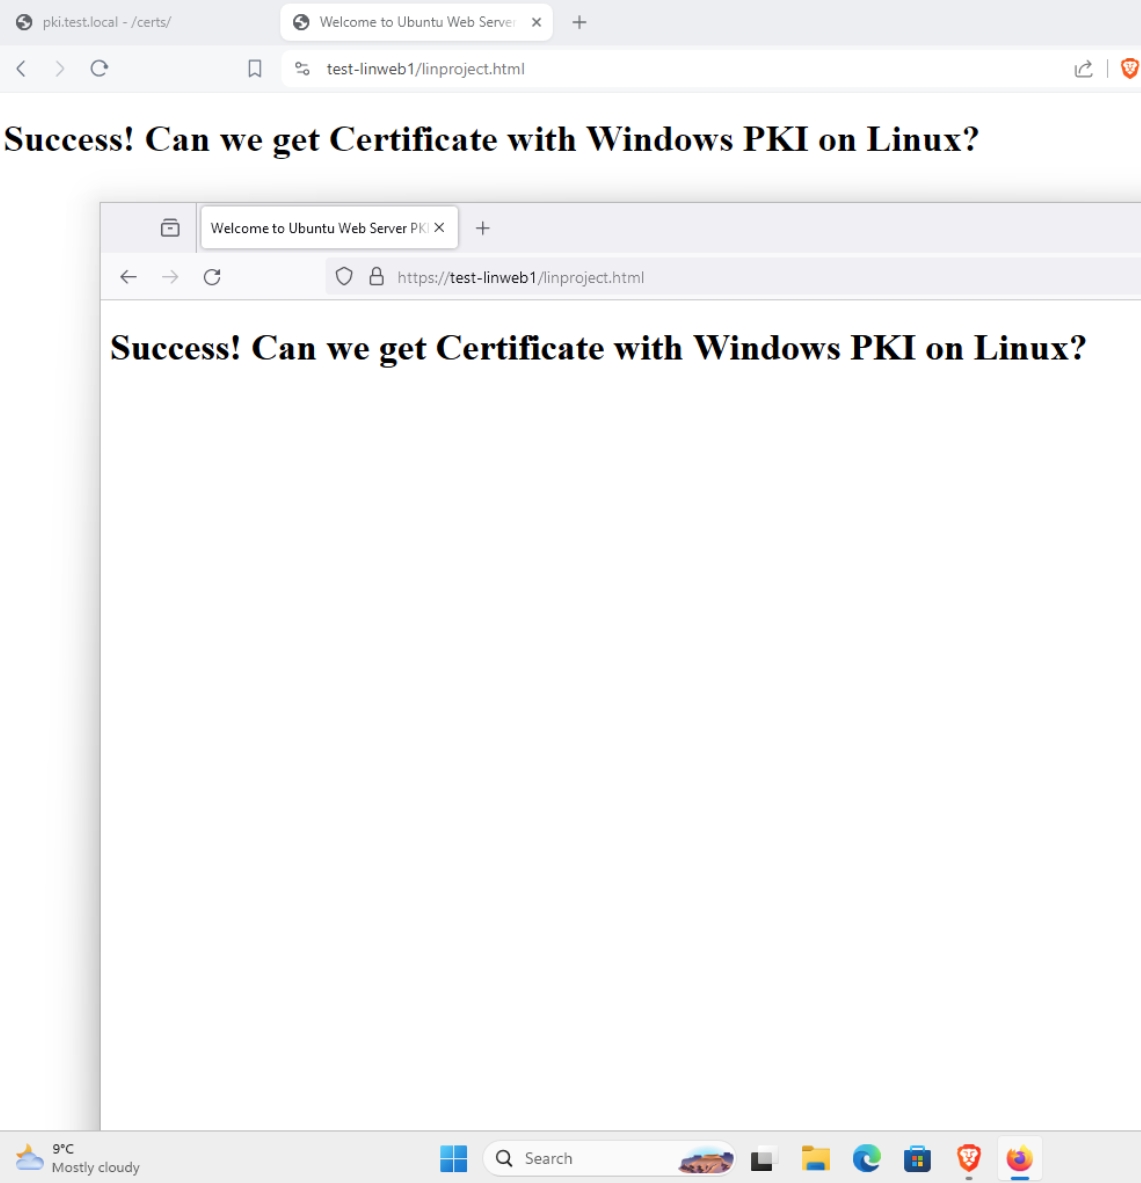
In Linux, if you try this web you will get errors, because of the certificate chain and browsers… I will eventually add how to resolve these problems on Linux to this guide.