We already went through installation, configuration, limits and antispam for Exchange Server 2019. In this guide we are going to cover clustering for Exchange Server 2019. We are going to setup two node DAG – simple and functioning.
Before we begin
A quick note about DAG (Data Availability Group) – DAG replicates databases in real time, I haven’t done production setup without DAG so far. It is ok to have one Exchange Server for testing purposes, maybe your own little Exchange learning project, but if you are deploying Exchange in production environment, I would say DAG is a must have.
It will make you life so much easier and maintenance task seamless. I often do CU updates, and DAG can be life saver in those situations if CU upgrade goes wrong.
Lab Setup
Before we go into configuration, I will explain my setup. I did a whole series on Exchange, and if you followed it, you are familiar with setup, but if you are not, here are the specs. Everything I’m going to specify below is on Windows Server 2019 with latest patches (March 2021). Exchange Servers are Exchange 2019 CU9.
Both SBEX1 and SBEx3 have Exchange installations in place. SBEx1 is configured and operational with database named DB1.
SBEx3 is only installed with default database in place (we will not replicate that one) and no configuration.
Network specs and naming
Domain name is: informatiker.local
Domain controller is on 10.0.0.31
I have one edge role which handles incoming/outgoing email traffic. Edge role server is named “edge” and is inside DMZ in separate network. Edge role is not mandatory, and you can disregard this information if you don’t have it. It does not affect this guide.
Exchange Edge role server “edge” – 192.168.50.3
We are going to need “witness” for our DAG. Witness will make sure there is a quorum when one member of DAG goes down.
Witness machine – ExWitness – 10.0.0.38
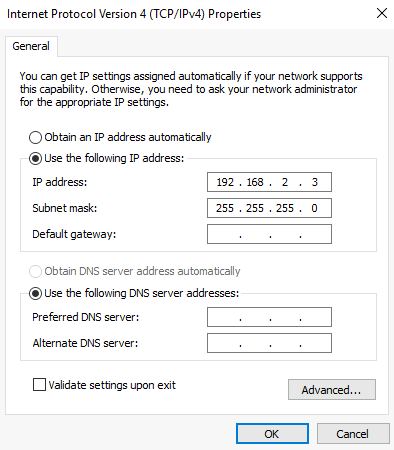
We are going to create DAG server between two mailbox servers I have in that lab. They are named SBEx1 and SBEx3. I gave two network cards to both server – 10.0.0.x is production LAN, and 192.168.2.x will serve as internal network between Ex1 and Ex3 for DAG replication.
Exchange Mailbox role server “SBEx1” – 10.0.0.36/24
SBEx1 Replication Network – 192.168.2.2/24
Exchange Mailbox role server “SBEx3” – 10.0.0.37/24
SBEx3 Replication Network – 192.168.2.3/24
On both network adapters I turned off IPv6 and on replication network, besides IP and network mask there are no other data.
DAG that we will create will be named DAG01 – 10.0.0.39/24
Replication Network Settings (shown on SBEx3):
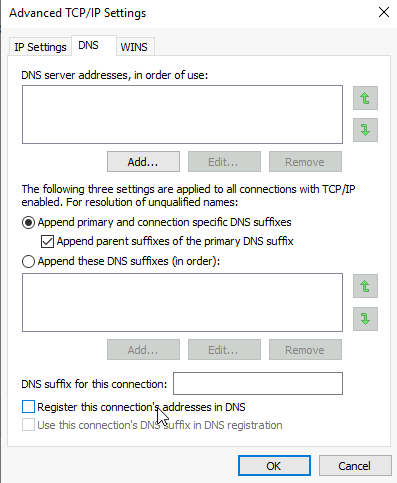
Click on Advanced Settings | On DNS tab unmark “Register this connection’s addresses in DNS”.
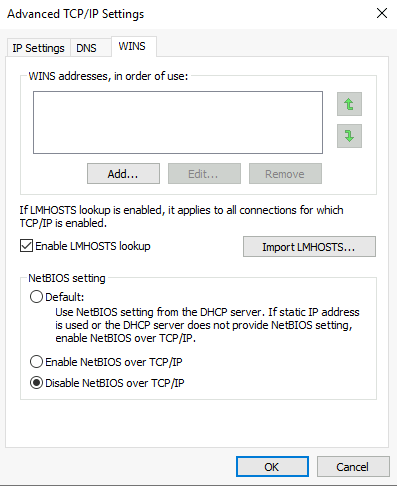
On WINS tab I usually Disable NetBIOS over TCP/IP
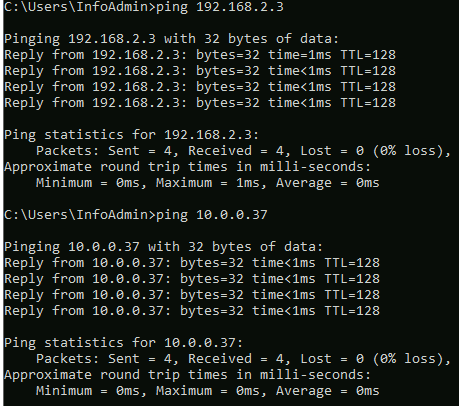
When you are done, try pinging both interfaces (10.0.0.x and 192.168.2.x) from both servers. It should work (check if you have ping enabled through firewall).
I also like to uncheck File and Printer Sharing for Microsoft Networks and Client for Microsoft Networks on my Replication cards, but that one is really optional, I see it more as an extra security precaution.
DAG Witness Settings
Ok, so you need one extra machine for the DAG “witness”. I does not have to be separate, dedicated installation just for the purpose of the DAG, it can be any machine in your network. Most important thing would be that this machine is available when one of the Exchange machines is DAG. That way you ensure that your DAG is functioning. In case one of your Exchange nodes is down and witness is down – your Exchange will not function. Have that in mind.
You need to make sure that witness server and at least one Exchange node are always up for this to work.
Ideally, witness machine should reside on separate hardware from these two machines.
In this scenario I have dedicated machine for DAG witness and it is called ExWitness (it is in domain) with installed Windows Server 2019.
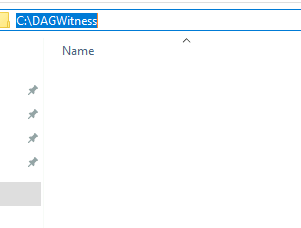
In C:\ I’m going to create folder named DAGWitness.
So, folder C:\DAGWitness
I shared that folder and added DAG01 computer (object we will create later, you will need to come back and do this step when you hve DAG01 created) full rights to that file share. You will be warned that the object is disabled, but just proceed. Also, don’t be alarmed if this folder disappears after you add it to DAG.

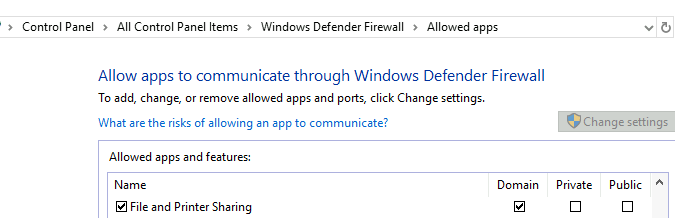
Make sure File and Printer Sharing is enabled on your Windows Firewall on Witness machine
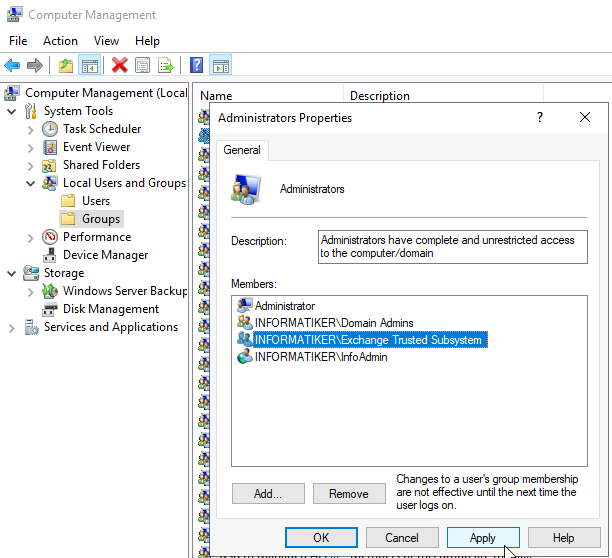
Also, on your Witness machine local Administrators group needs to have right to Exchange Trusted Subsystem. In case you are doing witness thing on your Active Directory machine, add Exchange Trusted Subsystem to Builtin/Administrators group.
Disk\Database setup on Exchange DAG members (SBEx1, SBEx3)
Disk setup should be the same on both members (in terms of Database and Logs location and drive letters.)
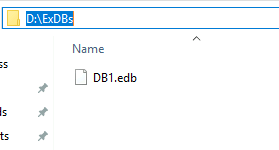
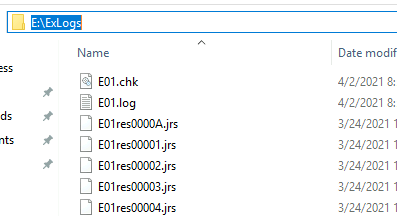
I created D:\ExDBs on both machines for database
and E:\ExLogs for logs on both machine
Database I wish to put to DAG (DB1) is currently residing on SBEx1, SBEx3 machine is empty and waiting for replication.
Active Directory setup
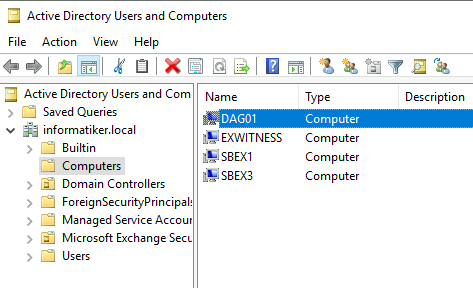
One more thing we need to prepare before we start – in Active Directory I will create new computer object and name it DAG01
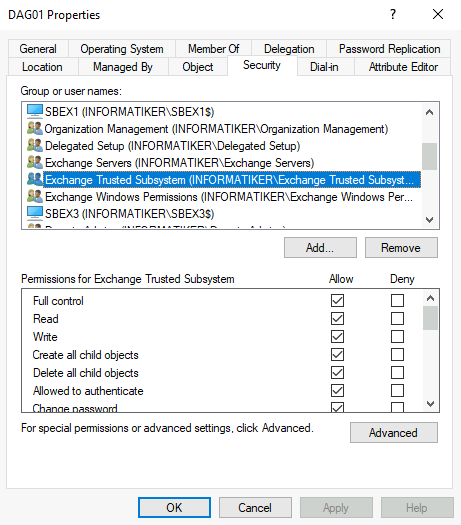
Full control of DAG01 computer should have Exchange Trusted Subsystem, SBEx1 and SBEx3
Be sure to go to view in Active Directory Users and Computers and select Advanced Features before you proceed.
Right click on created DAG01 computer object and select Properties
Under Security tab (you won’t see it if you haven’t enabled Advanced Features in ADUC) make sure that Exchange Trusted Subsystem has Full control, also add SBEx1 and SBEx3 (change these to your exchange names) have full control.
By default when you click on add, you will not be able to find your exchange servers, so make sure that under object types in search, you add computers, then you will be able to find your servers.
Apply, OK.
Now, after you done this – Disable DAG01 account.
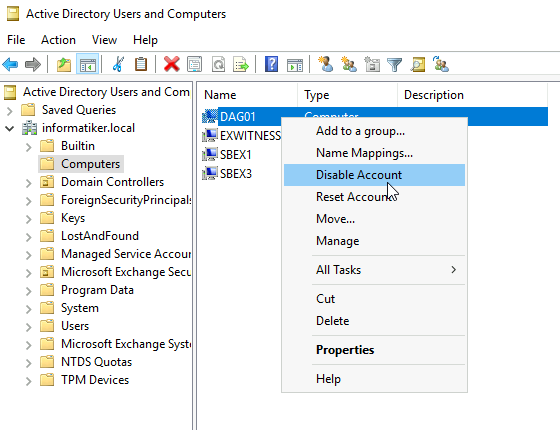
Yes, you heard well – disable it.
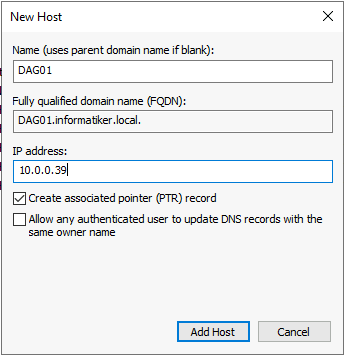
Also, add A record to your internal domain DNS with name DAG01 and IP address of 10.0.0.39 (change to IP settings of your DAG)
We are ready to create our DAG now.
DAG creation
I will initiate this process for SBEx1 where DB1 is active. We want to put DB1 to DAG so that it replicates between SBEx1 and SBEx3.
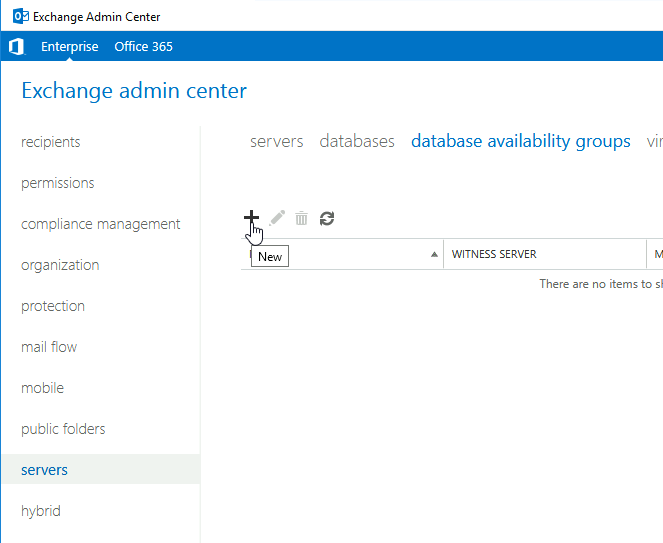
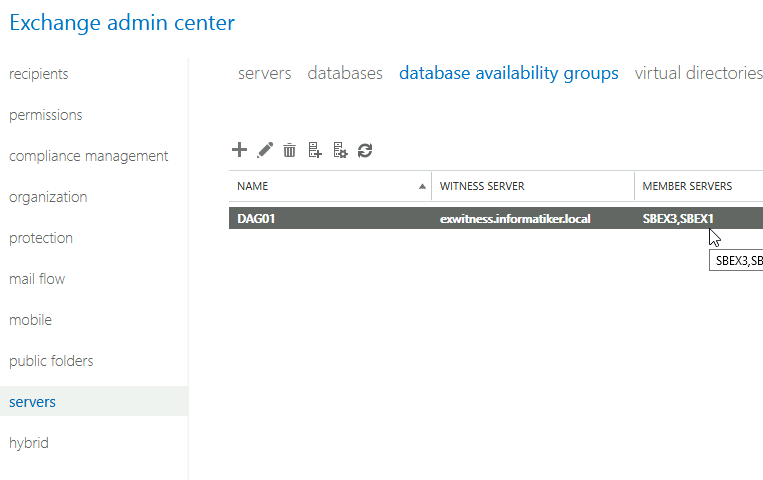
Login to Exchange admin center, select servers menu and click on database availability groups tab – click on plus (+) to add new DAG
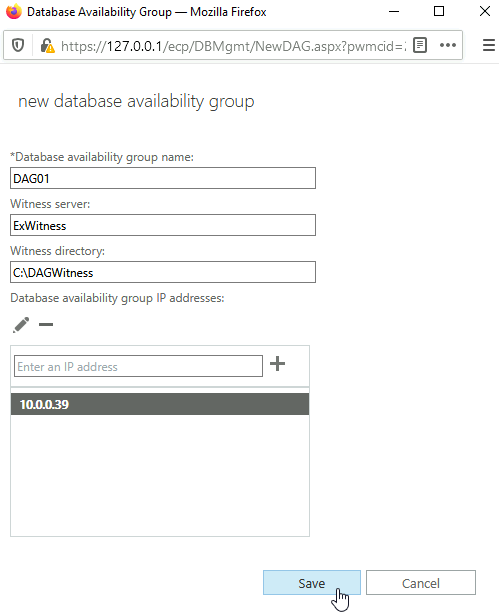
Now, we need to specify some details
We decided that our database availability group name will be DAG01, witness server is machine named ExWitness, and witness directory is C:\DAGWitness (do not enter network path in here). DAG IP address is 10.0.0.39
Save
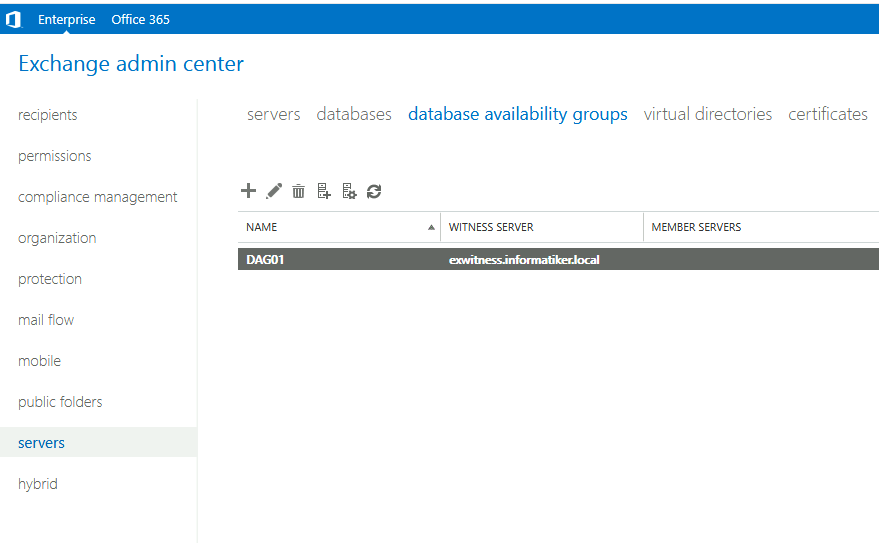
DAG is created, but we have no servers in it.
You can also check logs to see if everything went well.
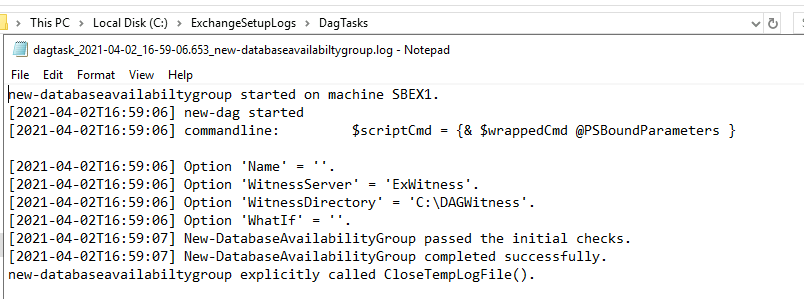
In case something is wrong, you may have lines like this in your log

You will probably get a pop-up with error in process of DAG creation, make sure you investigate and make everyhing right before you proceed.
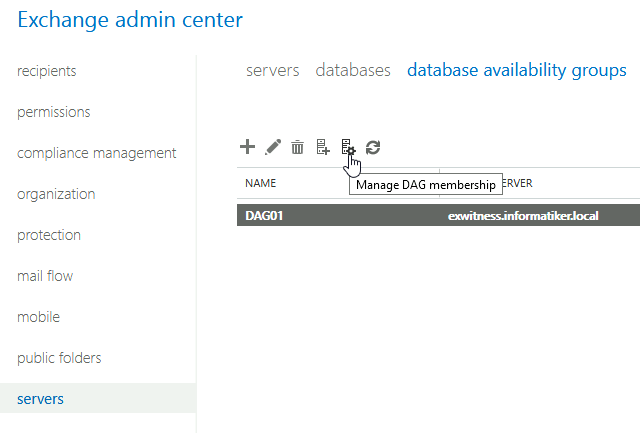
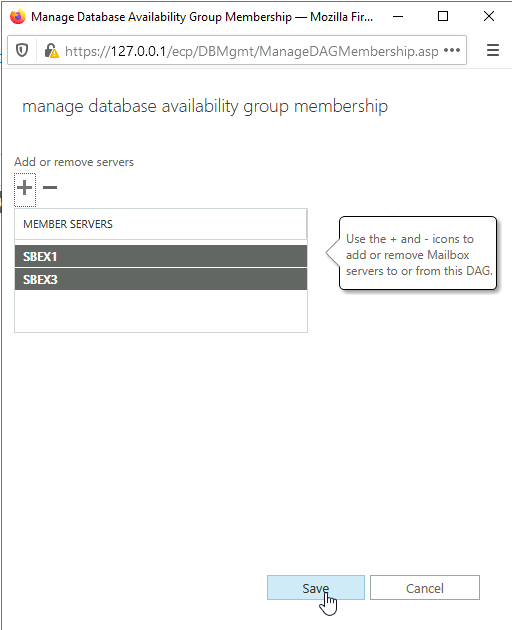
Add Servers to DAG
We now need to add Exchange servers to our DAG. I will add SBEx1 that is hosting database I wish to replicate, and SBEx3 to which I’m going to replicate database.
We are staying in same place, just click on Manage DAG membership (little server icon with cogwheel).
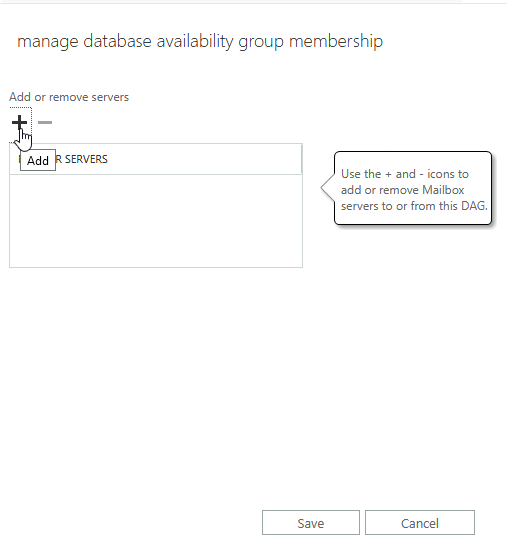
Click on Add
Select both servers to add and click OK
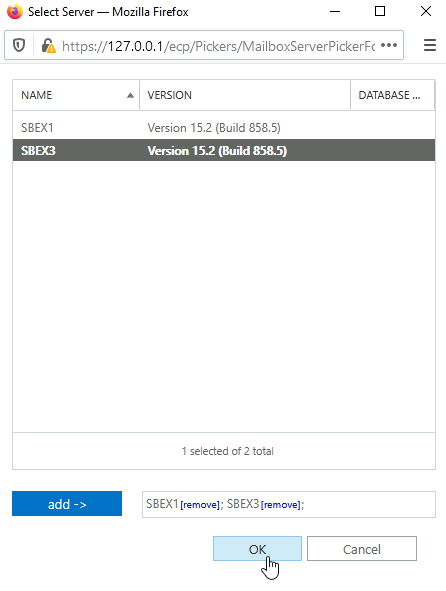
Both servers are added | Save
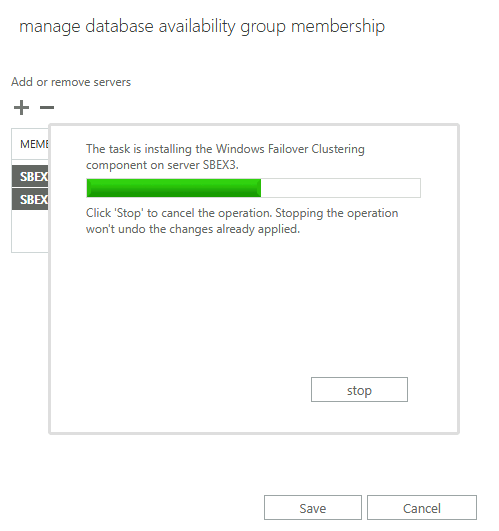
This will take some time…
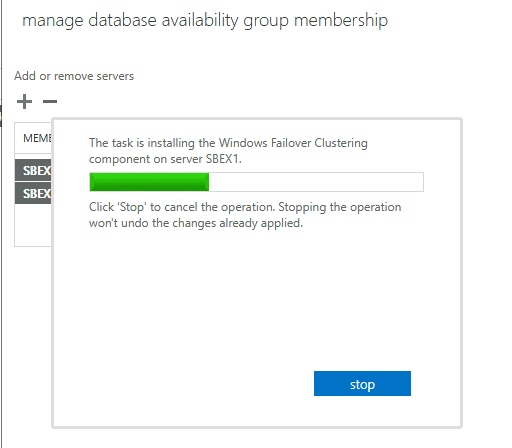
…
I got some errors…
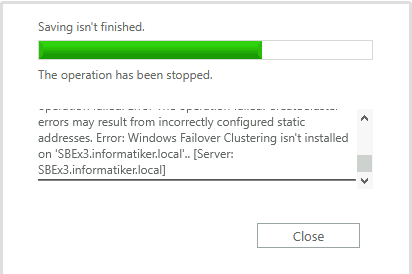
Details are in the log, you can find it in the same path as previous log I mentioned before.
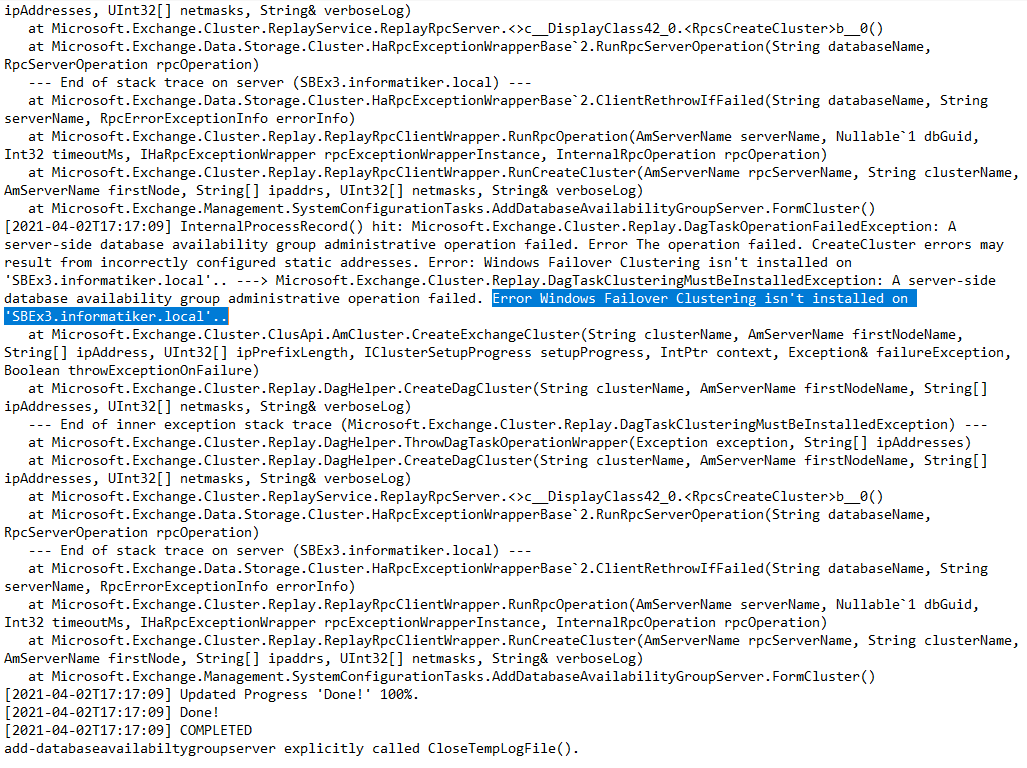
It looks like problem is that Failover Clustering is not installed on SBEx1 and SBEx3 (I got error on both nodes). Although, install procedure said that it was installing Failover Clustering on SBEx1 and SBEx3 (shown in the screenshots above).
I assume that the “error” was simply that the Failover Cluster role was installed on both servers and that servers need restart. I see Failover Cluster installed on both servers.
After I rebooted SBEx1 and SBEx3 server, I see that they are configuring new features.
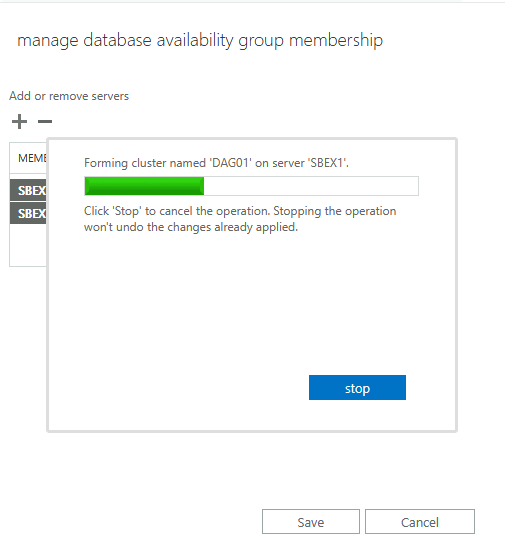
After restart on both servers was done – I started server adding procedure to DAG again. This time we got to the forming cluster named DAG01 part.
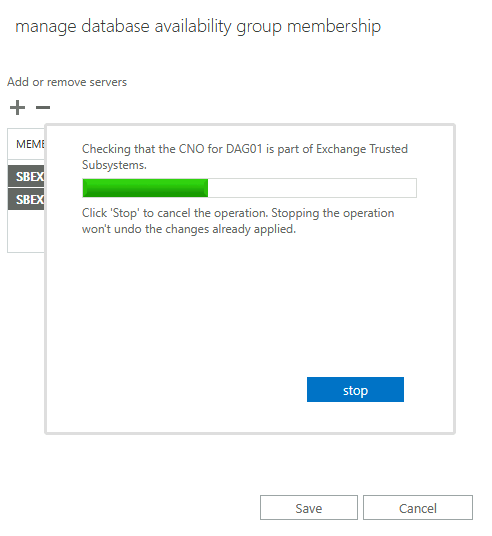
And adding server to DAG01

and checking if we added DAG01 Exchange Trusted Subsystems rights.
And we are done, this time everything is fine.
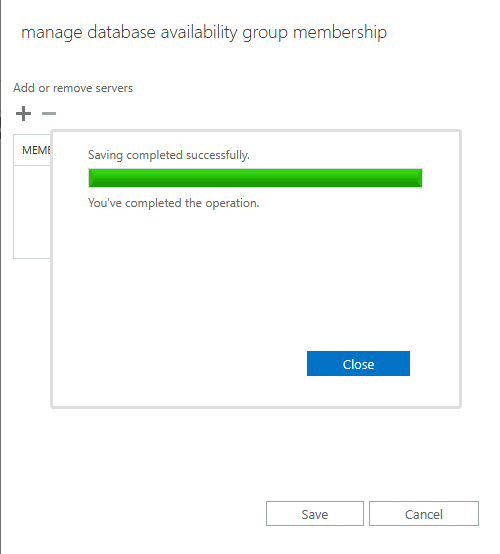
So, in reality “error” we got was just Exchange asking us to reboot after it have installed Failover Clustering role.
Now we can see SBEx1 and SBEx3
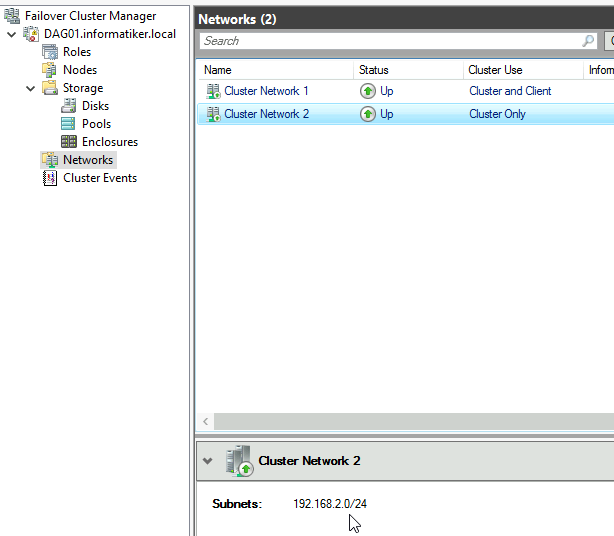
If you type in “Failover Cluster Manager” into search on Windows Server installation on which Exchange is residing on, you will be able to see how it is set.

Also, cluster networking is set just how I planned.
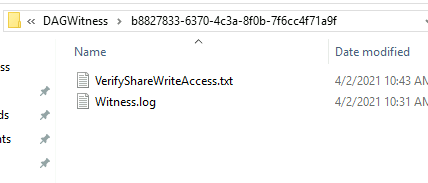
Before we go any further, go to your Witness machine and make sure that inside DAGWitness folder there is another folder with random numbers, letters and inside it there are some files.
This means that both nodes can write to it
Before we go further we will also check in Exchange Management Shell on SBEx1 to see if our networks are correctly defined inside Exchange (they should be according to Cluster Manager)
Get-DatabaseAvailabilityGroupNetwork DAG01 | Format-List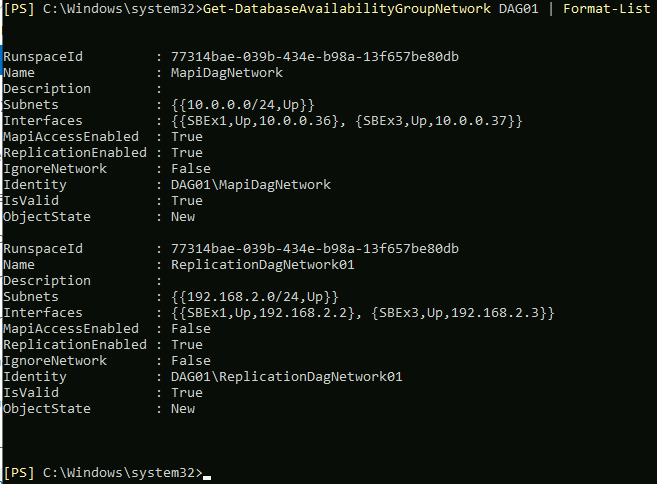
Ok, my Exchange network is defined correctly.
We can now proceed to next step.
Place database in DAG
Ok, final piece of the puzzle. We are going to replicate DB1 from SBEx1 to SBEx3.
On SBEx1 I’m going to servers menu, and then to databases tab.
On databases tab select DB1 and click on more (…) and select Add database copy
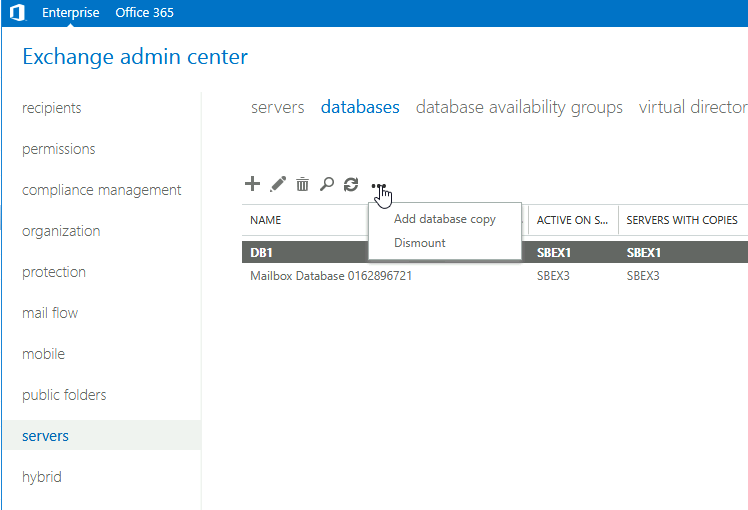
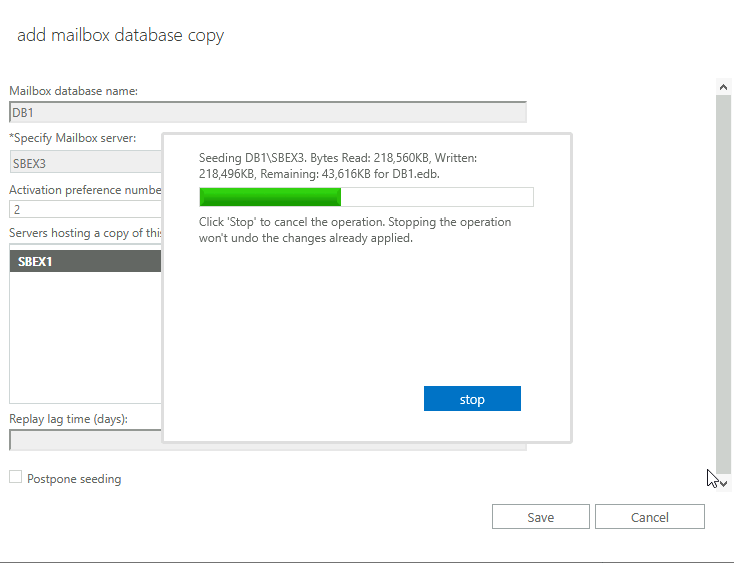
I will click on browse and select SBEx3. After that I’m going to click on Save

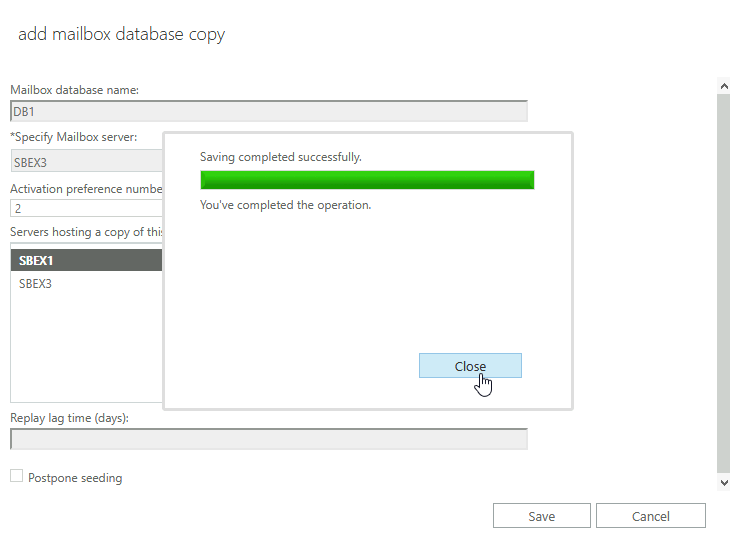
Seeding of the DB started
And process is success!!
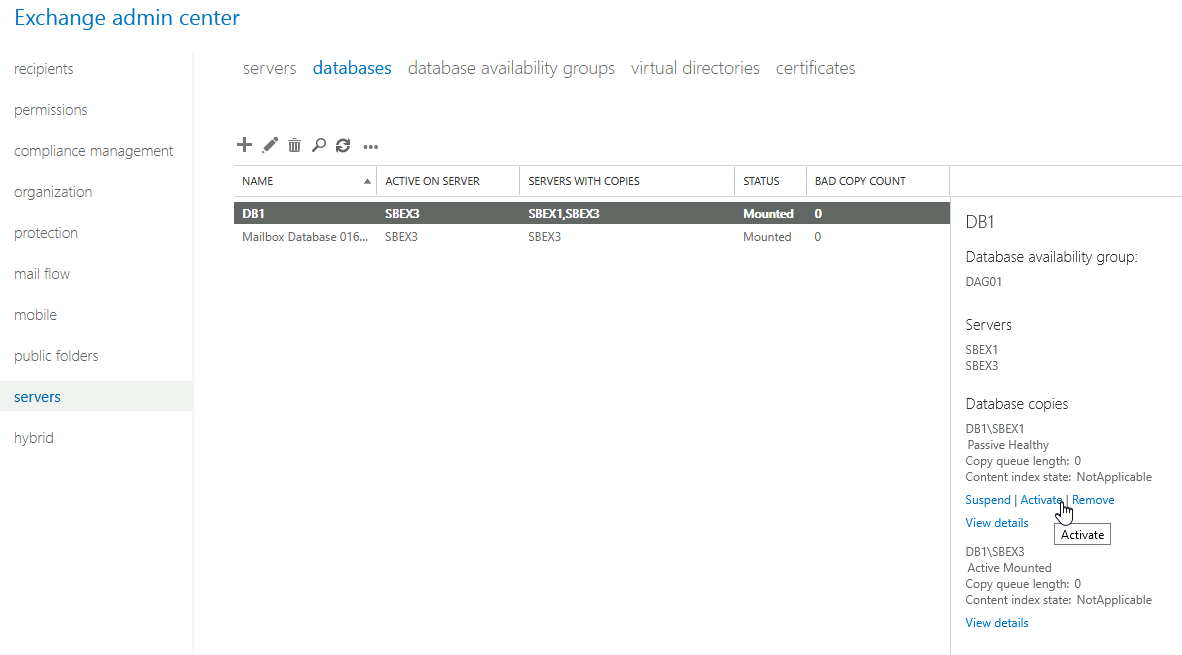
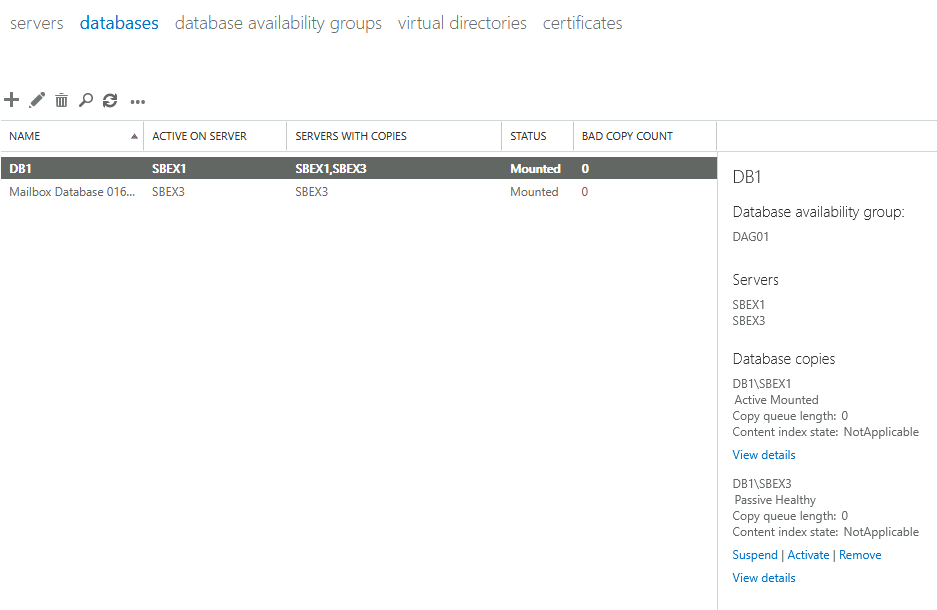
Ok, now we can see that DB1 is part of the DAG01 and has two servers available SBEx1 and SBEx3
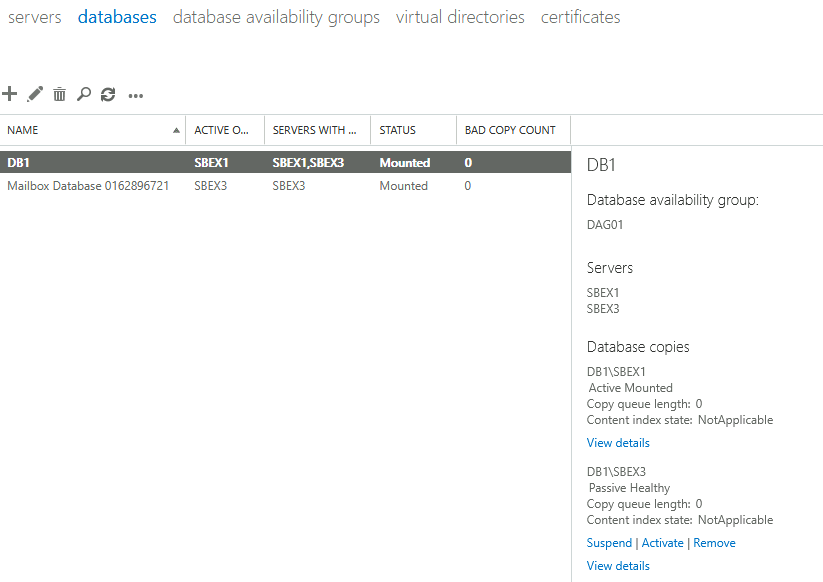
Everything is ok, database is healthy and mounted.
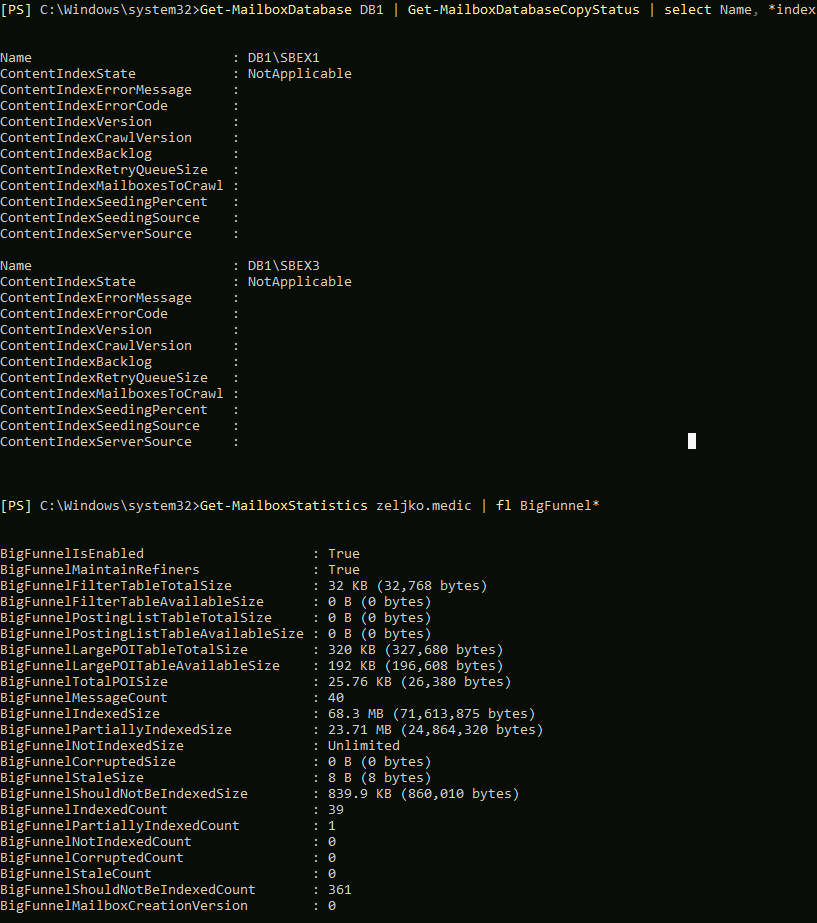
If any of you are familiar with earlier Exchange iterations 2010,13,16… you will notice that Content index state is in “NotApplicable”. You will probably get panicked now and think – this is disaster, it will be painful to repair…
Historically, content index if not in Healthy state would prohibit you to failover your DBs.
However, this system is redesigned in Exchange 2019 – in short, Exchange 2019 uses something called Big Funnel and search indexes are no longer on mailbox database level, but on mailbox itself.
I’m wrestling with exchange now for 15 years, and I really appreciate this, this is huge improvement on DB level.
Let’s just check state if Content Index
Get-MailboxDatabase DB1 | Get-MailboxDatabaseCopyStatus | select Name, *index*And second command is (change zeljko.medic for your mailbox name)
Get-MailboxStatistics zeljko.medic | fl BigFunnel*From first command you can see that there is no errors on any other problems with content index – because it does not function on DB level anymore.
Second command will show you state of content index for mailbox of user zeljko.medic. Here you will be able to see if there are some problems.
Ok, that should be it, we created DAG, but before we wrap this up, we will just do a quick test.
DAG testing
I will should you just quick and simple way you can failover Database from one Exchange server to another.
My database is currently mounted at SBEx3 server.
To failover from SBEx3 to SBEx1 open Exchange admin center – go to servers menu and click on databases tab
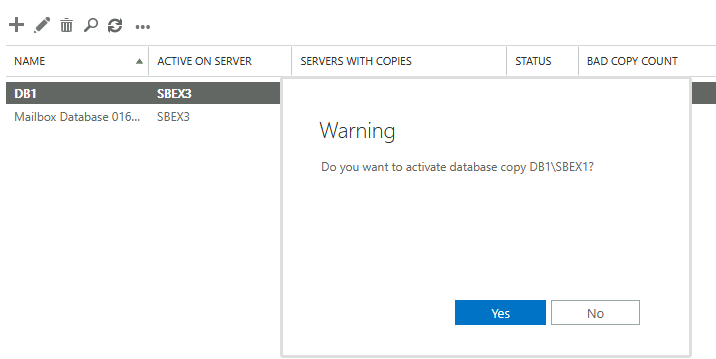
You can see that database DB1 is active on server SBEX3. On the right part of the screen you have Database copies menu, You can see that DB1\SBEX3 is Active Mounted and DB1\SBEX1 has Status Passive Healthy. That is ok. Select Activate under DB1\SBEX1
You will be asked if you wish to activate DB1\SBEX1. Select Yes
If everything is ok, your database should failover to SBEX1
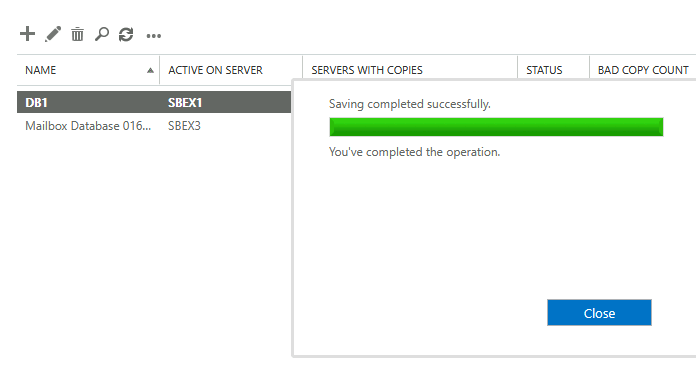
You can repeat the process to bring back database to DB3.
This is plain and simple, there are many more options, but these are for some other time, since this is already getting long.
Conclusion
In this guide we did successful creation of Exchange DAG, and now our database is highly available. This is super useful for patching and maintenance of Exchange servers.
In future guides I will try to explain how to also make your OWA, Autodiscovery highly available.