We went through installation and basic configuration of Microsoft Exchange 2019. One of the crucial parts in this journey is also configuring antispam/malware on Exchange 2019. In today’s world one of the most used vectors of attacks on companies is email communication. So, be extra careful about spam and make sure you go through this topic in details.
Before we begin
Defending your company/organization from spam is more an art, not an exact discipline. Why? Because, even through the best filters in the world something will eventually slip through. You have to be careful with spam settings – if you define your antispam setup too “strong” you will get a lot of false positives – a lot of legitimate email will be marked as spam.
If you configure your antispam too loose – spam will get through, and you will maybe be victim of malware, phishing, depending on other mechanisms inside your company.
Also, I my day to day operations I don’t rely only on Exchange integrated antispam. I also use third party products for antispam.
I think you should also use additional antispam and security solutions in your Exchange environment.
However, have in mind that there is no 100% accurate antispam solution, something will always slip through, that is why you need to raise awareness inside your company about spam/malware – people are always the key in the end.
Antispam Features on Exchange 2019
First of all, if you wish to know more – here are good Microsoft links that are covering antispam/malware on Exchange server
These can be your starting points for in-depth exploration of antispam features on Exchange.
Mailbox server
If you only have mailbox server installed as your only solution for Exchange – you will have to enable antispam agents on mailbox server.
These are the agents you have on your disposal (there are more details on Microsoft website):
Sender Filter agent – compares sending server to a list of domains or senders that are forbidden fro msending messages to your organization.
Sender ID agent – relies on the IP address of the sending server and purported responsible address (PRA) of the sender to determine if sending email address is spoofed.
Content Filter agent – assigns a spam confidence level (SCL) based on data from legitimate and spam messages. More can be found on internet and Microsoft links I put above this.
Protocol Analysis agent (sender reputation) – sender reputation uses several tests to calculate a sender reputation level (SRL) on incoming messages and determines if message is legit or spam.
These filter can be enabled on Mailbox server and I will show you how.
Edge Server
If you have edge server installed in front of your mailbox server, you are in better position, because agents I mentioned above are already enabled on the edge role (or at least they should be, I had situation when they where not, so check that out).
In addition to the agents I mentioned above you can also use following two agents (not available on Mailbox role server)
Connection filtering agent – uses an IP block list, IP allow list, IP block list providers, allow list providers to determen if connection should be blocked or allowed.
Recipient filter agent – uses a block list to identify messages that aren’t allowed into organization.
Attachment filtering agent – blocks attachments based on file name, type…
Installation
Let’s get to business of installing and enabling antispam filters.
Mailbox role server
I will perform this on Mailbox role. Start Exchange Management Shell (as admin).
First, let’s see what we got installed and enabled.
Get-TransportAgent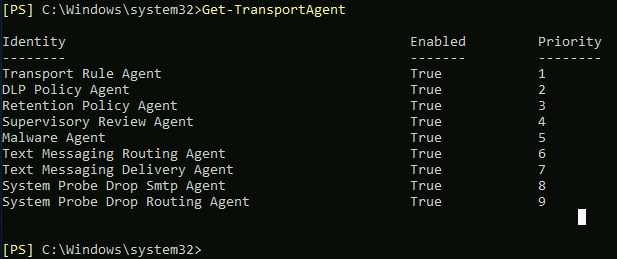
Navigate to you Exchange installation folder (by default C:\Program Files\Microsoft\Exchange Server\V15
& $env:ExchangeInstallPath\Scripts\Install-AntiSpamAgents.ps1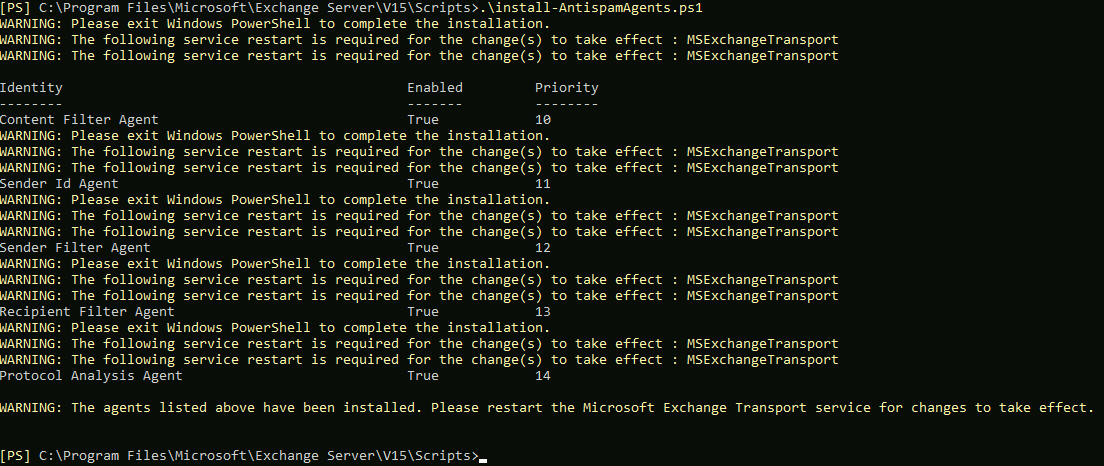
Restart Exchange Transport service (run Exchange Management Shell as admin!!)
Restart-Service MSExchangeTransport
Let’s now again check our Transport Agent stats
Get-TransportAgent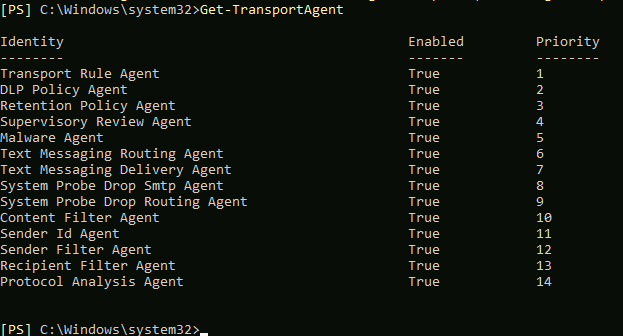
There are new antispam agent enabled – good.
We need now to specify our internal SMTP agents so that Sender ID agent ignores them. (replace 192.168.50.3 and 10.0.0.36 with your IP addresses on which your Exchange servers reside. It could be only one IP address if you have only one server.
Set-TransportConfig -InternalSMTPServers @{Add="192.168.50.3","10.0.0.36"}Let’s check if our command worked
Get-TransportConfig | Format-List InternalSMTPServers
All good in my case
We can also check status of our antispam filters by entering following
Get-ContentFilterConfig | Format-Table Name,Enabled; Get-SenderFilterConfig | Format-Table Name,Enabled; Get-SenderIDConfig | Format-Table Name,Enabled; Get-SenderReputationConfig | Format-Table Name,Enabled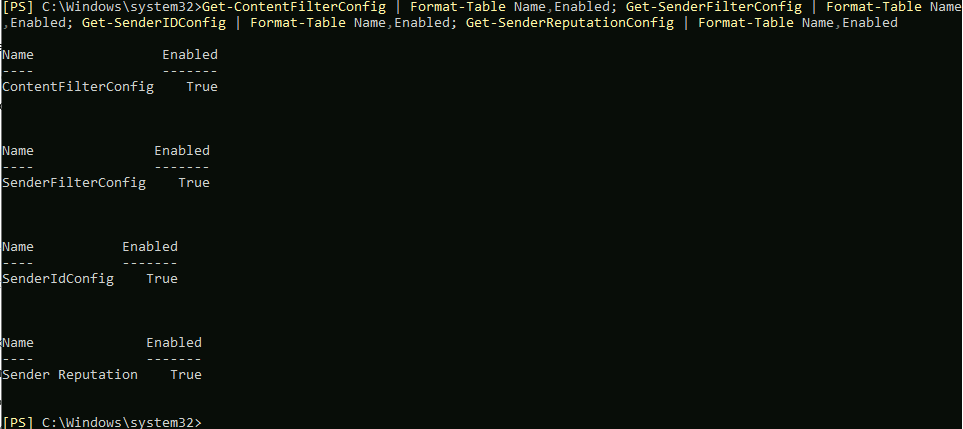
To check the detailed info and config of each of running agents, type in following
Get-ContentFilterConfig | Format-List *Enabled,RejectionResponse,*Postmark*,Bypassed*,Quarantine*;Get-SenderFilterConfig | Format-List *Enabled,*Block*Get-SenderIDConfig | Format-List *Enabled*,*Action,Bypassed*Get-SenderReputationConfig | Format-List *Enabled*,*Proxy*,*Block*,*Ports*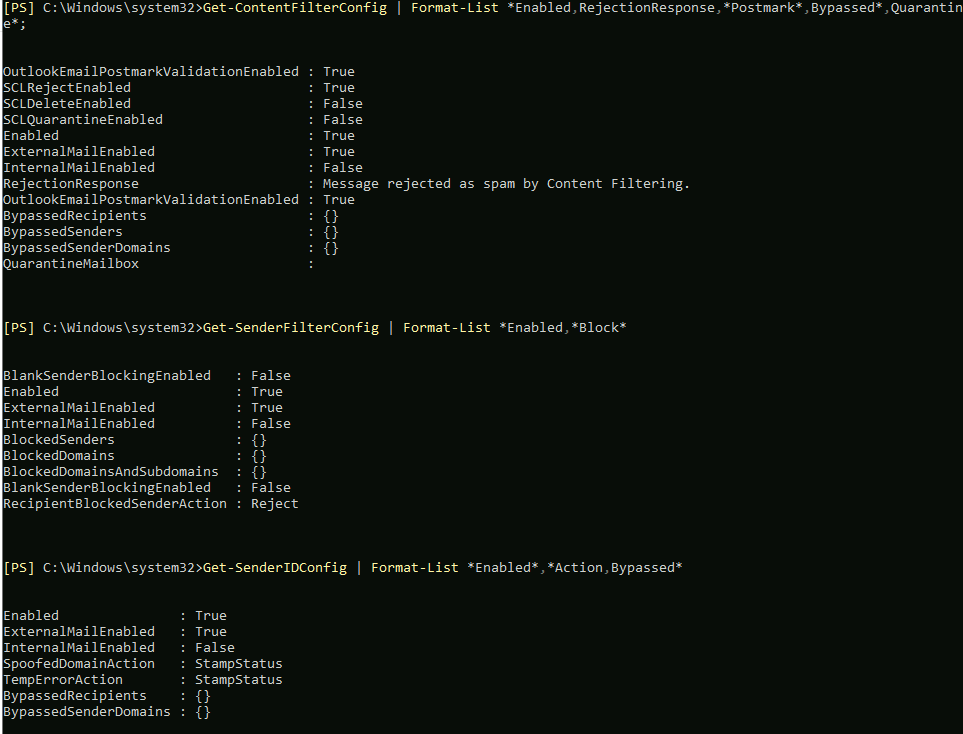
Ok, we are done with installation of antispam agents on mailbox role server
Edge role server
This is optional, and only valid if you have edge role server in place.
Check installed agents by typing in
Get-TransportAgentIf there are no installed antispam agents – repeat steps from Mailbox role server installation.

If you got this on the screen – you are ok.
Additionally you can enable “exclusive” edge antispam agents (if they are not already enabled) by typing in
Enable-TransportAgent "Connection Filtering Agent"Enable-TransportAgent "Attachment Filtering Agent"Enable-TransportAgent "Recipient Filter Agent"That is more or less everything about installation of antispam on Exchange server.
Configuration
Mailbox role
Configuration is individual thing depending on your needs, organization exposure… I will give some general guidelines, and links you can inform yourself more on.
Sender filtering agent
Here is the link that goes much more into details about this topic
You can enable/disable sender filtering by typing in
Set-SenderFilterConfig -Enabled $falseSet-SenderFilterConfig -Enabled $trueBy default Sender filtering should be enabled for external connections. You can get status of sender filtering for external connections by typing in
Get-SenderFilterConfig | Format-List ExternalMailEnabledYou can also do this for internal connections (by default it is disabled)

Add/Remove users/domains to list
To add user/domains or subdomains to this list – use following
Example can be
sender1 – user.name@domain.com
domain1 – domain.com
You can also add subdomains, for example – mail.domain.com
Set-SenderFilterConfig -BlockedSenders <sender1,sender2...> -BlockedDomains <domain1,domain2...> -BlockedDomainsAndSubdomains <domain1,domain2...>Following command describes how to add and REMOVE users or domains from list
Set-SenderFilterConfig -BlockedSenders @{Add="<sender1>","<sender2>"...; Remove="<sender1>","<sender2>"...} -BlockedDomains @{Add="<domain1>","<domain2>"...; Remove="<domain1>","<domain2>"...} -BlockedDomainsAndSubdomains @{Add="<domain1>","<domain2>"...; Remove="<domain1>","<domain2>"...}To check settings of sender filtering
Get-SenderFilterConfig | Format-List Blocked*You can also block senders that have blank sender field with
Set-SenderFilterConfig -BlankSenderBlockingEnabled $trueTo check if you are blocking blank senders type in
Get-SenderFilterConfig | Format-List BlankSenderBlockingEnabledIf you need more details about sender filtering, all is on the link above.
Sender ID filtering
All the details about sender filtering can be found here
To enable or disable Sender ID type in
Set-SenderIDConfig -Enabled $falseSet-SenderIDConfig -Enabled $trueTo check status of the agent, type in
Get-SenderIDConfig | Format-List EnabledAgain, Sender ID should be enabled for external connections, to check the status type in
Get-SenderFilterConfig | Format-List ExternalMailEnabledTo disable or enable Sender ID for external connections, type in
Set-SenderIDConfig -ExternalMailEnabled $trueSet-SenderIDConfig -ExternalMailEnabled $falseYou can do this also for internal connections if needed.
You can define default action for Sender ID for spoofed messages by typing in following
Set-SenderIDConfig -SpoofedDomainAction <StampStatus | Reject | Delete>Example below will return message with 5xx SMTP error if sender has SPF record, but IP does not match authoritative server in the list
Set-SenderIDConfig -SpoofedDomainAction RejectCheck status by typing in
Get-SenderIDConfig | Format-List SpoofedDomainActionConfigure Sender ID for Transient Errors
Set-SenderIDConfig -TempErrorAction <StampStatus | Reject | Delete>Command below will stamp messages with Sender ID “status cannot be determined due to temporary DNS error”. The message will be then processed by further antispam agents
Set-SenderIDConfig -TempErrorAction StampStatusTo check config of this, type in
Get-SenderIDConfig | Format-List TempErrorActionAdd exceptions to Sender ID
To add exception type in
Example:
recipient1 – user.name@domain.com
domain1 – domain.com
Set-SenderIDConfig -BypassedRecipients <recipient1,recipient2...> -BypassedSenderDomains <domain1,domain2...>To add/remove exception type in
Set-SenderIDConfig -BypassedRecipients @{Add="<recipient1>","<recipient2>"...; Remove="<recipient1>","<recipient2>"...} -BypassedSenderDomains @{Add="<domain1>","<domain2>"...; Remove="<domain1>","<domain2>"...}To check status of these commands – type in
Get-SenderIDConfig | Format-List BypassedRecipients,BypassedSenderDomainsContent Filter Agent
You can learn more details by following
Enable/disable agent
To enable/disable Content Filter agent, type in
Set-ContentFilterConfig -Enabled $falseor
Set-ContentFilterConfig -Enabled $trueCheck status of agent by typing in
Get-ContentFilterConfig | Format-List EnabledEnable/disable content filtering for external messages
By default this is enabled.
Set-ContentFilterConfig -ExternalMailEnabled $falseSet-ContentFilterConfig -ExternalMailEnabled $trueTo check status
Get-ContentFilterConfig | Format-List ExternalMailEnabledYou can do the same for the internal messages.
Configure exceptions for Content Filtering
Example:
recipient1 – user.name@domain.com
domain1 – domain.com
Set-ContentFilterConfig -BypassedRecipients <recipient1,recipient2...> -BypassedSenders <sender1,sender2...> -BypassedSenderDomains <domain1,domain2...>To add/remove users or domains, use following
Set-ContentFilterConfig -BypassedRecipients @{Add="<recipient1>","<recipient2>"...; Remove="<recipient1>","<recipient2>"...} -BypassedSenders @{Add="<sender1>","<sender2>"...; Remove="<sender1>","<sender2>"...} -BypassedSenderDomains @{Add="<domain1>","<domain2>"...; Remove="<domain1>","<domain2>"...}To check status of the exceptions
Get-ContentFilterConfig | Format-List Bypassed*Configure allowed/blocked words/phrases
Add-ContentFilterPhrase -Influence GoodWord -Phrase <Phrase> -Influence BadWord -Phrase <Phrase>Example
Add-ContentFilterPhrase -Influence GoodWord -Phrase "customer feedback"To remove word or phrase
Remove-ContentFilterPhrase -Phrase <Phrase>To check status
Get-ContentFilterPhrase | Format-Table -Auto Influence,PhraseThere are more options on content filter, so make sure to check Microsoft link for further details.
Sender Reputation
I will not write about this because it requires fiddling to be properly set so you are not to aggressive or to loose in your settings.
Check the link below and act according to your needs.
I usually do this after some period of monitoring mailflow.
These are the basic steps for the Mailbox role antispam settings.
Edge Role
If you have edge role installed, there are few more things you can do. If you don’t have edge role, and you are doing everything on one server, you can skip this.
Connection filtering agent
You can find much more details here – https://docs.microsoft.com/en-us/exchange/antispam-and-antimalware/antispam-protection/connection-filtering-procedures?view=exchserver-2019
Here I will mention some basic things you can do with connection filtering agent, this is huge topic, so be sure to go through above links.
IP Block list
To view status of IP Block list on your server type in
Get-IPBlockListConfig | Format-List *Enabled,*ResponseI would highly recommendone thing here, of course, be sure to go through documentation to provide your domain best possible protection.
But, one thing only I would do immediately is set IP Block List Providers. There are few Real Time Block list that are powerful, free and easy to add.
Please be sure to check terms and conditions of services before you add them.
Here are two that are very powerful and that I’m using
SpamHaus – zen.spamhaus.org, SpamCop – bl.spamcop.net
Add-IPBlockListProvider -Name Spamhaus -LookupDomain zen.spamhaus.org -AnyMatch $true -Enabled $true -RejectionResponse "IP address is listed by Spamhaus"Check status of your BlockList Providers by typing in
Get-IPBlockListProvider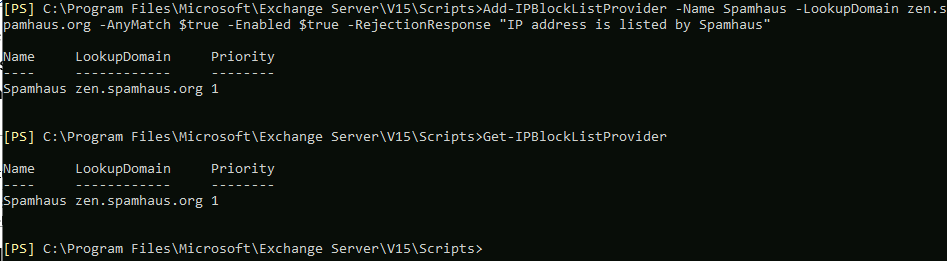
BE sure to check BlockList on your own and add them to your system. Also, be sure to use reputable blocklists, I’ve seen a lot of problems with blocklists also, since not every blocklist is very well maintained.
To remove Block List provider, type in
Remove-IPBlockListProvider -identity <name>To check if your list are effective run following command from scripts folder inside exchange installation folder
Get-AntispamTopRBLProviders.ps1
You cannot see anything in my case, since I’m doing this on test domain inside test lab.
Attachment filtering agent
This is the last agent I will be covering here, and it is interesting one, because you will want to block some file extensions to reach your internal network.
To read more on this topic go here – https://docs.microsoft.com/en-us/exchange/antispam-and-antimalware/antispam-protection/attachment-filtering-procedures?view=exchserver-2019
To check attachment filtering type in following
Get-AttachmentFilterEntry | Format-Table -Auto Type,NameTo add file extension to attachment filtering type in following (I will use jpeg for example.
Add-AttachmentFilterEntry -Name image/jpeg -Type ContentTypeYou can also do that a bit different way
Add-AttachmentFilterEntry -Name *.jpg -Type FileNameTo test this out, send an email with attached file format you just filtered.
To remove extension from filter, type in following
Remove-AttachmentFilterEntry ContentType:image/jpegor, if you used second method
Remove-AttachmentFilterEntry FileName:*.jpgWhen prohibited attachment is detected, you can define actions that are used.
Here are the actions that can be used
Set-AttachmentFilterListConfig [-Action <Reject | Strip | SilentDelete>] [-RejectResponse "<Message text>"] [-AdminMessage "<Replacement file text>"] [-ExceptionConnectors <ConnectorGUID>]This is an example that will reject message with prohibited attachment and send reject message
Set-AttachmentFilterListConfig -Action Reject -RejectResponse "This message contains a prohibited attachment. Your message can't be delivered. Please resend the message without the attachment."Ok, and that would be it.
Conclusion
I provided here some basic steps for configuring antispam protection for you Exchange installation.
Be sure to check other resources, and be proactive in antispam policy. Watch actively your mailflow and adjust your protective policies accordingly.
This is a huge topic, and I tried just to give you general idea where to look.