I mentioned already few times, and I will mention it again probably – CentOS is no more a viable option for anything that needs stability in my workflow, so I’m focusing on Debian-Ubuntu alternative. First thing you want to do to on every machine, especially if it is internet oriented is – security hardening. I will go here through some of my steps for Ubuntu.
This guide assumes you are doing this on a clean Ubuntu machine without any services or previous installations. It is mainly focused on SSH since it is service that is running whole time on your server. If you are installing any other services on your server, be sure to check security practice for those services as well.
Login to your server via SSH. I have some VPS machines for testing purposes, so I will use them for this.
xxx.xxx.xxx.xxx is your public IP (or private) IP address of the Ubuntu machine you wish to connect to.
ssh root@xxx.xxx.xxx.xxxBefore you try any of this, if you are doing this on the server that already has data – make sure you backup it. In case you mess something up, you can always go back to previous state.
Patching software
Always my first step – bring your software installation up to date.
sudo apt update
sudo apt upgrade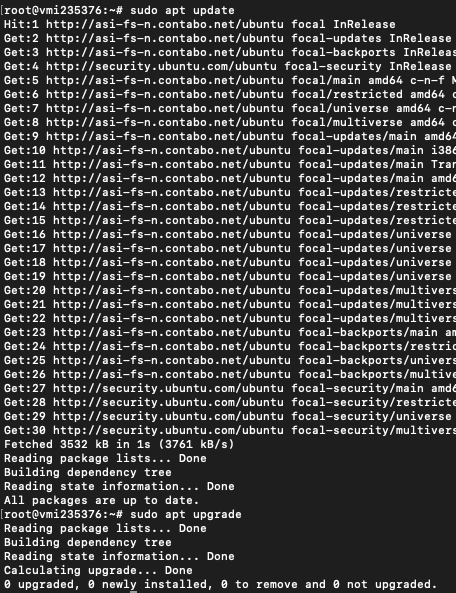
Very nice addition would also be to enable automatic security updating of the system – instructions can be found here – https://www.informaticar.net/how-to-enable-and-disable-automatic-updates-on-ubuntu-22-04/#more-12095
Creating New User
Using root user (also is with Administrator) is not a bright idea, especially if you are exposing a machine to the internet. I’m going to create user named zeljko and use it for all my administrative needs. Later on we will disable root user.
adduser zeljkoWe will also add user zeljko to sudo group.
usermod -aG sudo zeljko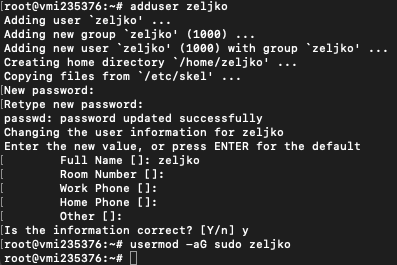
and we will test to see if everything is ok.
First we will change from logged root to created account zeljko.
Instead username I entered my account name – zeljko
su - usernameAfter you changed your user from root to zeljko, we will also check is zeljko now part of the sudo group by typing in
sudo whoami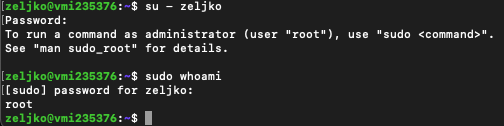
Command returned root, so that means we have sudo privileges.
Type
exit
exit
First to move back to root account ,and then to log-out of ssh session. We will log back in with created zeljko account and manage our machine further.
Also, that is an opportunity to see if everything is ok with our new user, before we move on with our settings.
Log back into ssh, this time with your created account. I will login with zeljko.
ssh zeljko@xxx.xxx.xxx.xxxLocking root for ssh login
First step will be to remove root account from logging to ssh
sudo nano /etc/ssh/sshd_configFind following line and change to no
PermitRootLogin no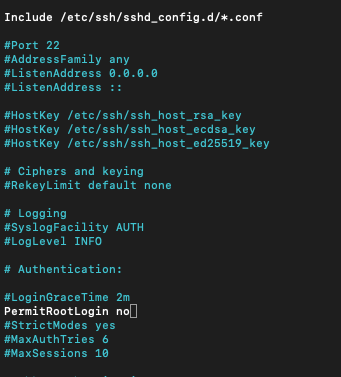
Save changes and exit file.
Now, we will restart ssh server
sudo service ssh restart
I tried to connect to ssh with root user, but I got message “Permission denied”. That is good.
Changing SSH port and account lockout policy
While we are at SSH setup, we will also change default SSH port 22 to 222. This is optional, you may or may not choose to do this.
If you are going to change SSH port 22, you can select whichever port you like (as long as there is not other service running on it on your server), it does not have to be 222.
This is mainly done because this way you can reduce number of bot attacks that are scanning common ports.
Before we change SSH port, we are first going to check if the firewall is active. If firewall is active we need to pass port 222, if it is not, we will do it later after we configure firewall.
To check if firewall is enabled type in
sudo ufw status
My firewall is inactive, so I will configure it later. If your firewall is active, type following in:
This one is probably enabled if you are able to login to ssh
sudo ufw allow sshAnd this one is a new one we need so that we don’t lock out ourselves after changing ssh port
sudo ufw allow 222Now, lets change the port.
sudo nano /etc/ssh/sshd_configNow find following lines, uncomment them (remove #) and type in following
Port value will change port from 22 to 222 and MaxAuthTries will lock out IP address if it enters wrong password in more than 5 attempts (you can set this lower or higher).
Port 222
MaxAuthTries 5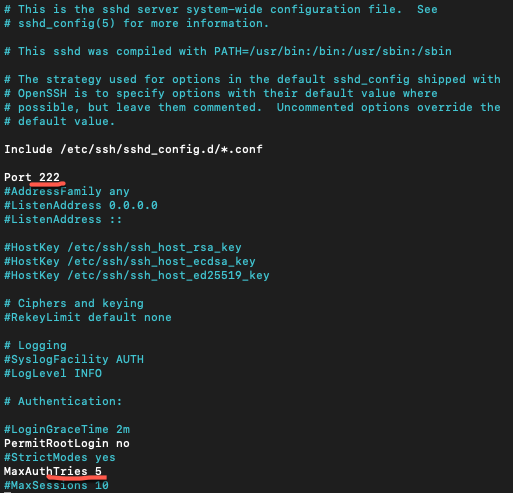
Save and exit file.
Restart ssh service
sudo service ssh restartI immediately logged out of my ssh session and tried to login again, but – connection is refused.
Command we need now to login back to ssh is
ssh zeljko@xxx.xxx.xxx.xxx -p 222If you don’t want to use port 222 and you want to stick with default port 22, you can leave out -p 222 switch.
Ok, this part is done.
Other SSH settings
We will be going through few more settings in SSH config file, check them out and see what fits for your workflow.
So, we will be editing
sudo nano /etc/ssh/sshd_configProtocol 2
First thing, we will enable Protocol 2. SSH by default works with Protocol 1. Protocol 2 is newer more secure and robust version introduced in 2006.
Protocol 2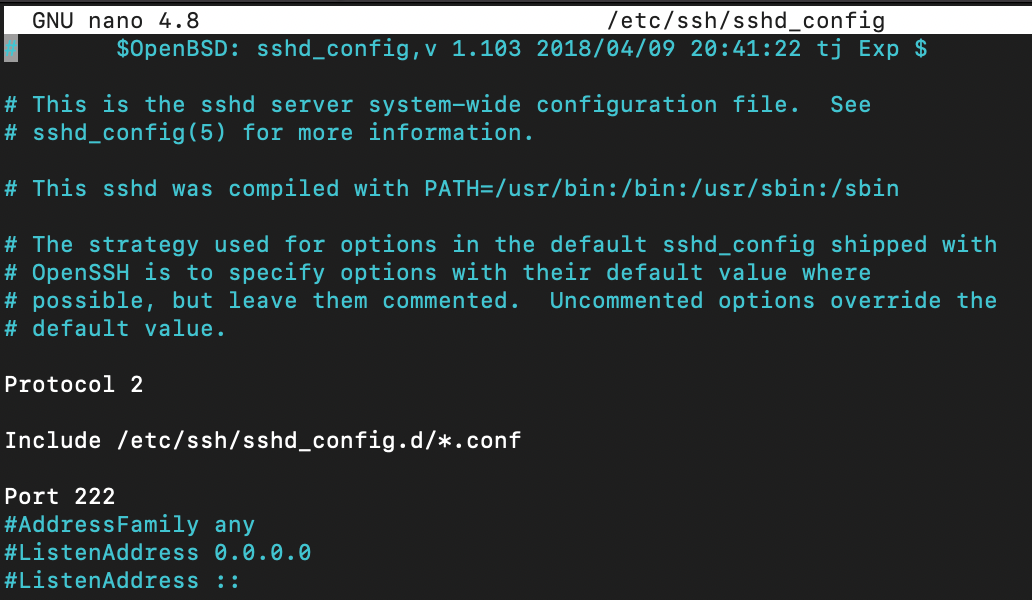
Restart SSH
sudo systemctl restart sshdTo test setting, I disconnected from my SSH session and tested first with Protocol 1 by entering switch -1
ssh -1 zeljko@xxx.xxx.xxx.xxx -p 222I got error “SSH protocol v.1 is no longer supported” – that is good, and means Protocol 1 no longer works on our machine.

If I try to login with -2 switch
ssh -2 zeljko@xxx.xxx.xxx.xxx -p 222That worked, and I was able to login. You can leave out -2 switch from you ssh login command, it will work normally.
Timeout Idle Value
If you leave your PC unattended for some time with your SSH connections active, it can be an issue. To be honest, I don’t find this setting such a big deal, because one open SSH connection is least of my worries if someone gains physical access to my PC.
If you wish, you can uncomment and set following value (I set 180 seconds, which is 3 minutes)
ClientAliveInterval 180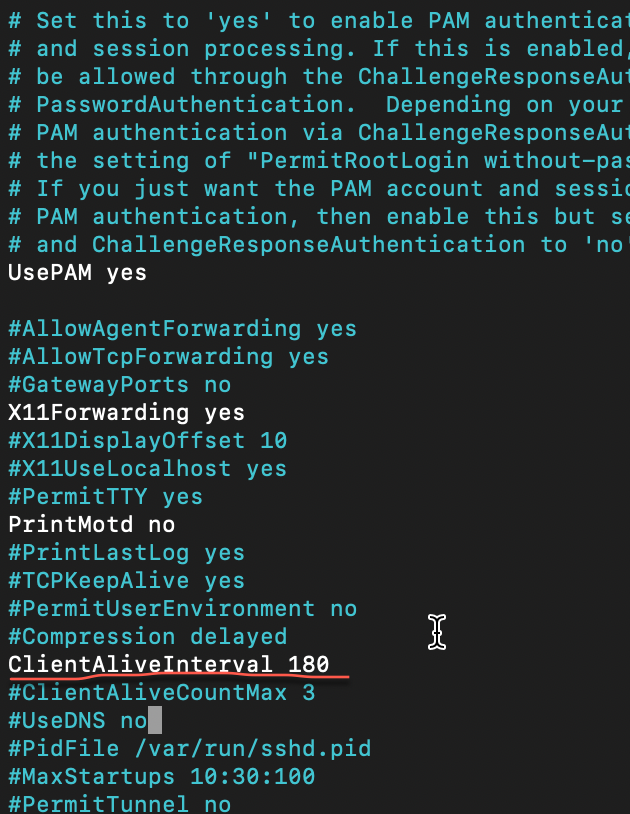
Limit SSH access to some users
You can define user accounts that are enabled to connect to SSH. Every other user would be refused. I will allow access to two users, zeljko and informaticar.
Add following line to your sshd_config file
AllowUsers zeljko informaticar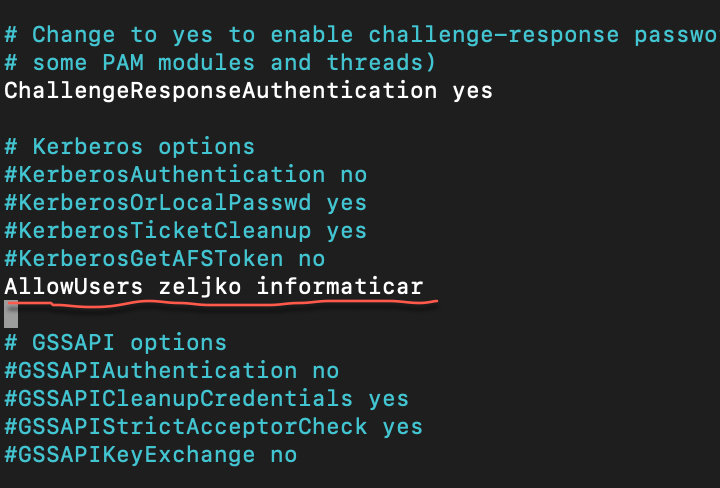
You will need to restart ssh service after adding this
sudo systemctl restart sshdFirewall setup
Ok, we went through it a bit when setting custom port for SSH.
You can check your firewall status by typing in
sudo ufw statusWe already established that my firewall is not active.

First we will allow outgoing but block incoming connections.
sudo ufw default allow outgoing
sudo ufw default deny incoming
We need to let SSH pass through (in case you haven’t changed default port 22 to 222)
sudo ufw allow sshSince I changed default SSH port to 222, I will need to let in port 222 without default SSH rule above.
sudo ufw allow 222We can now enable our firewall
sudo ufw enable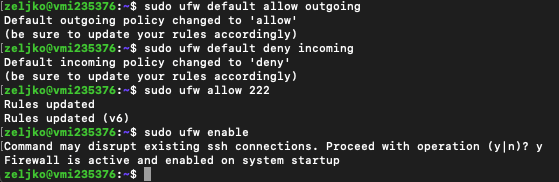
Now if we check our ufw status
sudo ufw status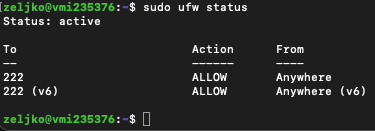
After this I rebooted server, logged back into SSH without problem.
Disable root account completely on your system
Besides disabling root user to login via SSH, you can also disable root account completely on your system.
To disable root account type in following
sudo passwd -l root
If you need to re-enable your root user, you can do so by typing in following
sudo passwd rootYou will have to type in new password for the user twice, and it would be enabled again.
Enable 2FA
You should make this a habit, it brings security of your internet exposed servers to whole new level.
We will install Google Authenticator
sudo apt install libpam-google-authenticator
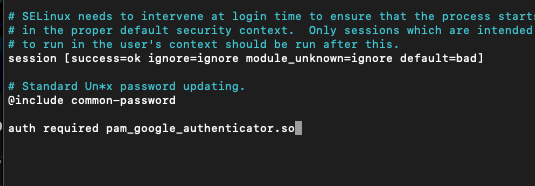
We will need to modify /etc/pam.d/sshd file to allow Google Authenticator…
sudo nano /etc/pam.d/sshdAdd following line
auth required pam_google_authenticator.soI added line to the bottom of the file
Next file we will need to edit is
sudo nano /etc/ssh/sshd_configChange to yes following line
ChallengeResponseAuthentication yes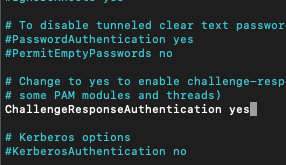
Now, we will configure Google Authenticator for user zeljko
Into terminal just type in
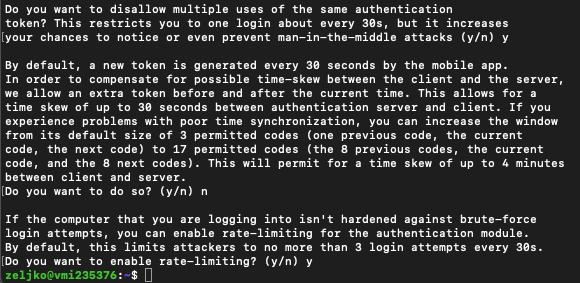
google-authenticatorTime-based tokens – y
After entering y in the first question you will get your QR code and backup codes. Open Google Authenticator on your Android/iPhone and scan QR code. Also, write down verification and emergency codes.
update .google_authenticator file – y

Dissalow multiple uses – y
Permit shew of up to 4 minutes – n
Enable rate limiting – y
Now we will restart ssh service
sudo service ssh restartI will also try to log out of my SSH session and hope for the best when I try to log back in.

Success, my verification code was accepted.
Passwordless authentication on SSH
You could also enable public key authentication instead of passwords, if you are often logging from the same machine to your servers. It is highly recommended and secure if used properly. If that is something you will use, you can check out my blog post covering that type of authentication.
Install Fail2Ban
Fail2Ban is IPS (Intrusion Prevention System) and it monitors logs and system and check fdor unusual behavior and login attempts. If it detects multiple failed login attempts it will blacklist IP address from which requests are coming.
To install Fail2Ban
sudo apt-get install fail2ban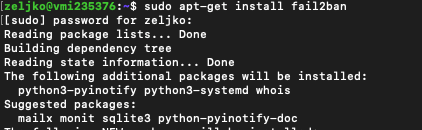
Lets check fail2ban service status
sudo service fail2ban status
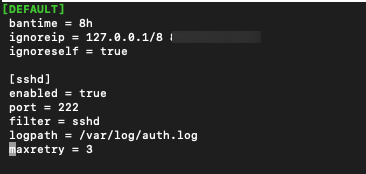
We will now create new jail.local file. /etc/fail2ban folder holds jail.conf file, we will not edit that file and we will not touch it. We will create jail.local file as follows
sudo nano /etc/fail2ban/jail.localdd following to this file. If your ssh is located on port 22, then you need to specify it instead port 222. Also, instead of xxx.xxx.xxx.xxx you can specify your IP address if you have fixed one.
[DEFAULT]
 bantime = 8h
 ignoreip = 127.0.0.1/8 xxx.xxx.xxx.xxx
 ignoreself = true

 [sshd]
 enabled = true
 port = 222
 filter = sshd
 logpath = /var/log/auth.log
 maxretry = 3
Save file and exit
Restart fail2ban
sudo systemctl restart fail2banTo list banned offender type in
sudo iptables -L f2b-sshd --line-numbersTo remove ban, type in
sudo iptables -D fail2ban-ssh <Chain num>Install AntiVirus
This is something that is highly debated in Linux community – should you, or should you not install antivirus on Linux?
It is all up to you, you need to assess your risks, types of workload you will be handling and in the end decide if you want AV on your Linux. There are not many good AV solutions for Linux I can recommend or know… Ubuntu official website mentions AVAST, NOD32, F-PROT, Panda, Sophos, Symantec… Some of them are supported only on some versions of linux.
ClamAV is a free antivirus, to install it, run following
apt-get install clamav clamav-daemon -yTo update it, we need to first stop the service
systemctl stop clamav-freshclamUpdate database using following command
freshclamStart service once again by running
systemctl start clamav-freshclam
systemctl enable clamav-freshclam
For more details check the internet for more ClamAV details on scanning, maintaining…
Second one you should think about is rkhunter, which can do a quick scan for rootkits
apt-get install rkhunterTo scan your system run
rkhunter -CConclusion
These are most basic tips to get you started, for every service you enable on the server go through documentation and internet – find best practices and security tips and make sure you implement them. Do your research and make sure you have best measures implemented for your situation and your workloads. There is no absolute security in IT world, but you can minimize at least know risk.