We will do quick tutorial on how to enable automatic security updating on Ubuntu. I like to have control on updates on most important machines, but updating takes a lot of time, and is sometimes time critical. So I like my less important machines to be automatically updated with security updates. Here is how I do it.
If you have GUI version of Ubuntu 22.04, updating can be easily resolved through GUI. But, if you are without GUI, there are a few steps we need to do…
This guide assumes you know how to install Ubuntu and do basic manual config and maintenance.
Installation
Ok, let’s start
First we will run update and upgrade manually
sudo apt update
sudo apt upgrade
When that is done our next step will be to install “unattended-upgrades” package. This precious package will enable us to install updates automagically.
sudo apt install unattended-upgradesDepending on the type of installation, you maybe have this one already installed.
Check if the service is up and running
sudo systemctl status unattended-upgrades
For good measure, I will also run enable command, so that I’m sure service will start after machine reboot.
sudo systemctl enable unattended-upgradesIf you plan to do auto reboots (i do) when system is updated, you will also need
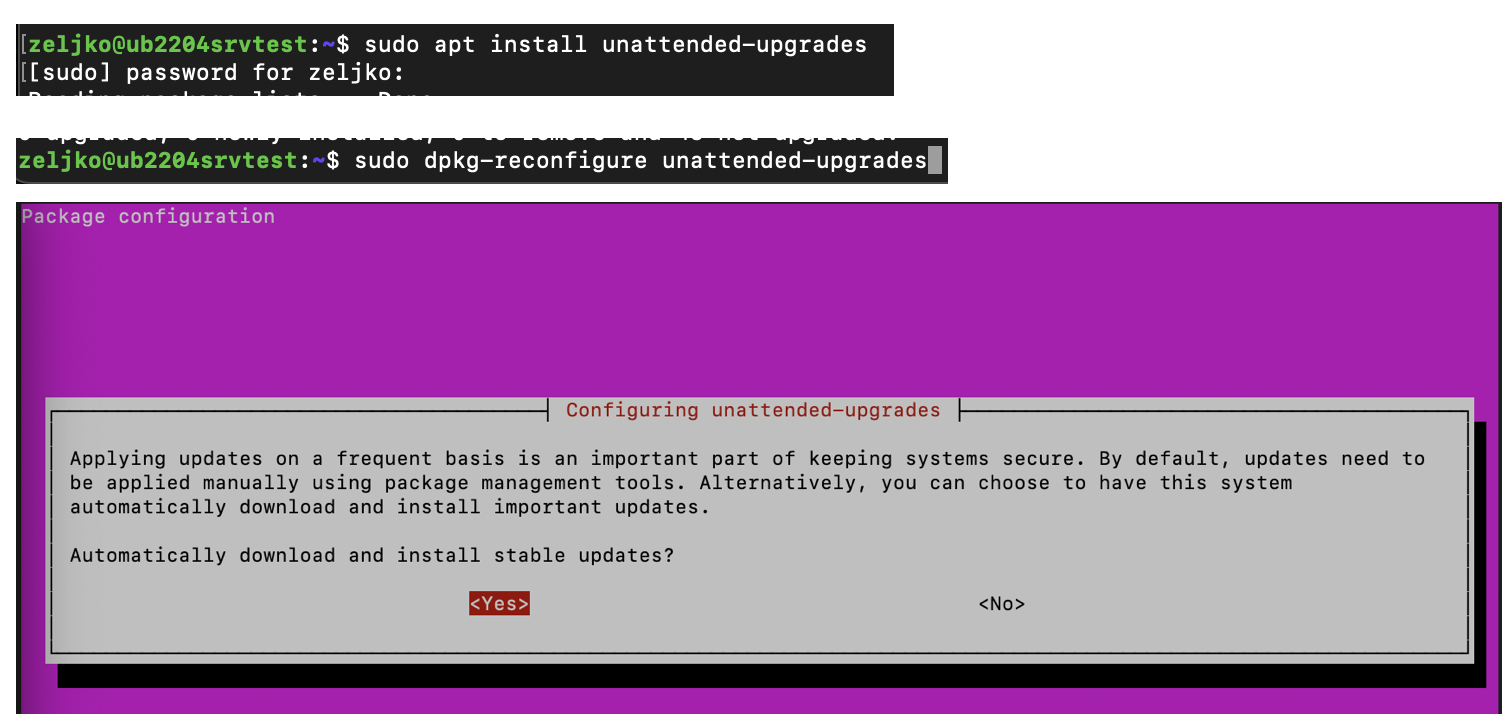
sudo apt install update-notifier-commonNow, we will setup our package by running
sudo dpkg-reconfigure unattended-upgradesNew pop-up will appear which will say “Automatically download and install stable updates?” We will select Yes
An that is that for the first part. We will now fine tune our automatic update experience.
Edit Unattended-upgrades config file
Many of these options are personal preference, and you should fine tune this to your environment and your needs. Here are some recommendations.
We will open config file with nano. Use editor you like if you are used to something else.
sudo nano /etc/apt/apt.conf.d/50unattended-upgradesFirst part of the file looks like this
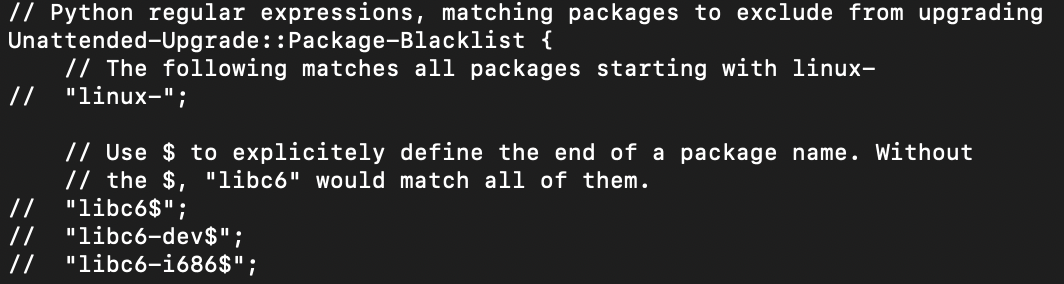
Unattended-Upgrade::Allowed-Origins {
        "${distro_id}:${distro_codename}";
        "${distro_id}:${distro_codename}-security";
        // Extended Security Maintenance; doesn't necessarily exist for
        // every release and this system may not have it installed, but if
        // available, the policy for updates is such that unattended-upgrades
        // should also install from here by default.
        "${distro_id}ESMApps:${distro_codename}-apps-security";
        "${distro_id}ESM:${distro_codename}-infra-security";
//      "${distro_id}:${distro_codename}-updates";
//      "${distro_id}:${distro_codename}-proposed";
//      "${distro_id}:${distro_codename}-backports";
That is pretty much how it should stay, two forward slashes // mean that the line is commented and option which has // before it, is not active/enabled.
Lines
//      "${distro_id}:${distro_codename}-updates";
//      "${distro_id}:${distro_codename}-proposed";
//      "${distro_id}:${distro_codename}-backports";
Should stay commented.
Here are some more options I like to have enabled.
In time you will have older kernel packages that are not used. I like to enable this one so after update, unused kernel packages are cleaned.
Unattended-Upgrade::Remove-Unused-Kernel-Packages "true";

Leaving packages out of automatic updates
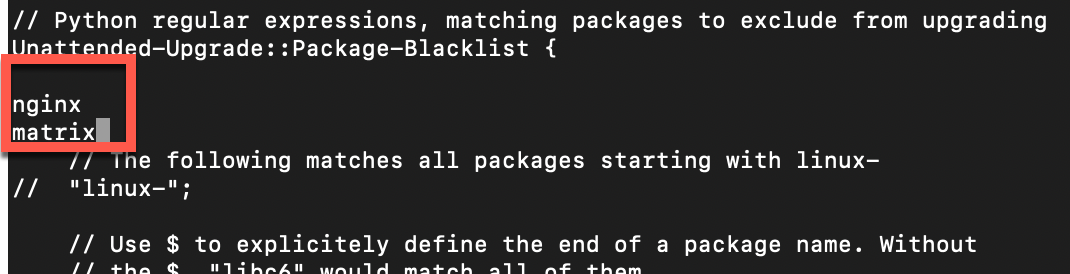
If you wish to leave some packages out of automatic updates, you will add those to Unattended-Upgrade::Package-Blacklist part. I won’t be using it in this guide, but there are some instances I used that.
This is how that line would look like if I had something to add to it. Let’s say I will add nginx and matrix
Enable Automatic Reboot
Again, this is one of the options I use on some servers, on the other I don’t. See for yourself if these options suite you.
I will uncomment Unattended-Upgrade::Automatic-Reboot line and set true as a value (false is default value)
Unattended-Upgrade::Automatic-Reboot "true";
I will also uncomment Unattended-Upgrade::Automatic-Reboot-WithUsers line and leave it at true. On some servers I don’t care if anybody is logged in, I care about completing updates as soon as possible.
Unattended-Upgrade::Automatic-Reboot-WithUsers "true";
On some servers I also uncomment Unattended-Upgrade::Automatic-Reboot-Time line and set it to 03:00 (02:00) is default value. It is a habit from Windows Server, there 03:00 is set as default maintenance time.
Unattended-Upgrade::Automatic-Reboot-Time "03:00";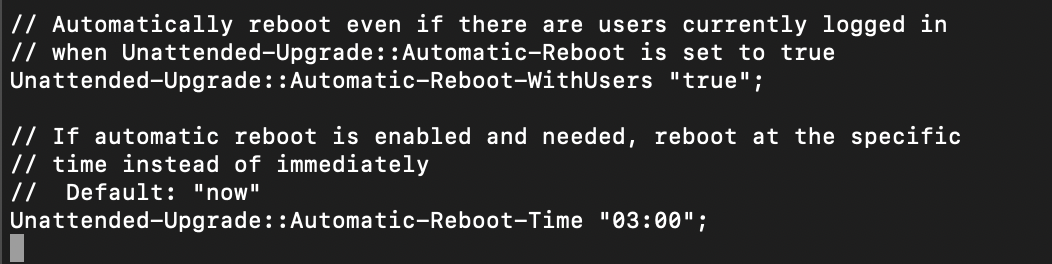
While we are at the timing, you can also specifiy when to run Unattended-Upgrade with cron job as another option.
sudo crontab -e
In crontab, set following, and Unattended-Upgrade will run every day at this time. With command below, upgrade will run daily at 1 am.
0 1 * * * sudo /usr/bin/unattended-upgrade -vGo through config, and set it to your preferences. See what else is in there, these are just a few examples of what it can do.
eMail alerts
There is a possibility to set email alerts to see if your updates went well or not. I will show you one scenario through which you can achieve this. We won’t be installing our own web server, we will be using outside service – we need transactional email service, which has smtp relay. For this case we will use Brevo.
Register to the site, and setup relay smtp. Settings are under (as of start of 2024) under Transactional – Email – Settings – Configuration – SMTP Relay – Get your SMTP key

Don’t close Brevo yet, if you just registered, we have another important thing to set if you just started with the service!!
Ok, first part is done, now we need to install mail addon to our server.
sudo apt install postfix libsasl2-modulesAfter you start install, new pop-up will appear – confirm with OK
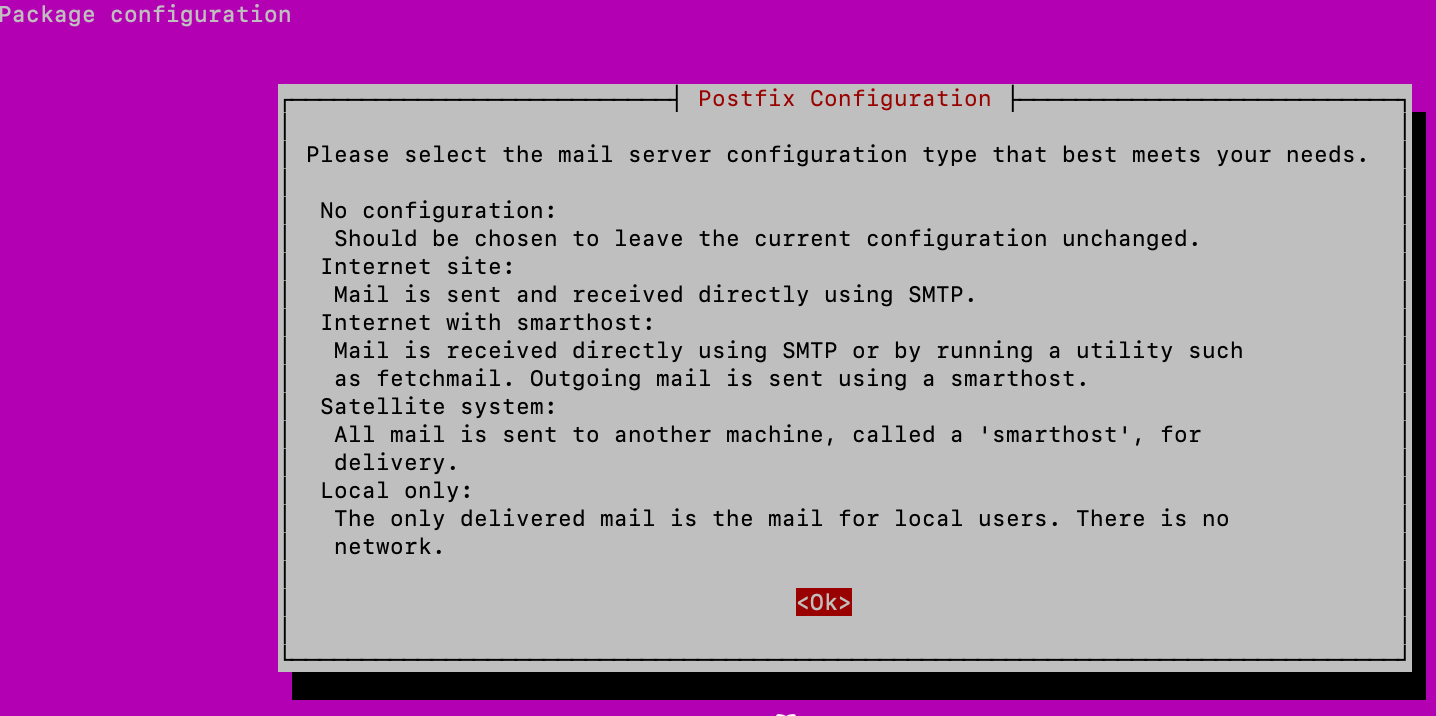
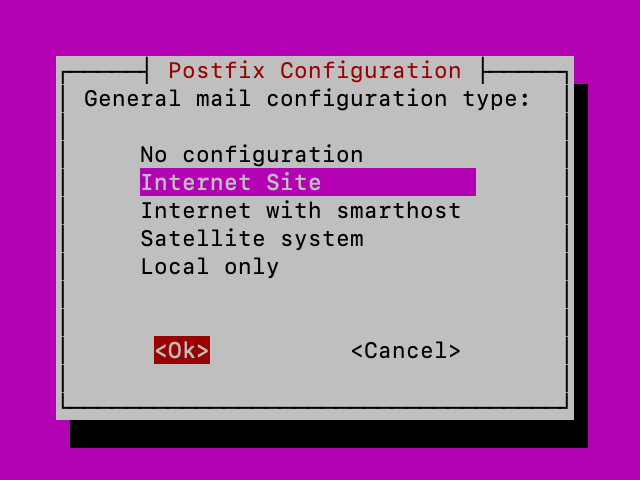
We now need second option – Internet Site – ok
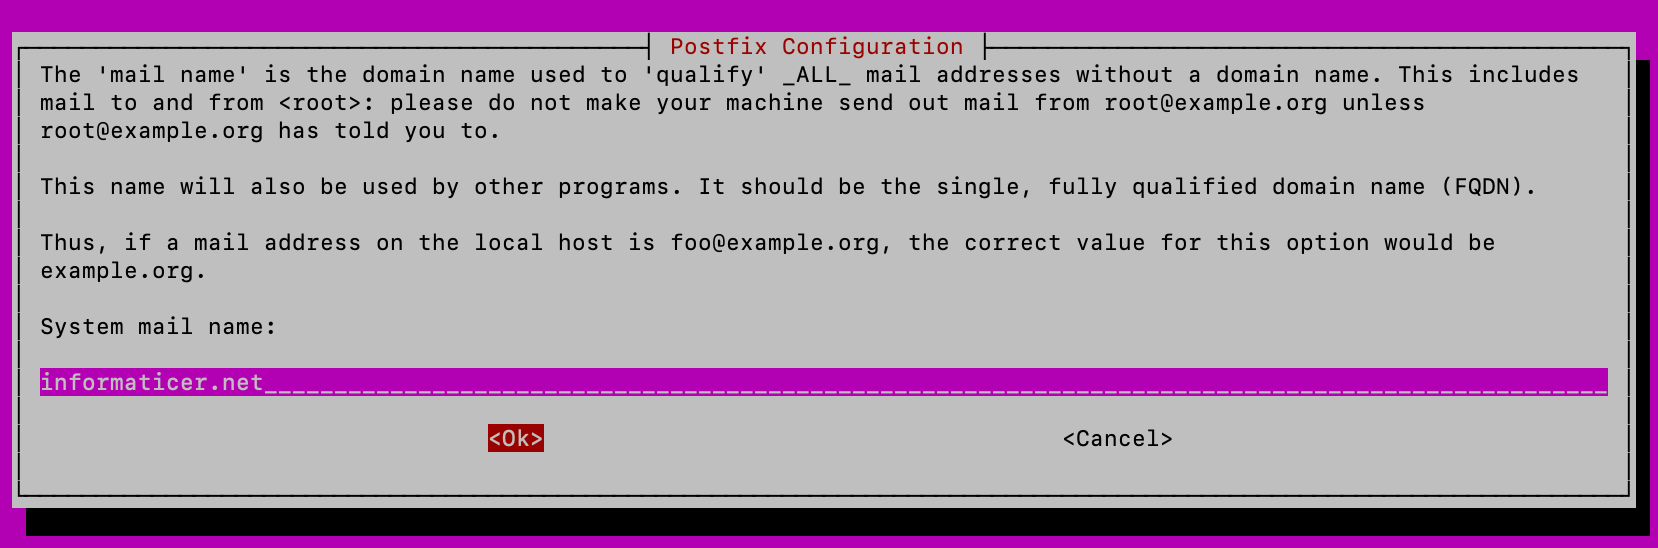
On the last screen, I will enter my domain name (you will enter yours!!) and confirmed with ok. I entered domain which I registered my Brevo account with.
Ok, installation is done. We will now edit and configure postfix config file
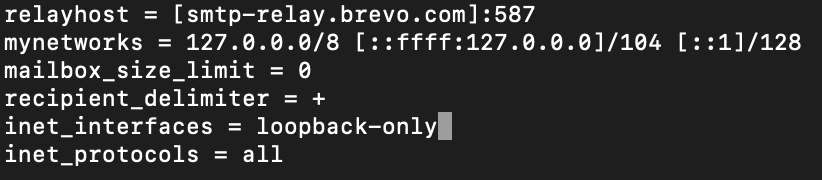
sudo nano /etc/postfix/main.cfFind relayhost = line and add following
relayhost = [smtp-relay.brevo.com]:587If you added brackets [] to the relayhost, make sure you have brackets for smtp value also in sasl_passwd file we will create further below.If smtp values are not formated same way – email won’t work!!

Now, before we close this file, add following to the bottom of the file
# outbound relay configurations
smtp_sasl_auth_enable = yes
smtp_sasl_password_maps = hash:/etc/postfix/sasl_passwd
smtp_sasl_security_options = noanonymous
smtp_tls_security_level = may
header_size_limit = 4096000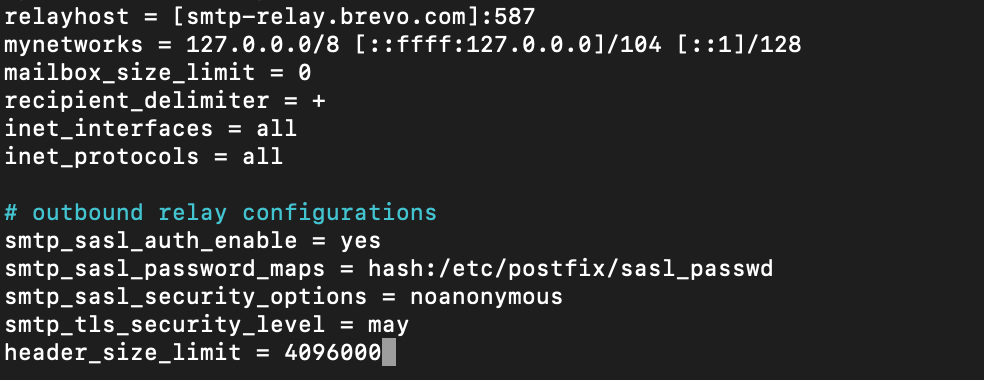
And one more thing, if this is not your primary email server, and you only installed this to send notifications from a service, you will want to disable inbound email. Find inet_interfaces line and change from all to loopback-only
inet_interfaces = loopback-only
Now, we have to create /etc/postfix/sasl_passwd file and in it, we have to enter our username and password which are under SMTP relay settings I posted above on Brevo website.
sudo nano /etc/postfix/sasl_passwd
Enter one line and change brevosmpt_username with Brevo login you have under SMTP relay settings (it is email address) and for password – set password from Brevo you found under SMTP relay settings, you have it under SMTP keys as depicted on the screenshot above (smtp key value). Make sure that : sign stays between username and password. Save and close.
If you added brackets [] to the relayhost, make sure you have brackets for smtp value also in main.cf file we already created above. If smtp values are not formated same way – email won’t work!!
[smtp-relay.brevo.com]:587 brevosmtp_username:brevosmtp_password

Next step is to create hash DB with postmap
sudo postmap /etc/postfix/sasl_passwdLet’s now reboot Postfix
sudo systemctl restart postfixWe will also change permissions on these files, so that only root can read and edit them
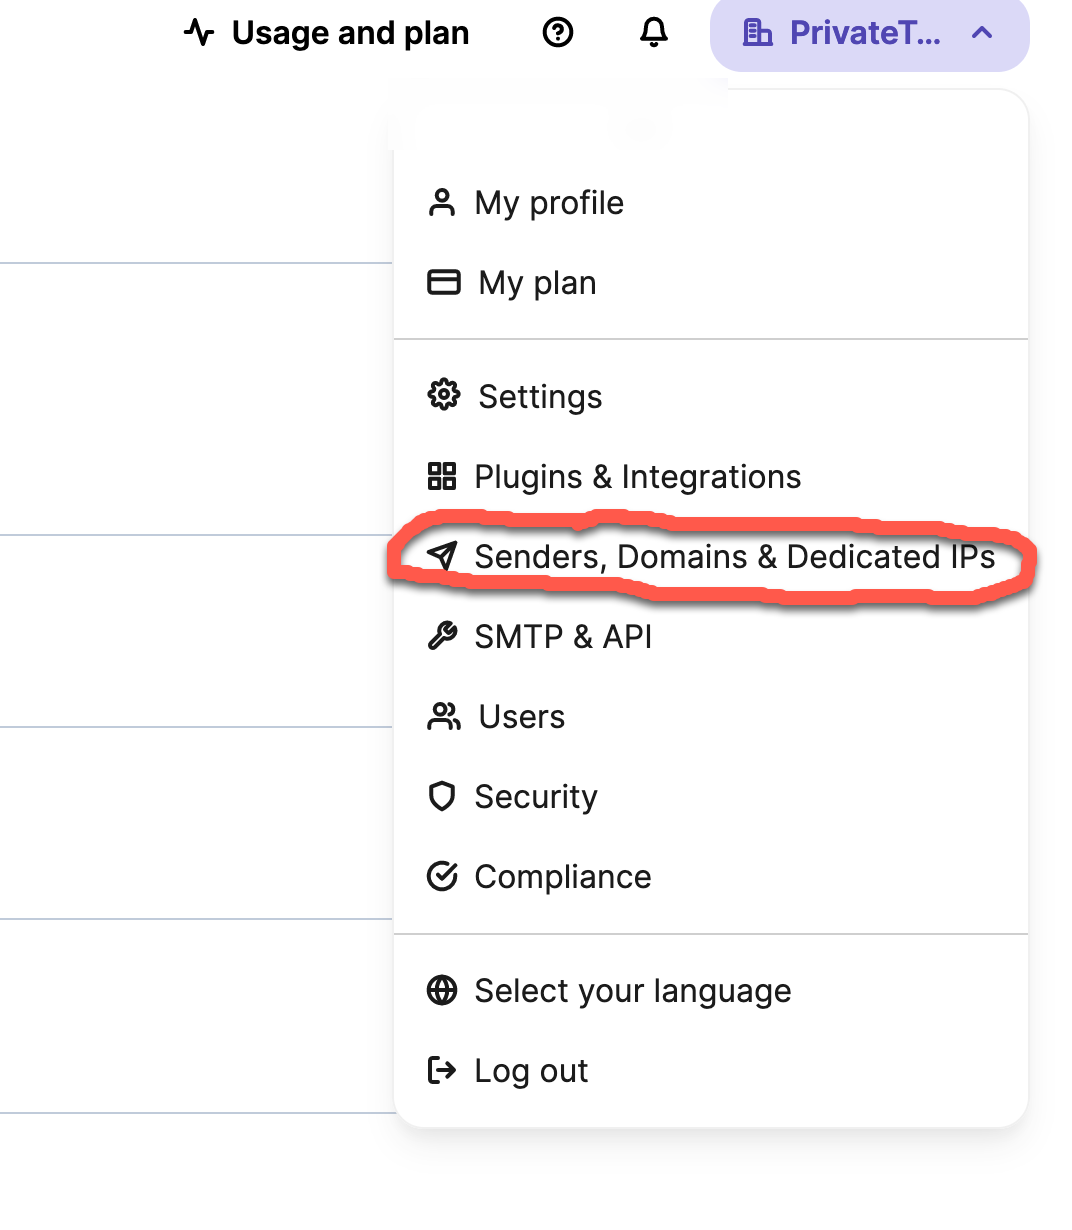
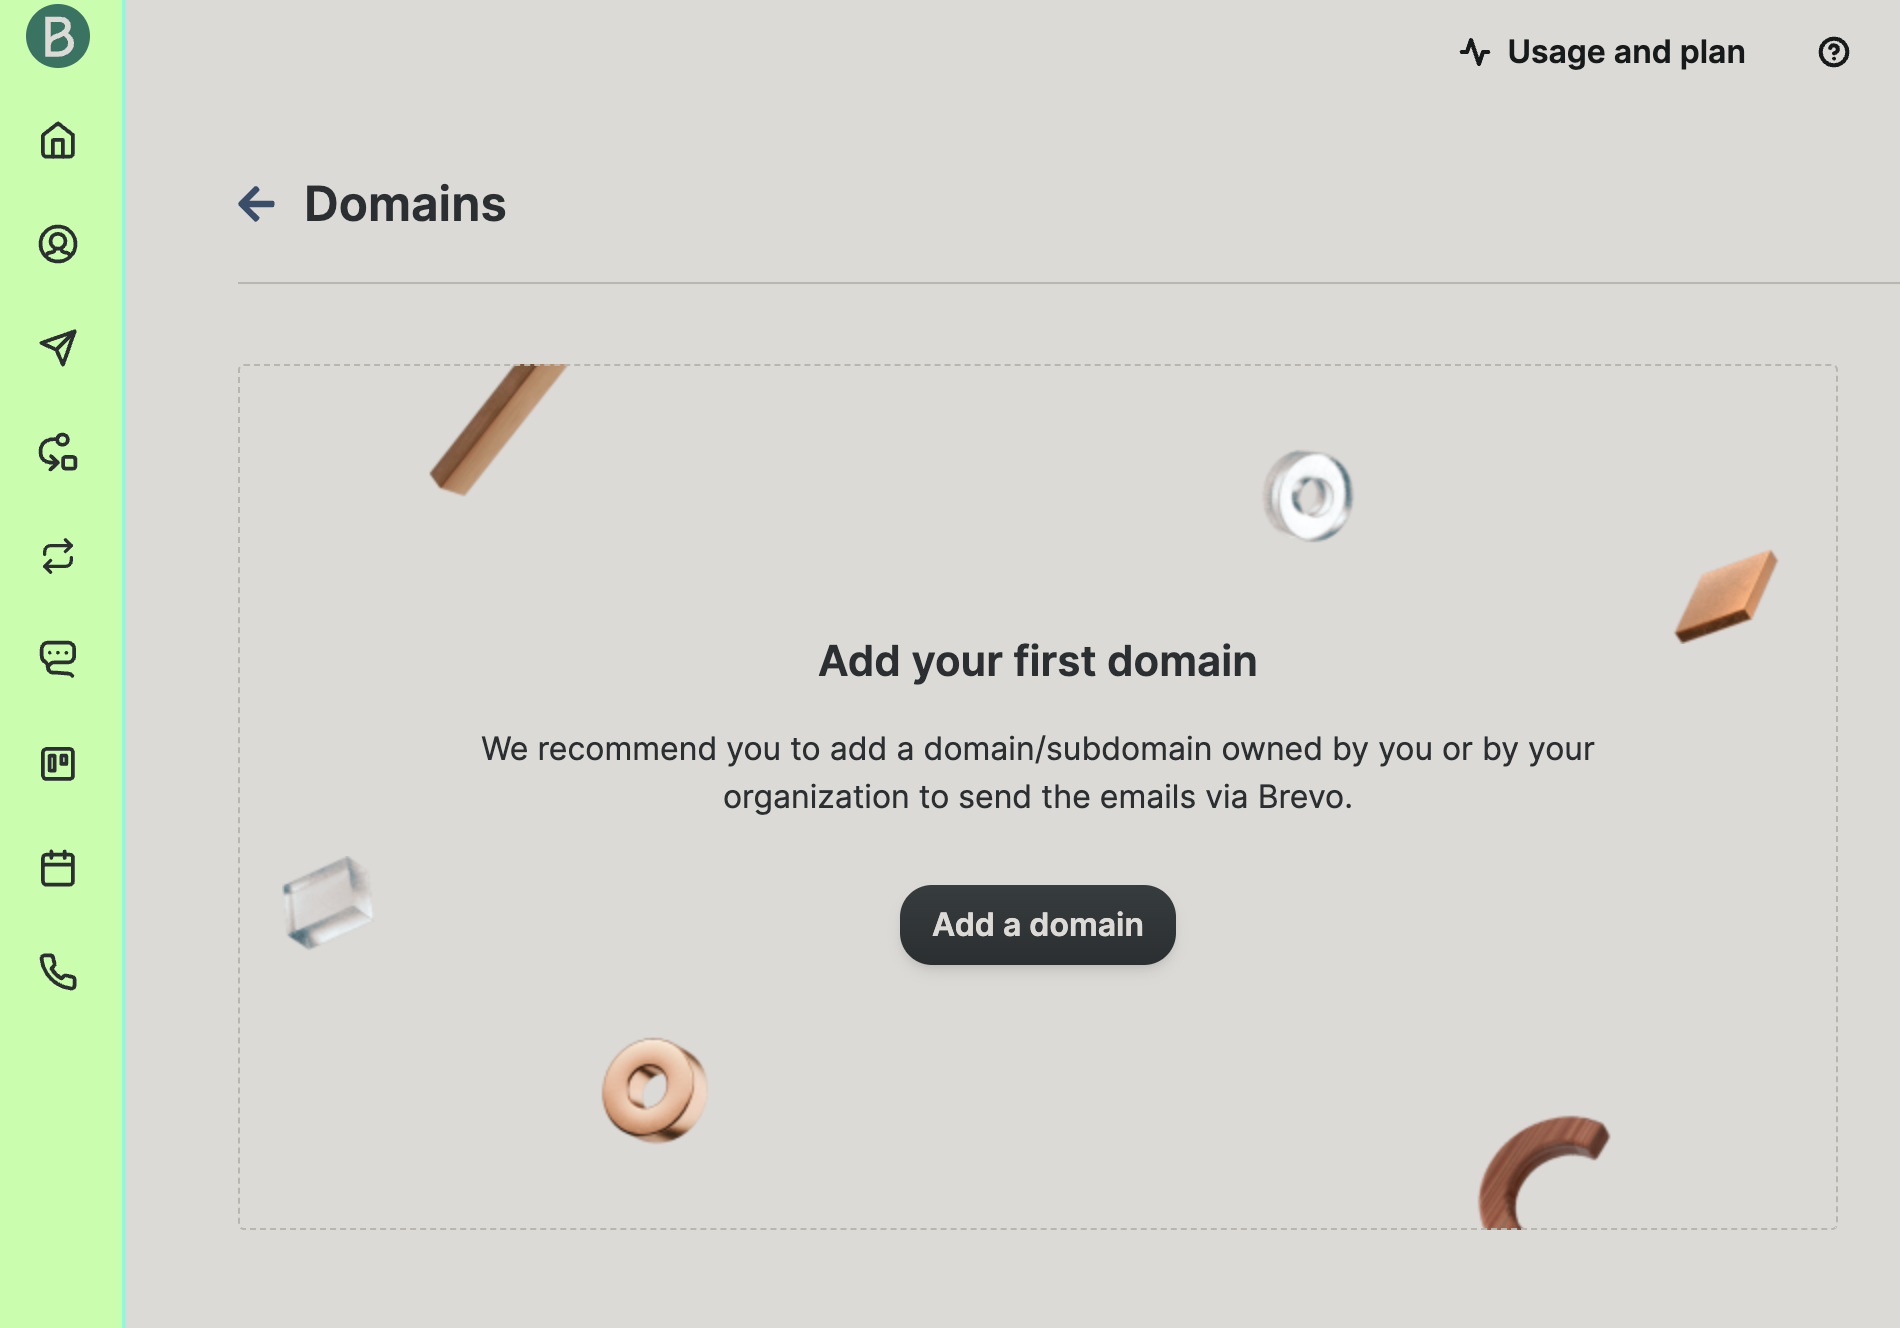
sudo chmod 0600 /etc/postfix/sasl_passwd /etc/postfix/sasl_passwd.dbBefore we proceed with test, make sure you registered your domain with Brevo. Search for Senders, Domains & Dedicated IPs. Senders, Domains & Dedicated IPs can be selected from the menu on top right corner. Select Domains

Add a domain – you will need a domain to set here. In the next step you will have to add txt value to your DNS, and also TXT value for DKIM in your DNS. After everything matches – you are good to go.
Ok, let’s test if this works
First we will install
sudo apt install bsd-mailxAnd now, finally, the test. Instead of (frombrevoemail@domain.com) you will enter your email your registered with Brevo and that you are using under SMTP Relay login. Instead of (toemail@receiver.com) you will enter email address to which you wish to send email.
echo "this is a test." | mailx -r frombrevoemail@domain.com -s "hello world" toemail@receiver.com
This probably won’t work if sender and receiver are same domain. Use different domain for sender and receiver part. Also, use different domain from the one you specified in Brevo for notifications.
In the example below – I registered with informaticar.net to Brevo and am sending email to outlook.com.

If we look into
cat /var/log/mail.logWe can see that a mail is sent successfully.

Check your spam folders if you don’t see these in your inbox. If something doesn’t work, make sure you covered Brevo correctly and go back to /etc/postfix/main.cf and /etc/postfix/sasl_passwd and check settings there. Also, go through errors in /var/log/mail.log
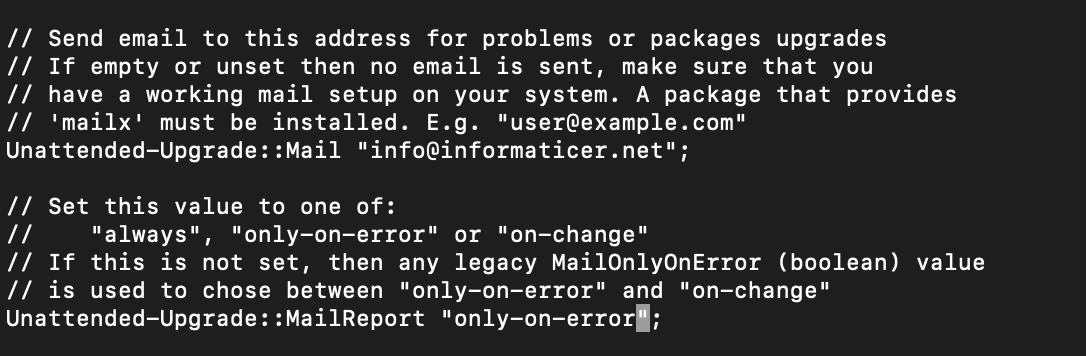
Ok, let’s wrap up with configuring mail in Unattended-Upgrade
sudo nano /etc/apt/apt.conf.d/50unattended-upgradesTwo lines we wish to uncomment:
First one is for email – you will uncomment it, and between quotation marks add your email address you wish to receive notifications on.
Unattended-Upgrade::Mail "youremail@domain.test";
Second setting is when you wish to receive email – always, on-change or only-on-error are possible values. I usually use – only-on-error
Unattended-Upgrade::MailReport "only-on-error";Ok, we are done with emails!
Test Run
We can do test run with following command
sudo unattended-upgrades --dry-runYou may get empty response (is everything is ok), so you may wish to see output of the command. In that case, and -v at the end
sudo unattended-upgrades --dry-run -v
Run Unattended-Upgrades Manually
Can be done with following command
sudo unattended-upgrade -vCheck Logs
If you wish to check the status of upgrade service and need more info, you can find logs on
cat /var/log/unattended-upgrades/unattended-upgrades.logCheck if we have Automatic Updates enabled
Simply go here
sudo nano /etc/apt/apt.conf.d/20auto-upgrades
File should look like this
APT::Periodic::Update-Package-Lists "1";
APT::Periodic::Unattended-Upgrade "1";
Value 1 enables, and 0 disables.
Don’t touch anything, just close it. It is set as it should be.
Can this service upgrade OS?
Let’s say you want to migrate from Ubuntu 22.04 to 23.10. Can Unattended-Upgrade service do that? In short – no, it cannot.
You will need to do that manually in this order
sudo apt update
sudo apt upgrade
sudo do-release-upgrade
How do I go back to manual updating?
Uninstall the package
sudo apt remove --purge unattended-upgradesAfter that we will recheck APT periodic config
sudo nano /etc/apt/apt.conf.d/10periodicIt should look like this
APT::Periodic::Update-Package-Lists "1";
APT::Periodic::Download-Upgradeable-Packages "0";
APT::Periodic::AutocleanInterval "0";
Final Tips
Check empty disk space – make a service that informs you, or check manually.
Always do backups – you never know what can go sideways. Patching/updating is not always reliable
Periodically check manually if everything is ok. Services stop – software breaks – check it.
If you are doing this on large scale, maybe find other ways to do it. Ansible?