I already showed you how to setup your own email server on Ubuntu using Postfix and Dovecot. We also added Roundcube to our setup to have web interface for our mailing solution.
Now we will add PostfixAdmin to help us manage our email server and domains.
You can find more details about PostfixAdmin here
PostfixAdmin can manage mailboxes, virtual domains, alias domains, has quota support for mailboxes…
Check out website listed above for more info.
Before we begin
You need functional LAMP stack, I already wrote about that, so make sure you prepare it.
You also need functioning email server on Ubuntu 20.04. I already wrote about that too, and you can find all the details on my blog.
Also, you will need ssl certificates (described in my email server guide) for this guide.
You will also need postfix A record in your DNS (0.123.456.789 represents IP address)
A record – postfixadmin 0.123.456.789
I’m doing all of this on my email server which has Postfix, Dovecot and Roundcube on it.
Ok, lets start
Installing PostfixAdmin on Ubuntu 20.04
First we will install dbconfig-no-thanks to prevent automatic db wizard.
sudo apt install dbconfig-no-thanksNext, we will install Postfix admin
sudo apt install postfixadmin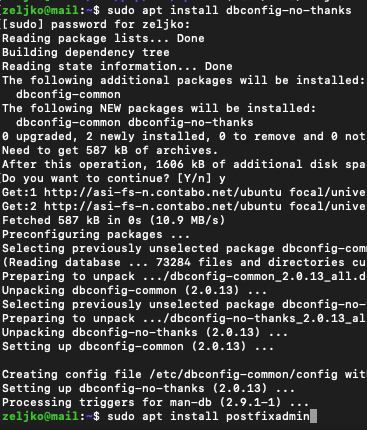
Now, we will remove dbconfig-no-thanks
sudo apt remove dbconfig-no-thanksand launch config wizard for PostfixAdmin
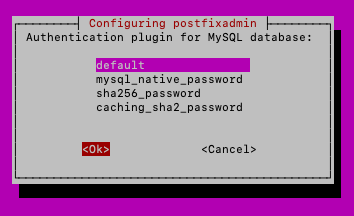
sudo dpkg-reconfigure postfixadmin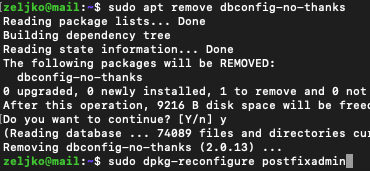
Reinstall database for postfixadmin – yes

Connection method for MySQL – Unix socket
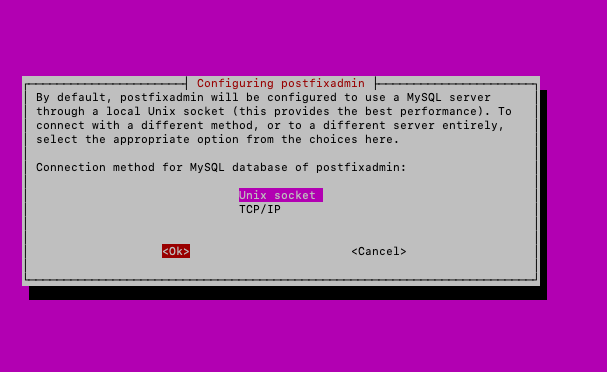
OK
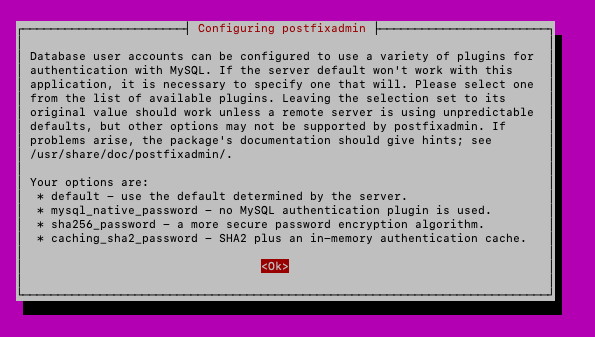
default
I will name database – postfixadmin
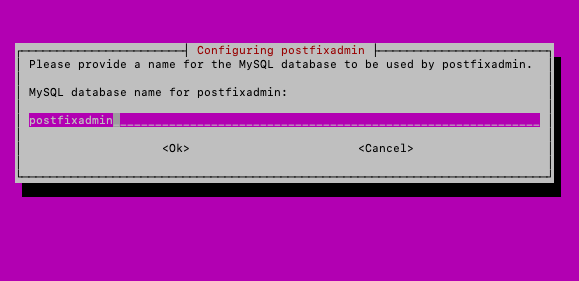
Ok
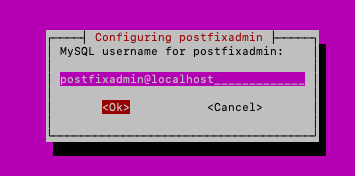
MySQL user – I will leave default postfixadmin@localhost
Next, you need to define password for your postfixadmin user
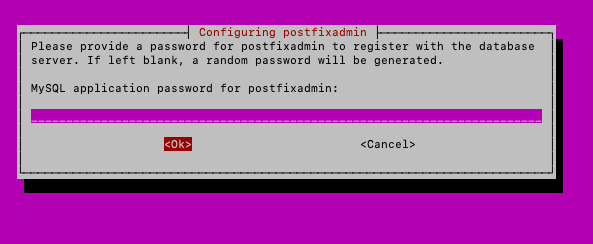
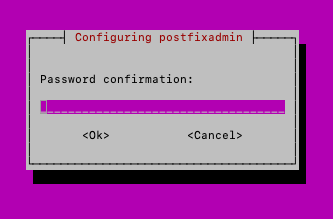
You will also need to confirm password
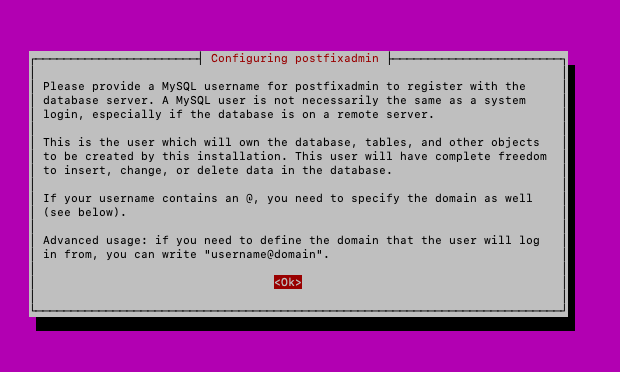
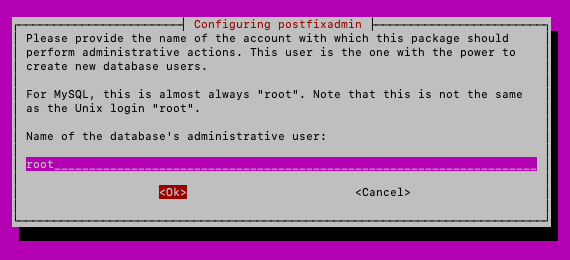
Lastly, we need to name database administrative user. For this guide, I will leave root user
Lets test our mysql created postfix user and see databases installed
mysql -u postfixadmin -pAfter login, issued command to show databases
SHOW DATABASES;Exit with following
EXIT;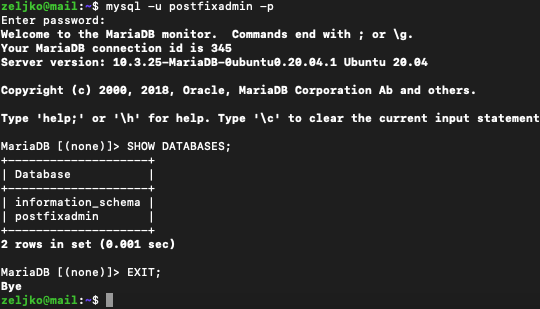
We need to edit also two configuration files created by postfixadmin – postfixadmin.conf and dbconfig.inc.php and change mysql to mysqli in those files.
sudo nano /etc/dbconfig-common/postfixadmin.confChange value from mysql to mysqli
dbc_dbtype='mysqli'
Save and exit
Postfixadmin installs web files under /usr/share/postfixadmin owned by root. We need to add templates_c directory to that path.
sudo mkdir /usr/share/postfixadmin/templates_cWe now need to set some permissions
But before we do that, we need to install acl package
sudo apt install acland now we can execute command and grant permissions to www-data to templates_c folder.
sudo setfacl -R -m u:www-data:rwx /usr/share/postfixadmin/templates_c/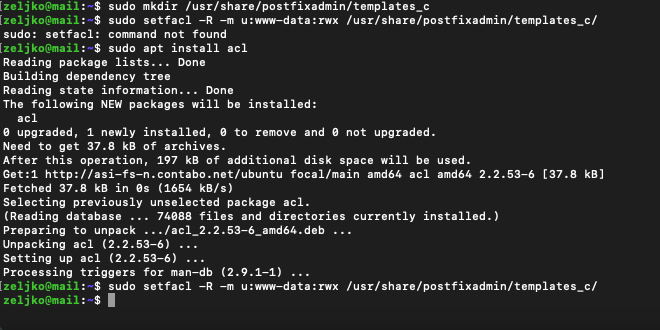
We will now configure Apache Virtual Host
Apache Virtual Host
We need to create Virtual Host file for our postfixadmin so that we can access our postfixadmin website.
sudo nano /etc/apache2/sites-available/postfixadmin.confEnter your domain name, and change your SSL certificates name and path if needed!
<VirtualHost *:443>
   ServerName postfixadmin.your_domain_or_ip
   DocumentRoot /usr/share/postfixadmin/public

ErrorLog ${APACHE_LOG_DIR}/postfixadmin_error.log
CustomLog ${APACHE_LOG_DIR}/postfixadmin_access.log combined

<Directory />
    Options FollowSymLinks
    AllowOverride All
  </Directory>

  <Directory /usr/share/postfixadmin/>
    Options FollowSymLinks MultiViews
    AllowOverride All
    Order allow,deny
    allow from all
  </Directory>

   SSLEngine on
   SSLCertificateFile /etc/ssl/certs/ssl1.crt
   SSLCertificateKeyFile /etc/ssl/private/ssl1.key
</VirtualHost>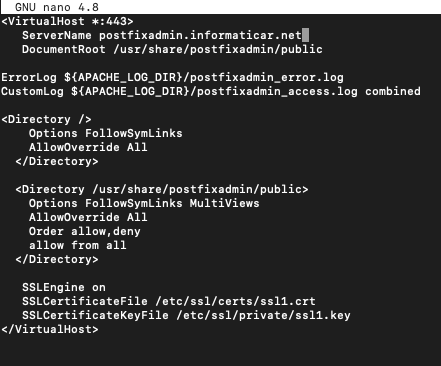
Save file and exit
Run following to enable configuration
sudo a2ensite postfixadmin.confTest your configuration
sudo apache2ctl configtestIf everything ok, restart apache
sudo systemctl reload apache2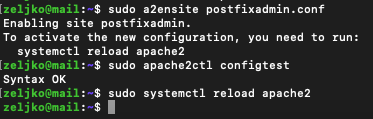
Also, before continuing be sure that you have all the PHP modules in place. You should have them if you followed my previous LAMP and email guides.
sudo apt install php7.4-fpm php7.4-imap php7.4-mbstring php7.4-mysql php7.4-json php7.4-curl php7.4-zip php7.4-xml php7.4-bz2 php7.4-intl php7.4-gmpWe won’t open just yet our website but our installation should now be available at
https://postfixadmin.informaticar.net/public/setup.php
Don’t forget to add A record for postfixadmin, or you will struggle like I did for 15 minutes to resolve why webpage won’t open :)
We will create our own settings file inside config.local.php
sudo nano /usr/share/postfixadmin/config.local.phpEnter following into file
<?php
$CONF['encrypt'] = 'dovecot:ARGON2I';

$CONF['dovecotpw'] = "/usr/bin/doveadm pw -r 5";
if(@file_exists('/usr/bin/doveadm')) { // @ to silence openbase_dir stuff; see https://github.com/postfixadmin/postfixadmin/issues/171
    $CONF['dovecotpw'] = "/usr/bin/doveadm pw -r 5"; # debian
}
Argon2 is important parameter, it enables strong password scheme

Save and close file
We will just create symlink for /etc/postfixadmin
sudo ln -s /usr/share/postfixadmin/config.local.php /etc/postfixadmin/config.local.phpOk, lets now setup our postfixadmin in web browser
PostfixAdmin web setup
Now we need to head to (change informaticar.net to your domain)
https://postfixadmin.informaticar.net/public/setup.php
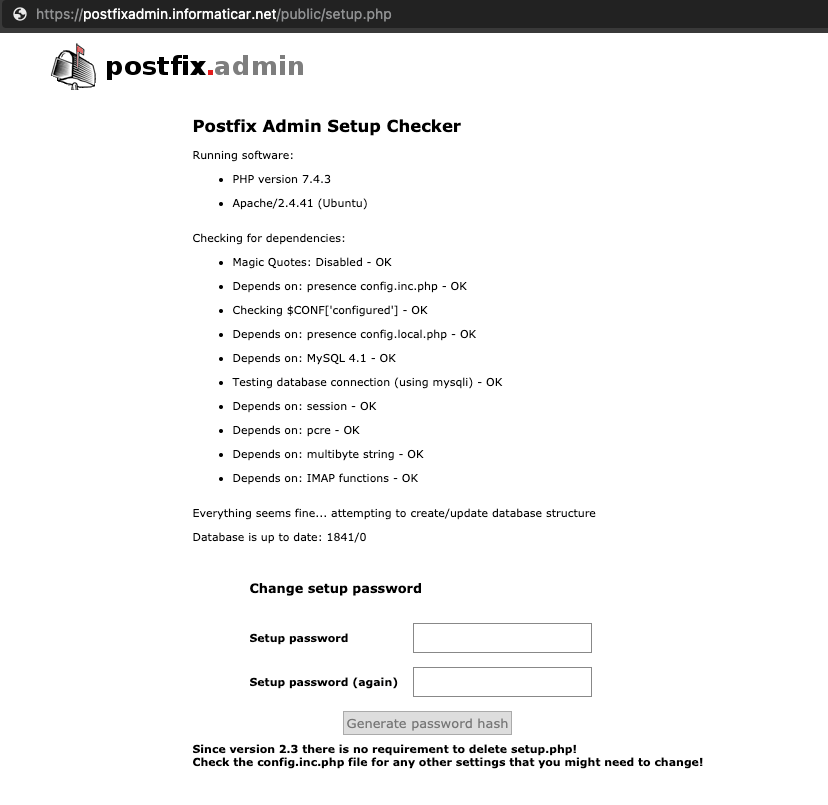
Enter setup password and click on Generate password hash
After you entered password twice and selected Generate password hash you will get following
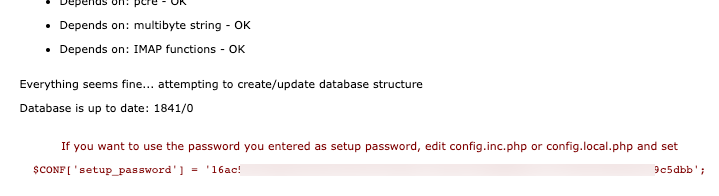
Copy that line into config.local.php
sudo nano /usr/share/postfixadmin/config.local.phpAdd following line to the bottom of the file (enter your HASH, don’t copy mine!!!)
$CONF['setup_password'] = '16ac566c68mbnrytrtyuiyuiyui:60cbiopvbn070472d5e3986ad6c29c5dbb';
Save and close file.
Go back to the webpage.
At the bottom of the page, in first field, enter password you define just now in the step before this. Enter admin account for your postfixadmin. You need to specify email address and new password.
Make sure your password has at least one capital letter, two digits and a special sign.
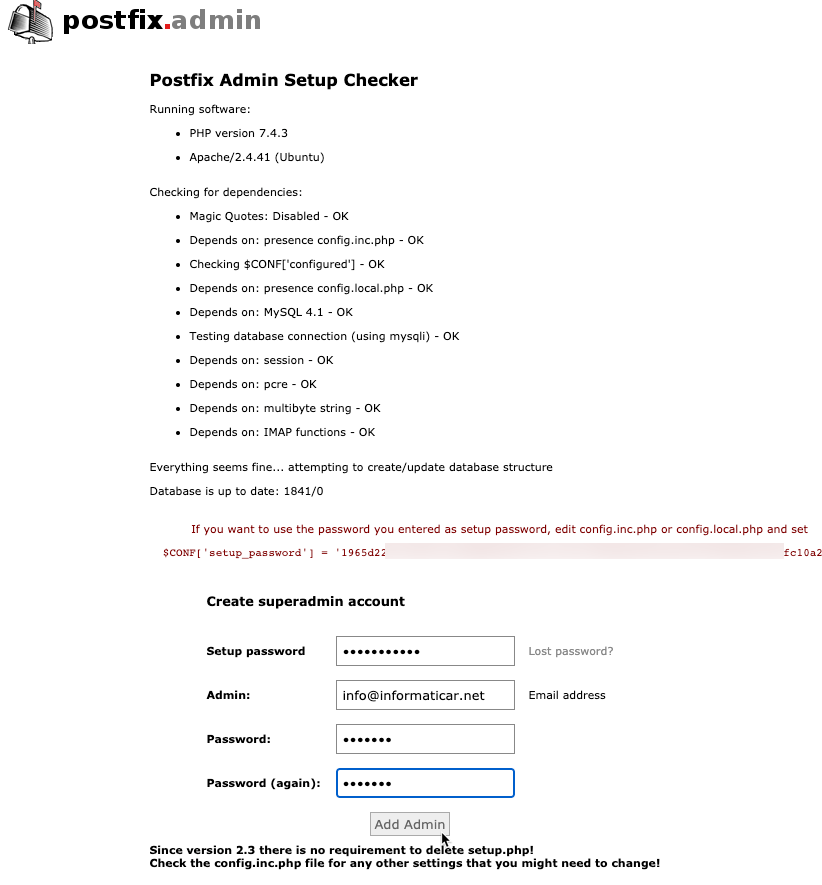
Ok, we are done with the setup.
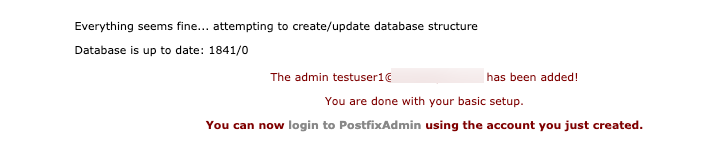
Our login site should now be available at
https://postfixadmin.informaticar.net/public/login.php
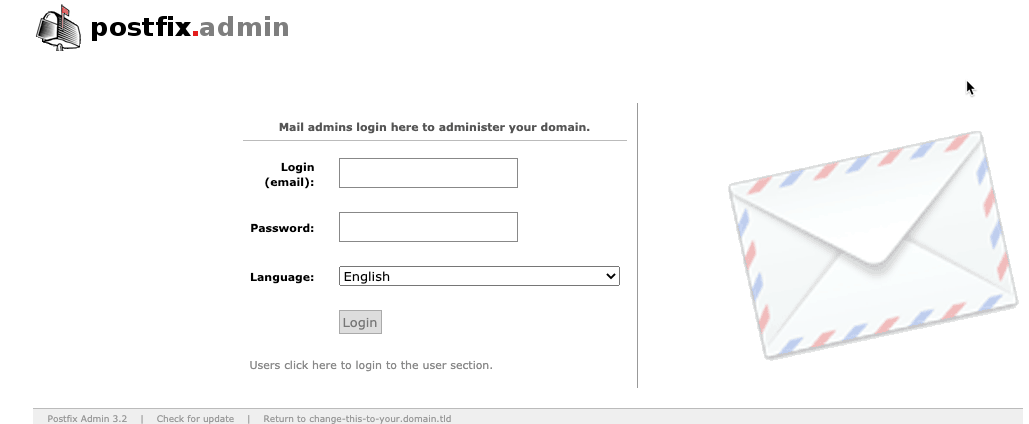
We are in.
We are still not done with this setup, we have couple more steps to do.
Check database
Let’s see what tables postfixadmin created
sudo mysql -u rootWe will now change to postfix database
USE postfixadmin;Let’s see created tables
SHOW TABLES;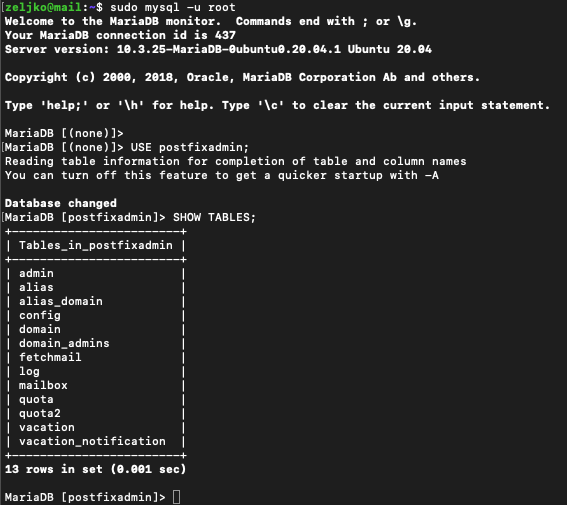
There should be 13 tables, most important are – domain, mailbox and alias.
To logout of MariaDB, enter
EXIT;Configure Postfix to use MariaDB
In the initial email setup we done, in order for user to use email, he/she need to have user account on the Ubuntu itself. We are now going to shift to virtual domain mailboxes from local accounts.
Lets configure Postfix to use virtual mailbox domains.
First, lets install MySQL support for Postfix
sudo apt install postfix-mysqlNow, we need to edit Postfix main.cf
sudo nano /etc/postfix/main.cfAdd following to the end of the file
virtual_mailbox_domains = proxy:mysql:/etc/postfix/sql/mysql_virtual_domains_maps.cf
virtual_mailbox_maps =
   proxy:mysql:/etc/postfix/sql/mysql_virtual_mailbox_maps.cf,
   proxy:mysql:/etc/postfix/sql/mysql_virtual_alias_domain_mailbox_maps.cf
virtual_alias_maps =
   proxy:mysql:/etc/postfix/sql/mysql_virtual_alias_maps.cf,
   proxy:mysql:/etc/postfix/sql/mysql_virtual_alias_domain_maps.cf,
   proxy:mysql:/etc/postfix/sql/mysql_virtual_alias_domain_catchall_maps.cf
We also need dovecot to deliver incoming emails to virtual users message stores so we will enter following below lines that we already entered.
virtual_transport = lmtp:unix:private/dovecot-lmtp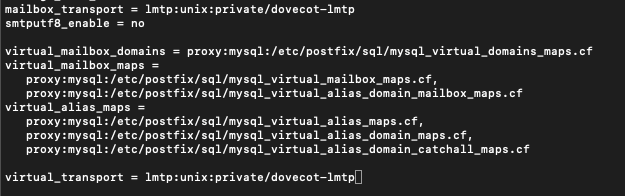
Save and exit.
Now, we need to create directories we specified above in main.cf file. We will also need to create some configuration files specified above.
Lets get to work.
sudo mkdir /etc/postfix/sql/We will now create mysql_virtual_domains_maps.cf file
sudo nano /etc/postfix/sql/mysql_virtual_domains_maps.cfEnter following – replace password with the password you created for postfixadmin account at the beggining of this guide in the wizard we went through just after installing Postfixadmin
user = postfixadmin
password = password
hosts = localhost
dbname = postfixadmin
query = SELECT domain FROM domain WHERE domain='%s' AND active = '1'
#query = SELECT domain FROM domain WHERE domain='%s'
#optional query to use when relaying for backup MX
#query = SELECT domain FROM domain WHERE domain='%s' AND backupmx = '0' AND active = '1'
#expansion_limit = 100
Next, we will create mysql_virtual_mailbox_maps.cf
sudo nano /etc/postfix/sql/mysql_virtual_mailbox_maps.cfEnter following in the file.
Again, change password with your postfixadmin pass
user = postfixadmin
password = password
hosts = localhost
dbname = postfixadmin
query = SELECT maildir FROM mailbox WHERE username='%s' AND active = '1'
#expansion_limit = 100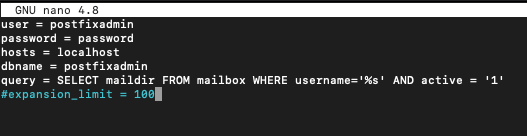
Create mysql_virtual_alias_domain_mailbox_maps.cf
sudo nano /etc/postfix/sql/mysql_virtual_alias_domain_mailbox_maps.cfAdd following (remember to change pass…
user = postfixadmin
password = password
hosts = localhost
dbname = postfixadmin
query = SELECT maildir FROM mailbox,alias_domain WHERE alias_domain.alias_domain = '%d' and mailbox.username = CONCAT('%u', '@', alias_domain.target_domain) AND mailbox.active = 1 AND alias_domain.active='1'
Again, we will create another one named mysql_virtual_alias_maps.cf
sudo nano /etc/postfix/sql/mysql_virtual_alias_maps.cfAnd add following content
user = postfixadmin
password = password
hosts = localhost
dbname = postfixadmin
query = SELECT goto FROM alias WHERE address='%s' AND active = '1'
#expansion_limit = 100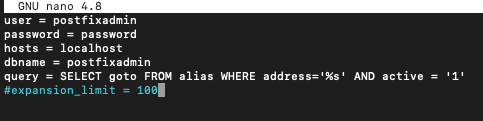
Create mysql_virtual_alias_domain_maps.cf
sudo nano /etc/postfix/sql/mysql_virtual_alias_domain_maps.cfAdd following
user = postfixadmin
password = password
hosts = localhost
dbname = postfixadmin
query = SELECT goto FROM alias,alias_domain WHERE alias_domain.alias_domain = '%d' and alias.address = CONCAT('%u', '@', alias_domain.target_domain) AND alias.active = 1 AND alias_domain.active='1'
Create file
sudo nano /etc/postfix/sql/mysql_virtual_alias_domain_catchall_maps.cfEnter following into file
# handles catch-all settings of target-domain
user = postfixadmin
password = password
hosts = localhost
dbname = postfixadmin
query = SELECT goto FROM alias,alias_domain WHERE alias_domain.alias_domain = '%d' and alias.address = CONCAT('@', alias_domain.target_domain) AND alias.active = 1 AND alias_domain.active='1'
Ok, that should be more or less it, we created all necessary files

We need to modify some permissions and make data readable only to postfix and root since everyhing is in plain text.
sudo chmod 0640 /etc/postfix/sql/*
sudo setfacl -R -m u:postfix:rx /etc/postfix/sql/
We also need to check mydestination paramater in Postfix
postconf mydestinationOutput should be something like this
mydestination = $myhostname, informaticar.net, localhost.informaticar.net, mail.informaticar.net, localhostSince we are going to use virtual mailbox we need to modify some parameters
sudo postconf -e "mydestination = \$myhostname, localhost.\$mydomain, localhost"
Now, lets open main.cf file again
sudo nano /etc/postfix/main.cfAdd following to the end of the line
virtual_mailbox_base = /var/vmail
virtual_minimum_uid = 2000
virtual_uid_maps = static:2000
virtual_gid_maps = static:2000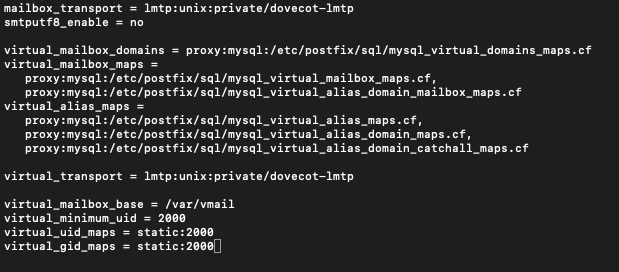
Save and exit file
We need to restart Postfix
sudo systemctl restart postfixwe need to add user vmail with uid 2000
sudo adduser vmail --system --group --uid 2000 --disabled-login --no-create-homeWe will also create mail base station
sudo mkdir /var/vmail/and make vmail owner
sudo chown vmail:vmail /var/vmail/ -R
Ok, we are done with Postfix.
Configure Dovecot to use MariaDB
We need also to configure Dovecot IMAP so it can query users from database.
Lets first install something
sudo apt install dovecot-mysqlNow, we wil ledit some more files :)
sudo nano /etc/dovecot/conf.d/10-mail.confEarlier, if you configured email server with my guide, we configured mail_location to use maildir.
We now need to enable mail_home since we are going to use virtual users who don’t have their home folders
mail_home = /var/vmail/%d/%n/I mentioned this part also in my email guide, but now, we need it, so make sure it is enabled and configured.
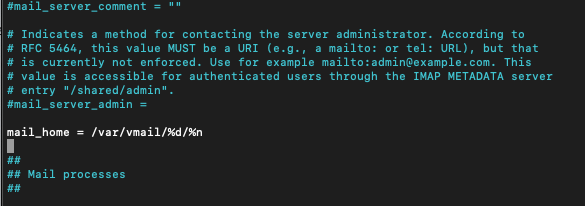
Save and close
We now need to edit 10-auth.conf file.
sudo nano /etc/dovecot/conf.d/10-auth.confWe need to change in auth_username_format from n (which drops domain extension) to u – which won’t drop domain away.
auth_username_format = %uAlso, at the bottom of the file, uncomment following
!include auth-sql.conf.extAlso, uncomment following line to prevent local users to send emails without registering in PostfixAdmin
#!include auth-system.conf.ext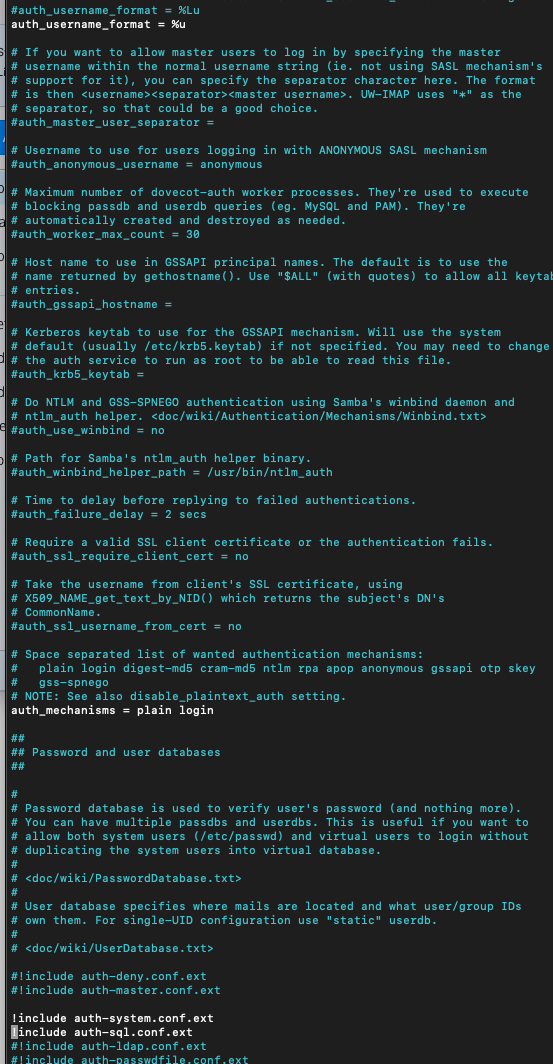
In the end, add following two lines so you can debug login issues.
auth_debug = yes
auth_debug_passwords = yes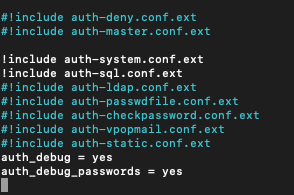
Save and close file.
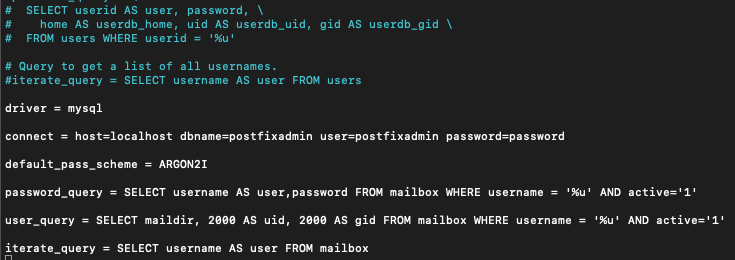
Ok, we now need to create and edit dovecot-sql.conf.ext file
sudo nano /etc/dovecot/dovecot-sql.conf.extAdd these lines to the bottom of the file, and just like in Postfix config part, change password with your postfixadmin pass.
driver = mysql

connect = host=localhost dbname=postfixadmin user=postfixadmin password=password

default_pass_scheme = ARGON2I

password_query = SELECT username AS user,password FROM mailbox WHERE username = '%u' AND active='1'

user_query = SELECT maildir, 2000 AS uid, 2000 AS gid FROM mailbox WHERE username = '%u' AND active='1'

iterate_query = SELECT username AS user FROM mailbox
Restart Dovecot
sudo systemctl restart dovecotAdd Domain to PostfixAdmin
Log back in to your PostfixAdmin web interface
https://postfixadmin.informaticar.net/login.php
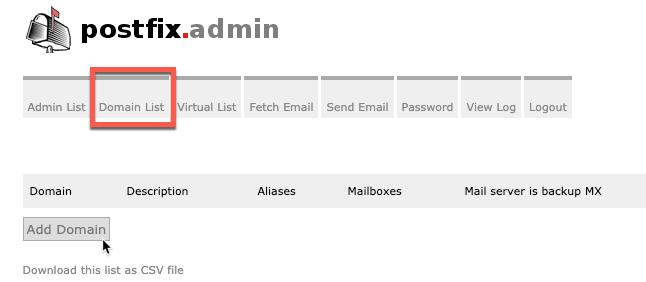
Go to Domain List and click on Add Domain
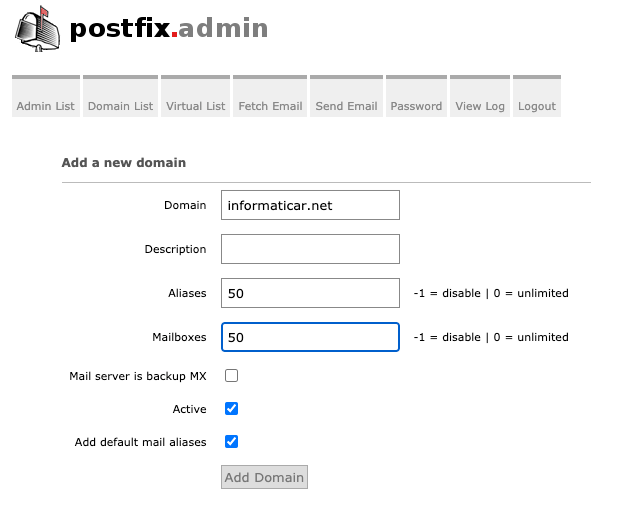
Define your domain and click on Add Domain
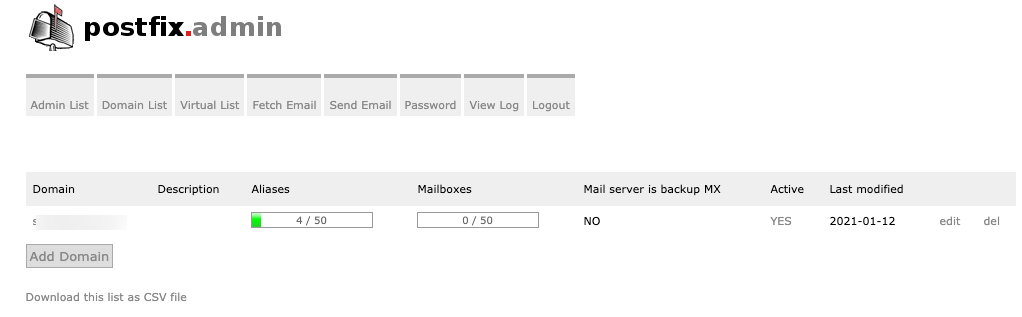
If you click back on Domain List, you should now see your domain listed
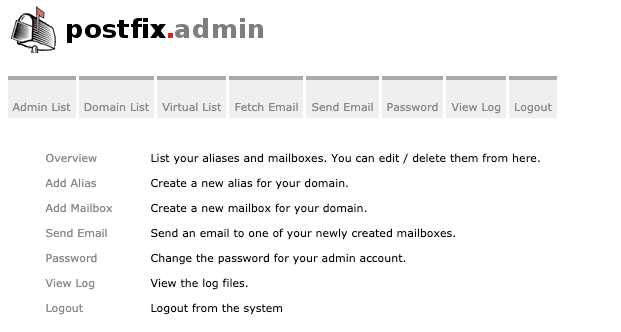
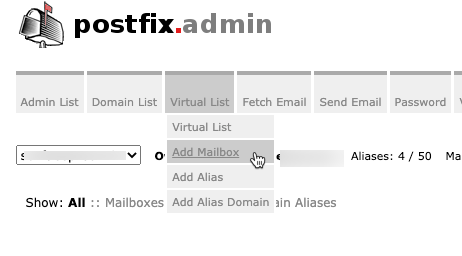
Now, lets add new mailbox. Click on Virtual List – Add Mailbox
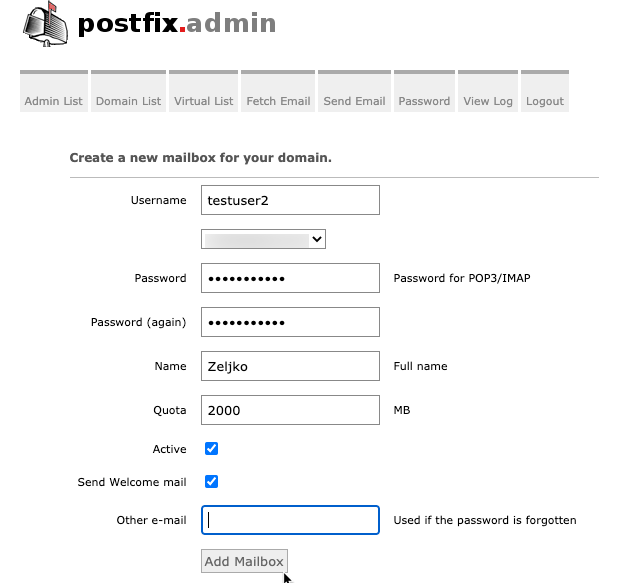
I will define testuser2 and select Add Mailbox
I successfully logged in to new created account via Roundcube. You can also add this account via email client, I already showed that part in my email setup guide.
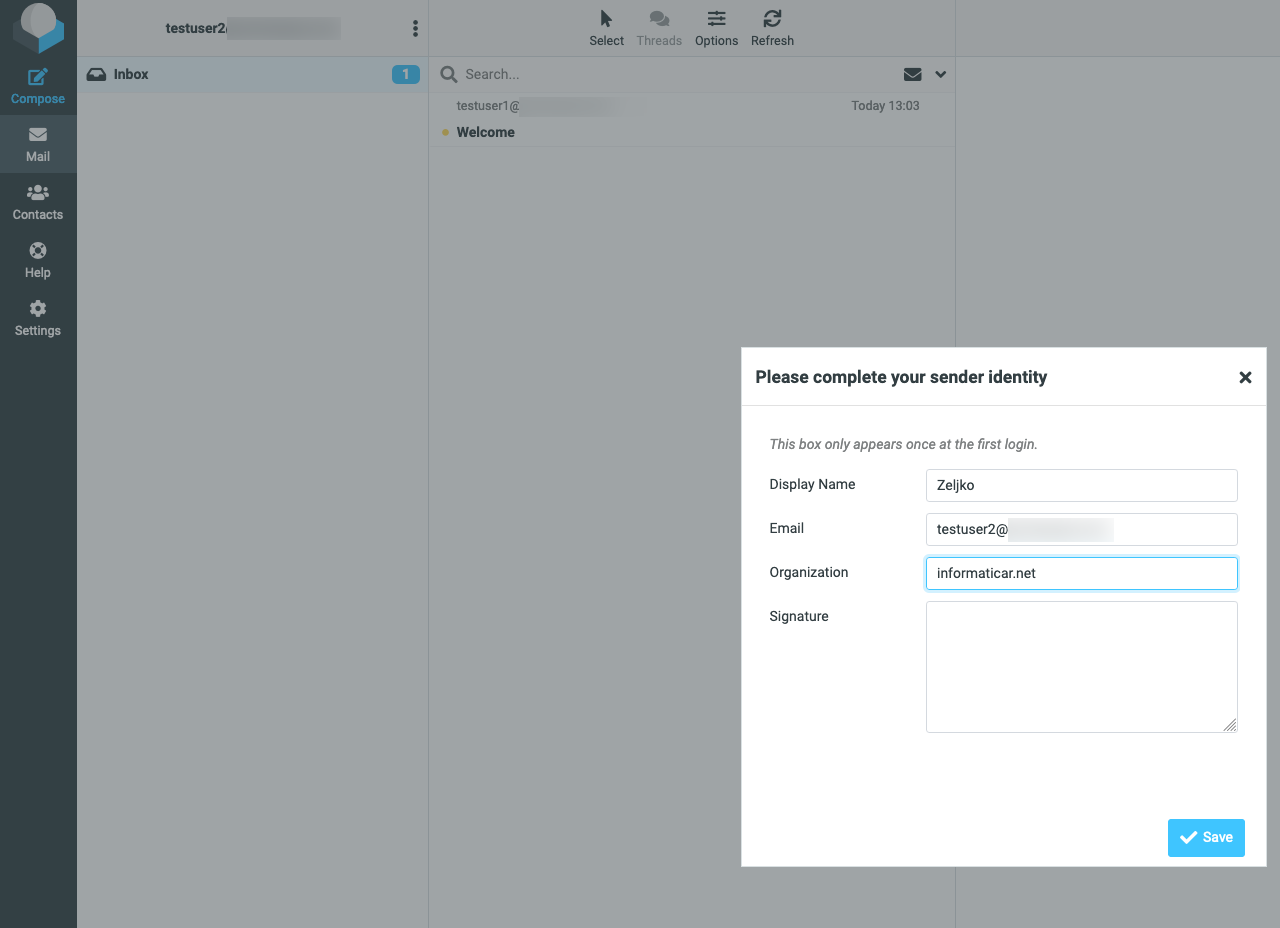
I tried to send/receive emails and other functionalities, all works well.