We already went through email and DNS setup, but there is one thing I haven’t covered yet and is making life miserable for every IT guy/girl – spam.
You can manage spam via Postfix and here are some tips on how to do it.
Usually spammers don’t have PTR record for their email, they don’t resend emails if delivery fails (you can use tarpiting). Also, they usually forge Form field and they have no valid hostname in HELO/EHLO.
Ok, so let’s see how we can mitigate some of these issues.
Before we begin
I’m doing this on my already installed email server, which resides on Ubuntu 20.04. You can check more details on my blog.
All of these are supplement measures for antispam/antivirus solution and will make job easier for your other antispam/antivirus measures.
Greylisting in Postfix
Greylisting will not replace antispam but can make life easier for it. This measure is very effective but can also have some penalties for end user. I will also say – first test this before prouction, it may slow your email communication significantly – test before you put it into production, and see if this technique fits your need.
Basically, what greylisting does is when someone sends you email and your email server receives it, it tells to the sending server – can you please try again later? Legit email server will try again and have it’s email delivered. Most spammers don’t have time for this.
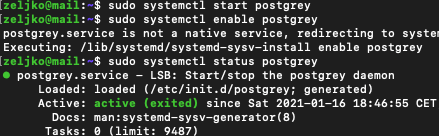
sudo apt install postgreyStart the service and enable auto start.
sudo systemctl start postgrey
sudo systemctl enable postgrey
Open Postfix main.cf file
sudo nano /etc/postfix/main.cfAdd following under smtpd_recipient_restrictions
check_policy_service inet:127.0.0.1:10023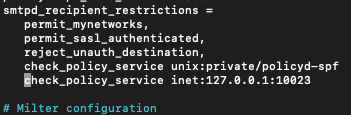
Save the file and exit.
Restart Postfix
sudo systemctl restart postfixYou can check if service is running by running following command
sudo netstat -lnpt | grep postgreyIf you don’t have netstat installed on your server, you can install it by running – sudo apt install net-tools
Command returns nothing when I enter it.

It should return that postgrey is listening on port 10023. But it is not.
Let’s edit postgrey file
sudo nano /etc/default/postgreyEdit line POSTGREY_OPTS so that it look like this
POSTGREY_OPTS="--inet=127.0.0.1:10023"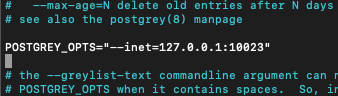
Save file and exit.
Restart Postgrey
sudo systemctl restart postgreyAnd let’s now check once again if the postgrey is listening.
sudo netstat -lnpt | grep postgreyIt is now

Greylisting is slow for end users…
Greylisting can be somehow bad experience for a user, because users wait more time for emails.
To mitigate this we can do following
Whitelist
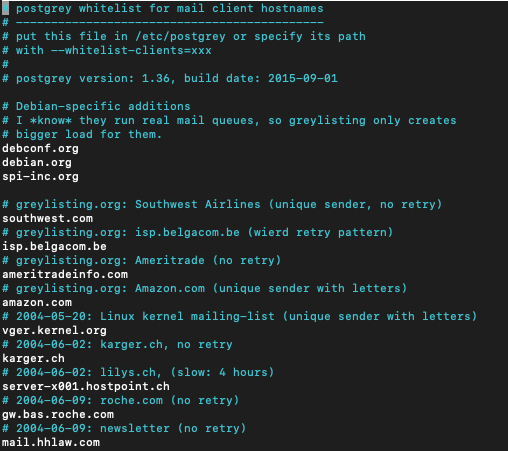
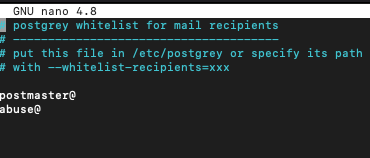
/etc/postgrey/whitelist_clients and /etc/postgrey/whitelist_recipients are files we need. First one has hostnames in it, and second one – recipients addresses.
This is part of the whitelist_client file by default after install
and this is the part of whitelist_recipients file
After editing these files, restart postgrey.
sudo systemctl restart postgreyCreate another MX record
You can also make this faster by simply creating another MX record with slightly higher weight record on the same IP. For example mail.informaticar.net with weight 10 and mail1.informaticar.net with weight 15. Both MX records on same IP address. In theory, if the mail.informaticar.net ask sending server to try later, it should immediately try on mail1.informaticar.net and user should receive email immediately instead of waiting for greylisting to do its thing.
You should also edit /etc/default/postgrey and add –delay=1 swich for this to work.
POSTGREY_OPTS="--inet=127.0.0.1:10023 --delay=1"In the end, this method is not 100% know for working, because it depends on sending email server. Maybe it won’t immediately try second MX record.
Reject email if it has no PTR record.
We already covered this in the email server installation guide and DNS guide. PTR record is one of the prerequisites if you want your email server to function properly.
I will not get into details about PTR because I already did that in previous guides.
To fiter emails without PTR record we need to edit main.cf file in Postfix.
sudo nano /etc/postfix/main.cfI don’t have smtpd_sender_restrictions in my main.cf file, so I will add this to the bottom of the file.
smtpd_sender_restrictions =
   permit_mynetworks
   permit_sasl_authenticated
   reject_unknown_reverse_client_hostname
If you have mtpd_sender_restrictions in my main.cf file just add following
reject_unknown_reverse_client_hostname
Save end exit file.
Restart Postfix service
sudo systemctl restart postfixEnable HELO/EHLO restrictions
Some spammers don’t have valid hostname in their HELO/EHLO SMTP dialog. Their HELO/EHLO can have invalid domains or internal domains listed.
To enable HELO/EHLO restrictions we will once again open main.cf file of Postfix.
sudo nano /etc/postfix/main.cfAdd following line
smtpd_helo_required = yesThen add following lines also to the same file in the smtpd_helo_restrictions section (or create one at the bottom of the file). I think that the lines are self-explanatory.
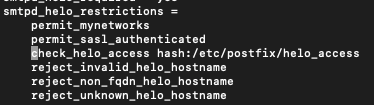
smtpd_helo_restrictions =
    permit_mynetworks
    permit_sasl_authenticated
    reject_invalid_helo_hostname
    reject_non_fqdn_helo_hostname
    reject_unknown_helo_hostname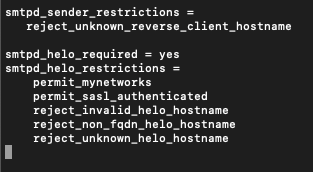
Save and exit file.
Reboot Postfix
sudo systemctl reload postfixThere are cases where legitimate email servers don’t have A record for HELO/EHLO hostname. We can whiteliste those servers by adding check_helo_access line that we will add to the smtpd_helo_restrictions in the main.cf file
check_helo_access hash:/etc/postfix/helo_accessThis is how it look like now
We also need to add the helo_access file.
sudo nano /etc/postfix/helo_accessServers should be listed like this in that file
email-webtest-prod-2.local          OK
ca-emailmark-01.informaticar.net    OK
You can leave these as a placeholders in the file so you have an idea how to add entries in the future.
Save and exit file.
We need to run following command to create /etc/postfix/helo_access.db file.
sudo postmap /etc/postfix/helo_accessReload Postfix
sudo systemctl reload postfixReject email if SMTP hostname don’t match/have valid A record.
The legitimate email server needs to have matching host A record in DNS.
In order to filter out emails that don’t have valid A record we need to do again main.cf file of Postfix again.
sudo nano /etc/postfix/main.cfunder smtpd_sender_restrictions section add two following lines
reject_unknown_reverse_client_hostname
reject_unknown_client_hostname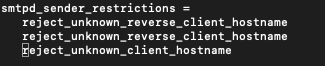
Save and close file.
Restart Postfix.
sudo systemctl restart postfixReject email if it does not have MX or A DNS record
Some spammers use non existent domain in MAIL FROM (also known as envelope address) field. If the sender has no MX record or A record, Postfix cannot send email to it, so why not reject it if you cannot reply to it – that should be a sound logic (I think :) )
Edit main.cf in Postfix
sudo nano /etc/postfix/main.cfUnder smtpd_sender_restrictions add following. It is good practice to put this at the top of reject rules in the smtpd_sender_restrictions part so that it executes first.
reject_unknown_sender_domain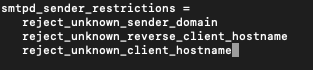
Save and close file.
Restart Postfix
sudo systemctl restart postfixUse Public Realtime Blacklists
These can be powerful tools.
We will again edit main.cf from Postfix
sudo nano /etc/postfix/main.cfUnder smtpd_recipient_restrictions we need to add following
   reject_rhsbl_helo dbl.spamhaus.org,
   reject_rhsbl_reverse_client dbl.spamhaus.org,
   reject_rhsbl_sender dbl.spamhaus.org,
   reject_rbl_client zen.spamhaus.org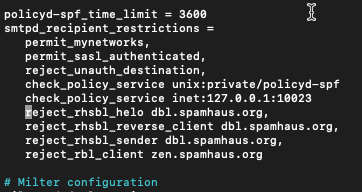
Save the file and exit
rhs – right hand side, domain name
reject_rhsbl_helo – will reject blacklisted HELO/EHLO hostnames
reject_rhsbl_reverse_client – if PTR record is blacklisted, mail will be rejected.
reject_rhsbl_sender – if MAIL FROM is blacklisted, email will be rejected.
reject_rbl_client – if IP is blacklisted, email will be rejected.
Create a whitelist
There may be exceptions you will need to whitelist.
Create following file
sudo nano /etc/postfix/rbl_overrideEnter something like following line to whitelist
informaticar.net OK //This domain belongs to Zeljko M, it is ok.Save and close file.
We also need to create rbl_override.db file.
sudo postmap /etc/postfix/rbl_overrideAgain, we need to edit main.cf Postfix file
sudo nano /etc/postfix/main.cfUnder smtpd_recipient_restrictions we need to add following
check_client_access hash:/etc/postfix/rbl_override,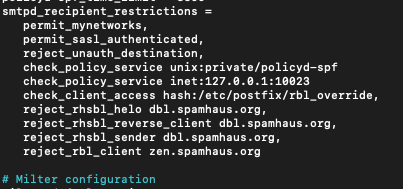
Save and exit
Restart Postfix
sudo systemctl reload postfixUsing Public Whitelist
If you wish to reduce false positives, public whitelist should be added.
Edit main.cf in Postfix
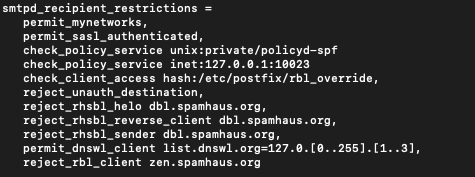
sudo nano /etc/postfix/main.cfAdd following to the file, add it above reject_rbl_client line
permit_dnswl_client list.dnswl.org=127.0.[0..255].[1..3],You can also add following to the file
permit_dnswl_client swl.spamhaus.org,I haven’t add last one to my filters
Save file and exit.
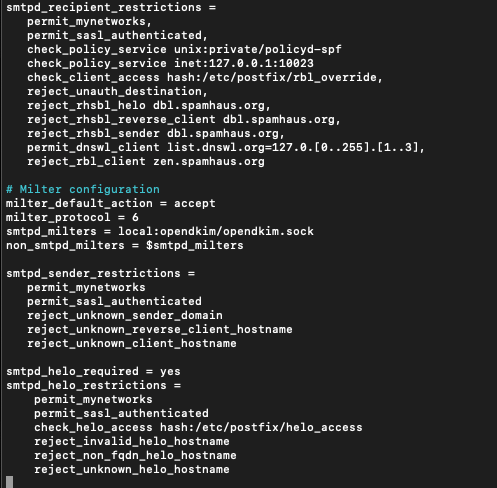
Here is overview of my filters
Other good practices
Enable DMARC policy.
I already talked about that, check my blog post about email DNS setup.
Make sure your email server is not an open relay!!!
I cannot stress this one enough. Being open relay will get you blacklisted very quickly.
Open main.cf in Postfix
sudo nano /etc/postfix/main.cfFind following line and check that it is just as the one specified below.
smtpd_relay_restrictions = permit_mynetworks permit_sasl_authenticated defer_unauth_destinationInstall Fail2ban
I already talked about this in Ubuntu Server Hardening guide.
Here is just a quick recap of commands.
To install it, run following
sudo apt install fail2banCheck if the service is started
sudo systemctl status fail2banBy default Fail2ban bans client IP for 10 minutes if it failed auth 5 times. The ban is done by adding iptables firewall rules. You can check rules by typing in
sudo iptables -LEdit /etc/fail2ban/jail.local to enable SMTP AUTH attack
sudo nano /etc/fail2ban/jail.localAdd following
[postfix-flood-attack]
enabled  = true
bantime  = 10m
filter   = postfix-flood-attack
action   = iptables-multiport[name=postfix, port="http,https,smtp,submission,pop3,pop3s,imap,imaps,sieve", protocol=tcp]
logpath  = /var/log/mail.log
You can also whitelist IPs by adding them to the same file like this (separate by space)
ignoreip = 127.0.0.1/8 ::1 111.222.333.444Also, you can specify (in the same file) how many failed attempts you wish to tolerate.
maxretry = 4Save and close file.
We also need to create filter
sudo nano /etc/fail2ban/filter.d/postfix-flood-attack.confAdd following
[Definition]
failregex = lost connection after AUTH from (.*)\[<HOST>\]
ignoreregex =
Save and close
Restart fail2ban
sudo systemctl restart fail2ban/var/log/fail2ban.log is location in which you can check logs, and see auth attempts to your email server.
If you want to manually block somebody, you can do so by entering following
sudo ufw insert 1 deny from 111.222.333.444 to anyOk, that is it more or less on this topic, we will also setup other antispam filters on our mail server, just to be extra careful.