In order for you email to work and people can send and receive mails without problems you need to set DNS server records properly. Also, additional DNS records like SPF and DKIM can help your email server reputation, and better spam detection.
Lets go through simple DNS setup for email server.
I will show you my DNS setup. There are a lot of ways you can host DNS – you can do it yourself, you can do it as a dedicated service, at your domain registrar, VPS provider (if you are using VPS VM at hosting provider).
Lets start with basics.
There are few things you need to have a website or email server available on the internet.
In order to have a service on the internet, you need domain name. Like for instance – my domain is named informaticar.net.
Buy a domain
You go to the domain registrar, like namecheap.com (not afiliated in any way, I just have good experience with them) and search for a name you like and see if it available. A lot of domains are already registered, so you will have to be creative.
Let’s say we bought informaticar.net domain name
Get an fixed public IP address
Once you bought domain – lets say we bought informaticar.net for a sake of this guide we need a couple of more components.
You need fixed public IP address – there are many ways you can host your services on the internet, but having fixed public IP is the most serious and reliable way to host your services.Fixed pubic IPv4 addresses are hard to come by and usually you home internet service and mobile data plan does not have fixed public IP.
How do I get public IP? You get internet connection (usually fiber optics) with fixed public IP (which can be expensive, depending or where do you live, or might be unavailable), or you select hosting company and host you internet services there (rent web/mail hosting, rent VPS, or arrange collocation for your machine at hosting provider). Renting VPS is my prefered way through which I get fixed IP at the same time.
Lets say we got a VPS machine with public IP address of 0.111.222.333 (this is not real or valid public IP address, but it will help us to distinguish concepts further on)
Get machine to put your web services on and connect your domain to
You bought domain because you want to host website, mail server or some other web/cloud service. You need to install these services somewhere. You are reading this because probably you want to know more and do something yourself. So, I won’t be talking about classic web/email hosting here. As I already mentioned, I like to host my web services through VPS.
What is VPS – virtual private server. You select hardware config (cpu, ram and disk space) OS you like to use (Windows, Linux) and provider sets for you clean virtual machine in the datacenter with which you can do what you want, install what you want (as long as it is legal).
With VPS you usually get your own fixed public IP address, be it IPv4 or IPv6 address.
VPS provider I like most is Contabo Again, I’m not affiliated with them, I use them for about 10 years, and (knock on the wood) they have been great so far.
DNS
Ok, so we established that we bought domain, got a VPS machine with fixed public IP address, and we want to install website and email server on that VPSmachine. But how will the world know that our website/email server is hosted on that specific VPS machine somewhere in data center?
We need DNS. With DNS we will connect our domain name with the public IP address of our VPS machine, so that anyone in the world can get our web service just by typing our domain name.
Ok, but where do I get DNS and how do I configure it? You can host DNS yourself, but this article will not teach you that.
You can host DNS through your domain registrar usually, or VPS provider. I know for a fact that both Namecheap and Contabo have DNS service.
For a simplicity of this tutorial we will use Premium DNS from Namecheap. So, webiste where I bought domain will also host my DNS. It can be also done via Contabo control panel of the VPS, but here, we are going to do it through Namecheap.
There are a lot of different ways to do any of these steps, but we will select this way. Ok ,lets start with DNS.
Setup DNS for email service
Namecheap will configure nameserver and basic stuff for your domain. You just need to add records you need.
For a email server, we need A record, MX record and PTR record.
DNS values as standardized, so everything I write here can be done on any other DNS server in the world.
For a email server to work we need to create something like mail.informaticar.net
I usually add mail. for my mail servers.
A record
Ok, so first we need to create A record. A record will have host name mail and value of a public IP 0.111.222.333
A record
mail   0.111.222.333
Ok, I changed IP address from the screenshot to hide my real one from the production system (although it is easy to find)
So, this is how that record would look like.

Now, if anyone in the world types in mail.informaticar.net they will be redirected right to your VPS server on IP 0.111.222.333 and if you have service alive and passing through firewall you would get response.
MX Record
MX record is specific to email communication. We will simply create mx record with value mail.informaticar.net.
You will also need to specify “weight” so that would be 10.
What is weight meaning. Lower weight – higher priority. I serious production systems you have more than one mail server.
Lets say you have two email servers. One is mail.informaticar.net with weight of 10 and second one is mail1.informaticar.net with weight of 30. Anyone on the internet who wishes to send you email will look first for the server with lower weight – so, they would try to access mail.informaticar.net first, and then, if it is not reachable, server would look for higher value and try to send to those email servers.
Ok, so we will select MX record and type following
mail.informaticar.net 10
Last one in these is PTR record
PTR record
Pointer record translates from IP address to domain name. It is reverse DNS record. It is extremely important record, because if PTR record doesn’t match your mail server name and IP, you can have problems and be listed as spammer.
For this record, if you internet connection with fixed public IP you will have to ask you ISP to enter this record for you.
Since we have VPS machine, Contabo is good enough to have that organized through the Control Panel of the VPS
So, you would simply go to revers DNS management, and enter following
IP address                      Name (PTR record)
0.111.222.333                 mail.informaticar.net
Check DNS configuration
On sites like mxtoolbox.com you can check your DNS configuration
MX Lookup
Ok, so the internet know that we exist.

You can also do here DNS Lookup, test email server once it is done.
We will do also email server test right now to see if we got our PTR record right. Ok, SMTP Reverse DNS Mismatch is OK.

So basic tests are ok, but at the first test we got DMARC Error.
Ok, lets set SPF, DKIM records to make our email server more reputable.
SPF Record
SPF is (sender policy framework) record that specifies which hosts or IP addresses can send email on behalf of a domain. Naturally, only your servers should be specified in this record.
Ok, lets create one. We will do simple one. We will create new TXT record and enter following
v=spf1 mx ~allv=spf1 – spf version 1
mx – all servers listed in MX records for domain are authorized to send email.
~all specifies that emails from your domain should only come from hosts specified in your spf.
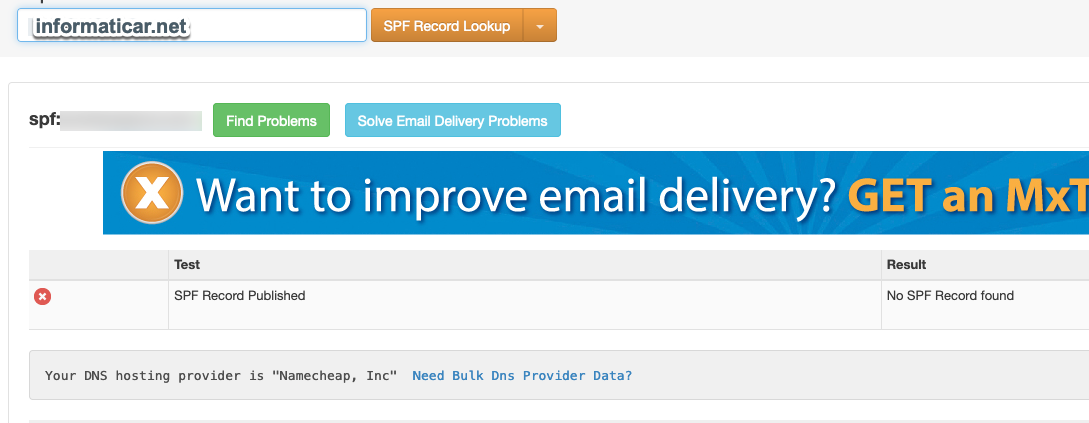
Lets check spf status for our domain on mxtoolbox. Ok, no SPF record, lets create one
So, for the type we entered TXT record, host @, and value v=spf1 mx ~all
HOST                VALUE
@                v=spf1 mx ~all
Some DNS providers may require double quotation marks for the spf value, so it would look like this “v=spf1 mx ~all”
Ok, so I entered my spf

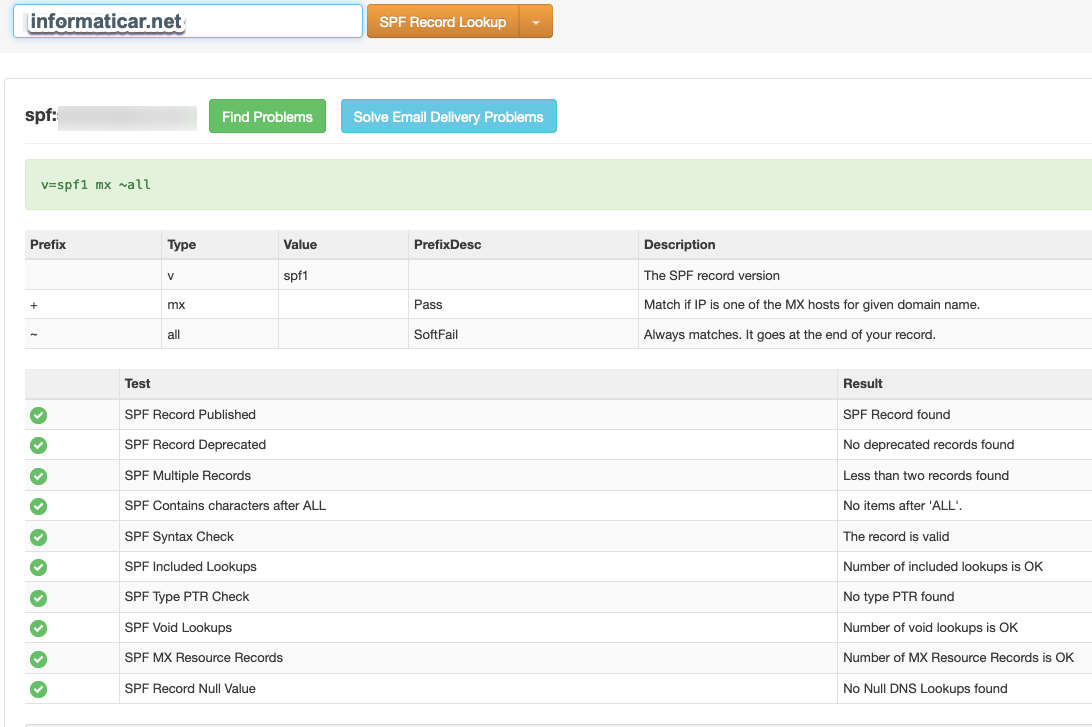
And let’s check mxtoolbox again
We are in green and valid
This guide is also part of my email server on Ubuntu series, so we will also be configuring Postfix on Ubuntu to work with spf.
Configure SPF policy agent
We well tell our Postfix to look for spf records of incoming emails.It may help detecting incoming forged emails.
First, installation
sudo apt install postfix-policyd-spf-pythonThen, ofcourse a little file editing
First, we will edit master.cf
sudo nano /etc/postfix/master.cfTo the end of the file add following
policyd-spf  unix  -       n       n       -       0       spawn
    user=policyd-spf argv=/usr/bin/policyd-spf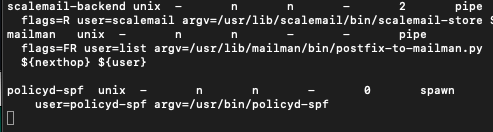
Now, we will edit main.cf
sudo nano /etc/postfix/main.cfAdd following to the file
policyd-spf_time_limit = 3600
smtpd_recipient_restrictions =
   permit_mynetworks,
   permit_sasl_authenticated,
   reject_unauth_destination,
   check_policy_service unix:private/policyd-spf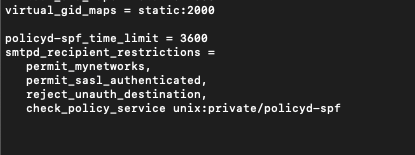
Save and close the file.
Restart Postfix
sudo systemctl restart postfixDKIM Setup
Again, this part goes with my email setup guide and is ment to be done on Ubuntu.
DKIM uses a private key to add a signature to emails from your domain. Receiving email server can verify them by looking into public key published on your DNS.
We will install OpenDKIM
sudo apt install opendkim opendkim-toolsWe will now add postfix user to dkim group
sudo gpasswd -a postfix opendkimWe will edit opendkim.conf
sudo nano /etc/opendkim.confUncomment following lines and add relaxed/simple to Canonicalization
Canonicalization   relaxed/simple
Mode               sv
SubDomains         no
Under “Subdomain no” add following in the opendkim.conf
AutoRestart         yes
AutoRestartRate     10/1M
Background          yes
DNSTimeout          5
SignatureAlgorithm  rsa-sha256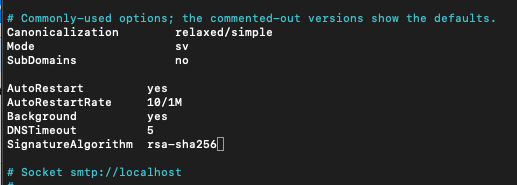
And, add following to the end of the file. UserID opendkim is already added in Ubuntu 20.04.
#OpenDKIM user
# Remember to add user postfix to group opendkim
UserID             opendkim

# Map domains in From addresses to keys used to sign messages
KeyTable           refile:/etc/opendkim/key.table
SigningTable       refile:/etc/opendkim/signing.table

# Hosts to ignore when verifying signatures
ExternalIgnoreList  /etc/opendkim/trusted.hosts

# A set of internal hosts whose mail should be signed
InternalHosts       /etc/opendkim/trusted.hosts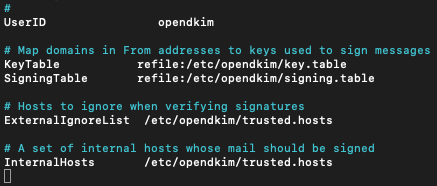
Save and close file.
Create Signing Table, Key Table, Trusted Hosts file.
First, we will create directories for OpenDKIM
sudo mkdir /etc/opendkim

sudo mkdir /etc/opendkim/keys
Change ownership
sudo chown -R opendkim:opendkim /etc/opendkim

sudo chmod go-rw /etc/opendkim/keys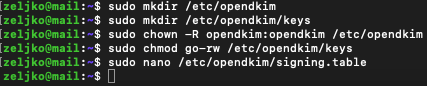
We will also create signing table
sudo nano /etc/opendkim/signing.tableAdd following line to your file. Change informaticar.net for your domain.
*@informaticar.net default._domainkey.informaticar.net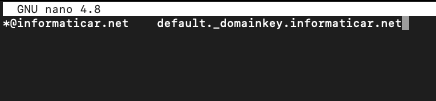
Save and close file.
Now, let’s create key table
sudo nano /etc/opendkim/key.tableAdd following to the file. Again, change informaticar.net for your domain name.
default._domainkey.informaticar.net informaticar.net:default:/etc/opendkim/keys/informaticar.net/default.private
Save and close file.
Now, we need to create trusted hosts file.
sudo nano /etc/opendkim/trusted.hostsAdd following to the file. Change informaticar.net into your domain.
127.0.0.1
localhost

*.informaticar.net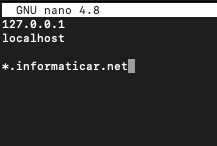
Save file and exit.
Generate Private/Public keypair
Ok, we need private key for signing of the outgoing emails, and public part will be published in our DNS so that recipients can verify us.
Create a folder dor a domain (change informaticar.net for your domain)
sudo mkdir /etc/opendkim/keys/informaticar.netWe will now generate keys using opendkim tool. Change informaticar.net for your domain!!
sudo opendkim-genkey -b 2048 -d informaticar.net -D /etc/opendkim/keys/informaticar.net -s default -v-d specifies domain
-D specifies directory
Private Key will be written to default.private and public to the default.txt

Now, we just need to maken opendkim owner of the private key
sudo chown opendkim:opendkim /etc/opendkim/keys/informaticar.net/default.privatePublish Public Key in DNS
To display public key type in following. Change informaticar.net to your domain!
sudo cat /etc/opendkim/keys/informaticar.net/default.txt
Create DKIM DNS record
Now, in DNS record we need new TXT record and under name we need to enter default._domainkey in the name field.Then from the terminal copy everything withing the round brackets. Make sure there are no double quotes or white spaces in the value field. If you don’t copy values properly, your DKIM test will fail.
So value like this
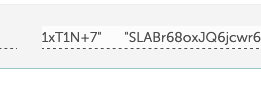
Needs to be changed to this
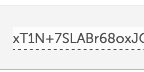
Erase blank/whitespace and double quotes.
So ,this is how your DNS should look like

Ok, let’s test with Mxtoolbox. Everything in green, that is how we like it. :)

Ok , we will do another test by executing following command on the machine our mial server is located on. Change informaticar.net for your domain!!
sudo opendkim-testkey -d informaticar.net -s default -vvv
If you got “key OK” then everything is all right. Key not secure doesn’t have to scare you, we got this message because we don’t have DNSSEC in place.
Connect Postfix to OpenDKIM
We need to create following directory and change permissions on them.
sudo mkdir /var/spool/postfix/opendkim
sudo chown opendkim:postfix /var/spool/postfix/opendkim
Then we need to edit OpenDKIM config file
sudo nano /etc/opendkim.confFind following line (Ubuntu 20.04)
Socket local:/run/opendkim/opendkim.sockAnd replace it with
Socket local:/var/spool/postfix/opendkim/opendkim.sock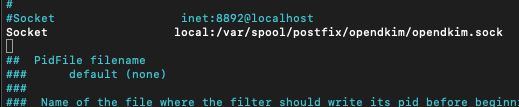
Save and exit file.
Next file we will edit is
sudo nano /etc/default/opendkimTry to find following line
SOCKET="local:/var/run/opendkim/opendkim.sock"or this one
SOCKET=local:$RUNDIR/opendkim.sockChange it to
SOCKET="local:/var/spool/postfix/opendkim/opendkim.sock"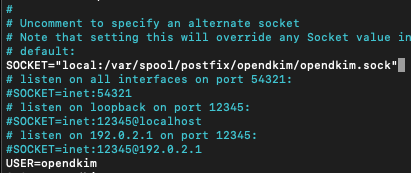
Save and close file.
Let’s just edit one more Postfix file
sudo nano /etc/postfix/main.cfAdd following to the bottom of the file
# Milter configuration
milter_default_action = accept
milter_protocol = 6
smtpd_milters = local:opendkim/opendkim.sock
non_smtpd_milters = $smtpd_milters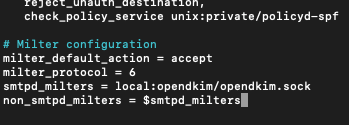
Save and close file
Restart OpenDKIM and Postfix
sudo systemctl restart opendkim
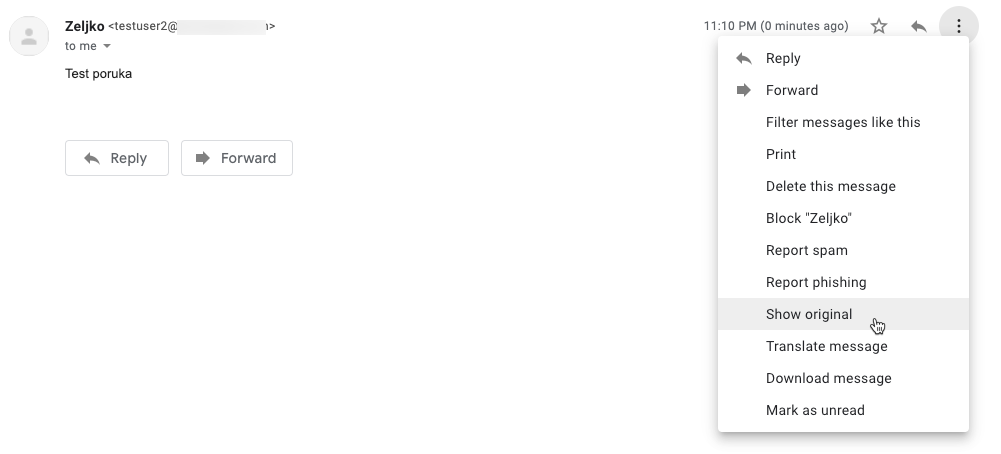
sudo systemctl restart postfix Ok, I will now send email from my email server informaticar.net to my gmail account to check SPF and DKIM in real life.
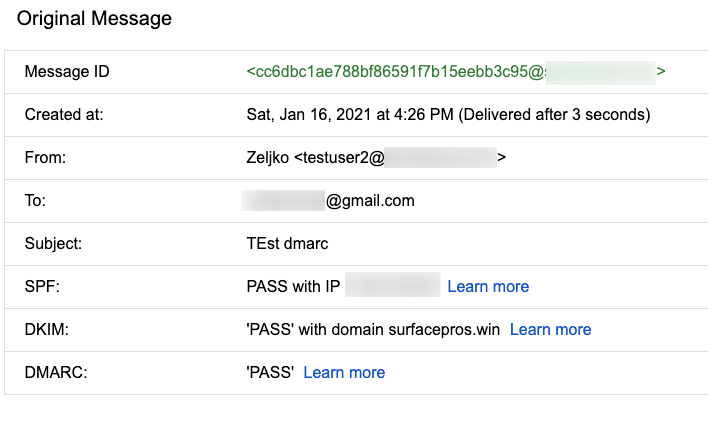
After you received email in gmail, open message you received, and in the top right corner of the message select menu and click on Show Original
SPF and DKIM have PASS status
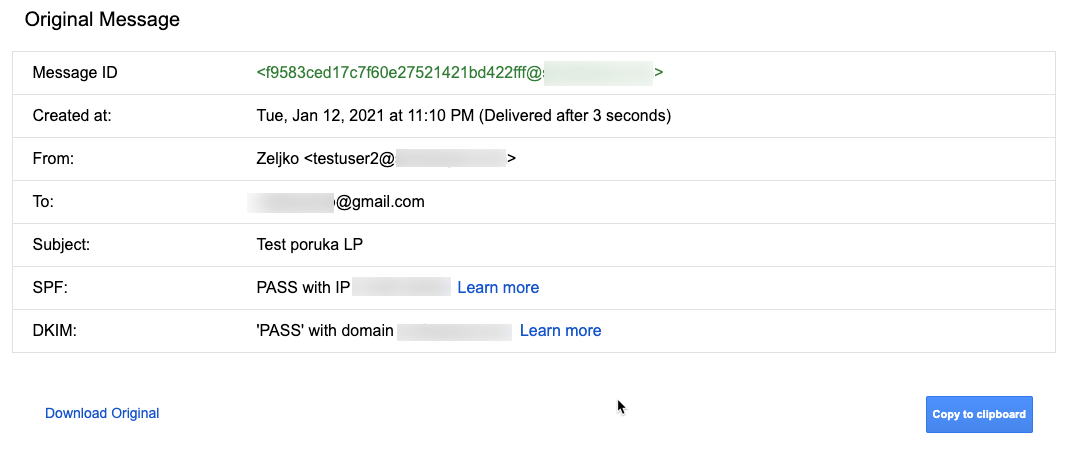
This is good, we done everything correctly.
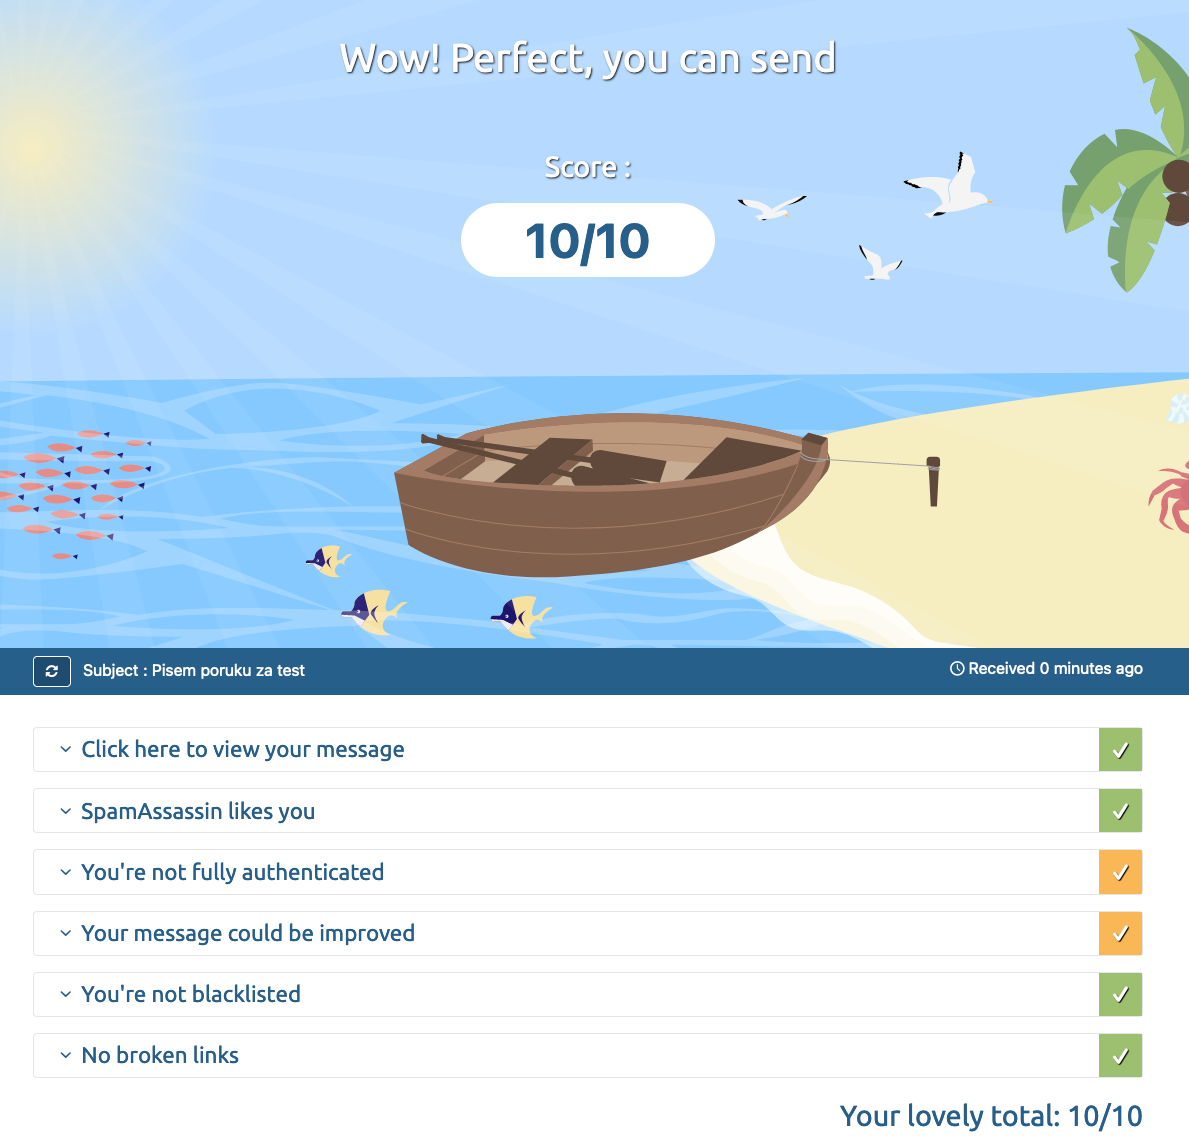
You can also test your email server through mxtoolbox.com and https://www.mail-tester.com/
This test is great test for your email if you plan to send newsletters, promotions… Make sure to include complete email message you plan to send.
Lets finish this part of the text with lovely screen from mail-tester.com.
DMARC setup
Ok, after we are done with the SPF and DKIM setup, we want to setup DMARC. DMARC (Domain based authentication, reporting and conformance) signals that mails from a domain are protected with SPF and DKIM. DMARC can help you discover legitimate email sources.
DMARC should help you improve domain reputation and help with fraud detection (forged From field).
DMARC is important for every business, especially if you rely on email marketing.
Also, warning, be careful with DMARC, and test it with gradual settings change, start with the most relaxed settings, and then tune it to your needs.
Explaining DMARC record
DMARC record is TXT record in DNS. You don’t need to do anything on your installation, you just need to add DMARC to your DNS.
There are sites like https://www.kitterman.com/dmarc/assistant.html? which can help you create your DMARC TXT record.
If we look at the screen of the website I posted above, this is what it looks like
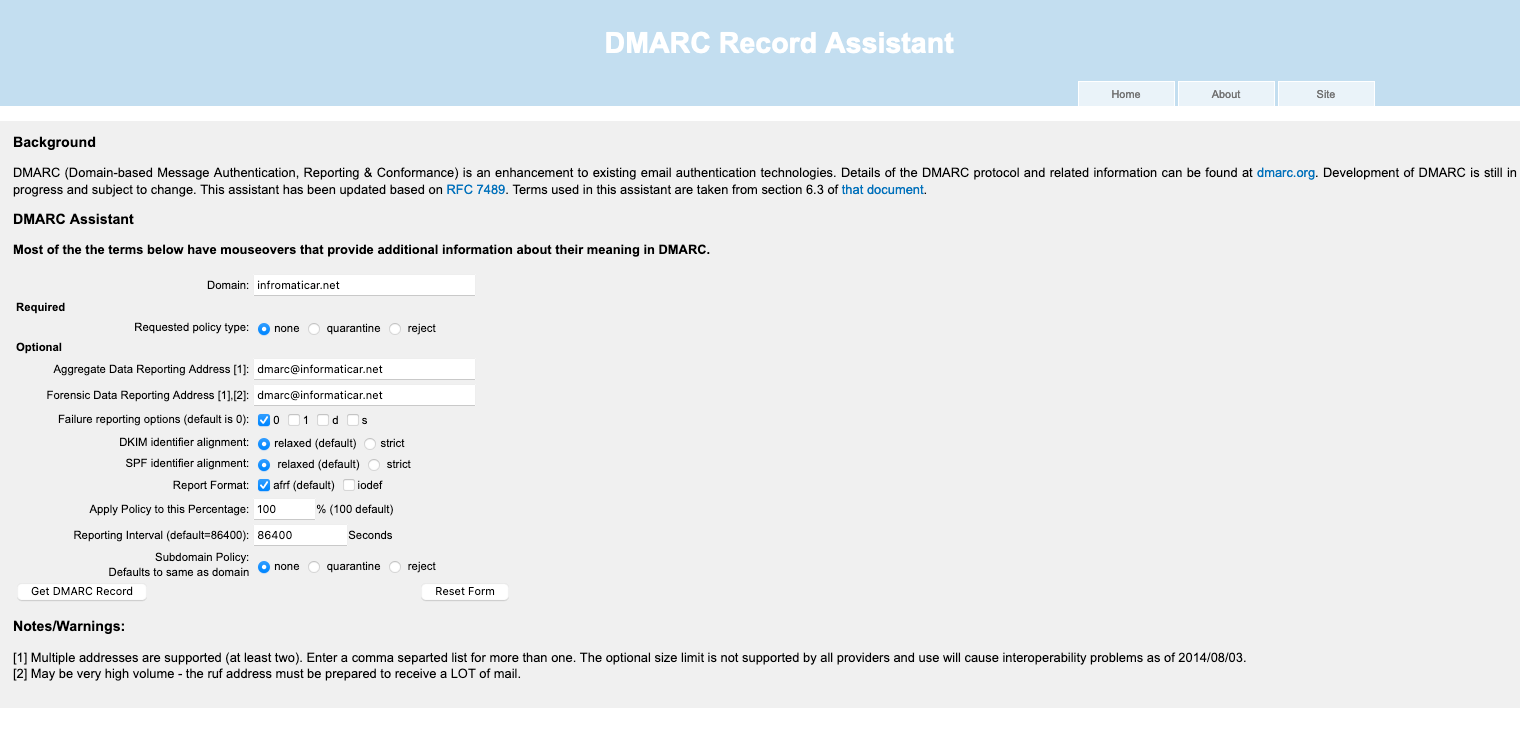
There are three policy types:
none – tells receiving email server to do nothing if email fails DMARC check.
quarantine – email will be put in quarantine if it doesn’t pass DMARC check.
reject – email will be rejected if the DMARC check fails.
None is a good start, later on you can change to quarantine and then to reject when you really know how your system works.
Don’t jump to reject or quarantine right away, wait for some data first.
Aggregate Data Reporting Address and Forensic Data Reporting Address:
Explained even in the footer of the webiste – email addresses you wish to receive reports on. Forensic data can be data intensive.
Aggregate Data are daily XML reports and Forensic data are real time reports. Most of the time you would like to receive aggregate data only.
Failure reporting options:
0 – generates report if ALL underlying mechanisms fail to pass DMARC check.
1 – generate reports if ANY mechanisms fail.
d – generates report if DKIM signature failed
s – generate report if SPF fails.
DKIM/SPF identifier alignment:
Relaxed is good for a start, later on you can change to strict if you see the need.
Apply policy to this percentage:
Simply, percentage of emails DMARC applies to. For a start, 100% is good.
You should wait a good amount of time to receive enough DMARC reports to tackle this percentage.
First, use none policy with 100%, then after some time, you can switch to quarantine policy when you are familiar with reports.
p=none; pct=100%;
But when you switch to quarantine you should go gradually and increase percentage.
p=quarantine; pct=25%;
p=quarantine; pct=50%;
p=quarantine; pct=75%;
p=quarantine; pct=100%;
Of course you can change percentage to values you find proper, but you get the idea.
Same should be repeated after you finally decide to use reject policy.
p=reject; pct=25%;
…
Reporting interval
Select time interval which you see fit.
Creating DMARC Record
Not all of these DMARC records are mandatory, so, you don’t have to specify for example reporting interval, or forensic email address, if you don’t plan to use it.
So, this is what the website above generated for me:
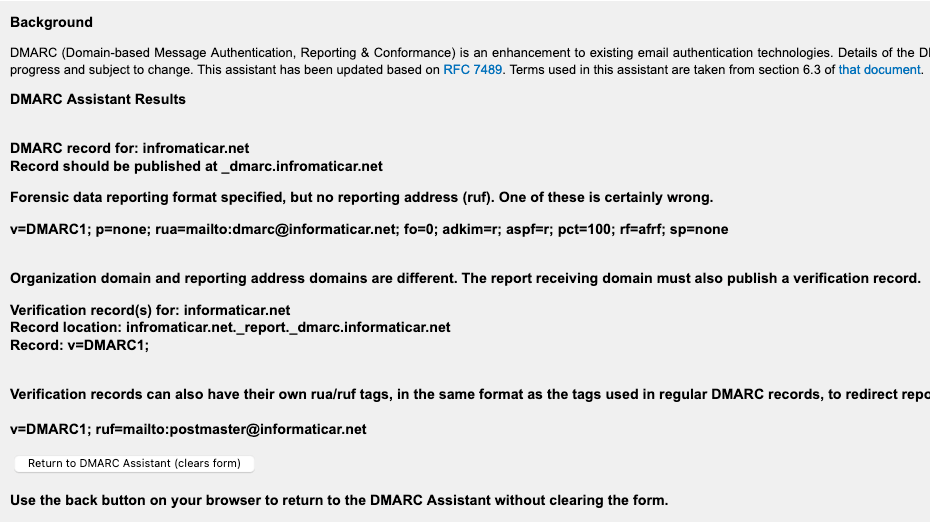
This is an example, but this is a DMARC I will use:
TXT host name
_dmarcTXT value
v=DMARC1; p=none; pct=100; fo=1; rua=mailto:dmarc@informaticar.netSo, policy is none, apllies in 100% and will generate comprehensive reports with fo=1, also, my aggregate email is defined (swap informaticar.net for your domain).
So, you see that I left out some of the commands from the website. My DMARC record will work, because it still has all the necessary ingredients in it.

Let’s test our DMARC setup with MXToolbox DMARC Lookup
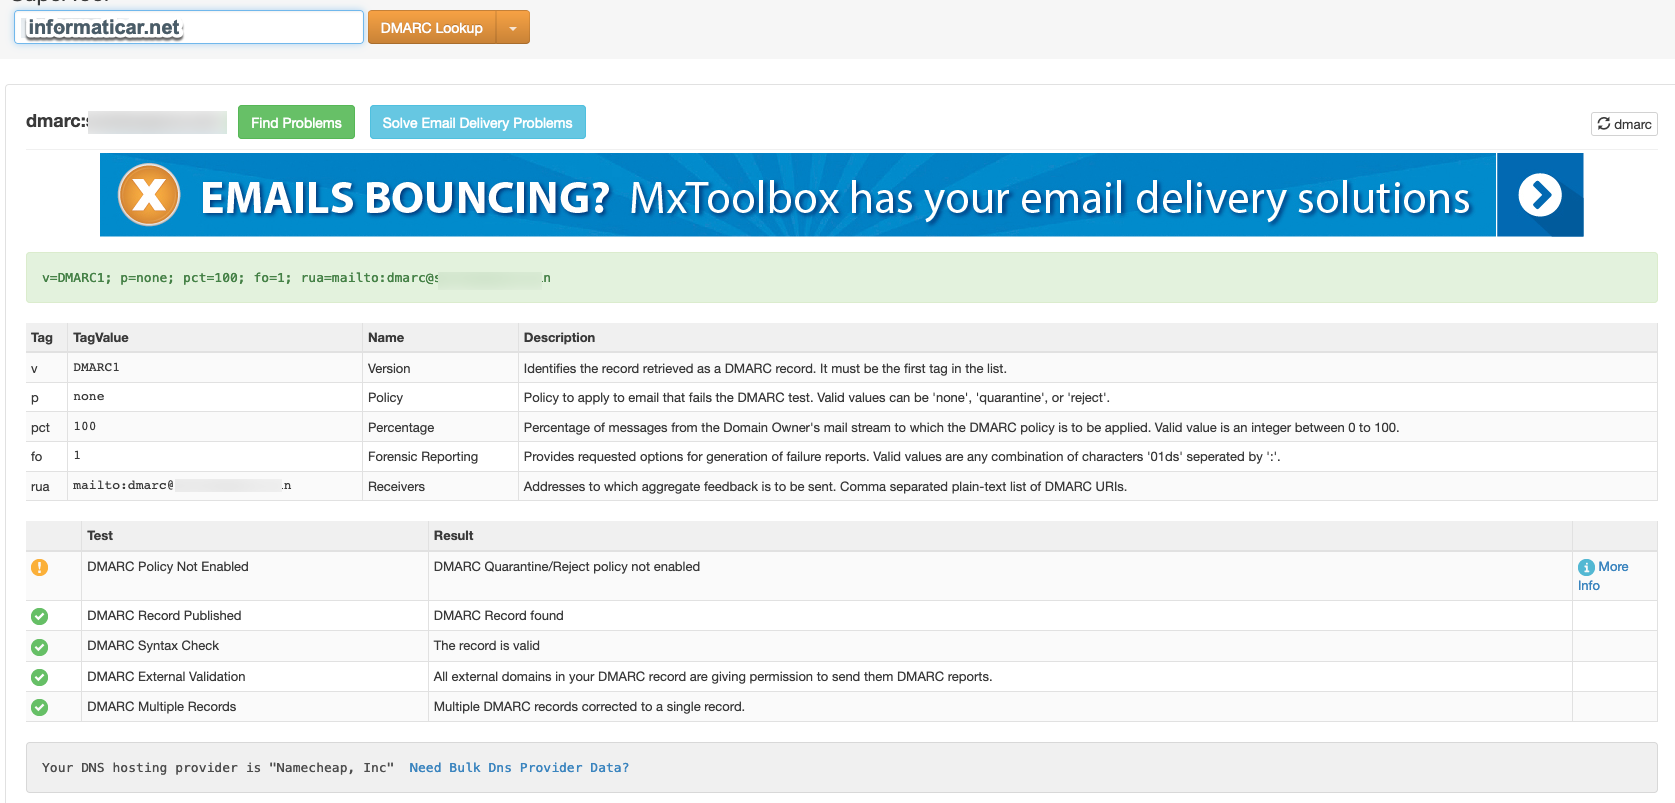
Ok, we are good, there is one exclamation mark, claiming that “DMARC Policy Not Enabled”. As I already said, we are using none until we gather information, and the in time we can slowly set to quarantine or reject policy.
To enable these out of the box would be possibly dangerous for our email mailflow. Do that only if you are 100% what you are doing and you have knowledge.
We will also repeat gmail test (just send email from your domain to gmail account). We have SPF, DKIM and DMARC pass.
Interpreting DMARC reports
As I already mentioned and we also defined in our DMARC DNS record – we will receive aggregate reports on our email account.
DMARC raw data are not very easy to understand. Postmark (thank you) can process these reports for you even for free and make them easier to understand.
You will just need to enter your data into Postmark and then you can slightly change your DMARC DNS record.
You can specify multiple email addresses to receive reports, or you can leave only one provided by Postmark, it is up to you.
Be sure to change “yourname” and informaticar.net for your unique data.
v=DMARC1; p=none; pct=100; fo=1; rua=mailto:yourname@dmarc.postmarkapp.com,mailto:dmarc@informaticar.net;In case you wonder what forensic reports do. Forensic reports will have entire copies of emails that failed DMARC check – email headers, subject lines, body… Some email servers don’t send forensic reports because of privacy and data sensitivity.
Conclusion
Ok, that would be it for this one, I tried to give you as much as I can in terms on the information and knowledge about setting up DNS for email server. With all these records and with this setup, you will be able to have an email server that is functioning.
I manage my own email servers now for almost 15 years, and in terms of DNS this is what works for me.