This tutorial will cover few items after Nextcloud installation. This tutorial is CentOS based, but you can find clues and solution for other platforms you are hosting Nextcloud on.
We will first login into our NextCloud installation and go to Settings | Administration | Overview.
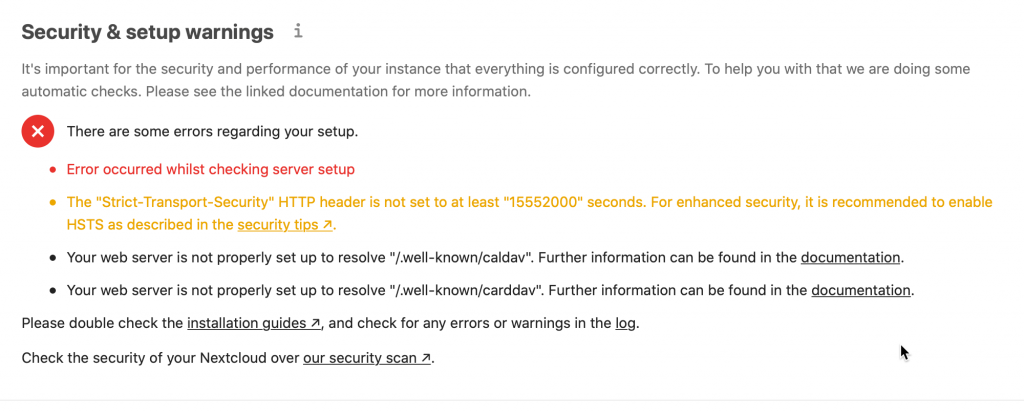
There are few errors there
If you followed my Nextcloud tutorial you will NOT get following error – “Your data directory and files are probably accessible from the internet”… If you got this error, you can reinstall Nextcloud by following my tutorial, or search through internet how to move your data directory after installation. I will not be covering that error here.
Before we go into each of these errors, lets first check our installation security here – https://scan.nextcloud.com
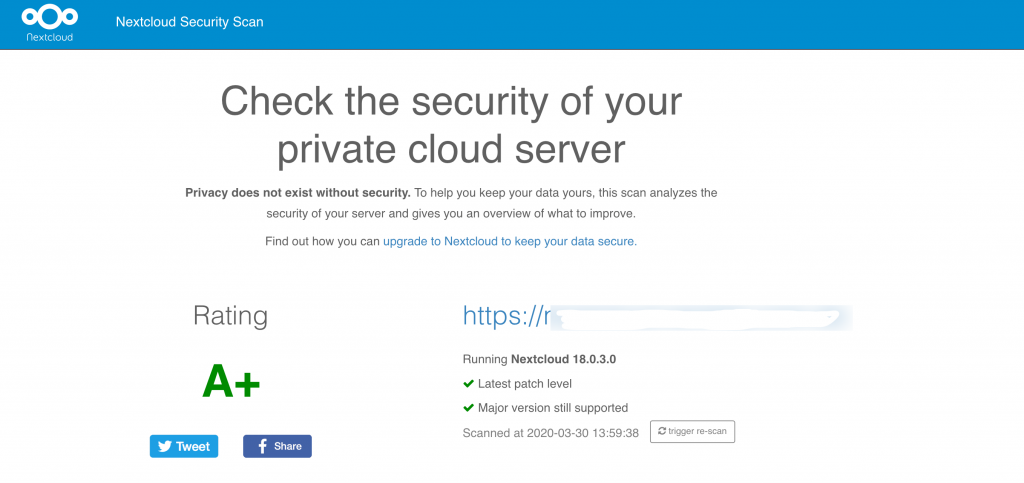
I have to say I like this test very much, it is great way to check security of your Nextcloud installation. Great job Nextcloud team.
Warning – The “Strict-Transport-Security” HTTP Header is not set to at least “15552000” seconds. For enhanced security. it is recommended to enable HSTS…
Again, Nextcloud provides solution for this “error” in its documentation – https://docs.nextcloud.com/server/18/admin_manual/installation/harden_server.html
I have virtual hosts enabled on my server, so I added this to the file. If you need to setup virtual hosts here is how to do it – https://www.informaticar.net/how-to-setup-apache-virtual-hosts-on-centos-rhel/
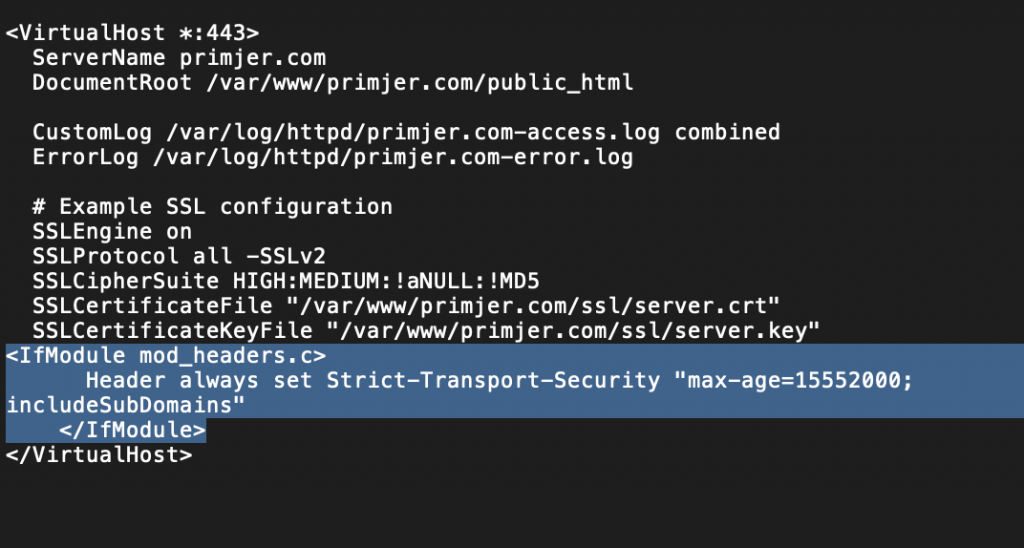
You need to add following part (<IfModule mod_headers.c>)
<VirtualHost *:443>
  ServerName cloud.primjer.com
    <IfModule mod_headers.c>
      Header always set Strict-Transport-Security "max-age=15552000; includeSubDomains"
    </IfModule>
 </VirtualHost>
This is how it looks in my virtual hosts file when added.
After I added IfModule part and restarted Apache, I refreshed security and setup warnings… HSTS warning is gone.
Warning – Your web server is not properly set up to resolve “/.well-known/caldav”. Further information can be found in the documentation.
Errors for caldav and carddav are the same. You can check few things…
Here is a link to Nextcloud documentation on that part – https://docs.nextcloud.com/server/18/admin_manual/issues/general_troubleshooting.html#service-discovery
First, enter your Nextcloud installation directory and check .htaccess file
According to documentation above, my rewrite rules are ok. You can check your rewrite rules, also see link above to Nextcloud documentation. There are some differences if Nextcloud uses domain or subfolder in domain name, so check that out.

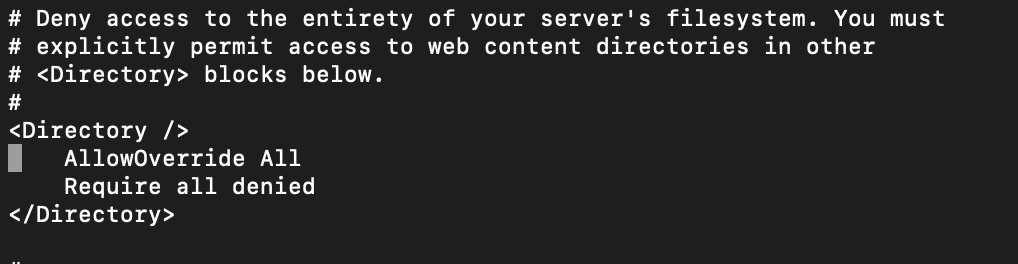
Ok, so I still have an error. If your rewrite rules are ok, you can still check few things. If you don’t use virtual hosts for apache, go to /etc/httpd/conf and open httpd.conf file
Find AllowOverride value and make sure it says AllowOverride All
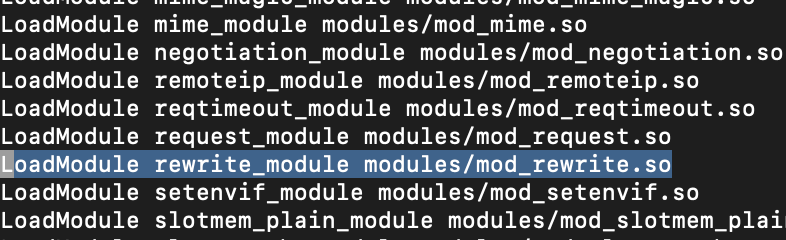
Next stop should be /etc/httpd/conf.modules.d/ and edit 00-base.conf file. Make sure LoadModule rewrite_module modules/mod_rewrite.so is uncommented.
If all of that is ok, you should not see caldav and carddav errors.
In my case, I have virtual hosts file defined for every domain. So, for Nextcloud, I had to open my virtual host file for Nextcloud and add following (make sure you change directory path to your Nextcloud installation path, and primjer.com for your domain name.
<Directory /var/www/primjer.com/public_html>
        Options -Indexes +FollowSymLinks
        AllowOverride All
    </Directory>
So, here is how it looks like.
After that, I restarted Apache by issuing
sudo systemctl restart httpdWarnings are gone. :)
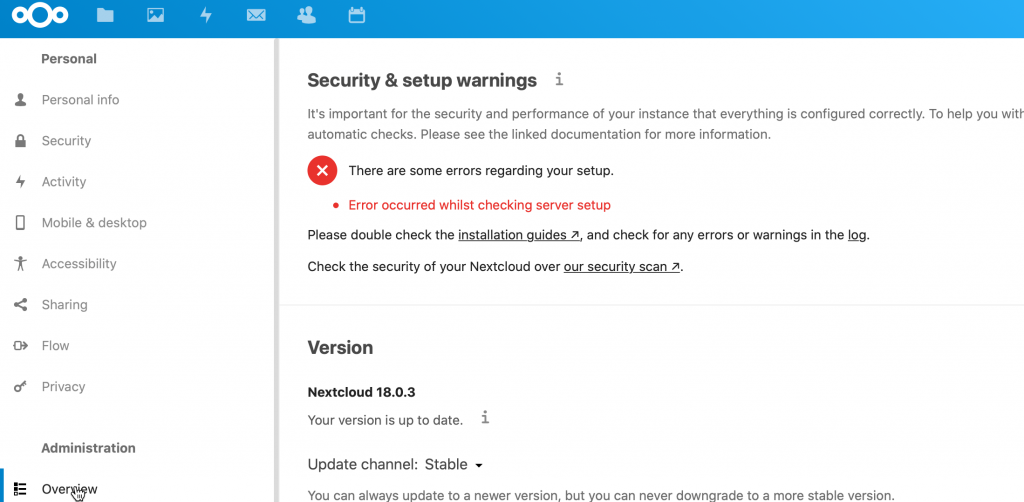
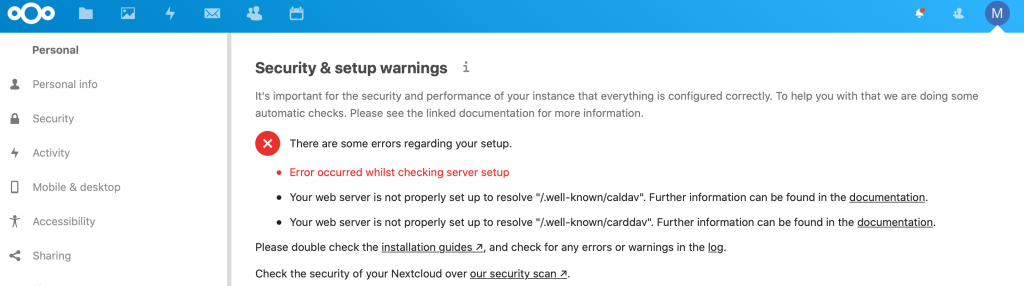
There is one error saying Error occured whilst checking server setup.
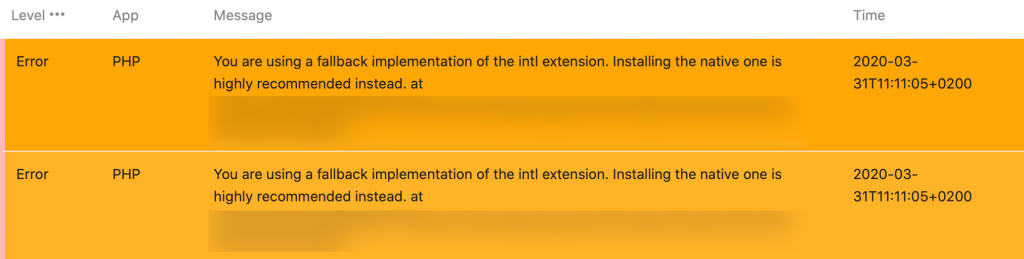
It is pretty generic error. But, if you look at the screenshot above, you can also see link to the log. Open log and look at the errors you have there. I have only one (for now)
“You are using a fallback implementation of the intl extension. Installing the native one is highly recommended instead…”
Ok, so I’m missing php intl extension. Command “yum list php*intl” revealed that I need to install following
sudo yum install php-intl.x86_64
After installation of php intl I got error again in Nextcloud, but after opening log, there is another error.
This time it is, “Call to undefined function OCA\Settings\Controller\posix_getuid“

I’m also missing php process extension. Command “yum list php*process” revealed what I need to install
sudo yum install php-process.x86_64
After that I refreshed Nextcloud Security & setup warnings.
Ok, generic error is gone, but whole new array of errors appeared.
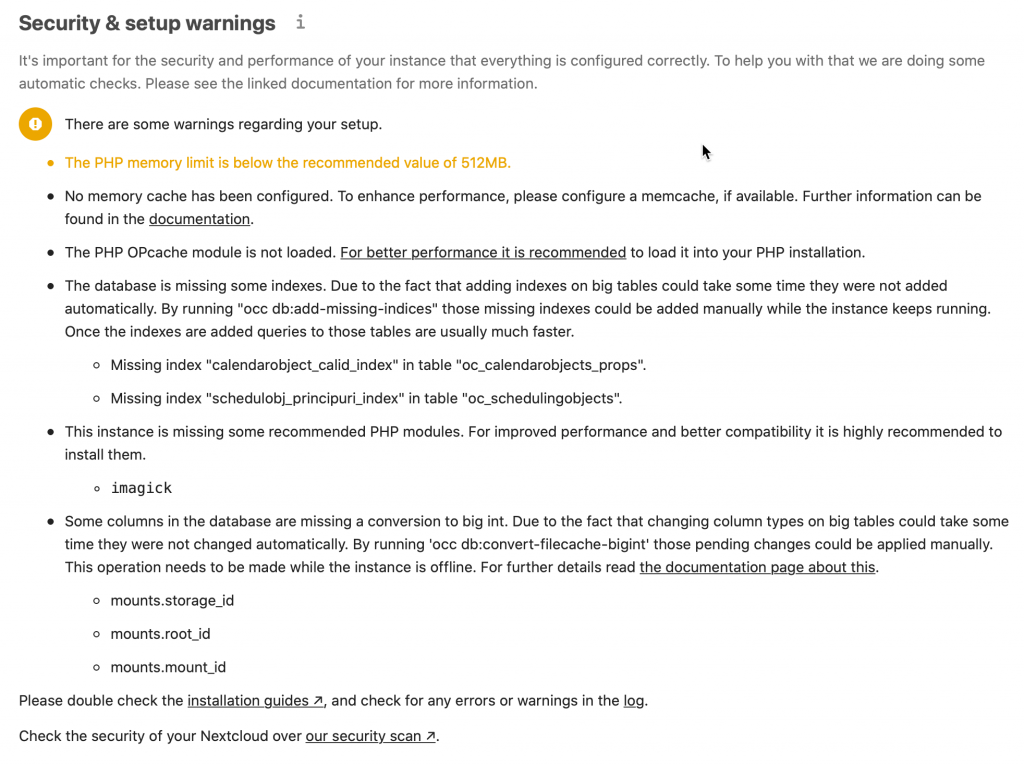
We will try to resolve warnings one by one. First one is
The PHP memory limit is below the recommended value of 512MB.
This one should be easy. Edit /etc/php.ini file. Find Resource Limits section in php.ini and change memory_limit value. I entered 1GB of memory, you should enter according to your resources/needs.
memory_limit = 1024M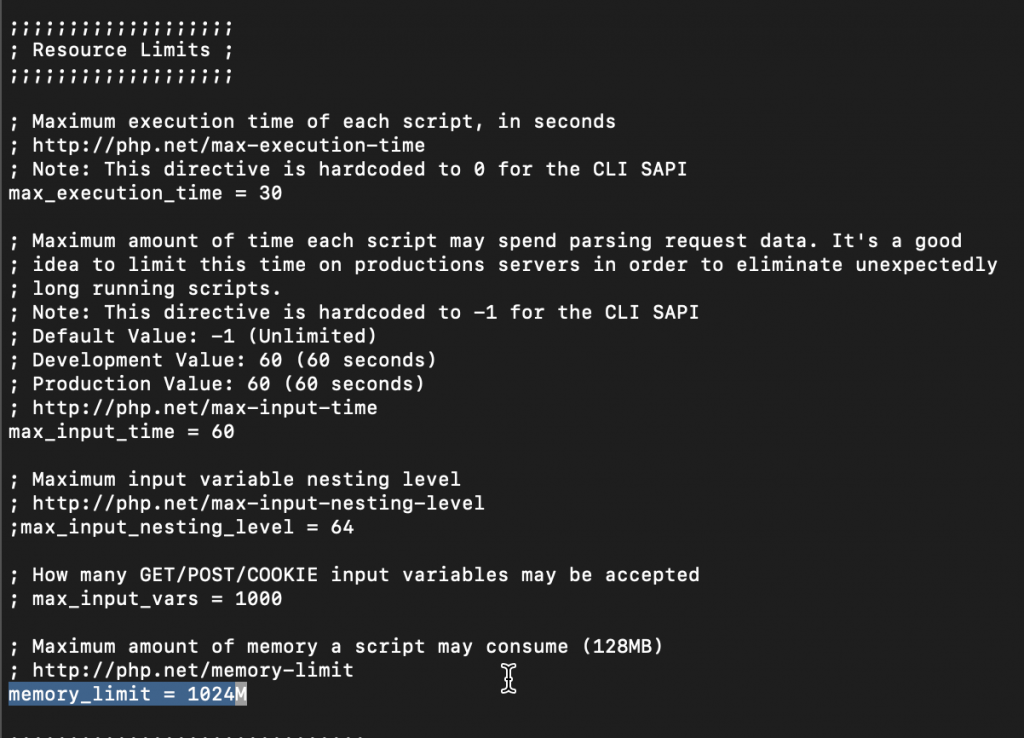
The PHP OPcache module is not loaded.
We are missing php opcache
sudo yum install php-opcache.x86_64
After installation we get following message

Ok, in CentOS 8 you will not be editing php.ini. Instead go to /etc/php.d and edit 10-opcache.in
Enable all that is listed above, and set values as listed above. My opcache.ini was missing opcache.memory_consumption=128 so I also added that line at the end of file.

Reboot server after altering opcache settings.
The database is missing some indexes. Due to the fact that adding indexes on big tables could take some time they were not added automatically. By running “occ db:add-missing-indices” those missing indexes could be added manually while the instance keeps running. Once the indexes are added queries to those tables are usually much faster
Foor this warning to clear out, we need to go to our nextcloud installation folder and issue following command:
sudo -u apache php occ db:add-missing-indices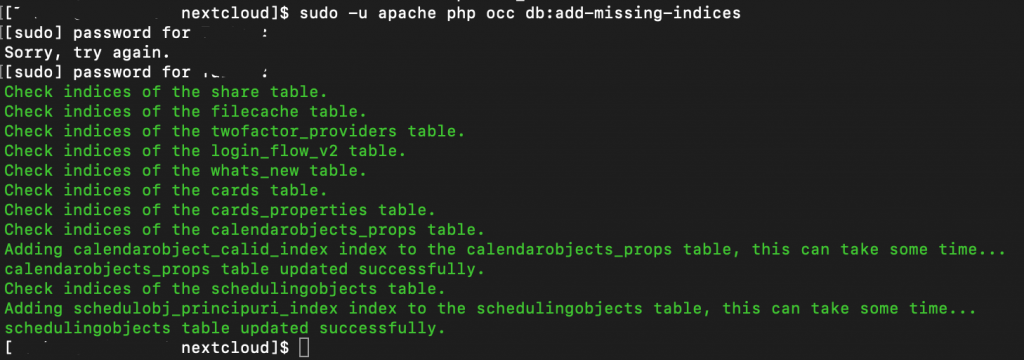
Our warning/error list grows thinner
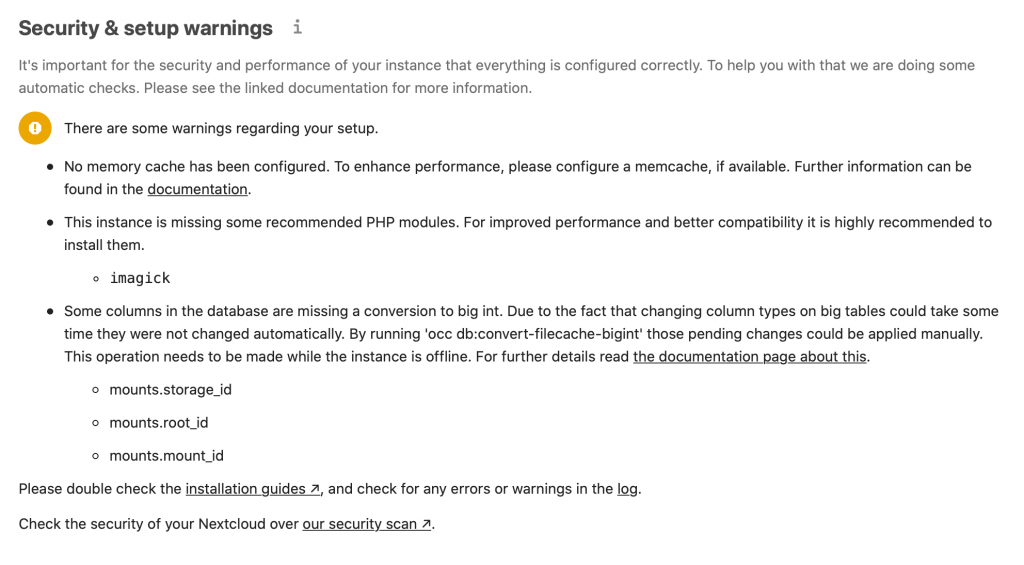
- This instance is missing some recommended PHP modules. For improved performance and better compatibility it is highly recommended to install them.
- imagick
With this one, there is a bit more work. We need to install imagick for CentOS and then enable it as PHP extension.
As a prerequisite we need to install EPEL repo.
Then run following commands:
sudo yum config-manager --set-enabled PowerTools
sudo yum install ImageMagick
sudo yum install ImageMagick-devel
sudo yum install php-devel
sudo yum install php-pear
sudo dnf install make
After all that is installed, run
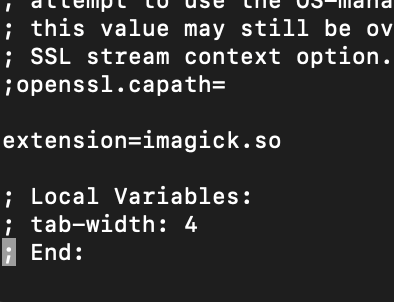
sudo pecl install imagickBuild should be successfully completed. In the end add
extension=imagick.soto the /etc/php.ini file. Make sure to add it before the end of the file.
Reboot the server again for changes to apply. I was able to clear warning after these steps.
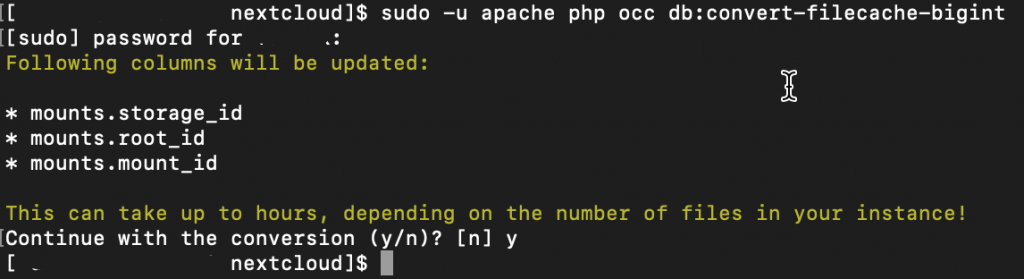
Some columns in the database are missing a conversion to big int. Due to the fact that changing column types on big tables could take some time they were not changed automatically. By running ‘occ db:convert-filecache-bigint’ those pending changes could be applied manually. This operation needs to be made while the instance is offline.
We already had similar error, and command is more or less pretty same. Go to the nextcloud installation folder and run following
sudo -u apache php occ db:convert-filecache-bigintWhen asked to confirm, select y
We will now take a look at our setup warnings list again.
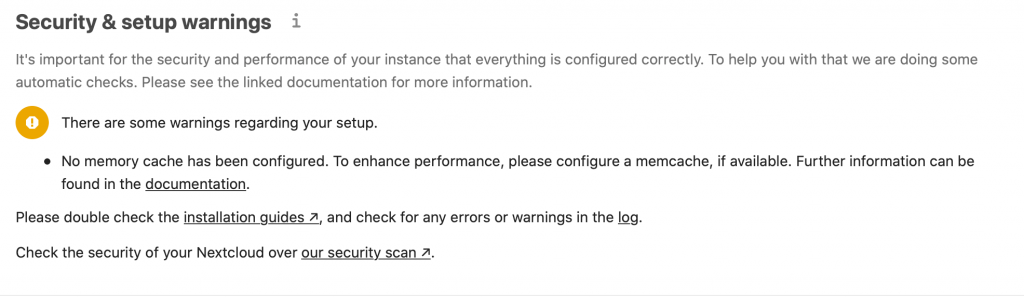
We are left with only one warning. This one is optional, and you can choose to ignore it.
No memory cache has been configured. To enhance performance, please configure a memcache, if available.
I will leave this warning, because on my current setup I don’t have option to configure memcache. You will need to install memcached – sudo yum install memcached, then you need memcache as php extension – pecl install memcache
After that, inside nexcloud directory in config. php you will need to enter few lines according to this manual from Nextcloud – https://docs.nextcloud.com/server/15/admin_manual/configuration_server/caching_configuration.html
Conclusion
We successfully cleared errors, warnings, and informational messages from our Nextcloud installation.