I love to have my own customized VMs in Azure Stack. Of, course you can use Azure Marketplace, but I like machines that I prepped with the software that I need preinstalled.
Let’s do a quick tutorial on how to prepare Windows VM for Azure. I will use Hyper-V on my workstation for preparation and Windows Server 2019 Datacenter Trial installation for this tutorial.
Machine is completely clean, without any roles installed. If you are doing this for production machine, make sure you have a backup first, and also see if there are some specific requirement for the services you are running.
You can find latest tutorial on this topic here – https://docs.microsoft.com/en-us/azure/virtual-machines/windows/prepare-for-upload-vhd-image .
Prerequisites
First, a few prerequisites.
- Disk you will upload will have to be VHD, not VHDX. In order to convert it, check my tutorial here – https://www.informaticar.net/convert-hyper-v-vhdx-to-vhd/
- It is very important you do this conversion at the beginning of the process, so you are sure your VM is bootable and working after conversion to VHD.
- If you are creating new machine (like I am for this tutorial) be sure to make it Generation 1 and immediately, before installing any OS, convert your disk to fixed size VHD.
- Also, make sure your VM does not have checked Dynamically allocated RAM (I uncheck that during setup period). I also like to turn off snapshots for my machines.
- VM size must be aligned to 1MB size. Fractions of a megabyte can cause errors. Make sure your VM size is a round number.
- Max size of a VHD is 2TB.
Configuration
First, we need to check for the persistent routes in our network config.
route print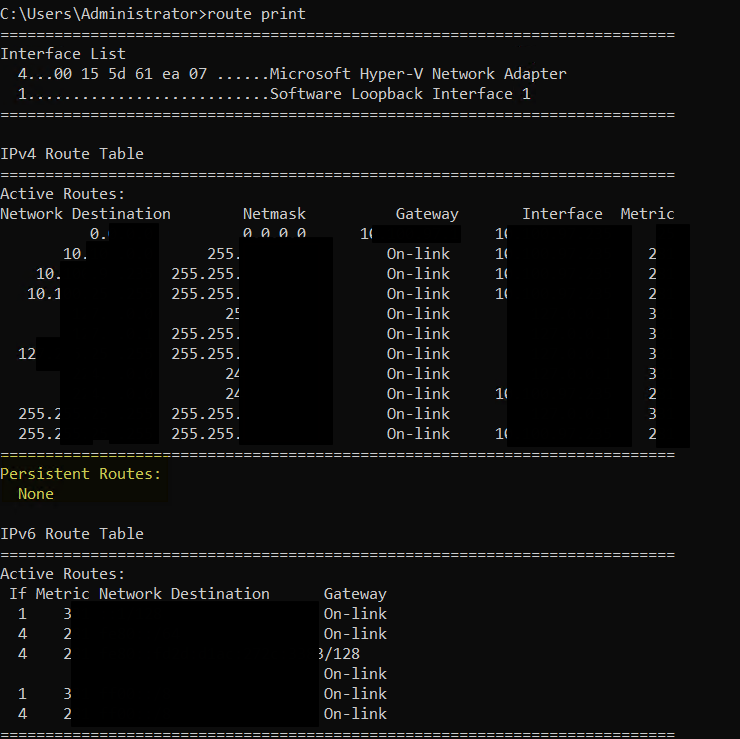
There should be no persistent routes, if you have them, use route delete command to remove them.
Next step is also network related. In PowerShell (with elevated privileges), enter following command:
netsh winhttp reset proxy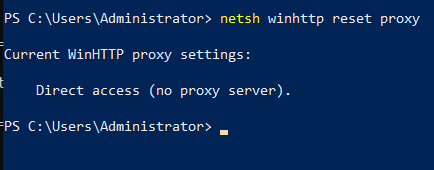
If you need proxy, please look at the link to the Microsoft documentation at the beginning of the tutorial.
Now, to a quick disk config, again in PowerShell.
diskpart
san policy=onlineall
exit 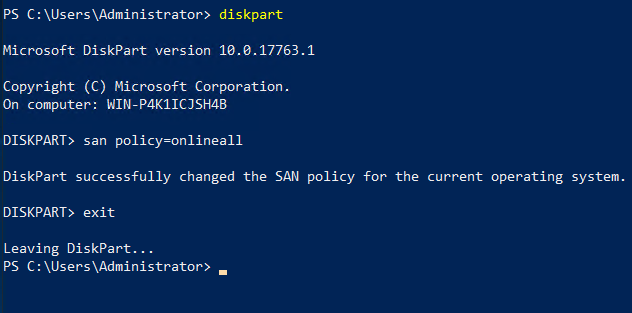
Set UTC time zone for Windows and set Windows time service (w32time) to Automatic:
Set-ItemProperty -Path 'HKLM:\SYSTEM\CurrentControlSet\Control\TimeZoneInformation' -Name "RealTimeIsUniversal" -Value 1 -Type DWord -Force

Set-Service -Name w32time -StartupType Automatic
Set High Performance for Power profile
powercfg /setactive SCHEME_MIN
Make sure environmental values tmp and temp have default values.
Set-ItemProperty -Path 'HKLM:\SYSTEM\CurrentControlSet\Control\Session Manager\Environment' -Name "TEMP" -Value "%SystemRoot%\TEMP" -Type ExpandString -Force

Set-ItemProperty -Path 'HKLM:\SYSTEM\CurrentControlSet\Control\Session Manager\Environment' -Name "TMP" -Value "%SystemRoot%\TEMP" -Type ExpandString -Force
Make sure following service have automatic startup
Get-Service -Name bfe | Where-Object { $_.StartType -ne 'Automatic' } | Set-Service -StartupType 'Automatic'
Get-Service -Name dhcp | Where-Object { $_.StartType -ne 'Automatic' } | Set-Service -StartupType 'Automatic'
Get-Service -Name dnscache | Where-Object { $_.StartType -ne 'Automatic' } | Set-Service -StartupType 'Automatic'
Get-Service -Name IKEEXT | Where-Object { $_.StartType -ne 'Automatic' } | Set-Service -StartupType 'Automatic'
Get-Service -Name iphlpsvc | Where-Object { $_.StartType -ne 'Automatic' } | Set-Service -StartupType 'Automatic'
Get-Service -Name netlogon | Where-Object { $_.StartType -ne 'Manual' } | Set-Service -StartupType 'Manual'
Get-Service -Name netman | Where-Object { $_.StartType -ne 'Manual' } | Set-Service -StartupType 'Manual'
Get-Service -Name nsi | Where-Object { $_.StartType -ne 'Automatic' } | Set-Service -StartupType 'Automatic'
Get-Service -Name TermService | Where-Object { $_.StartType -ne 'Manual' } | Set-Service -StartupType 'Manual'
Get-Service -Name MpsSvc | Where-Object { $_.StartType -ne 'Automatic' } | Set-Service -StartupType 'Automatic'
Get-Service -Name RemoteRegistry | Where-Object { $_.StartType -ne 'Automatic' } | Set-Service -StartupType 'Automatic'
Setting RDP
Next part will be important for me (and I believe for a lot of you, because we are going to set RDP connection for our VM)
First, we will make sure that RDP is enabled and on port 3389 (default RDP port)
Set-ItemProperty -Path 'HKLM:\SYSTEM\CurrentControlSet\Control\Terminal Server' -Name "fDenyTSConnections" -Value 0 -Type DWord -Force

Set-ItemProperty -Path 'HKLM:\SOFTWARE\Policies\Microsoft\Windows NT\Terminal Services' -Name "fDenyTSConnections" -Value 0 -Type DWord -Force

Set-ItemProperty -Path 'HKLM:\SYSTEM\CurrentControlSet\Control\Terminal Server\Winstations\RDP-Tcp' -Name "PortNumber" -Value 3389 -Type DWord -Force
Now, we will define listener for NICs
Set-ItemProperty -Path 'HKLM:\SYSTEM\CurrentControlSet\Control\Terminal Server\Winstations\RDP-Tcp' -Name "LanAdapter" -Value 0 -Type DWord -Force
Configuration of the NLA authentication for RDP connection is also a part of the process
Set-ItemProperty -Path 'HKLM:\SYSTEM\CurrentControlSet\Control\Terminal Server\WinStations\RDP-Tcp' -Name "UserAuthentication" -Value 1 -Type DWord -Force

Set-ItemProperty -Path 'HKLM:\SYSTEM\CurrentControlSet\Control\Terminal Server\WinStations\RDP-Tcp' -Name "SecurityLayer" -Value 1 -Type DWord -Force

Set-ItemProperty -Path 'HKLM:\SYSTEM\CurrentControlSet\Control\Terminal Server\WinStations\RDP-Tcp' -Name "fAllowSecProtocolNegotiation" -Value 1 -Type DWord -Force
Next, we will set Keep Alive values
 Set-ItemProperty -Path 'HKLM:\SOFTWARE\Policies\Microsoft\Windows NT\Terminal Services' -Name "KeepAliveEnable" -Value 1  -Type DWord -Force

Set-ItemProperty -Path 'HKLM:\SOFTWARE\Policies\Microsoft\Windows NT\Terminal Services' -Name "KeepAliveInterval" -Value 1  -Type DWord -Force

Set-ItemProperty -Path 'HKLM:\SYSTEM\CurrentControlSet\Control\Terminal Server\Winstations\RDP-Tcp' -Name "KeepAliveTimeout" -Value 1 -Type DWord -Force
Reconnect
Set-ItemProperty -Path 'HKLM:\SOFTWARE\Policies\Microsoft\Windows NT\Terminal Services' -Name "fDisableAutoReconnect" -Value 0 -Type DWord -Force

Set-ItemProperty -Path 'HKLM:\SYSTEM\CurrentControlSet\Control\Terminal Server\Winstations\RDP-Tcp' -Name "fInheritReconnectSame" -Value 1 -Type DWord -Force

Set-ItemProperty -Path 'HKLM:\SYSTEM\CurrentControlSet\Control\Terminal Server\Winstations\RDP-Tcp' -Name "fReconnectSame" -Value 0 -Type DWord -Force
Limit number of concurrent connections
Set-ItemProperty -Path 'HKLM:\SYSTEM\CurrentControlSet\Control\Terminal Server\Winstations\RDP-Tcp' -Name "MaxInstanceCount" -Value 4294967295 -Type DWord -Force
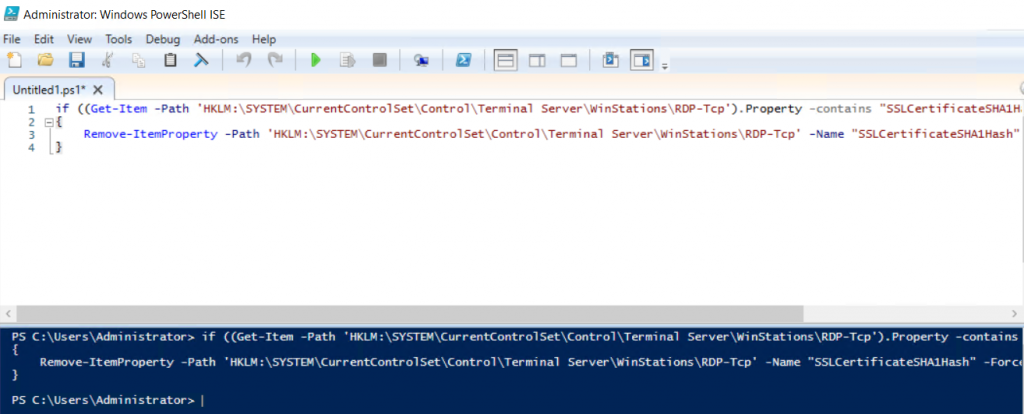
If there are any self-sign certs associated with RDP, remove them
if ((Get-Item -Path 'HKLM:\SYSTEM\CurrentControlSet\Control\Terminal Server\WinStations\RDP-Tcp').Property -contains "SSLCertificateSHA1Hash")
{
    Remove-ItemProperty -Path 'HKLM:\SYSTEM\CurrentControlSet\Control\Terminal Server\WinStations\RDP-Tcp' -Name "SSLCertificateSHA1Hash" -Force
}
Firewall
In next step we will configure firewall:
Set-NetFirewallProfile -Profile Domain,Public,Private -Enabled True
We will now allow WinRM through firewall
Enable-PSRemoting -Force

Set-NetFirewallRule -DisplayName "Windows Remote Management (HTTP-In)" -Enabled True
We also need to allow RDP
Set-NetFirewallRule -DisplayGroup "Remote Desktop" -Enabled True
Enable ping
Set-NetFirewallRule -DisplayName "File and Printer Sharing (Echo Request - ICMPv4-In)" -Enabled True
Verify VM
Next step would be to verify VM, so we are sure everything is ok.
First step should be to run checkdisk
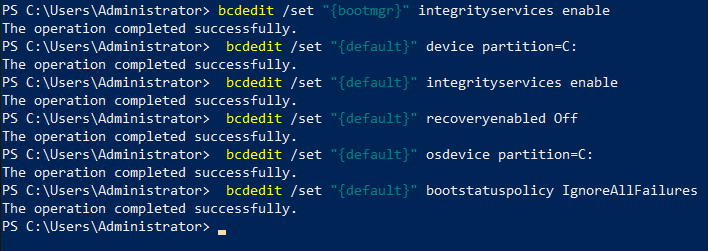
chkdsk /fNext, set BCD settings in PowerShell (elevated)
bcdedit /set "{bootmgr}" integrityservices enable
 bcdedit /set "{default}" device partition=C:
 bcdedit /set "{default}" integrityservices enable
 bcdedit /set "{default}" recoveryenabled Off
 bcdedit /set "{default}" osdevice partition=C:
 bcdedit /set "{default}" bootstatuspolicy IgnoreAllFailures
#Enable Serial Console Feature
 bcdedit /set "{bootmgr}" displaybootmenu yes
 bcdedit /set "{bootmgr}" timeout 5
 bcdedit /set "{bootmgr}" bootems yes
 bcdedit /ems "{current}" ON
 bcdedit /emssettings EMSPORT:1 EMSBAUDRATE:115200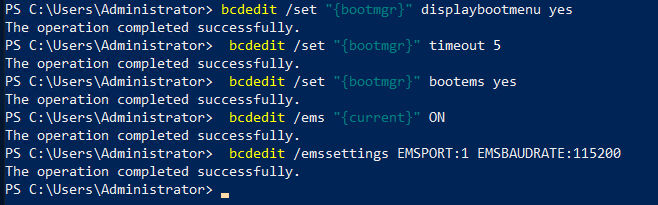
We will also enable dump log collection:
# Set up the guest OS to collect a kernel dump on an OS crash event
Set-ItemProperty -Path 'HKLM:\SYSTEM\CurrentControlSet\Control\CrashControl' -Name CrashDumpEnabled -Type DWord -Force -Value 2
Set-ItemProperty -Path 'HKLM:\SYSTEM\CurrentControlSet\Control\CrashControl' -Name DumpFile -Type ExpandString -Force -Value "%SystemRoot%\MEMORY.DMP"
Set-ItemProperty -Path 'HKLM:\SYSTEM\CurrentControlSet\Control\CrashControl' -Name NMICrashDump -Type DWord -Force -Value 1

# Set up the guest OS to collect user mode dumps on a service crash event
$key = 'HKLM:\SOFTWARE\Microsoft\Windows\Windows Error Reporting\LocalDumps'
if ((Test-Path -Path $key) -eq $false) {(New-Item -Path 'HKLM:\SOFTWARE\Microsoft\Windows\Windows Error Reporting' -Name LocalDumps)}
New-ItemProperty -Path $key -Name DumpFolder -Type ExpandString -Force -Value "c:\CrashDumps"
New-ItemProperty -Path $key -Name CrashCount -Type DWord -Force -Value 10
New-ItemProperty -Path $key -Name DumpType -Type DWord -Force -Value 2
Set-Service -Name WerSvc -StartupType Manual
Verify that WMI repo is consistent
winmgmt /verifyrepository
Make sure nothing else uses port 3389 for communication. To check, enter following command
netstat -anobIf you want to upload DC to Azure – there are steps on the Microsoft link posted in the beginning of the tutorial, make sure to check them.
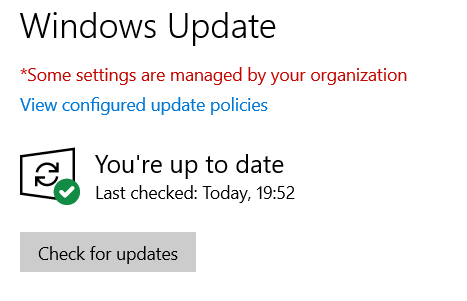
Windows Update
If you haven’t done it yet – update your Windows installation.
Preparing VM for upload
Two more steps until end.
We are more or less done, now we will run sysprep, generalize our installation and prepare it for Azure.
Run CMD as admin
Navigate to Windows/System32/Sysprep and run sysprep.exe

Select OOBe, Generalize and Shutdown, and then OK.
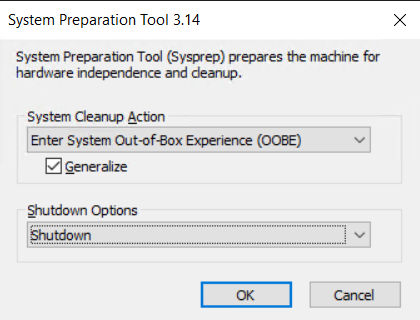
When the machine is done, it will shut down. If you haven’t done it yet convert your VHDX to VHD–
I cannot stress this enough – make sure your VHD is working and booting after you convert it from VHDX.
After you have VHD, you can upload it to Azure. If you done everything correctly, your machine will run.
If you are interesting to see how to upload and the publish your VHD in Azure Stack – https://www.informaticar.net/?p=4176