In the last year communication platforms exploded, Matrix Synapse is open source chat/video platform well worth trying. In this guide we will go through installation of Matrix Synapse on Ubuntu 20.04.
Before we begin
I will install this on VPS that has fixed public IP address, and this will be standalone installation for that VPS.
This guide assumes fresh installation with no other services on the machine. Also it assumes you already have ssh and firewall in place (we will only add ports to already enabled firewall).
Also, this guide assumes you have no databases or data on your machine. We will setup Postgres DB in this guide!
Also, I’m using my wildcard certificate, so there will be no Let’s Encrypt certificate.
Have that in mind and have a look at official Matrix Synapse documentation if you need any of the above.
To my DNS records I will add matrix.informaticar.net for the purpose of this guide.
Prerequisites
First, as always, bring your Ubuntu installation up to date.
sudo apt update
sudo apt upgrade
I will run all the commands as a local user. In screenshots I run as a root (sudo su) but I wouldn’t recommend that for a production environment. Once you are sure everything is working, execute the setup with local user, it should work with the listed commands.
Install dependencies for matrix-synapse
sudo apt install lsb-release wget apt-transport-https
We will also use matrix-synapse packages, in order to add them to Ubuntu we need to add GPG keys.
sudo wget -qO /usr/share/keyrings/matrix-org-archive-keyring.gpg https://packages.matrix.org/debian/matrix-org-archive-keyring.gpg

sudo echo "deb [signed-by=/usr/share/keyrings/matrix-org-archive-keyring.gpg] https://packages.matrix.org/debian/ $(lsb_release -cs) main" | sudo tee /etc/apt/sources.list.d/matrix-org.list

Since we added new repo, we will need to run update again and then install matrix synapse
sudo apt update
sudo apt upgrade
sudo apt install matrix-synapse-py3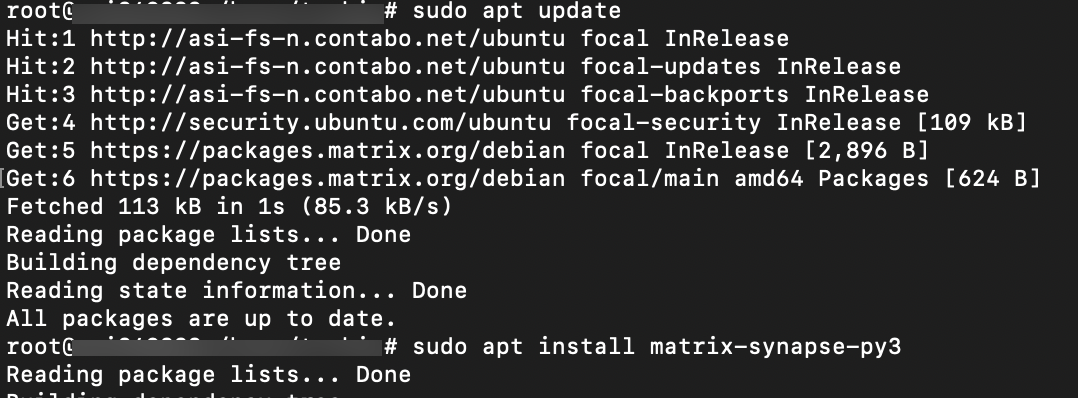
matrix-synapse-py3 package will triger synapse installation.
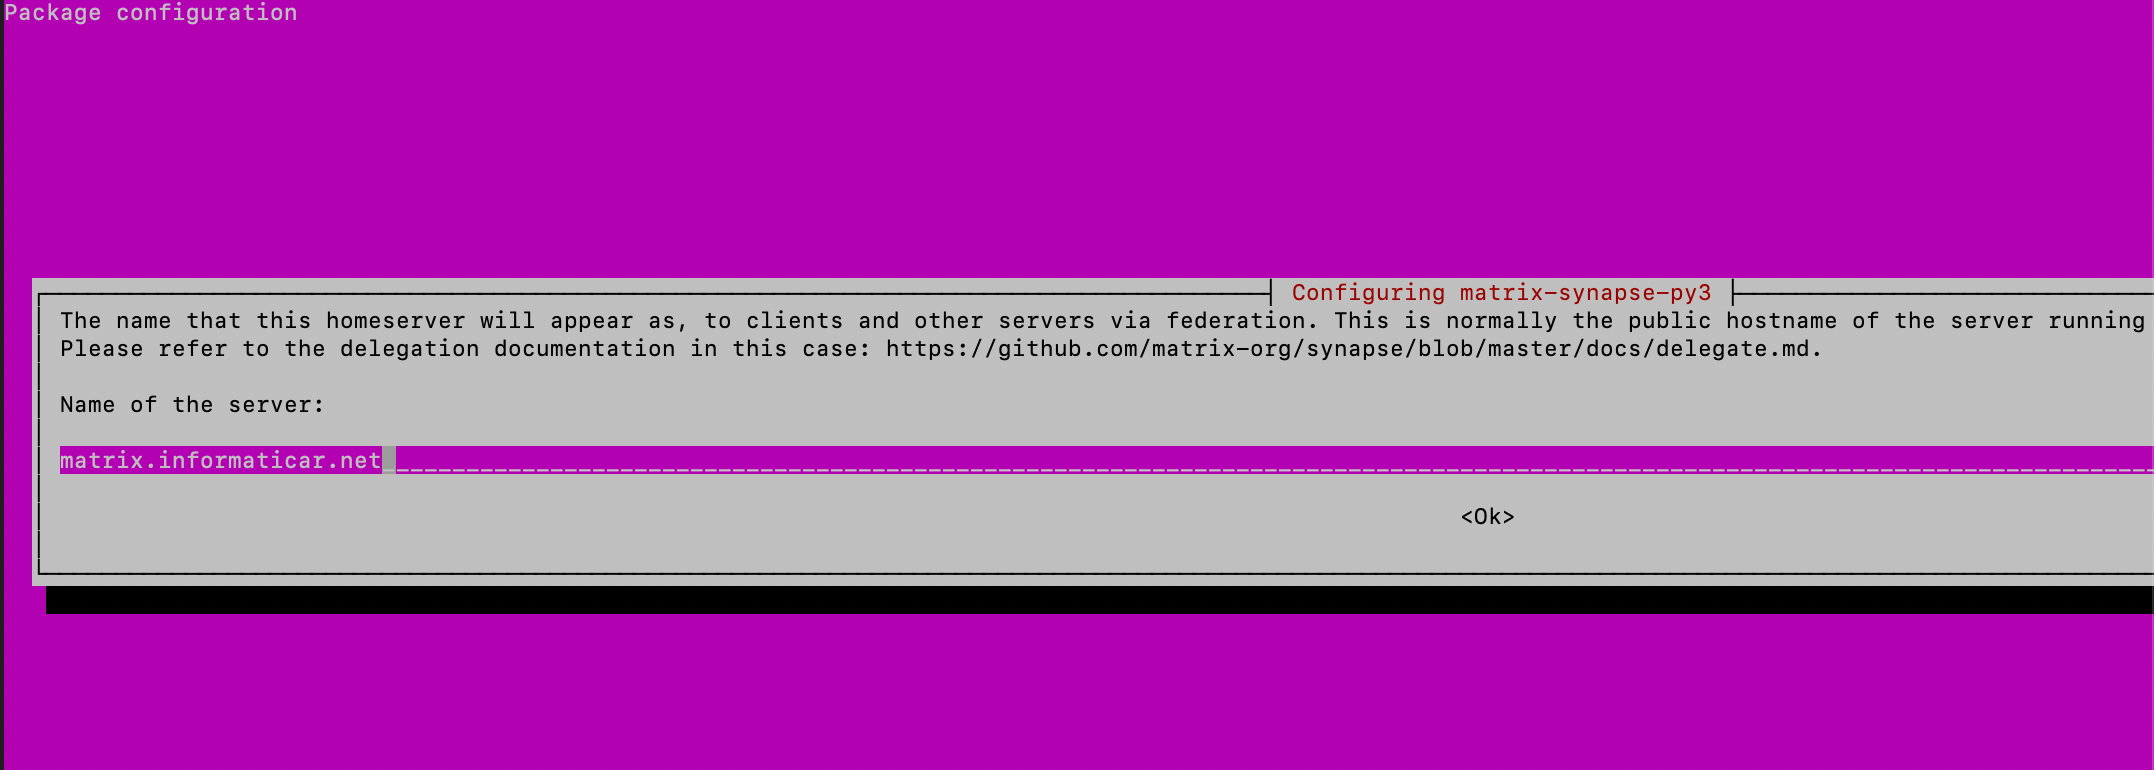
For a server name I will enter matrix.informaticar.net – you will enter your synapse server name in here. Official documentation recommends that you enter just your domain here – in my case that would be informaticar.net.
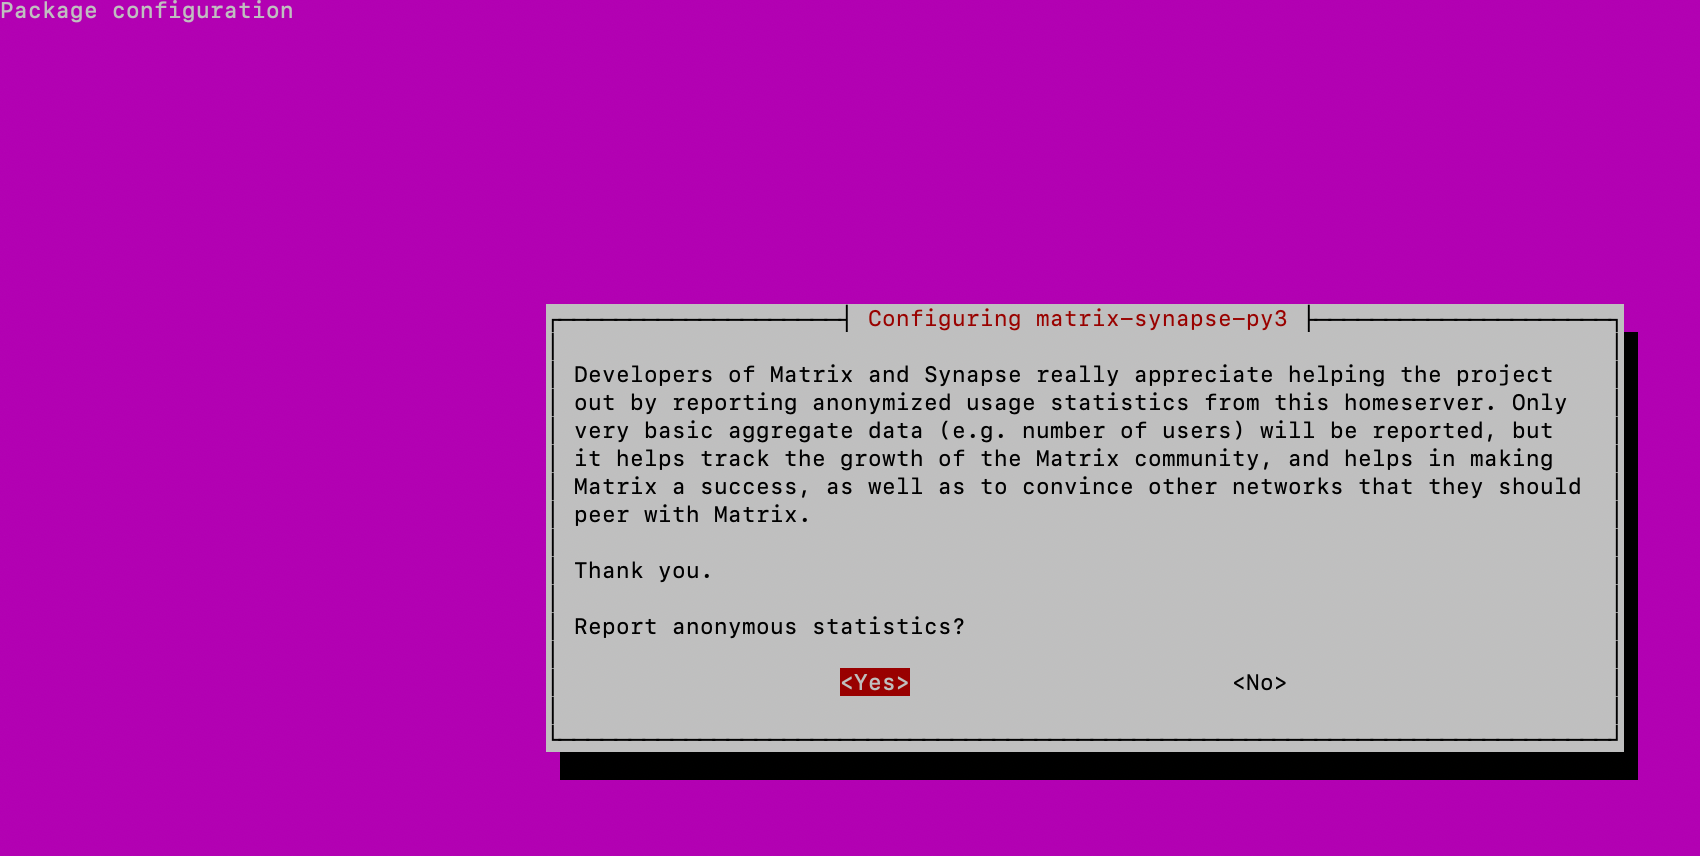
This one is up to you. I selected yes, to help developers.This is one of the metric with which they can keep funding for this great project.
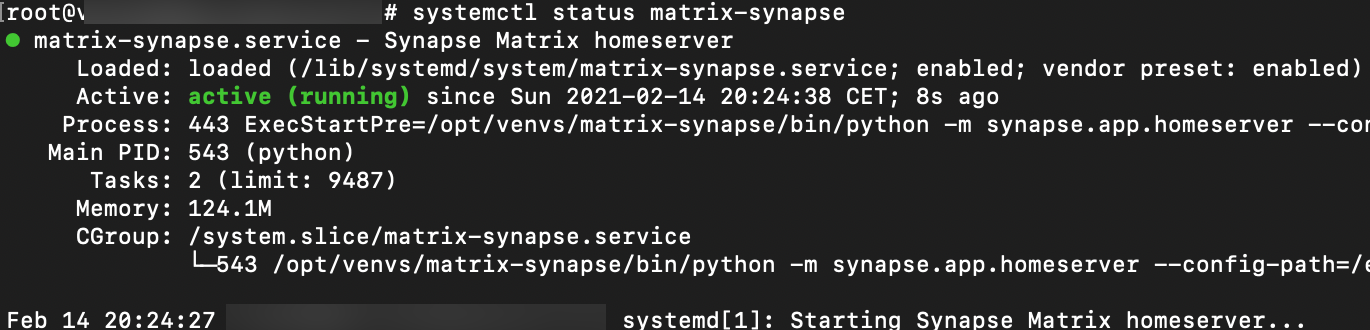
We will now enable synapse on system boot and start it
sudo systemctl enable matrix-synapse
sudo systemctl start matrix-synapse
sudo systemctl status matrix-synapse
Good idea would be also to check if port 8008 is now listening
ss -plnt
In case your matrix service will not start (like mine didn’t want to), you will need to do following.
_________________________________________
Do these steps only if your Matrix Synapse service is not running!!
We need to go through logs of Matrix Synapse
sudo nano /var/log/matrix-synapse/homeserver.log I found this line
twisted.internet.error.CannotListenError: Couldn't listen on ::1:8008: [Errno 99] Cannot assign requested address.
I also went on to see on which port is system listening
ss -plnt
Ok, so there is no port 8008 listening on my system.
I will need to edit homeserver.yaml file.
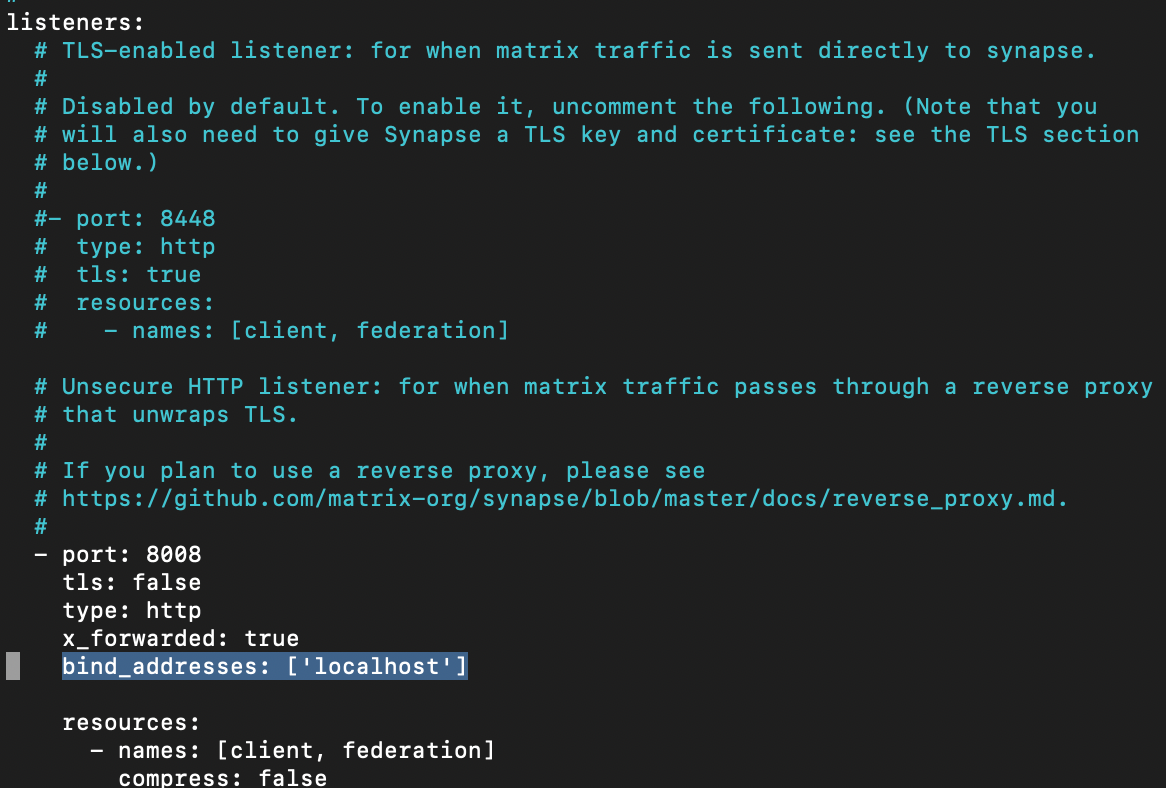
sudo nano /etc/matrix-synapse/homeserver.yamlIn listeners part of the homeserver.yaml file, under -port: 8008 in binding part I entered
bind_addresses: ['localhost']instead of 127.0.0.1 that was defined there.
After that I rebooted server, and the service was working.
Ok, we are done, matrix synapse service is working, we can proceed with the setup.
____________________________________________
Ok, we will now need to generate random string which will serve as a Matrix Synapse registration secret.
cat /dev/urandom | tr -dc 'a-zA-Z0-9' | fold -w 32 | head -n 1You will get something like this
2lyjkU7Ybp24rWR1TBJkut65RFcXZZA
We will need this key in a bit, so make sure you write down yours or save it somewhere.
Head on to your homeserver.yaml file
sudo nano /etc/matrix-synapse/homeserver.yamlUncomment line registration_shared_secret and add your key between double quotes.
registration_shared_secret: "2lyjkU7Ybp24rWR1TBJkut65RFcXZZA"Save and close file and reboot matrix synapse
sudo systemctl restart matrix-synapseSSL Certificate
This part is pretty simple in my case, I have already wildcard certificate for my domain. Again, I’m not doing this with Let’s Encrypt certificates.
Make sure that the Matrix Synapse has rights to the part where you keep your certificate!
My certificates are located in the following directory for this guide.
public part: /etc/matrix-synapse/matrixinformaticar.crt
private part: /etc/matrix-synapse/matrixinformaticar.key
Make sure that your certificates are secure, and select secure path for your certs (which would be wise).
Default system path (in Ubuntu) for public part of the cert is /etc/ssl/certs and private part of the cert /etc/ssl/private
Letting Matrix Synapse communicate
When I was using CentOS I did this part without Nginx proxy, it worked faster for me that way. But, since I had some problems on Ubuntu without reverse proxy (for some reason my install was slow), I’m going to configure reverse proxy on Nginx.
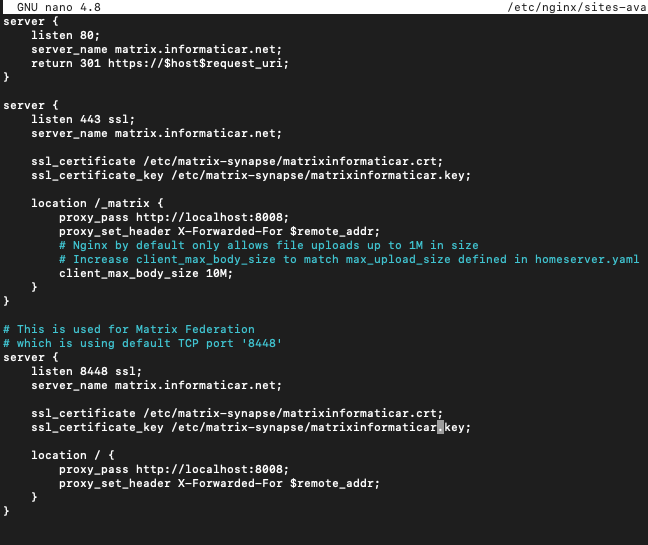
sudo apt install nginxWe are going to create new file for our Synapse installation
sudo nano /etc/nginx/sites-available/matrixThis is what you need to copy to that file
server {
    listen 80;
    server_name matrix.informaticar.net;
    return 301 https://$host$request_uri;
}

server {
    listen 443 ssl;
    server_name matrix.informaticar.net;

    ssl_certificate /etc/matrix-synapse/matrixinformaticar.crt;
    ssl_certificate_key /etc/matrix-synapse/matrixinformaticar.key;

    location /_matrix {
        proxy_pass http://localhost:8008;
        proxy_set_header X-Forwarded-For $remote_addr;
        # Nginx by default only allows file uploads up to 1M in size
        # Increase client_max_body_size to match max_upload_size defined in homeserver.yaml
        client_max_body_size 10M;
    }
}

# This is used for Matrix Federation
# which is using default TCP port '8448'
server {
    listen 8448 ssl;
    server_name matrix.informaticar.net;

    ssl_certificate /etc/matrix-synapse/matrixinformaticar.crt;
    ssl_certificate_key /etc/matrix-synapse/matrixinformaticar.key;

    location / {
        proxy_pass http://localhost:8008;
        proxy_set_header X-Forwarded-For $remote_addr;
    }
}
Next, we will enable virtual host and test it
sudo ln -s /etc/nginx/sites-available/matrix /etc/nginx/sites-enabled/
sudo nginx -t

Ok, all is good, we will now restart nginx service and enable it on boot.
sudo systemctl restart nginx
sudo systemctl enable nginx
Setting up Postgres
Instead of SQLite which is installed by default and meant only for testing purposes, I will be installing PostgreSQL and shifting to it before we start anything serious with Matrix Synapse.
To install it, type in following
sudo apt install postgresql postgresql-contribIn next few steps I will be creating user synapseuser with password Pass, and database synapse.Feel free to name all of these as you like.
sudo -i -u postgrespsqlCREATE USER "synapseuser" WITH PASSWORD 'Pass';CREATE DATABASE synapse ENCODING 'UTF8' LC_COLLATE='C' LC_CTYPE='C' template=template0 OWNER "synapseuser";When you are done type \q to exit, and again exit to exit postgres user.

Next stop will be Synapse homeserver.yaml configuration.
But first, a quick installation
sudo apt install python3-psycopg2Now, we will edit our homeserver.yaml file and replace sqlite with Postgres.
sudo nano /etc/matrix-synapse/homeserver.yamlFirst, comment out part for sqlite3
#database:
#  name: sqlite3
#  args:
#    database: /var/lib/matrix-synapse/homeserver.db
Next, uncomment following in the homeserver.yaml file, and use your synapse database name, user and password in it. One we earlier created in PostgreSQL
database:
  name: psycopg2
  args:
    user: synapseuser
    password: Pass
    database: synapse
    host: localhost
    cp_min: 5
    cp_max: 10
This is how it should look like
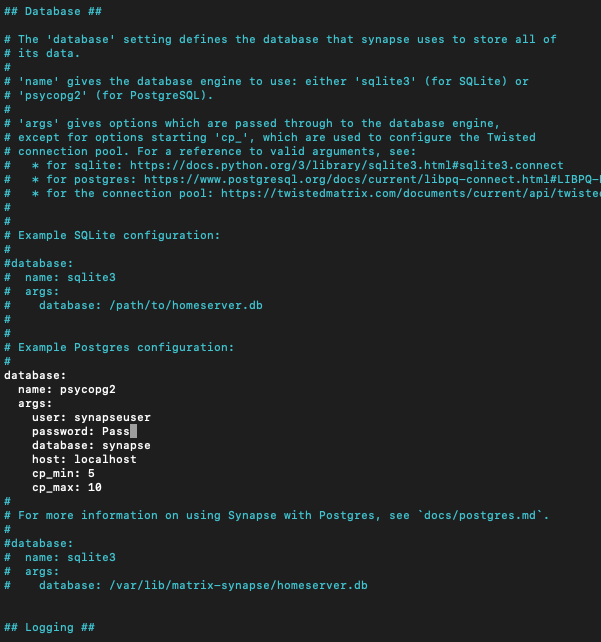
Save and exit.
Reboot the Matrix Synapse service
sudo systemctl restart matrix-synapse.serviceOk, that should be it, we will once again check our database settings after we create user, let’s go further now.
Firewall rules
You will probably need a few ports through your firewall.
sudo ufw allow 8448
sudo ufw allow https
Maybe you will also need (I haven’t opened http in my setup)
sudo ufw allow httpYou can check your open ports by typing in
sudo ufw statusBe careful with firewall, make sure you enable it for every internet facing service, but also, be sure you let all the ports you need through it before you enable it (ssh for example).
Now, if we did everything correctly, we should now be able to connect to our Matrix Synapse server.
https://matrix.informaticar.net:8448
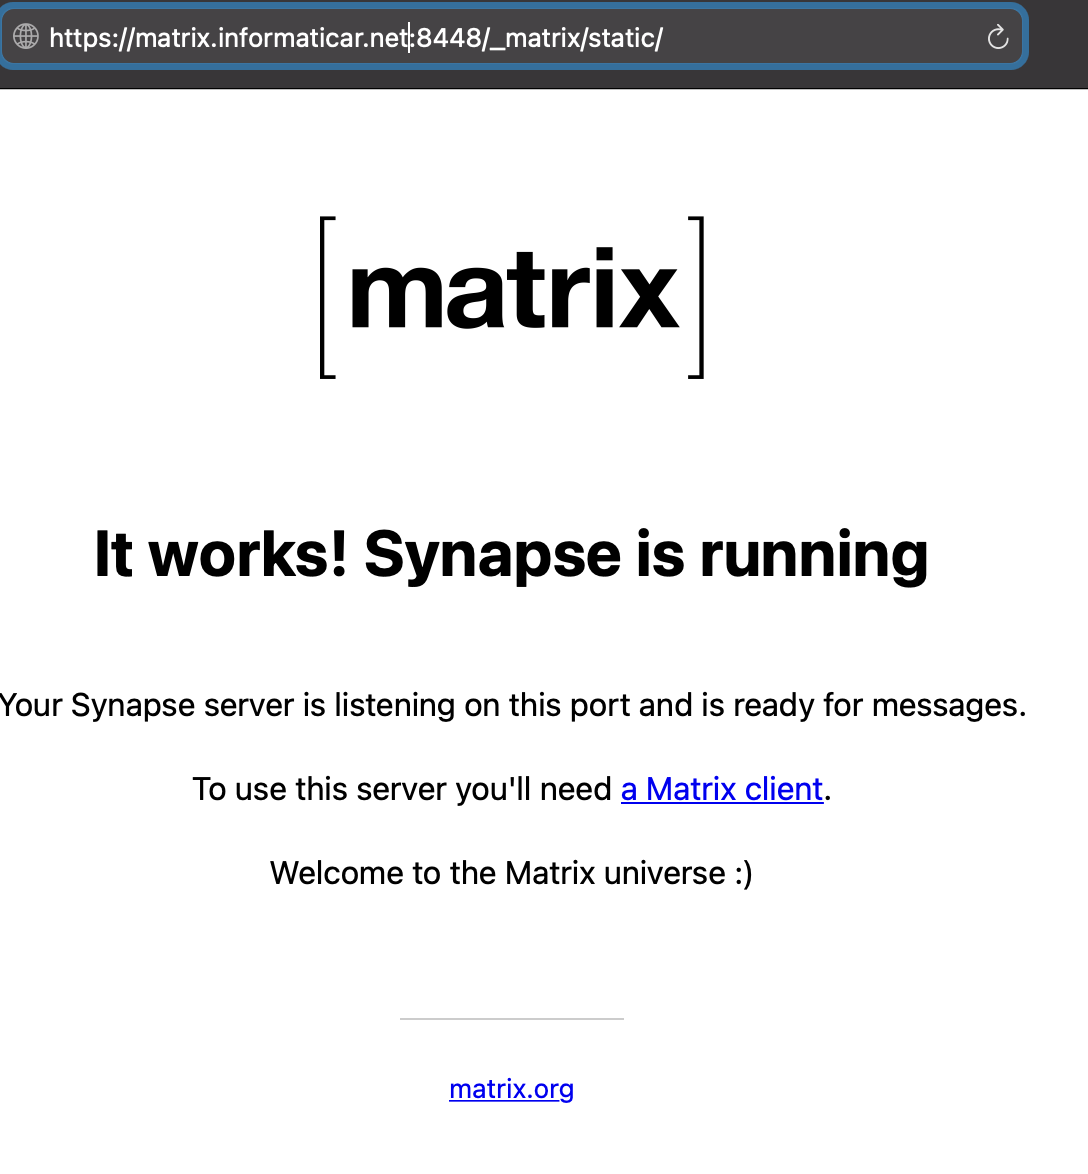
It is working! But we have more work to do.
We will now test our configuration by going to
https://federationtester.matrix.org
and entering only our domain name – matrix.informaticar.net
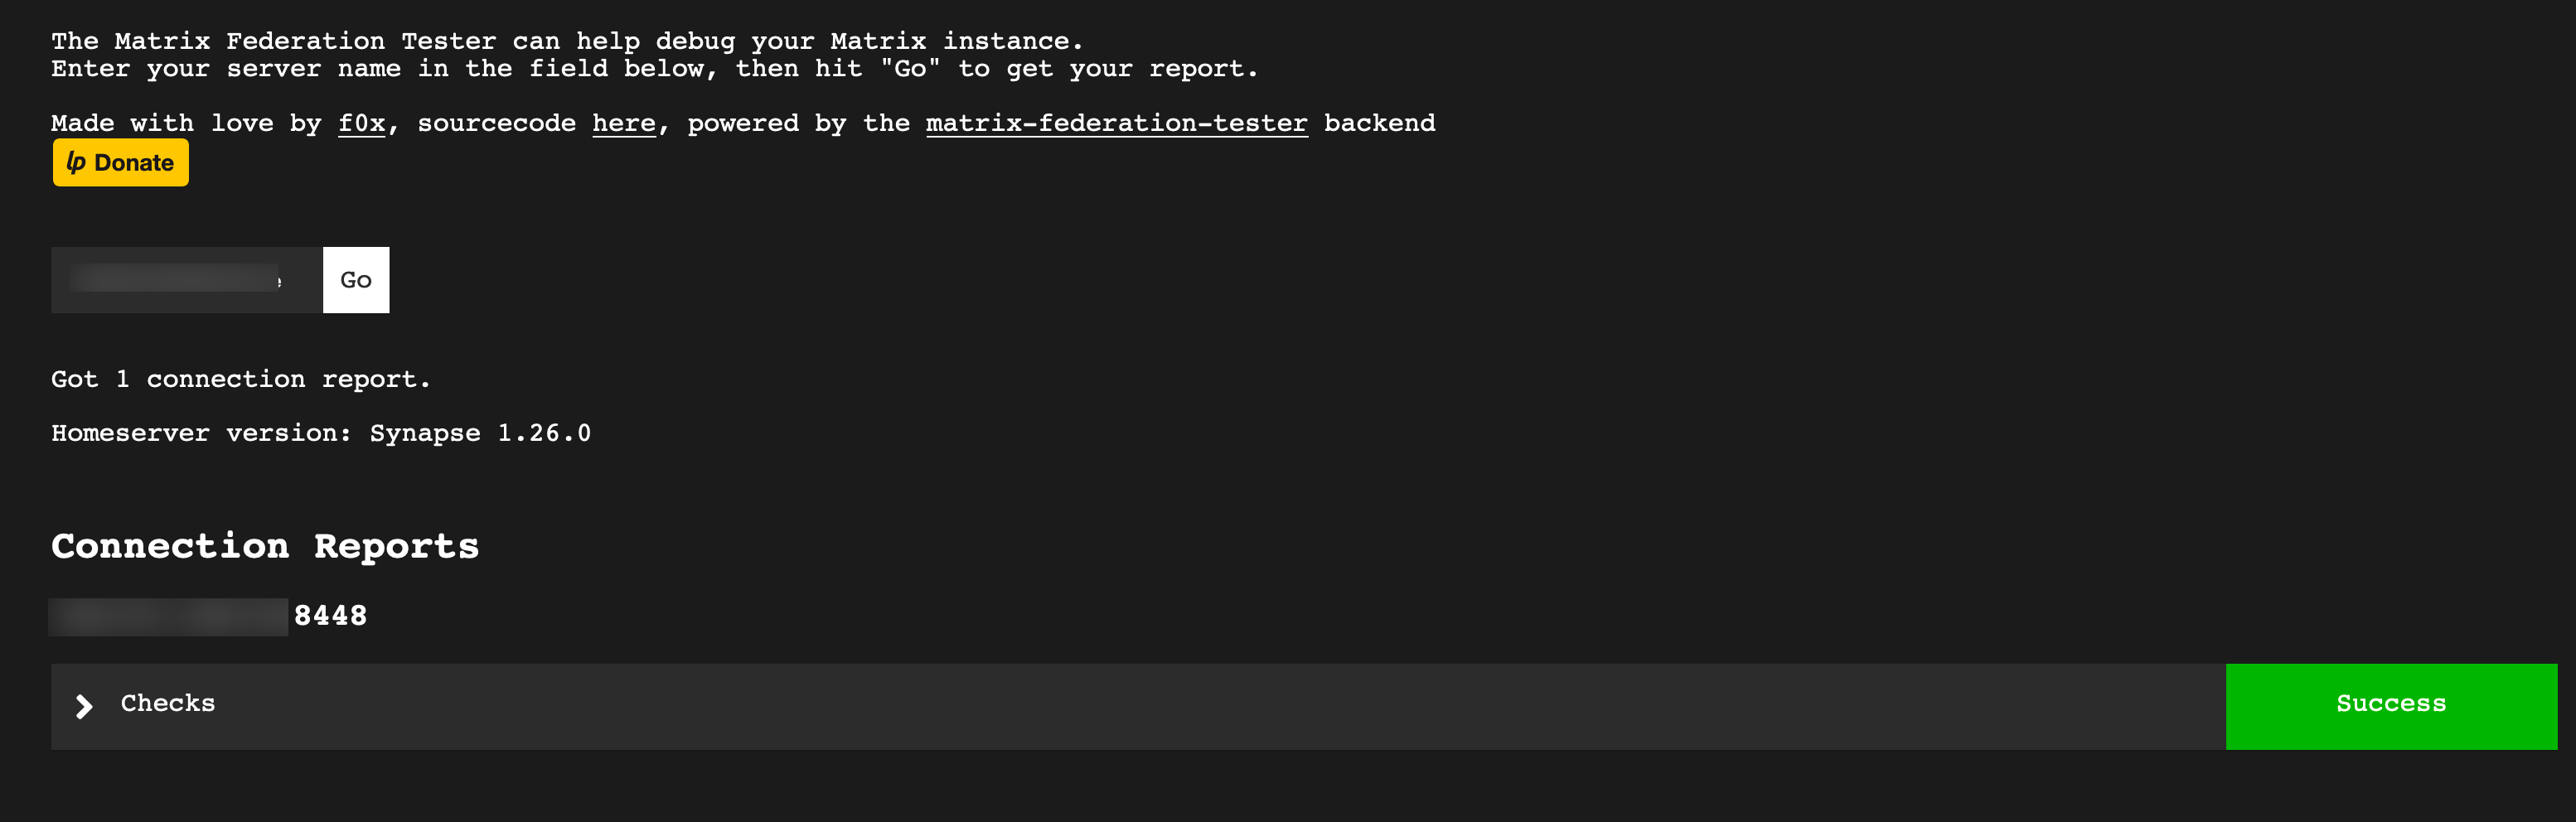
My server passed all tests, and everything got checked quickly.
Create admin account
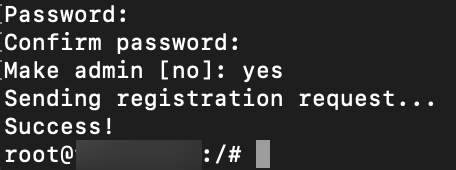
Next step will be to create our first user account, it will be our administrative account.
register_new_matrix_user -c /etc/matrix-synapse/homeserver.yaml http://localhost:8008
You will be also asked to enter password for your user (make sure it is a strong one) and if you should make it an admin. I clicked yes for the first account.
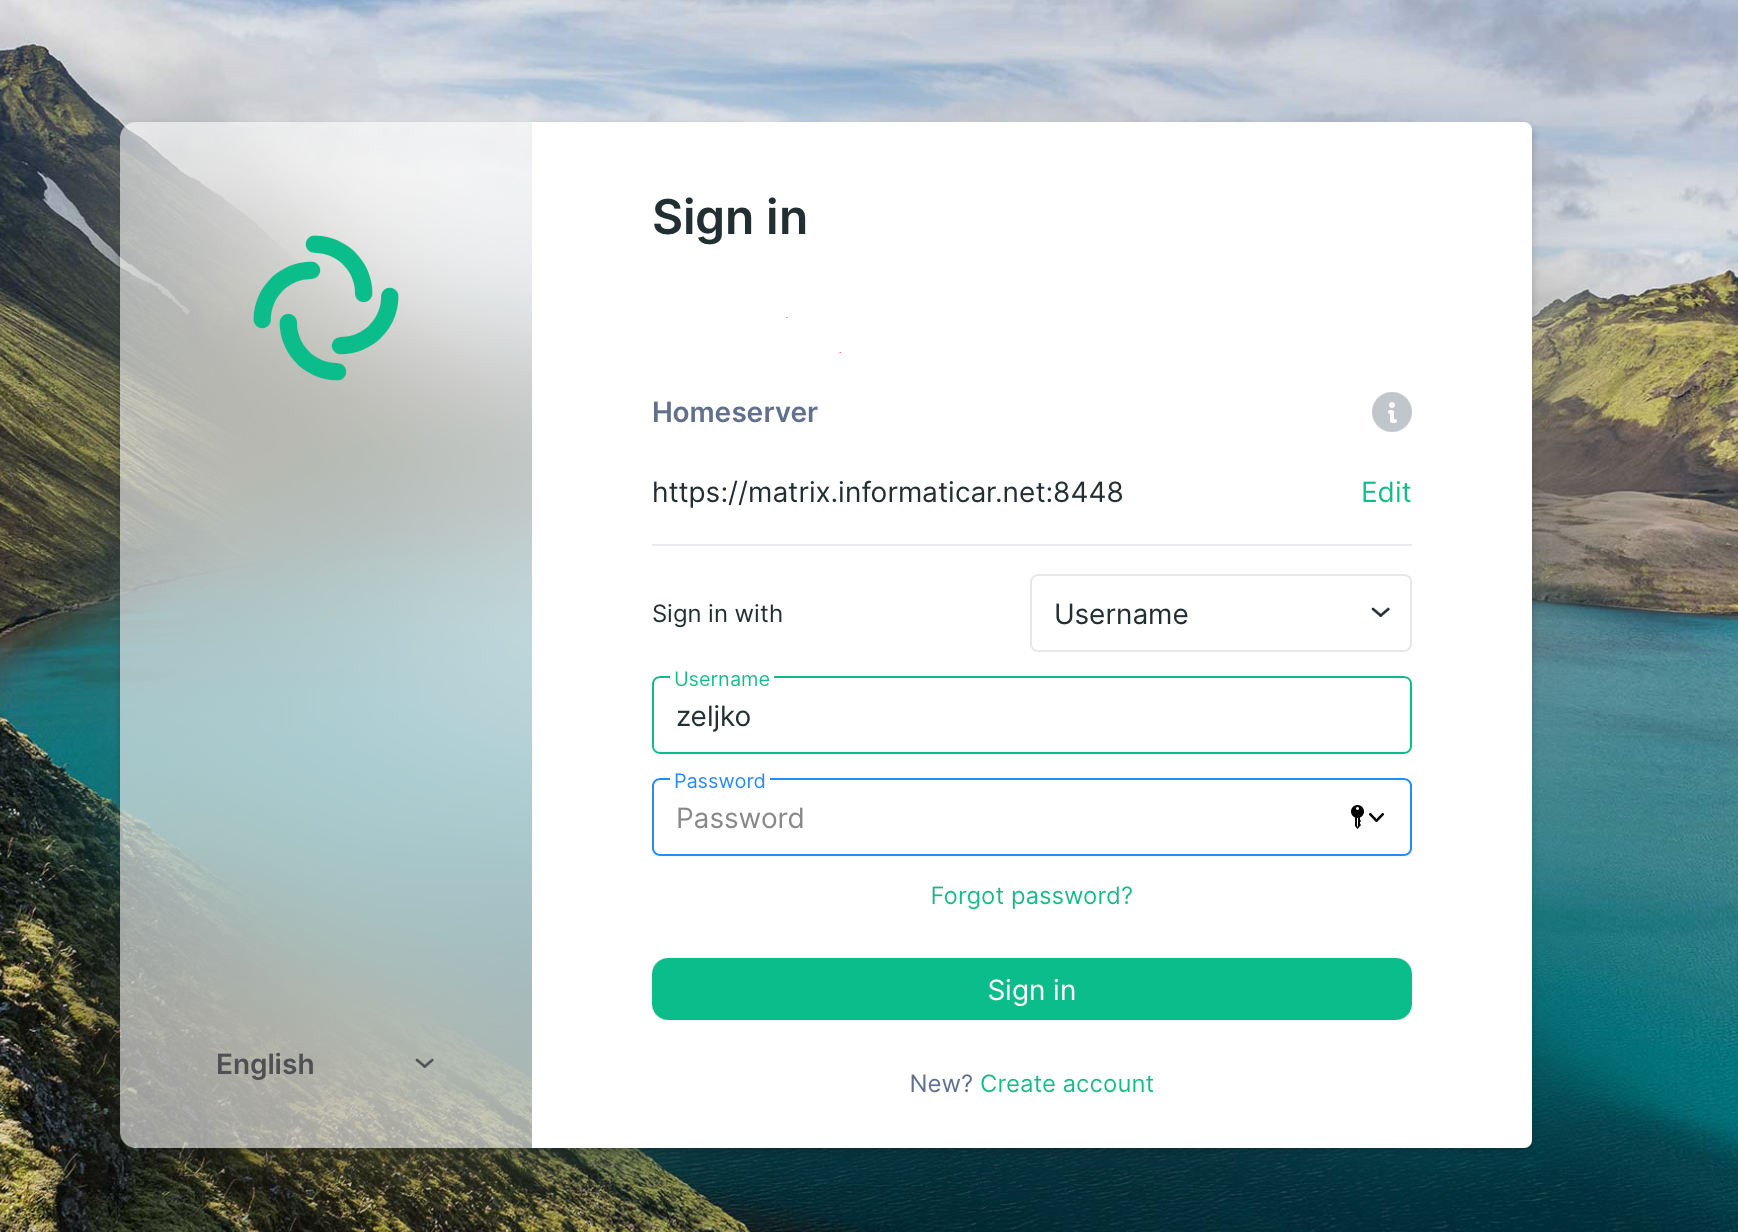
You can now login to your account by going to the Element webiste
https://app.element.io/#/login
Under homeserver you will have to select Edit and then enter full link to your Matrix Synapse server. Enter username and password you just created to login.
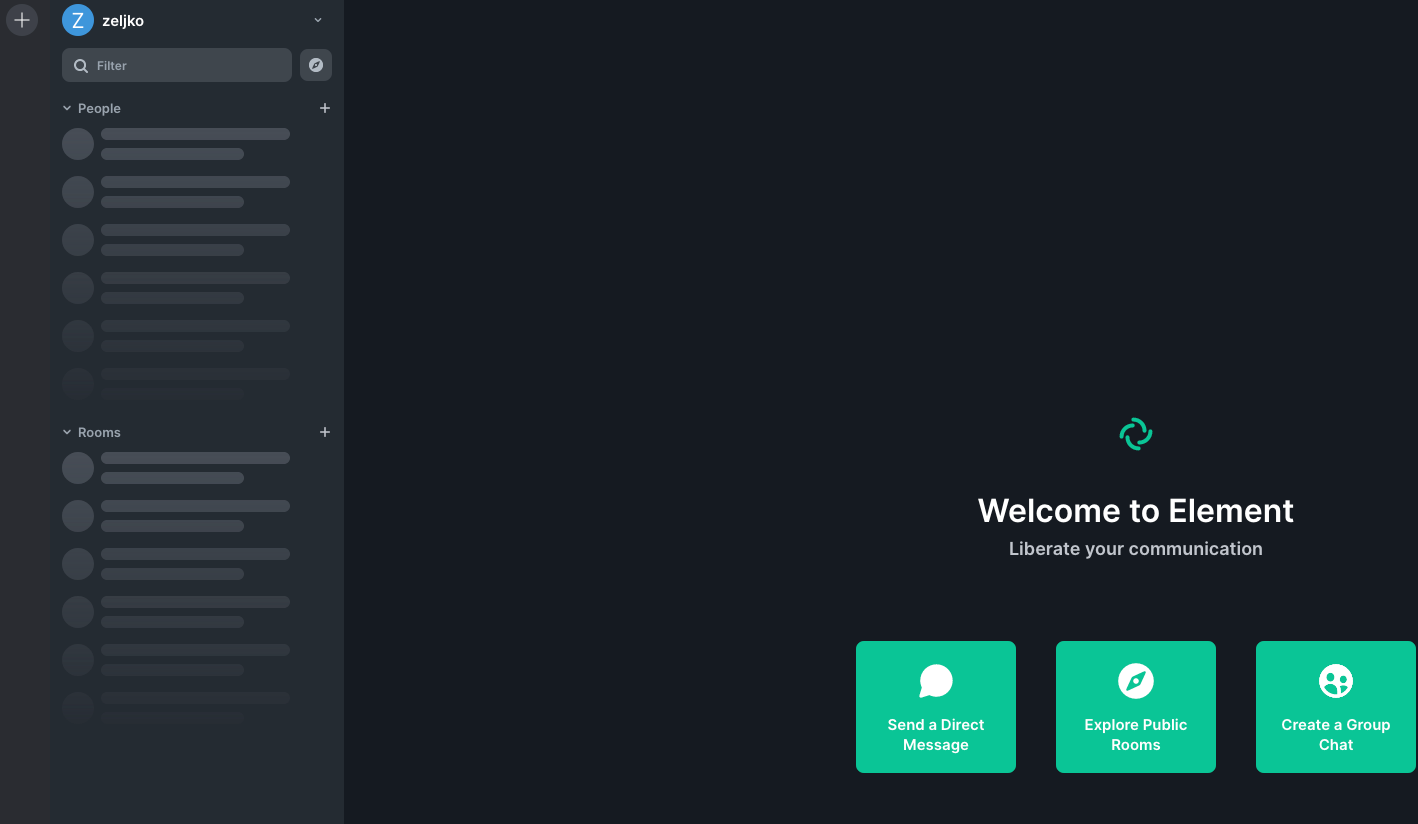
Other way would be to download Element app to your pc or mobile phone and repeat this login process.
My service is ok and working, I was able to login.
While we are at this step, maybe go to the homeserver.yaml file
sudo nano /etc/matrix-synapse/homeserver.yamland disable new user registration (if you need it, you can enable registration, I have fixed number of users, so I disable it).
enable_registration: false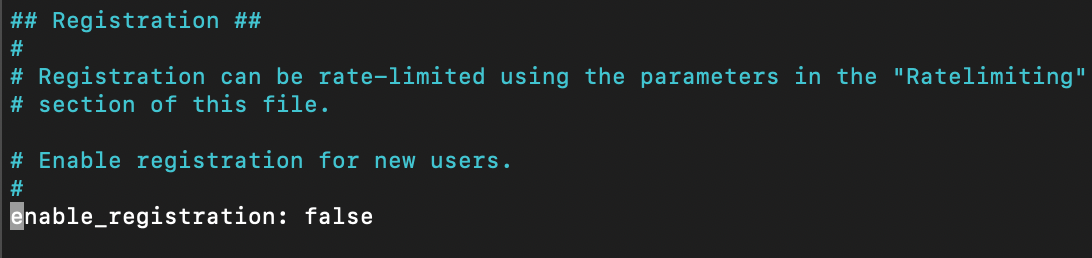
This is optional step and it depends on whether you want to allow registrations to your Matrix Synapse server or not.
Also, if you plan to use your Matrix Synapse server privately, you should consider disabling following two settings in homeserver.yaml
allow_public_rooms_without_auth: false
allow_public_rooms_over_federation: false
I did a reboot of the server after this step.
Checking if database is working properly
I’m always extremely careful when databases are in question, and I like to check things before they go into the production so I can act in time and prevent problems.
First, Synapse will put your media files in /var/lib/matrix-synapse/media folder
If you go to that folder immediately after a creation, it will be empty. So, I created room named dbtestroom and uploaded there pdf of 5.21MB in size
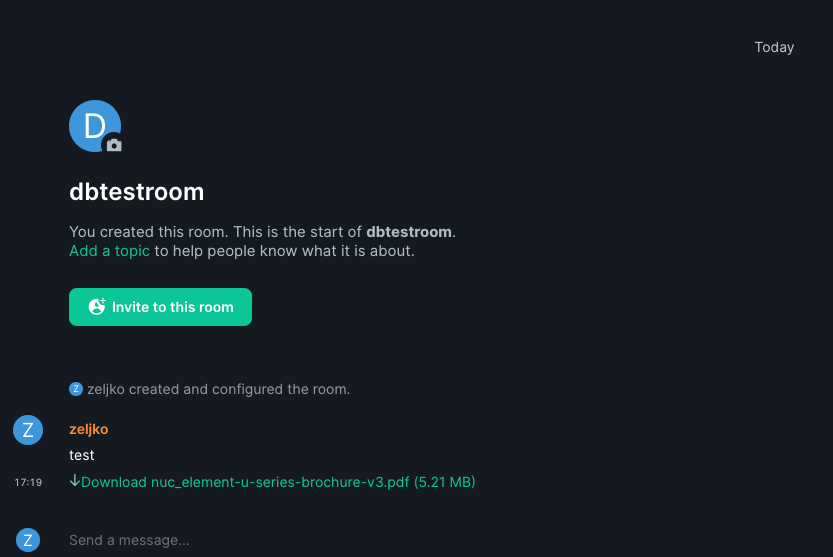
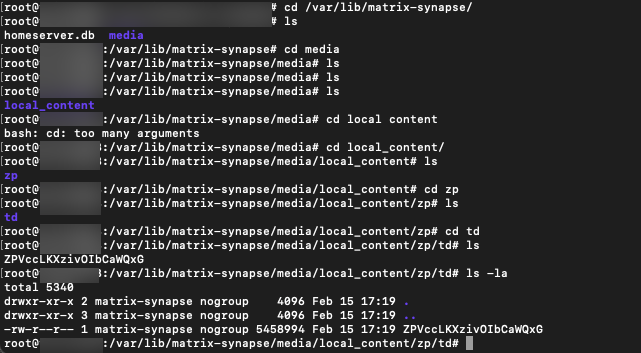
Ok, so I went to the terminal, and after a few commands and refreshes, local_content subfolder appeared in the media folder, and in it few other random named subfolders with the file of 5.4MB and random name. That should be it.
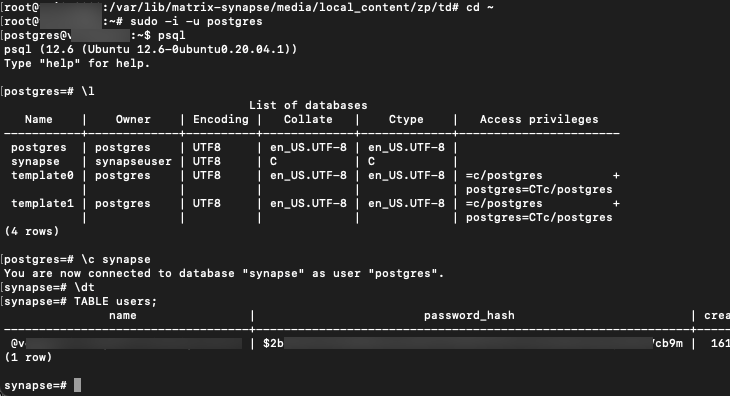
Ok, let’s now check if our database is getting filled with data
sudo -i -u postgrespsqlFollowing command will list all the databases
\lWe will select our synapse database by typing in
\c synapseWe can list all the tables in database synapse by typing in
\dtI would be now interested to see if user I created is in table users inside Postgres.
TABLE users;It is, so that is good, Synapse is using our Postgres DB.
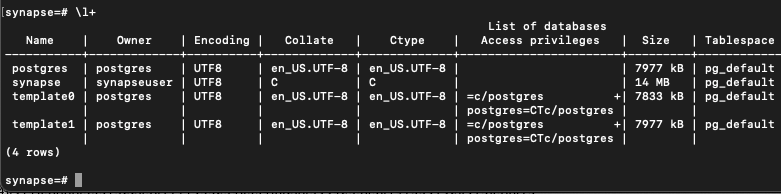
Ok, let’s now list DB size by typing in following
\l+Synapse is 14MB in size at the moment
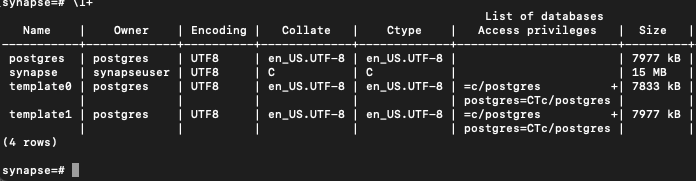
I will copy 1MB of text I found on the internet. It takes time because you have to copy in pieces…

Ok, let’s check our synapse DB size.
It grew 1MB, so that is good
You can also check Synapse logs (I listed some of them earlier) to see if everything is ok, also you can check Postgres logs and see if everyhing is fine. At last, check Nginx logs for clues about potential issues.
You should definitely make sure everything is fine before rolling this out into production.
Update Matrix Synapse
At some point you will need to update your Matrix, this is how I done it so far
First I update Ubuntu install
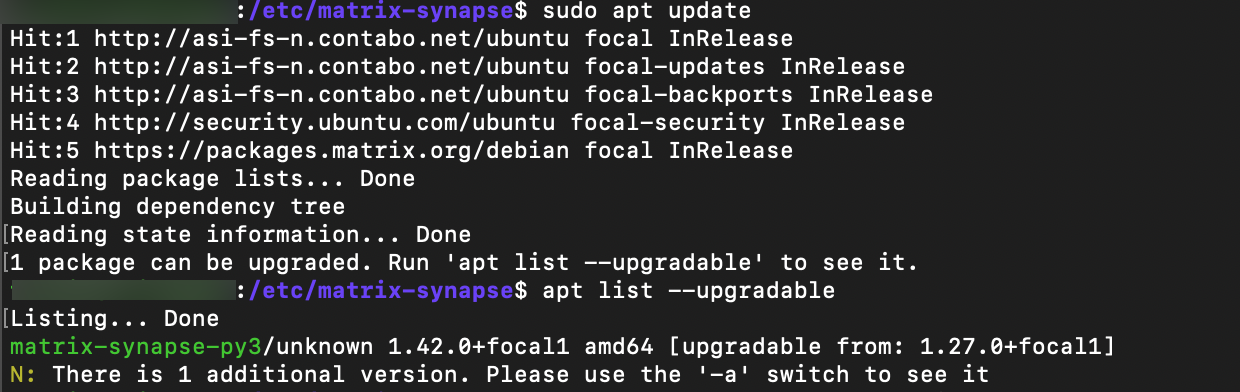
sudo apt update
sudo apt upgrade
Reboot after update/upgrade.
Update command will probably show that 1 package can be upgraded.
After you run apt list –upgradable you will see that we can update our matrix synapse.
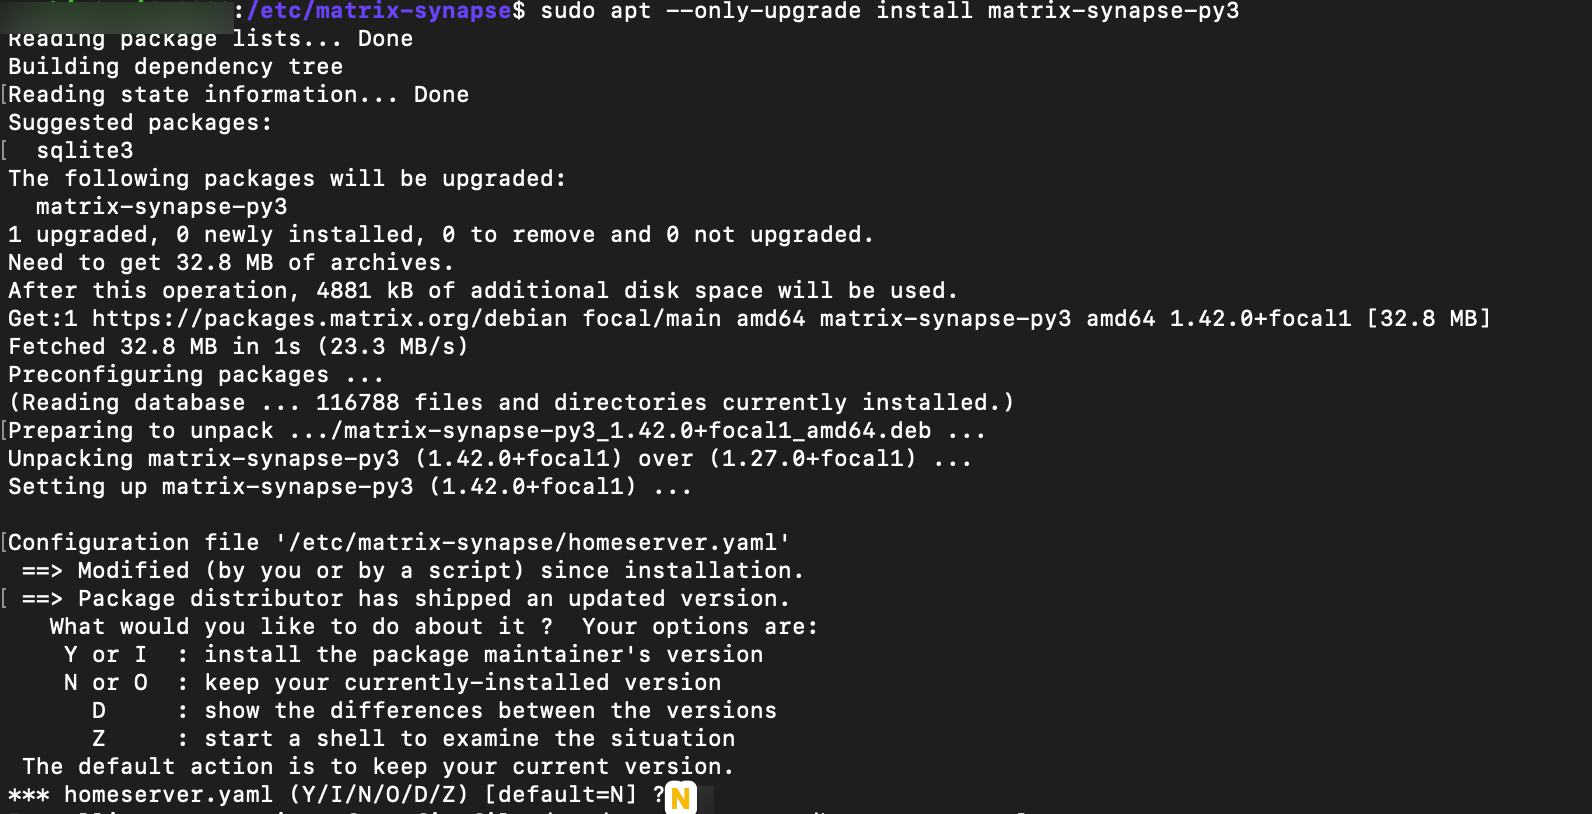
My Matrix install is located in /etc/matrix-synapse folder. Make sure you backup your homeserver.yaml file before you begin. My yaml file is located here – /etc/matrix-synapse/homeserver.yaml
After you have backup of your homeserver.yaml you can proceed- this is very important if you screw up and overwrite your homeserver.yaml – you will then again need your listener settings, database settings, registration shared secret…
sudo apt --only-upgrade install matrix-synapse-py3You will be asked for homeserver.yaml overwrite – select N – no
After this is done, reboot your server and that should be it. You are done.
Misc Settings
If you wish to upload larger files or pictures to your Matrix Synapse install, you should set following
First, head on to homeserver.yaml file
sudo nano /etc/matrix-synapse/homeserver.yamlFind and enable line max_upload_size: I set mine to 750M size. Define size you would like, it doesn’t have to be 750M size.
max_upload_size: 750M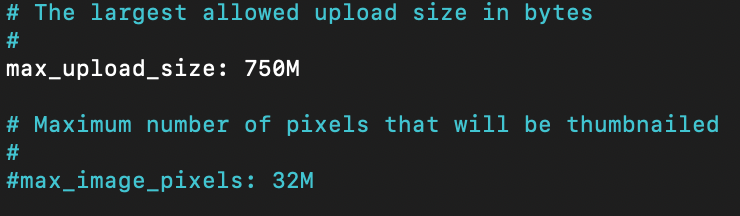
Save and exit file, and reboot Matrix Synapse service
sudo systemctl restart matrix-synapse.serviceNext, we need to set upload value also in Nginx (if you are using Nginx proxy)
First we will go to our matrix virtual site
sudo nano /etc/nginx/sites-available/matrixSet client_max_body_size
client_max_body_size 750M;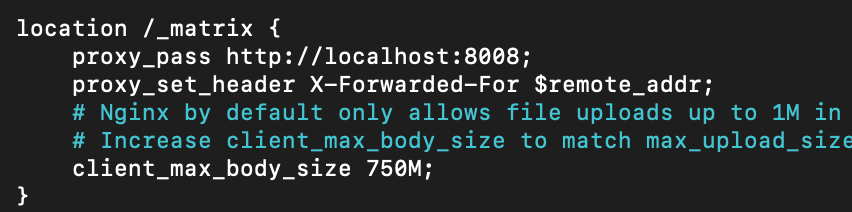
Save and exit file
Next, we will need to edit nginx.conf
sudo nano /etc/nginx/nginx.confI set client_max_body_size in http section uder Basic Settings
client_max_body_size 750M;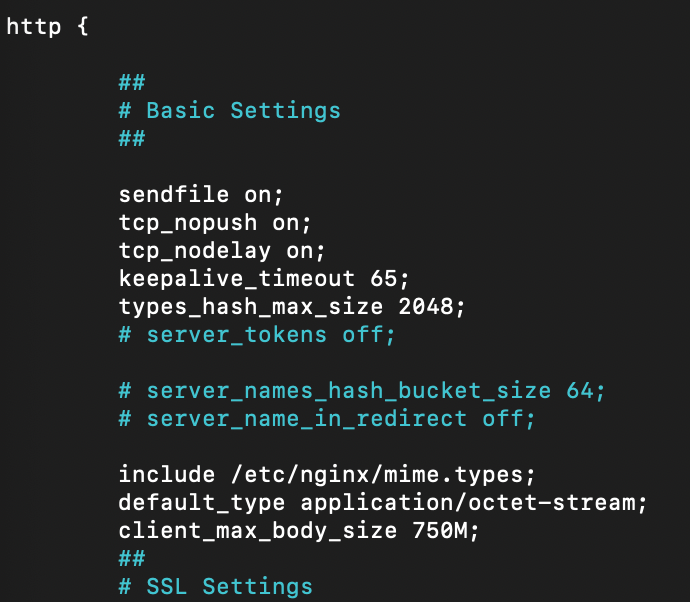
In Nginx it should be (according to the internet) enough to set client_max_body_size in just one of those two places, but that didn’t work for me.
Restart Nginx after you saved your settings
sudo systemctl restart nginxYou should now be able to upload large pictures, movies or files to your Matrix Synapse chat.