I already covered manual installation of OpenStack and decided I will also show how to deploy RedHat Openstack – Undercloud. After you deploy undercloud, you will then have to deploy overcloud on it. I will demonstrate Undercloud part, if there is enough interest I can also do a writeup on deploying RedHat Openstack overcloud.
I have notes and guide I made for myself n overcloud deploy, but if there is interest I can make (when I have time) usable guide for everyone.
Before we begin
For this guide I’m going to partially follow RedHat naming convention. Also, to complete this, you will need trial of subscriptions for Red Hat Server 8.2 and OpenStack 16.1.
Hardware prerequisites:
RedHat recommends following for your Undercloud machine:
CPU: 8 Thread 64bit CPU
RAM: Minimum of 24GB
Minimum disk space: 100GB
Network interfaces: 2x 1Gbit NIC
If you are doing this on bare metal, it should be nice for machines to have IPMI for control.
You can also deploy Red Hat undercloud on virtualization – KVM, Red Hat Virtualization, Hyper-V and VMware ESX and ESXi are supported.
I’m going to deploy my Undercloud with following specs:
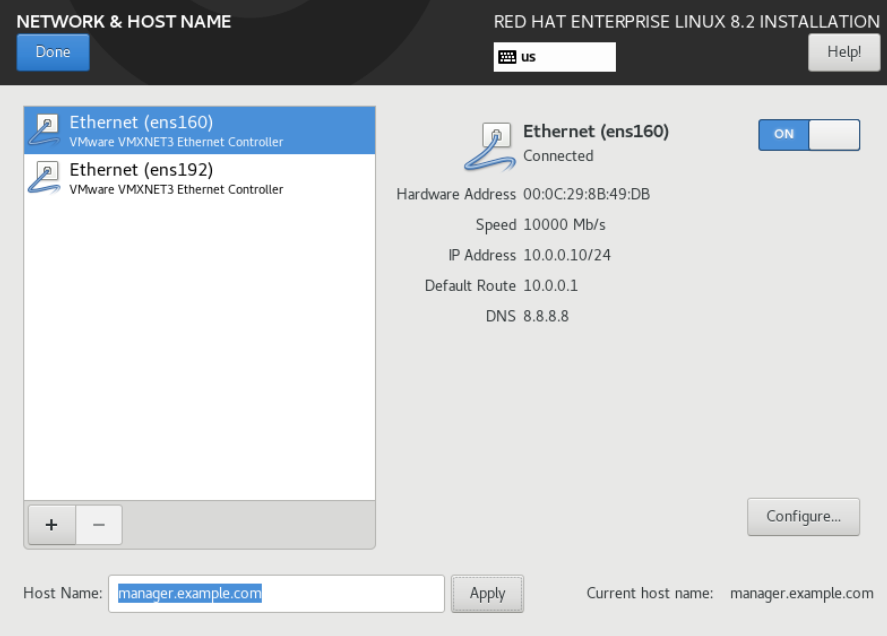
Machine name: manager.example.com
CPU: 8 Core
RAM: 32GB
Disk Space: 250GB
Network interfaces: External network: 10.0.0.10/24 (ens160)
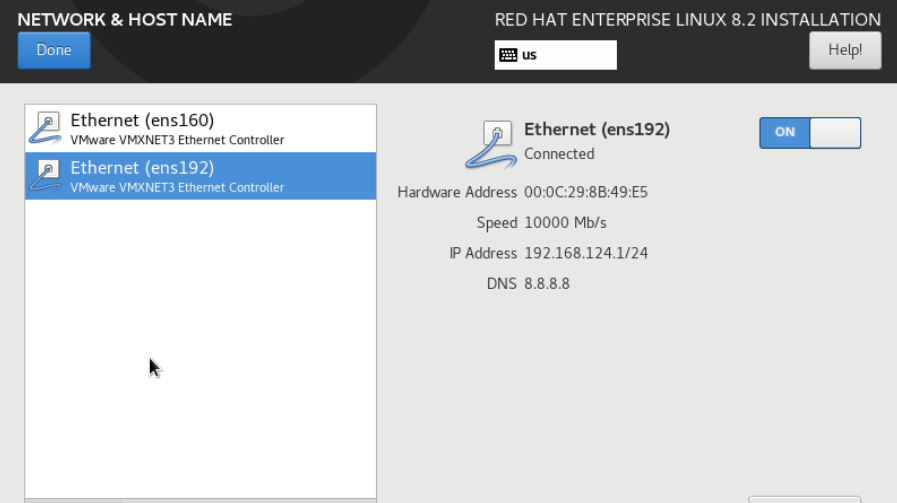
Provisioning network: 192.168.124.1/24 (ens192)
Local user on machine will be named stack with password stack.
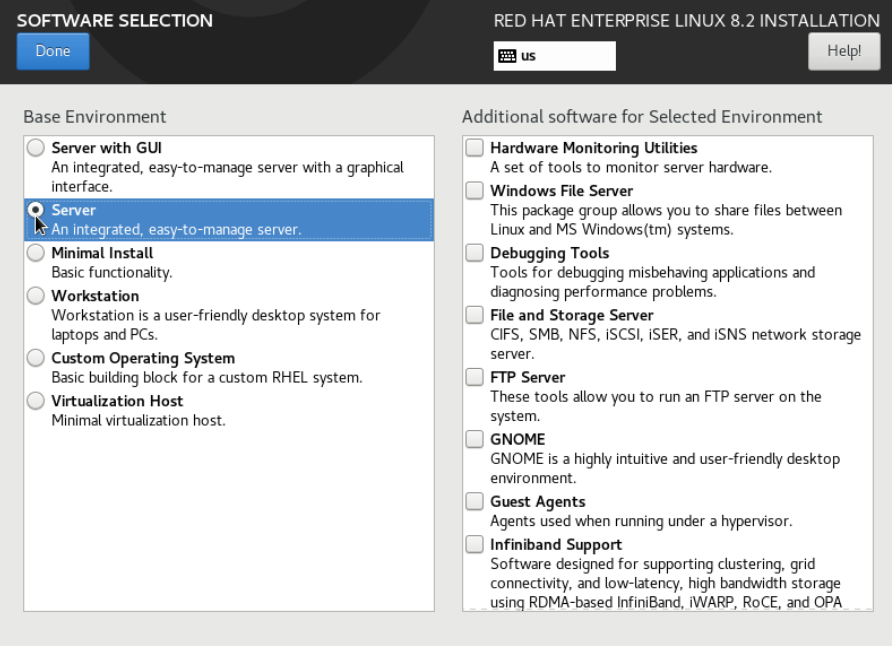
I installed Red Hat 8.2 as “Server” installation and already set my network preferences during setup process.
OS Preparation
We need to create user named stack, as I already mentioned.
I’m logged in as root to the configuration
useradd stack
I will also define password stack, for created user stack
passwd stackWe will also disable password prompts for stack while running sudo commands
echo "stack ALL=(root) NOPASSWD:ALL" | tee -a /etc/sudoers.d/stack

chmod 0440 /etc/sudoers.d/stack
We will now switch to the stack user
su - stackWe will right away create directories for images and heat templates
mkdir ~/images
mkdir ~/templates
If you haven’t already – change hostname for the machine
sudo hostnamectl set-hostname manager.example.com
sudo hostnamectl set-hostname --transient manager.example.com
Check names by issuing
hostname
hostname -r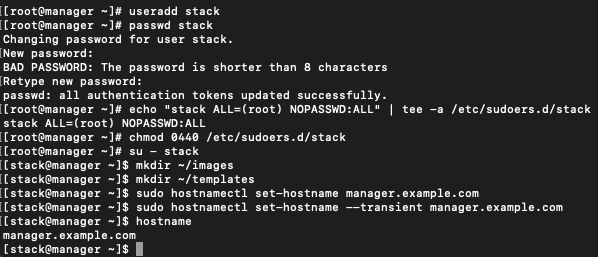
Also, we need to edit hosts file
sudo vi /etc/hostsEnter following into file
10.0.0.10 manager.example.com manager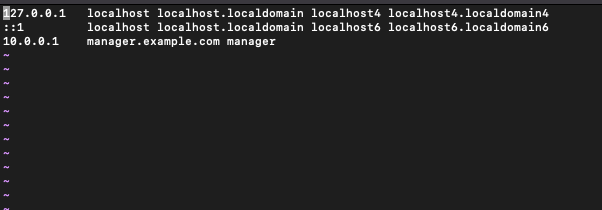
Register Undercloud – Attach Subscriptions
As I already mentioned, you will need to have valid Red Hat Openstack subscription or trial.
Login as stack user to your Undercloud OS.
Run following to register your system with Red Hat Contend Delivery Network or RH Satellite.
sudo subscription-manager registerYou will be asked for your Red Hat account username and password.
Run following to find your subscriptions. We are looking for Pool ID of Red Hat OpenStack Platform (RHOSP)
sudo subscription-manager list --available --all --matches="Red Hat OpenStack"Ok, under Pool ID there will be huge pile of numbers and letters, we need that for the following command. Change YOURPOOLIDNUMBERSLETTERS with the value you got under pool id.
sudo subscription-manager attach --pool=YOURPOOLIDNUMBERSLETTERS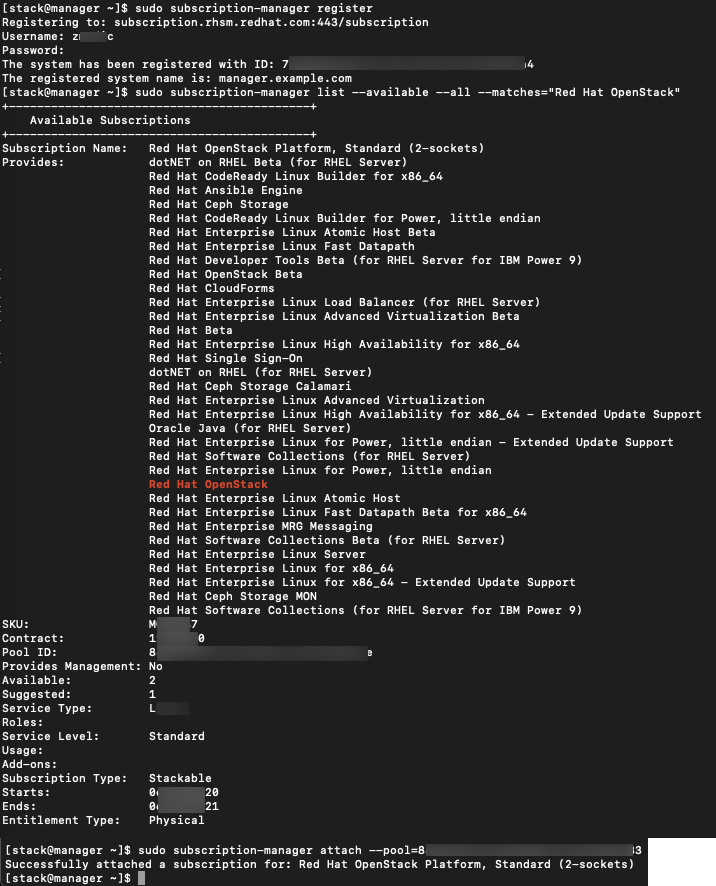
Ok, next step is going to be – locking of undercloud to RHEL 8.2
sudo subscription-manager release --set=8.2We will also need to disable repos and enable only ones we need for the undercloud
sudo subscription-manager repos --disable=*

sudo subscription-manager repos --enable=rhel-8-for-x86_64-baseos-eus-rpms --enable=rhel-8-for-x86_64-appstream-eus-rpms --enable=rhel-8-for-x86_64-highavailability-eus-rpms --enable=ansible-2.9-for-rhel-8-x86_64-rpms --enable=openstack-16.1-for-rhel-8-x86_64-rpms --enable=fast-datapath-for-rhel-8-x86_64-rpms --enable=advanced-virt-for-rhel-8-x86_64-rpms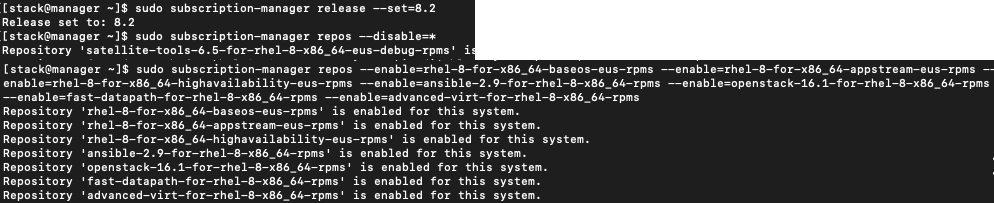
We then need to run following
sudo dnf module disable -y container-tools:rhel8
sudo dnf module enable -y container-tools:2.0
We also need to set virt to version 2.0
sudo dnf module disable -y virt:rhel
sudo dnf module enable -y virt:8.2
To make sure we done everything correctly we will update and reboot our installation.
sudo dnf update -y
sudo reboot
Installing director packages
Ok, so here starts the part which is the reason I’m writing this guide. When I read for the first time documentation on Red Hat, there was a lot of info in there. It is great if you are experienced user that wishes to know capabilities and want to expand your OpenStack install, but if you are only starting it can be confusing and overwhelming. Let’s start with this in a simplest possible manner.
We will install tools for directory installation and configuration
sudo dnf install -y python3-tripleoclient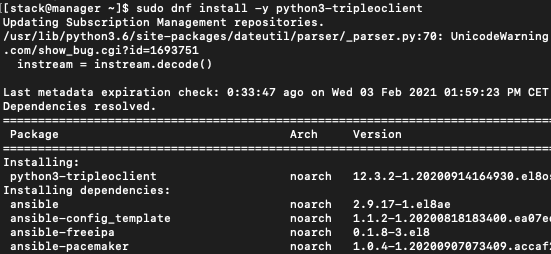
Preparation for container images
Undercloud requires file to determine where to get cloud images and how to store them. File will be stored in the home directory of stack user.
If you miss this step, you will not be able to download images needed for overcloud…
You will get error like this during the undercloud deployment if you skip his step.
“Failed to pull image registry.redhat.io…”

Ok, let’s create our containers-prepare-parameter.yaml file (!!this command gets messed with spaces and new lines, make sure to execute it in on line, or watch out where \ is put, refer to the screenshot below.)
openstack tripleo container image prepare default --local-push-destination \
--output-env-file containers-prepare-parameter.yaml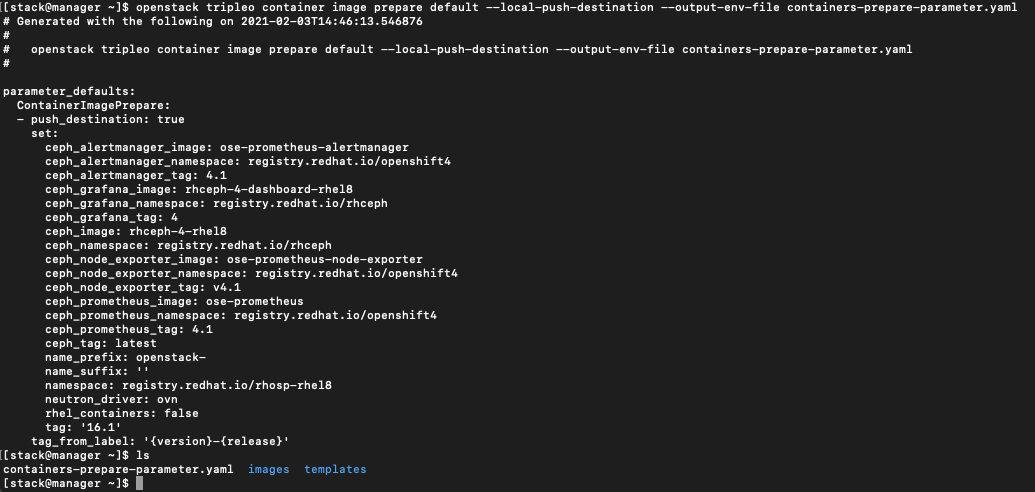
Let’s now edit the containers-prepare-parameter.yaml
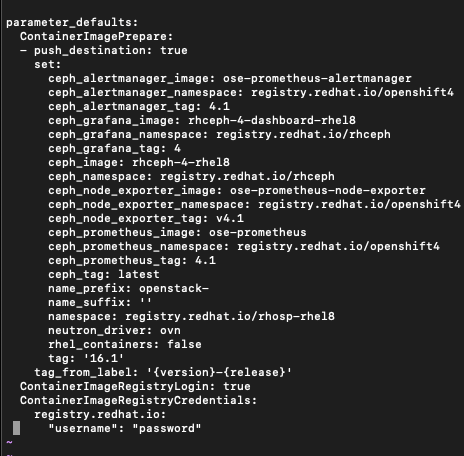
sudo vi containers-prepare-parameter.yamlAt the bottom of the file add following. Watch out for spacing, yaml is extremely sensitive to position of the text!
Under username and password values you should enter your Red Hat login data.
ContainerImageRegistryLogin: true
  ContainerImageRegistryCredentials:
    registry.redhat.io:
      "username": "password"
This is how it looks like
We will also check if our credentials work with Podman
podman login registry.access.redhat.com
Success, my credentials are valid.
Ok, let’s proceed further.
Configuring Director
We need undercloud.conf file to store settings for our undercloud deployment. Undercloud.conf will also be stored in our stack user home directory.
Let’s copy default template to our home dir.
cp /usr/share/python-tripleoclient/undercloud.conf.sample ~/undercloud.confTry to type command in one line, or be sure to check syntax so you don’t get errors copying it.

Ok, let’s configure our undercloud.conf file
sudo vi undercloud.confWe will need to uncomment and set following lines (in order of appearance)
certificate_generation_ca = local
container_images_file = /home/stack/containers-prepare-parameter.yaml
generate_service_certificate = true
local_interface = ens192
local_ip = 192.168.124.1/24
undercloud_admin_host = 192.168.124.3
undercloud_public_host = 192.168.124.2
cidr = 192.168.124.0/24
dhcp_end = 192.168.124.150
dhcp_start = 192.168.124.100
gateway = 192.168.124.1
inspection_iprange = 192.168.124.100,192.168.124.120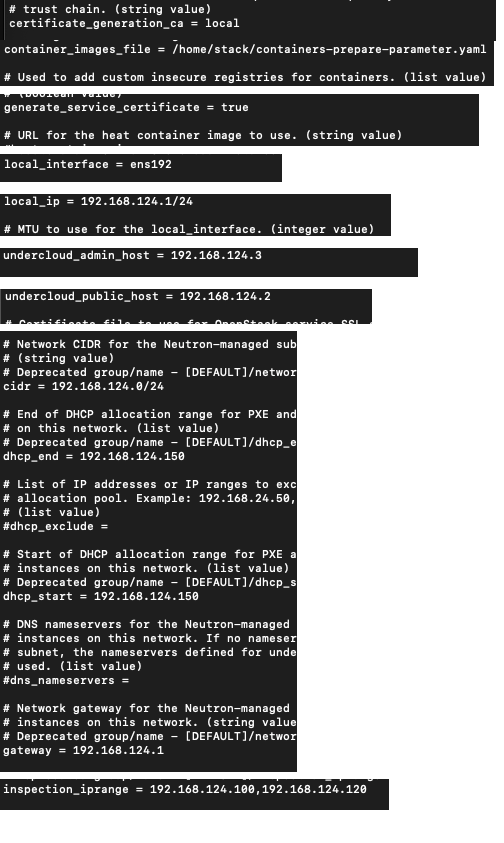
Check and double check all the settings and values, and we can start installation of the undercloud.
Install Undercloud
To install undercloud, type in following command
openstack undercloud installInstallation took about 20 minutes in my case, and ended successfully.
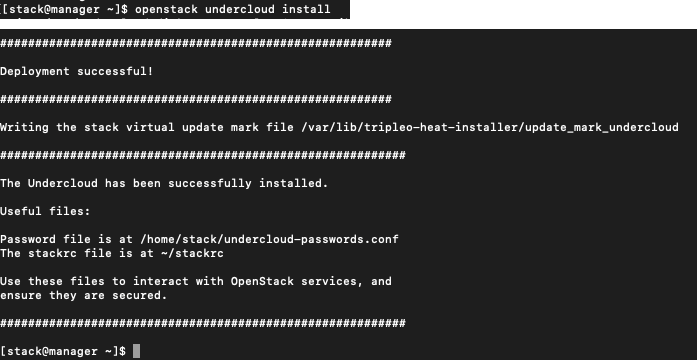
As you can see we also got passwords file located in undercloud-passwords.conf – that file will help us login and manage OpenStack, and stackrc will help us access director tools.
We will check enabled containers by typing in
sudo podman ps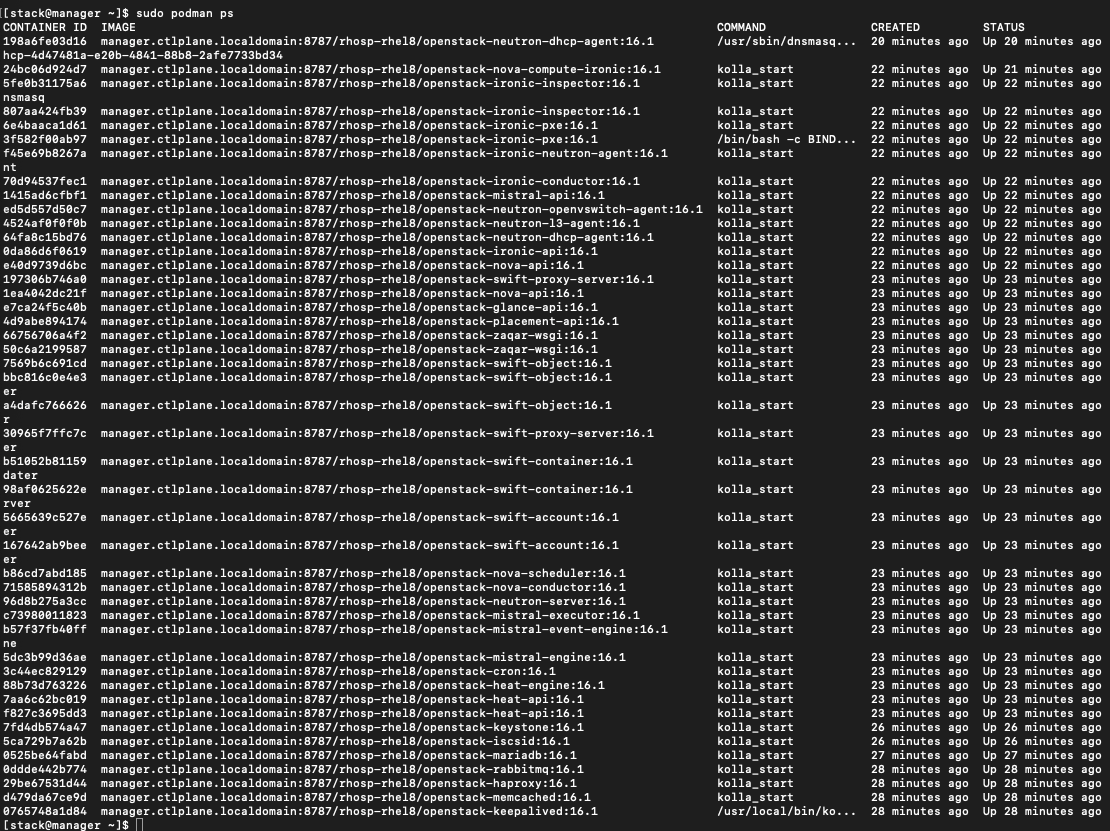
We will connect to deployed undercloud by typing in
source ~/stackrcYou can see how our command line now changed, we are “logged” into undercloud.

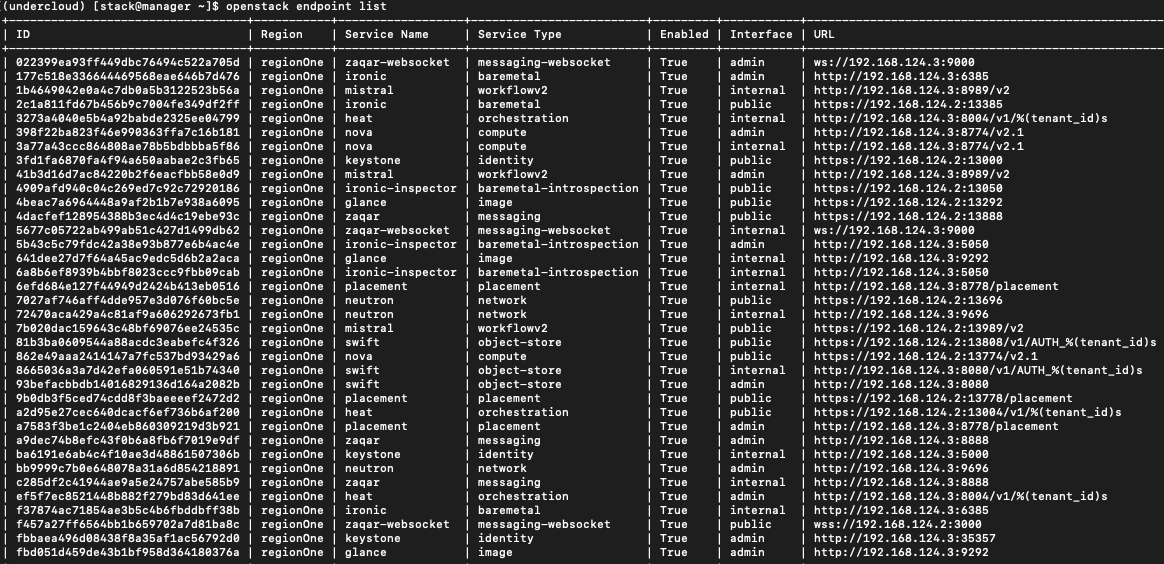
Following command
openstack endpoint listwill list endpoints for the services
Command
openstack host listwill show deployed hosts in the undercloud

Networking settings will be shown by typing in
cat /etc/os-net-config/config.json
So, my local nic named ens192 is attached to br-ctlplane – control plane bridge.
sudo ovs-vsctl showwill show you bridges and settings of the network.
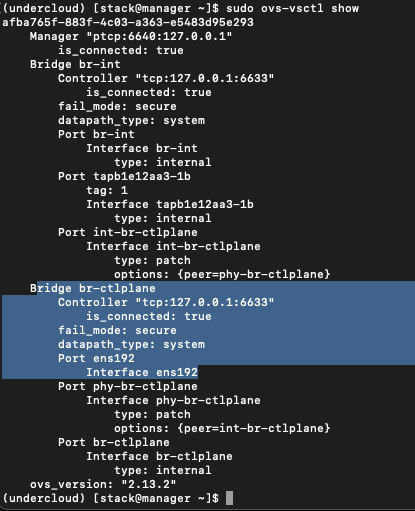
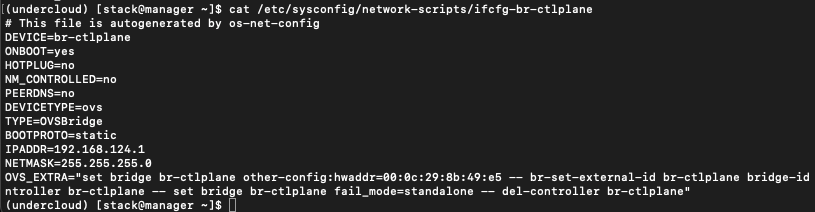
and finally, we have “interface” created for br-ctlplane, so if we ran
cat /etc/sysconfig/network-scripts/ifcfg-br-ctlplaneWe will see setup for our control plane bridge.
That is it, undercloud is deployed. Next step will be overcloud deployment. That will be topic for future guide if there is enough interest for this one.