I already did detailed SQL installation and light config guide in part of the server basics series. Today, we are going to make our installation highly available by implementing SQL AlwaysON.
If you are interested in knowing more about AlwaysON – you can start here
This guide relies entirely on my SQL installation guide, so if there is something you don’t understand (users, database creation…) be sure to check that out.
Prerequisites
I will do this on Windows Server 2019 DTCNTR edition and SQL Server Standard 2017. Same procedure should be for the 2019 version.
I installed SQL per my SQL installation guide on blog – so all users/DBs and settings are as per that guide. SQL is installed in exact same way, with exact same settings on both SQL servers.
This guide has a lot in common with server basics series I wrote. So, all machines are part of domain – informatiker.local.
BACKUP
If you plan to do this in production environment – have a good backup of your databases and systems. Always ON will force you to do backup before, but no matter – have that in mind – I cannot be responsible in any way for the damage or losses you do.
Network
We are going to use two SQL machines with two NICs-
SBDB1 – LAN IP: 10.0.0.37 Heartbeat IP 192.168.20.7
SBDB2 LAN IP: 10.0.0.38 Heartbeat IP 192.168.20.8
CLUSTERING NAMES\IPs
Failover Cluster – SQLCLUSTER1 IP – 10.0.0.39
Availability Group Listener – SQLListener1 – 10.0.0.40
Cluster Witness will be on Simple Windows 10 machine named Client1 – 10.0.0.110 \\client1\ClusterWitness
Name of the machines may differ on some screenshots but don’t let that bother you – I done this on various labs while making this guide.
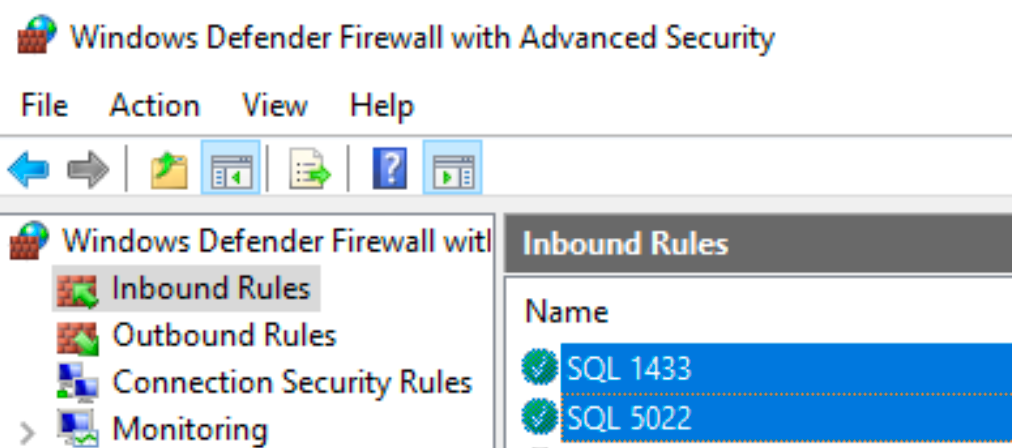
On both machines ports TCP 5022 and TCp 1433 should be opened for LAN network in firewall (inbound and outbound).
Drives
Both SQL machines have three additional drives – D:\ for DB and DATA, E:\ for logs and temp logs, and F:\ for backups.
You can check my SQL installation guide for more details on that.
Both SQL installations should have exact hardware, disk and directory layout…
Users
I have domain user sqldbadmin1 that is main SQL admin – I set both SQL installations with Windows authentication.
Database
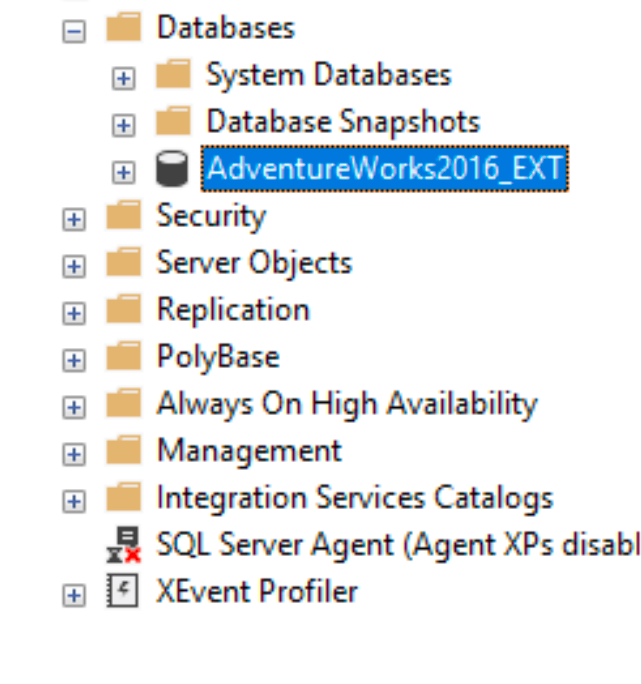
on SBDB1 I imported sample database named AdventureWorks2016_EXT (more details in my SQL install guide).
SBDB2 SQL is empty.
My SBDB1 machine will be the main one for this guide. You have all the details in my SQL installation guide on the blog – I already have imported DB on that machine.
I prepared SBDB2 machine the same way as SBDB1 (same accounts, same directories) but without any DBs installed on it.
TEST CONNECTION FROM SBDB2 TO SBDB1 server
This test is not mandatory, but I like to do it, just to check that SQL is accessible from the network.
I use Windows Authentication in SQL for this guide, and I created domain user sqldbadmin1 .
On SBDB2 I will login with sqldbadmin1 onto my Windows Server 2019 and try to connect to my SQL server installation.
On SBDB1 I did following:
Open SQL Server Configuration Manager | expand SQL Server Network Configuration | make sure TCP/IP is enabled | click on TCP/IP | select IP Addresses tab | make sure that LAN IP and local IP have status enabled. Also check if you are running on port 1433
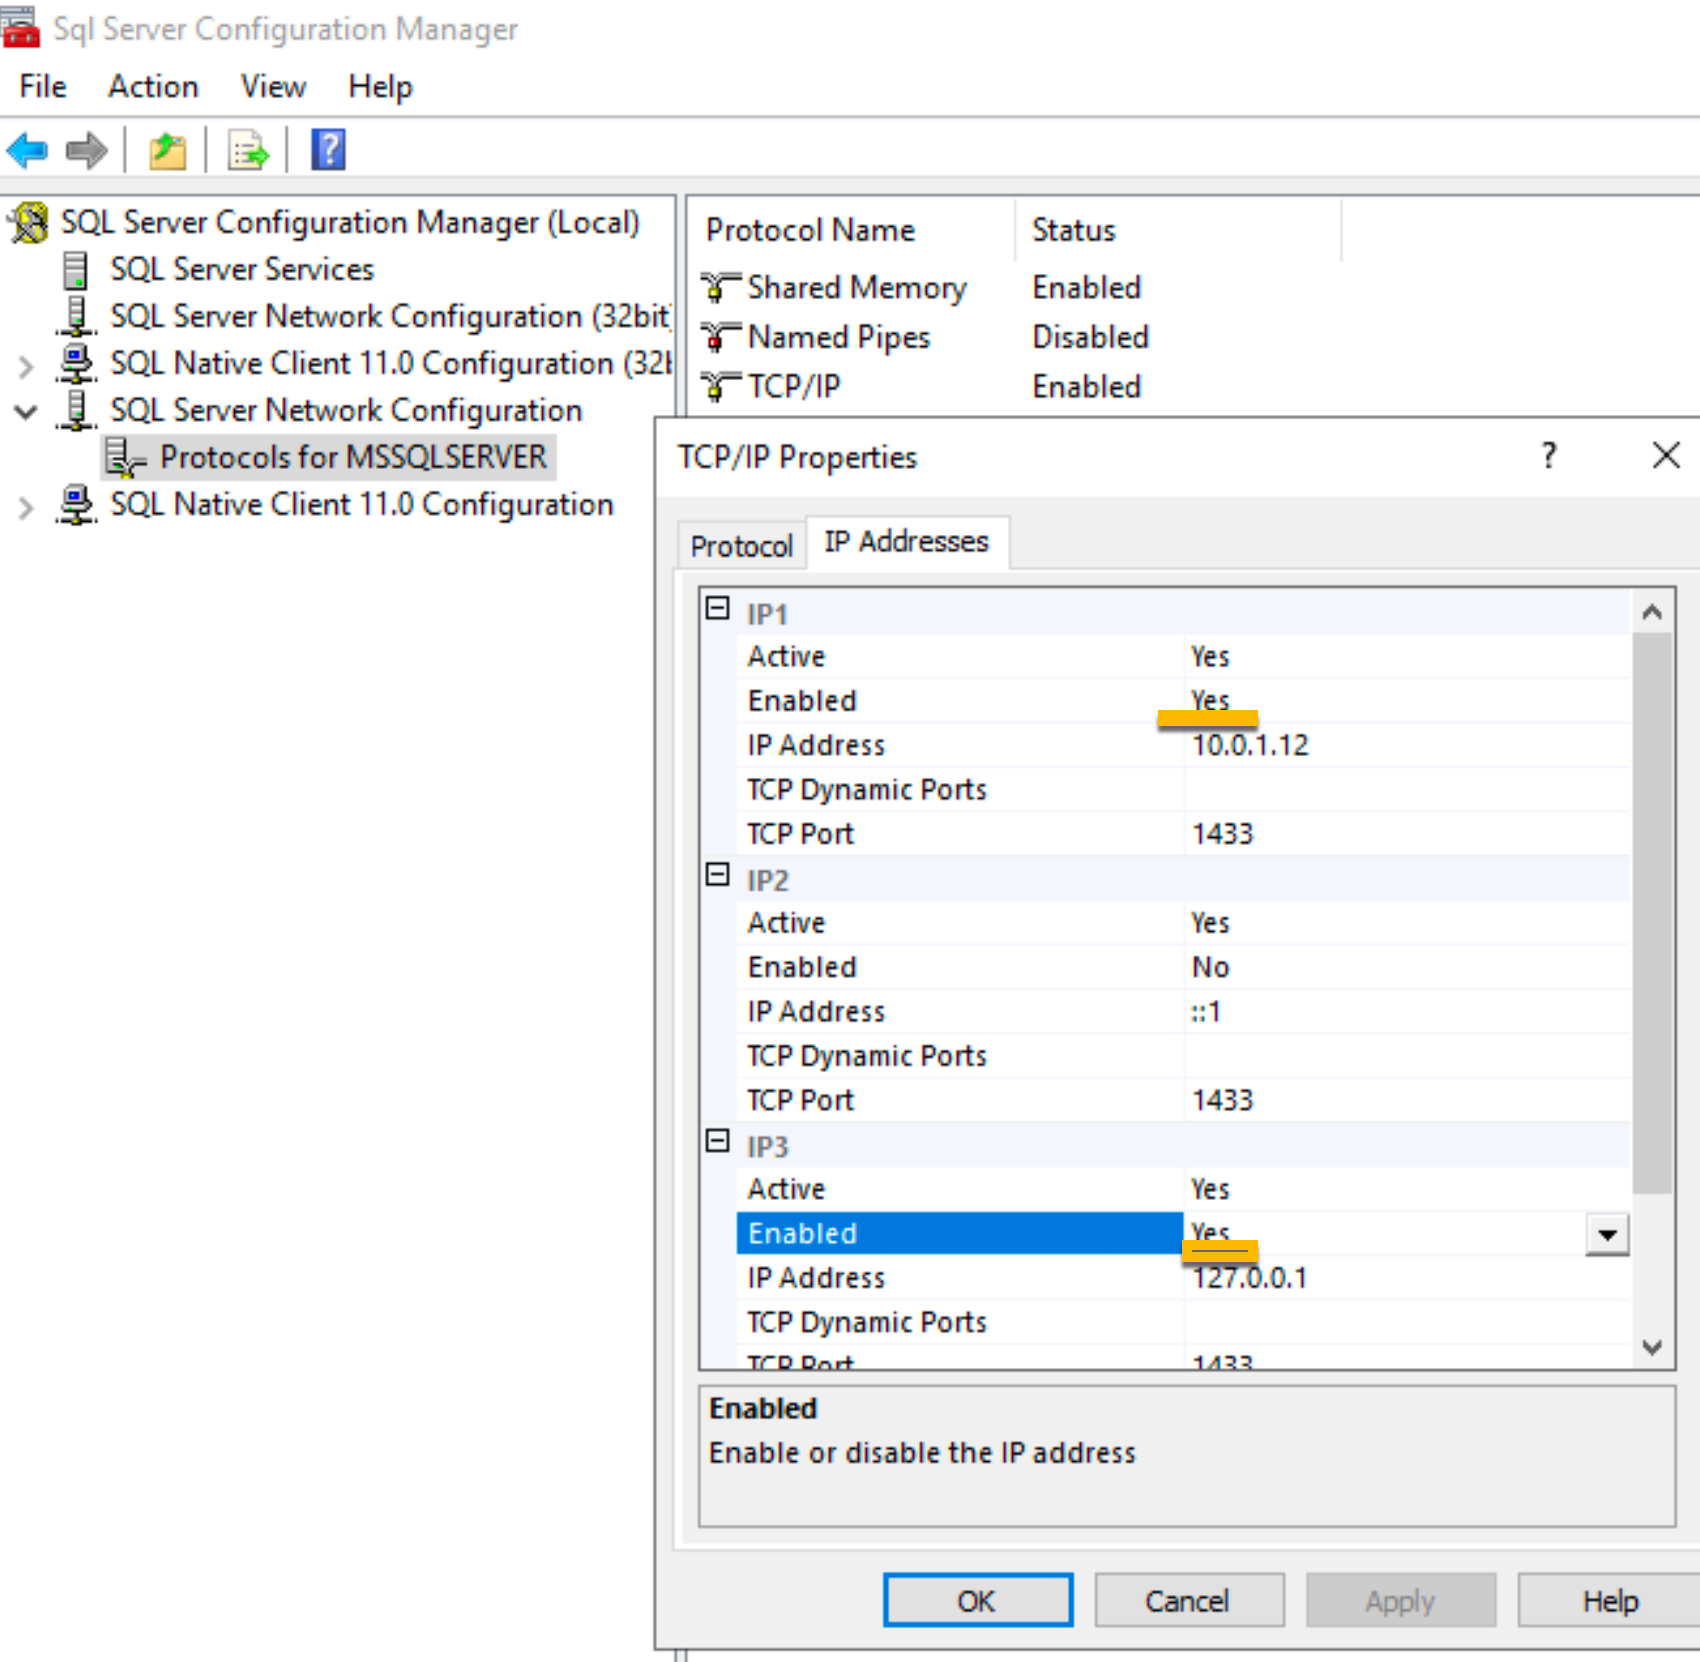
After you done this confirm everything – and reboot SQL service or SBDB1 server.
Method 1
On SBDB2 – login as domain user sqldbadmin1 into Windows Server 2019. Open SSMS and in server name enter SBDB1 – since we want to connect to remote server
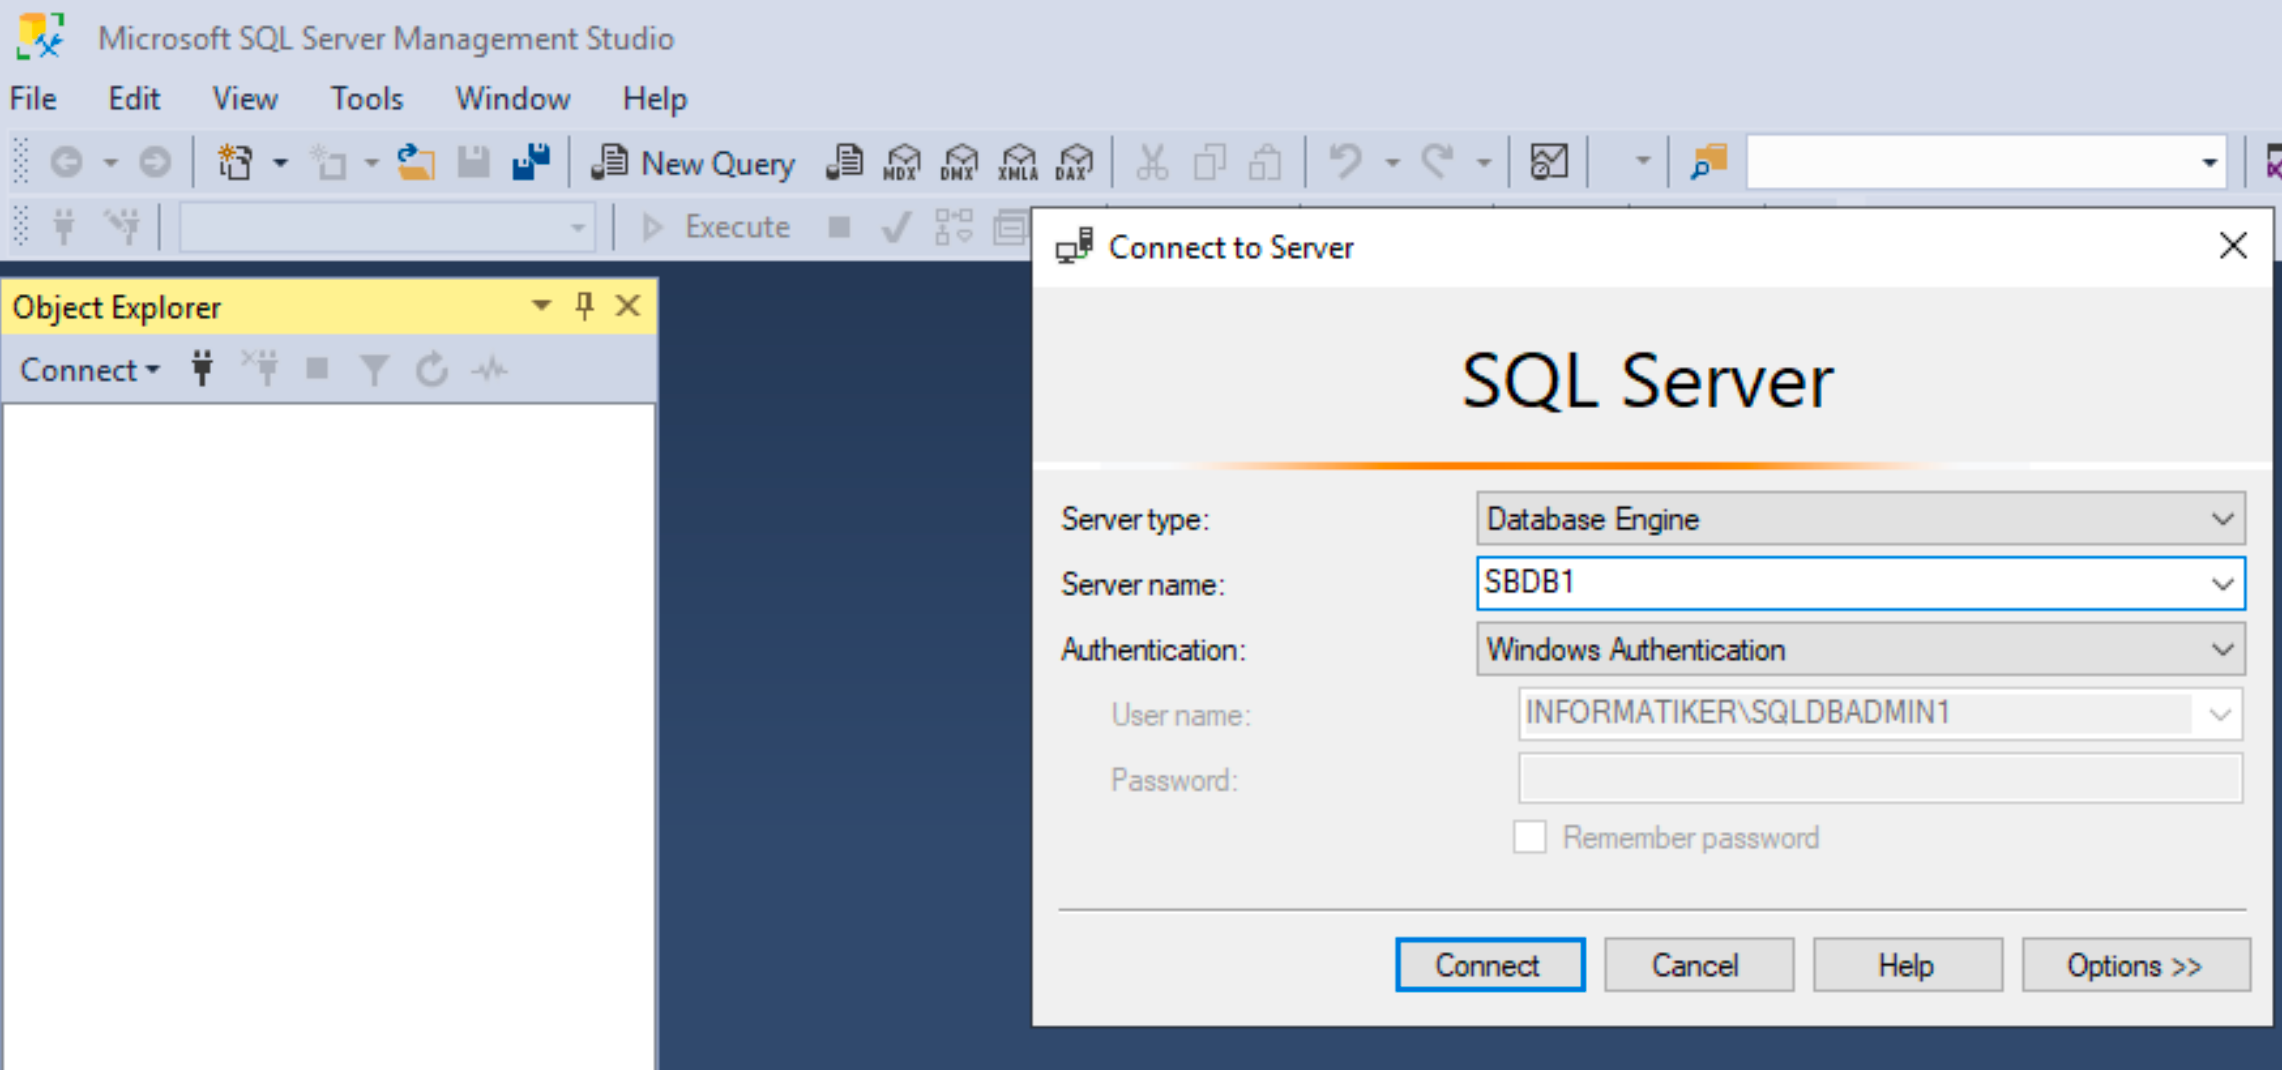
You should be able to connect and see AdventureWorks2016_EXT DB.
Method 2
I usually do another test when I need to make SQL accessible on local network.
We will do this on SBDB2
First, in File Explorer make sure you have File name extensions and Hidden items enabled.

Right click somewhere on your desktop | select New | Text Dcument
New Text Document will be created. Change .txt extension to udl
You will be asked to confirm file extension change – select yes

This will be the new file created. Double click on it to start it

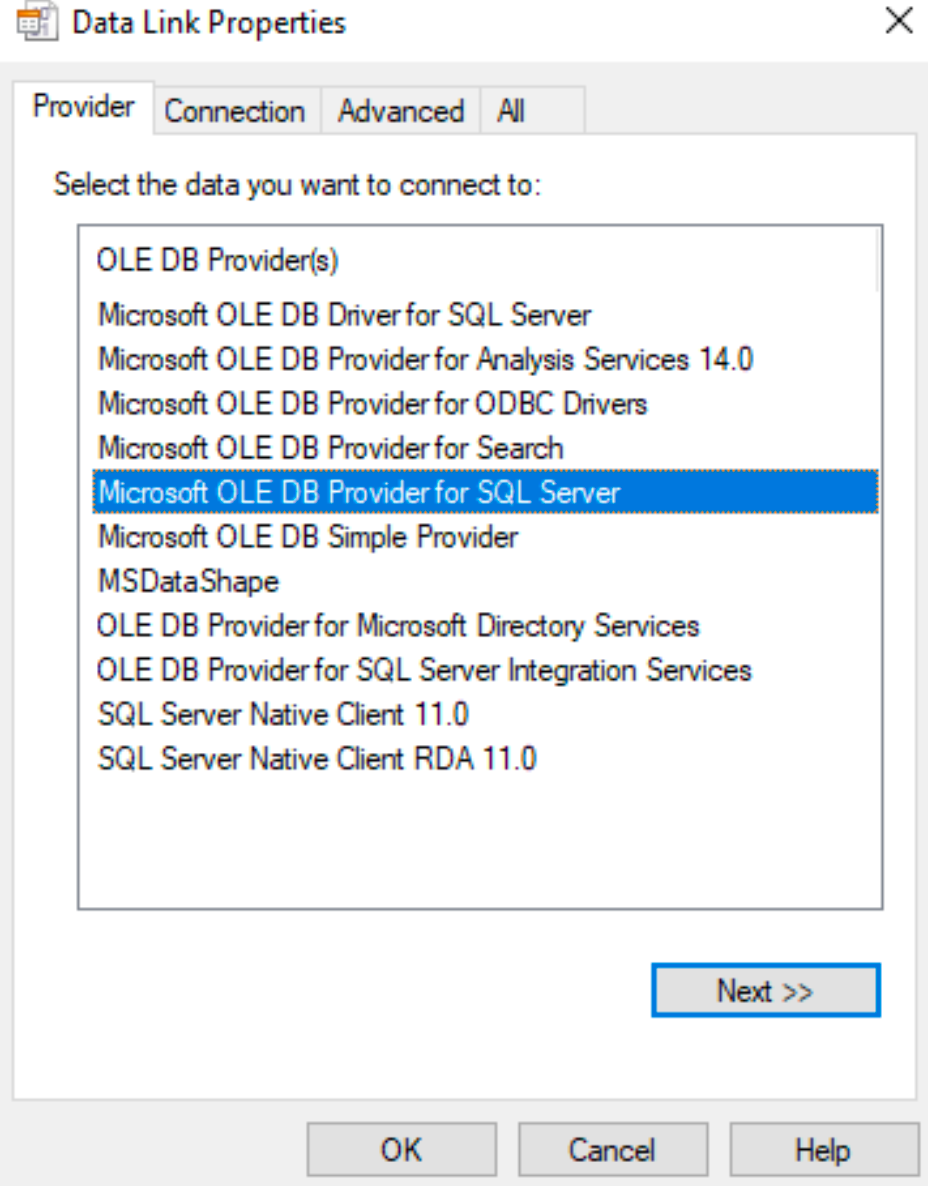
On Provider tab, make sure that “Microsoft OLE DB Provider for SQL Server” is selected.
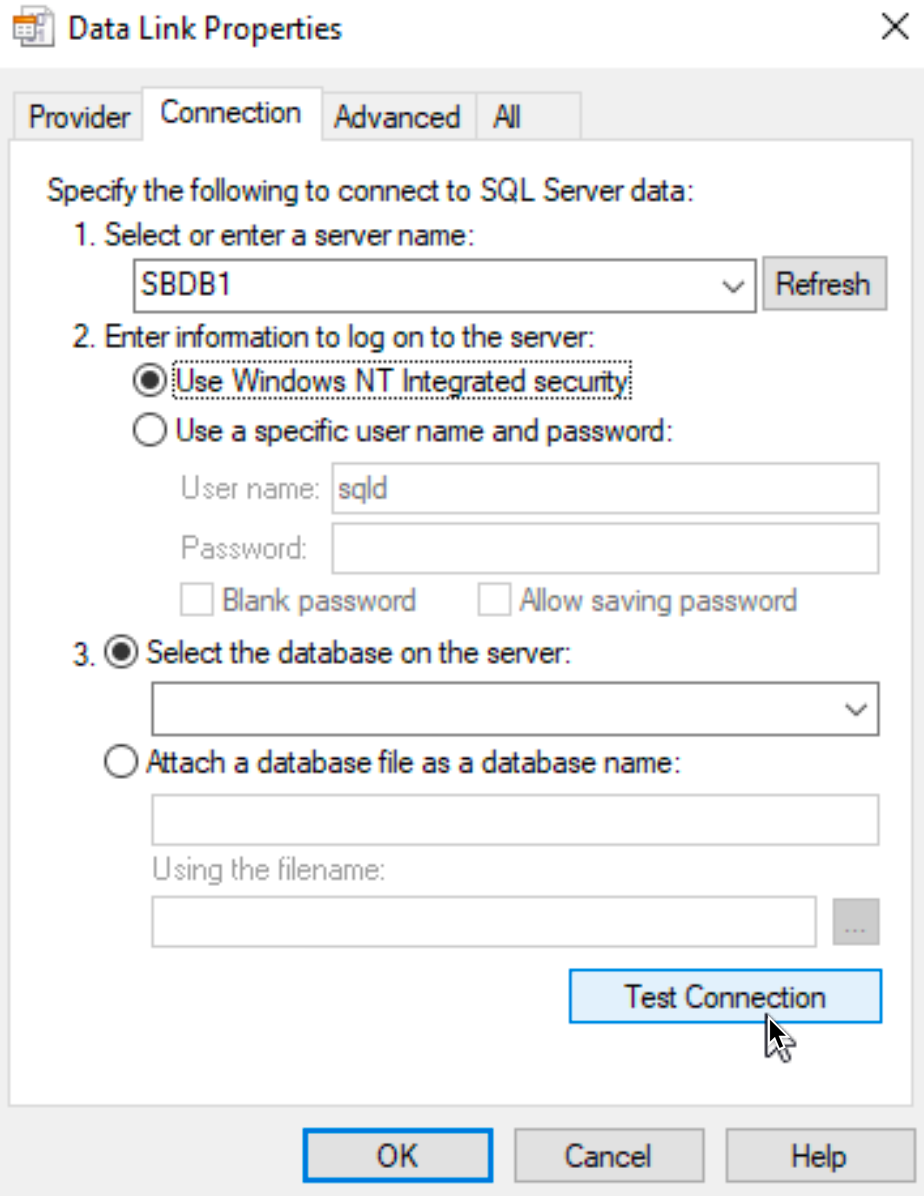
On Connection tab under server name enter SBDB1, and select “Use Windows NT Integrated security” (we selected Windows Authentication during SQL setup). Also make sure that you are logged in to Windows Server with domain account that has rights on SQL (in this case it is domain account sqldbadmin1) otherwise this will give you errors.
Select Test Connection
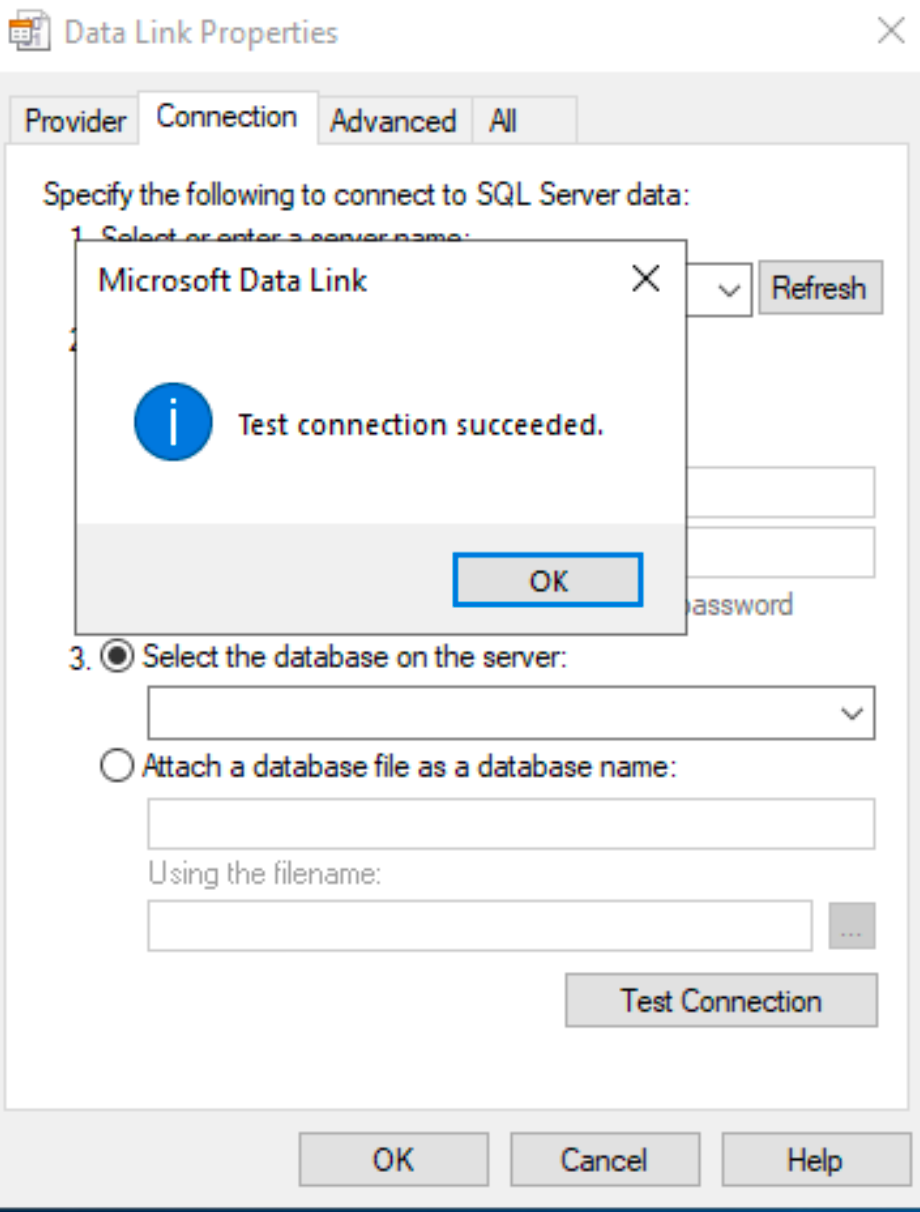
Test is success
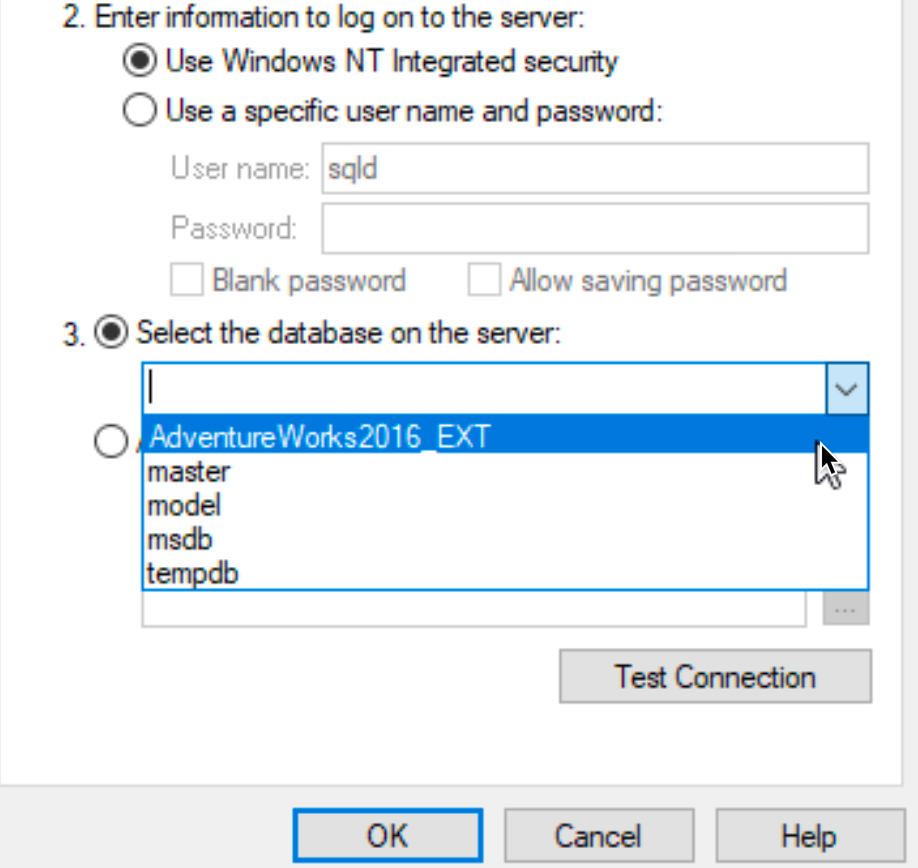
You will also be able to select databases from SBDB1 – so this is success.
We are now done with prerequisites.
Install Failover Clustering role on both SQL instances
Ok, I will not go through every detail of this step, since I already have guide on how to create Failover Cluster on my blog, and you can check that out if you need step by step tutorial.
This has to be done on both SQL nodes.
Install Failover Clustering Feature on both DB1 and DB2 servers.
I done both installations as domain administrator.
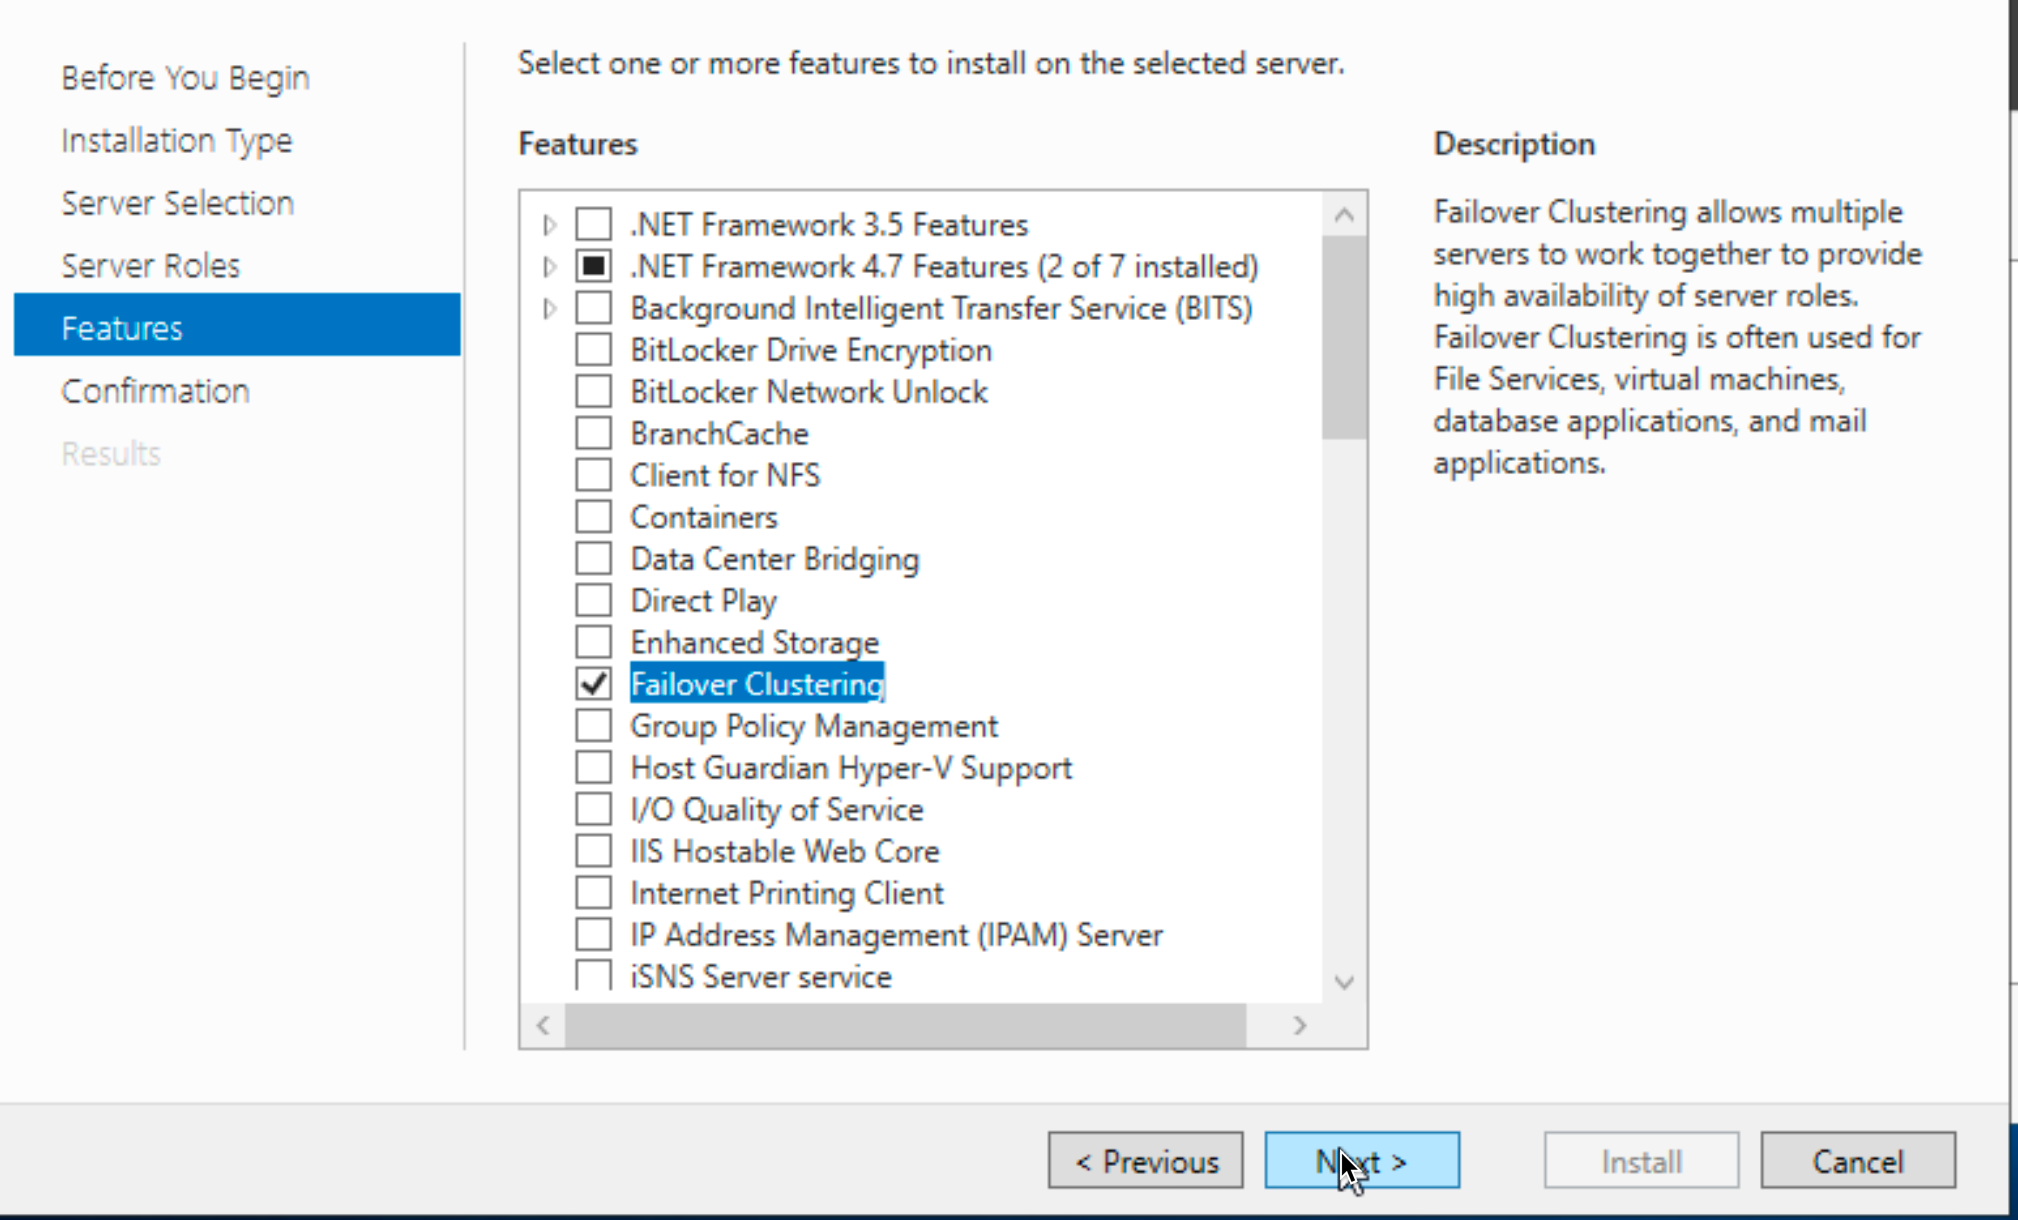
Reboot after Failover Clustering feature installation.
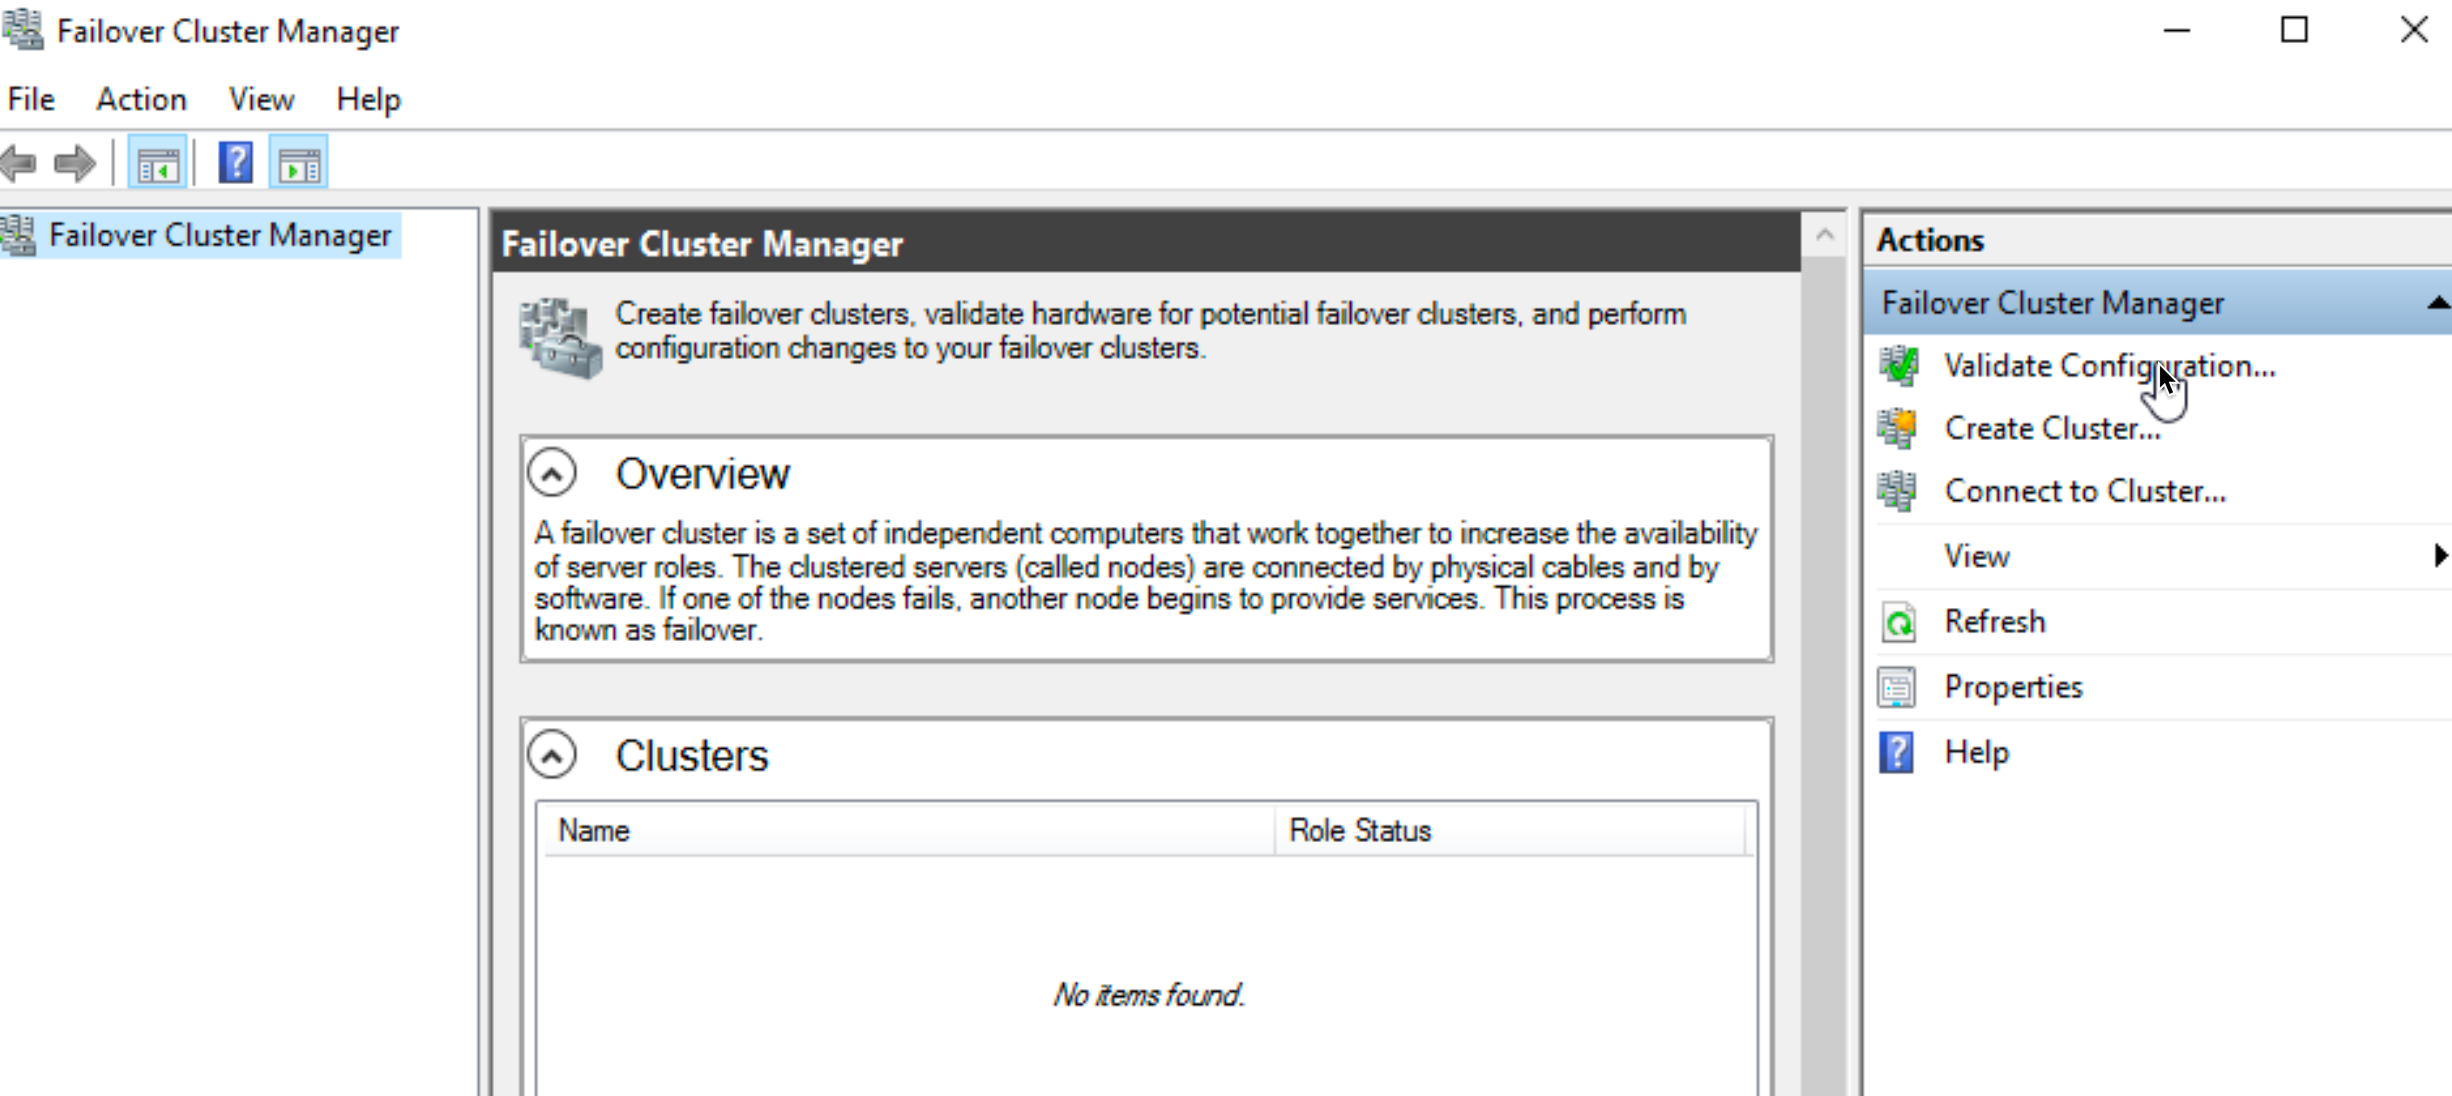
I will open Failover Cluster Manager on SBDB1 – this will be my primary replica server, so I will initiate everything from it.
Validate Configuration…
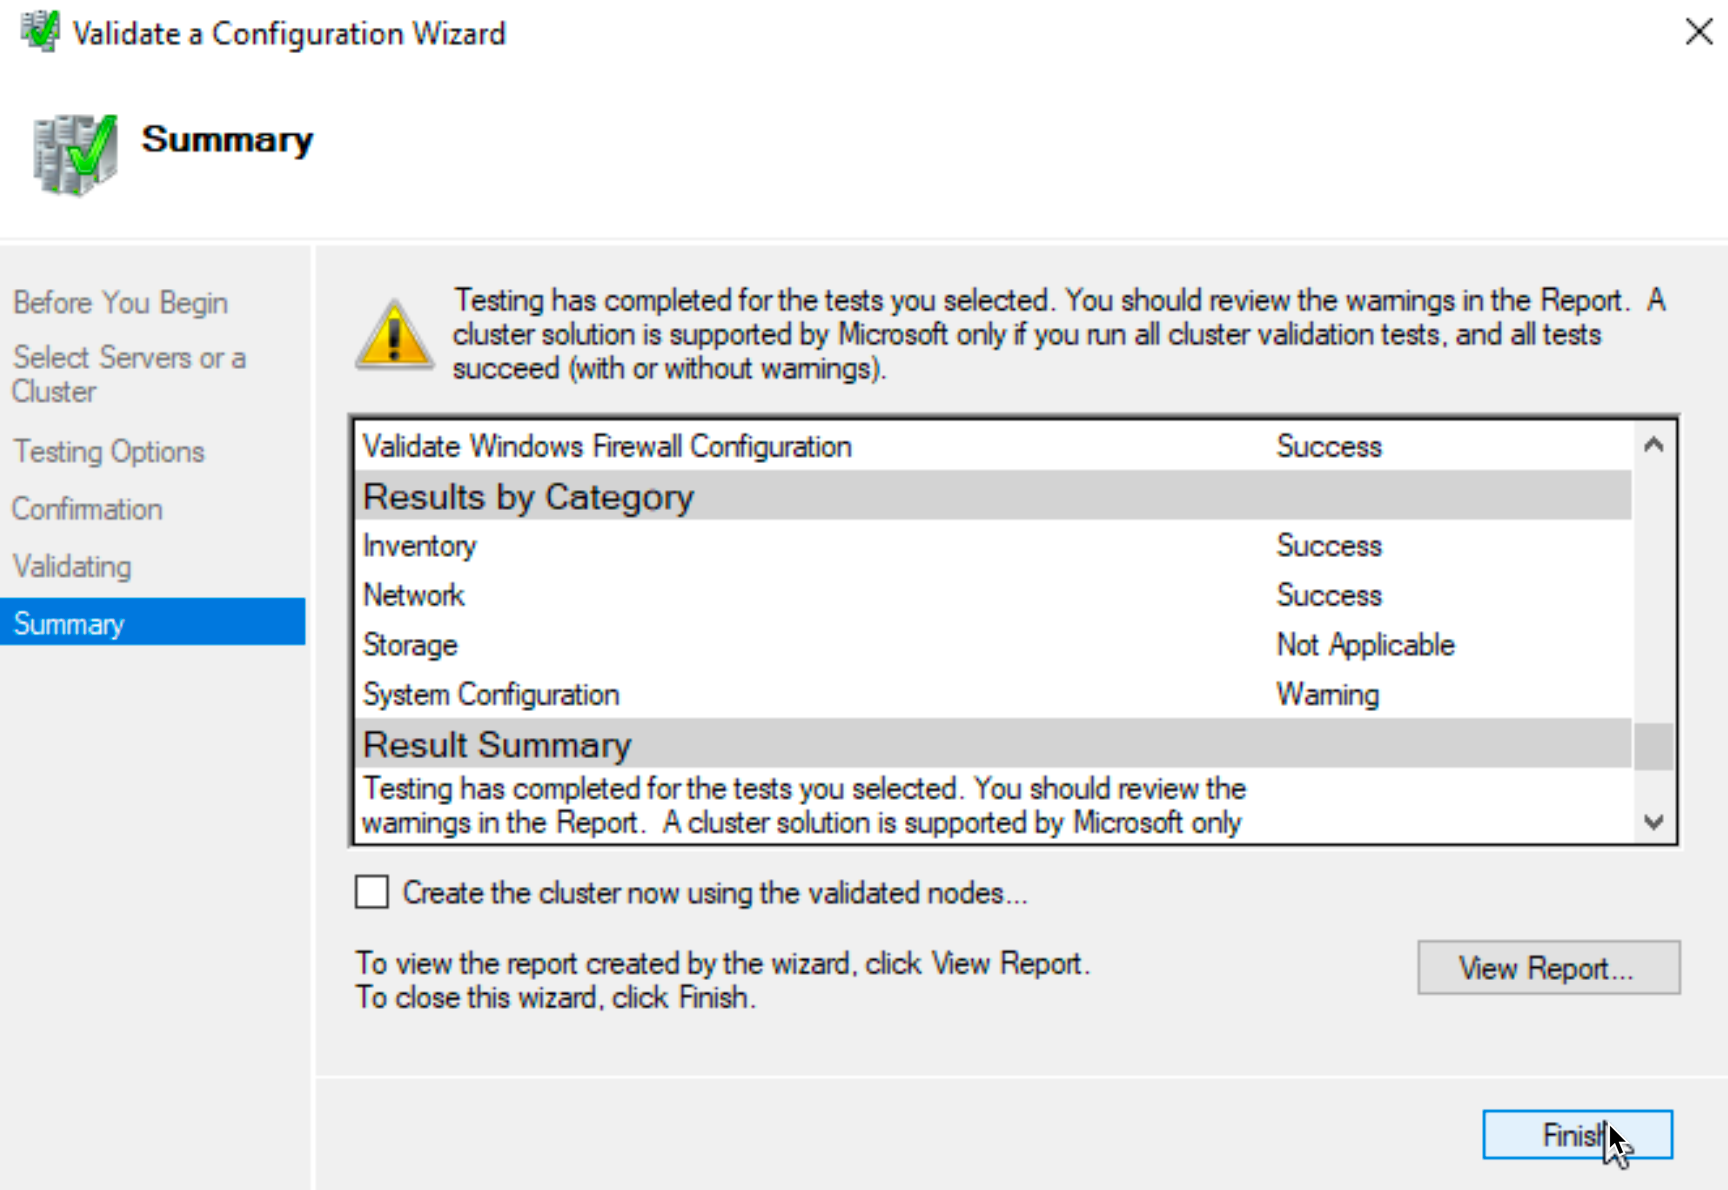
Select SBDB1 and SBDB2 and run all tests
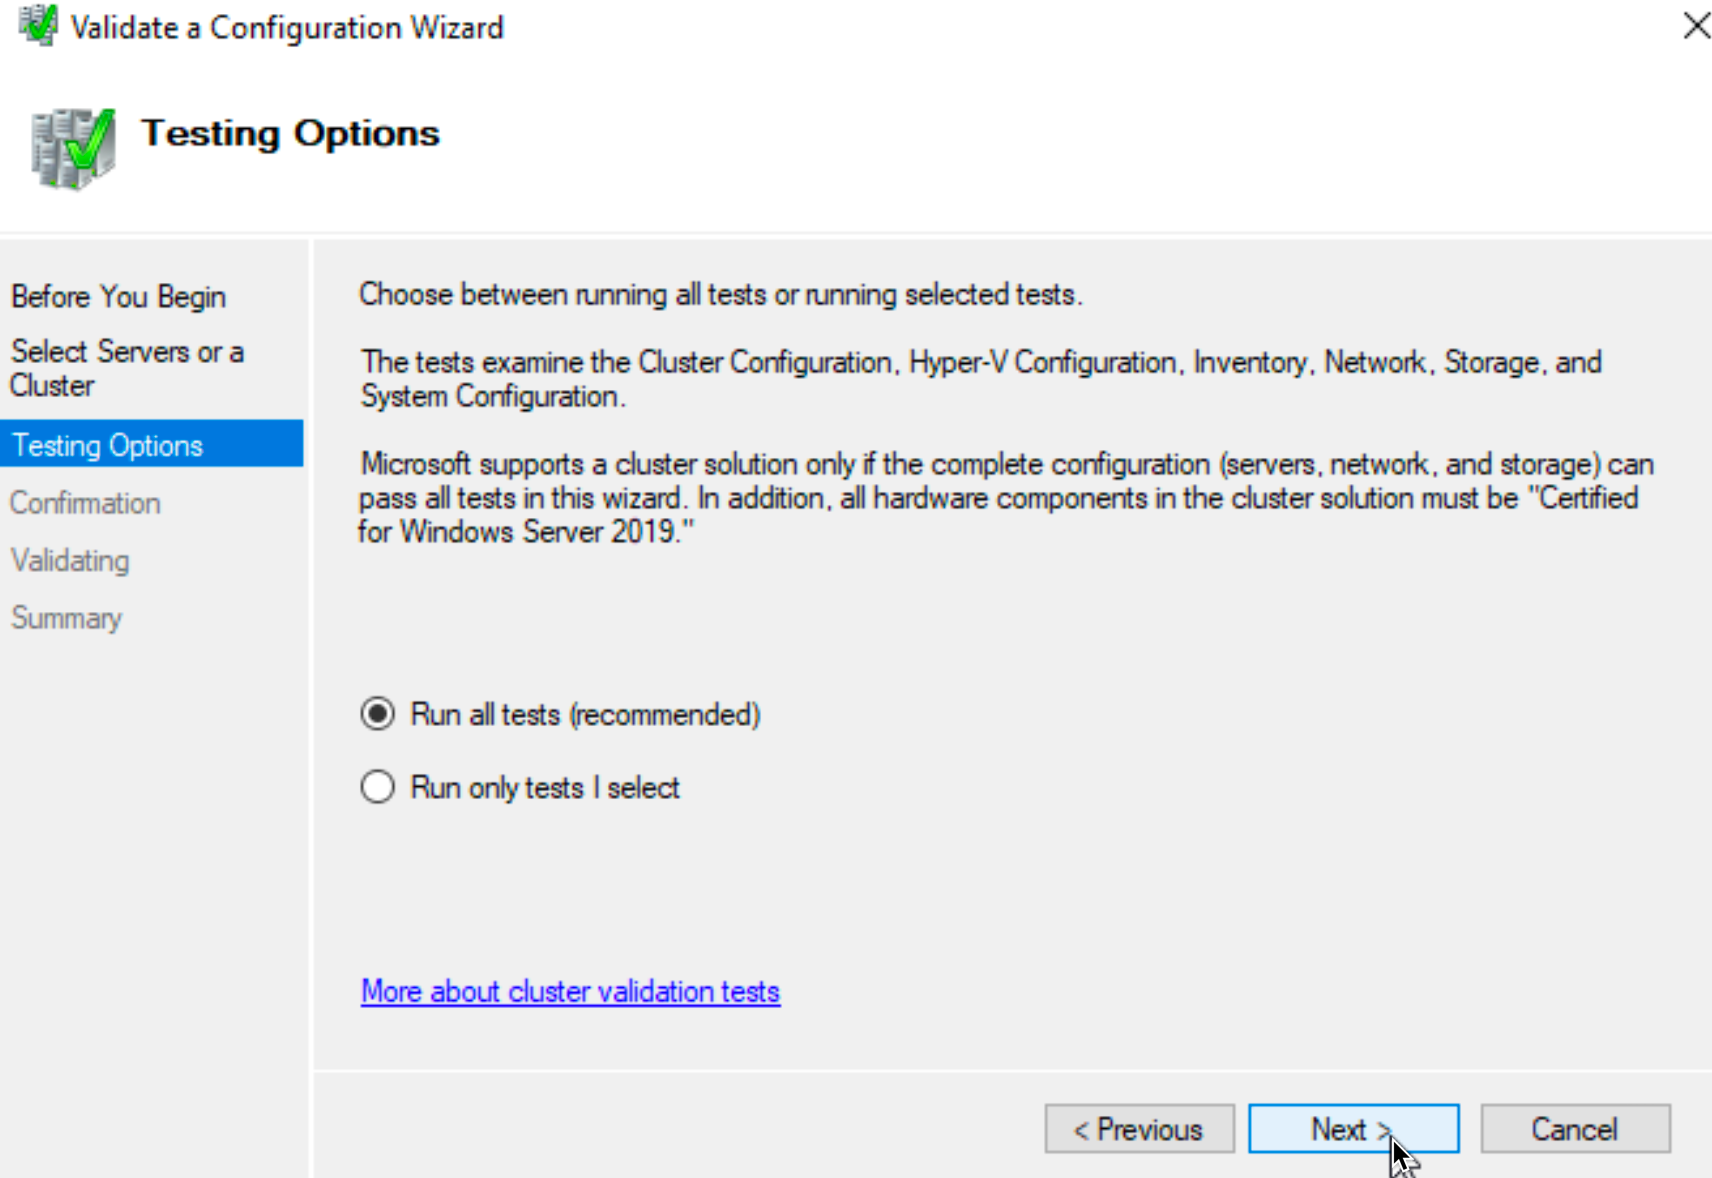
You will probably get some warnings, especially since storage is not configured as it should be.
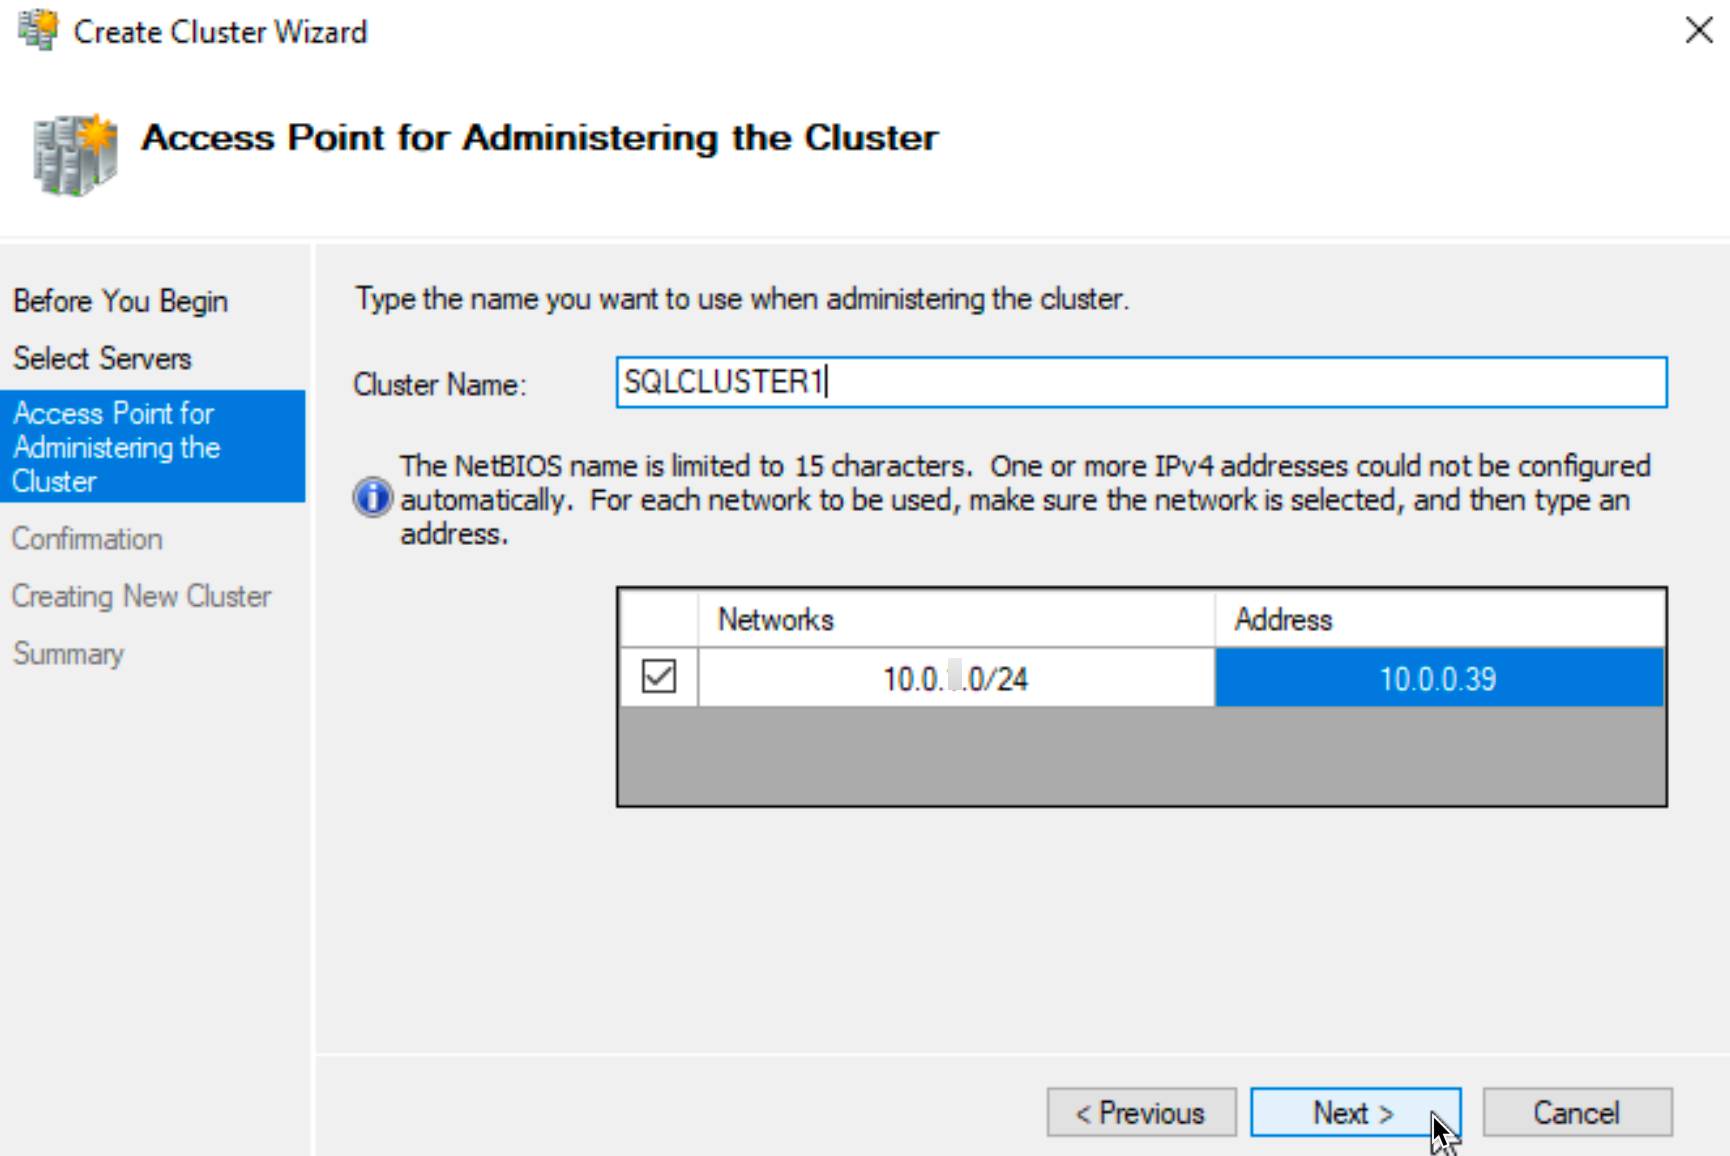
Go to Create Cluster in Action menu inside Filover Cluster Manager, enter both SBDB1 and SBDB2 servers in Select Servers dialog…

Give your cluster a name (I named mine SQLCLUSTER1) and gave it cluster IP 10.0.0.39
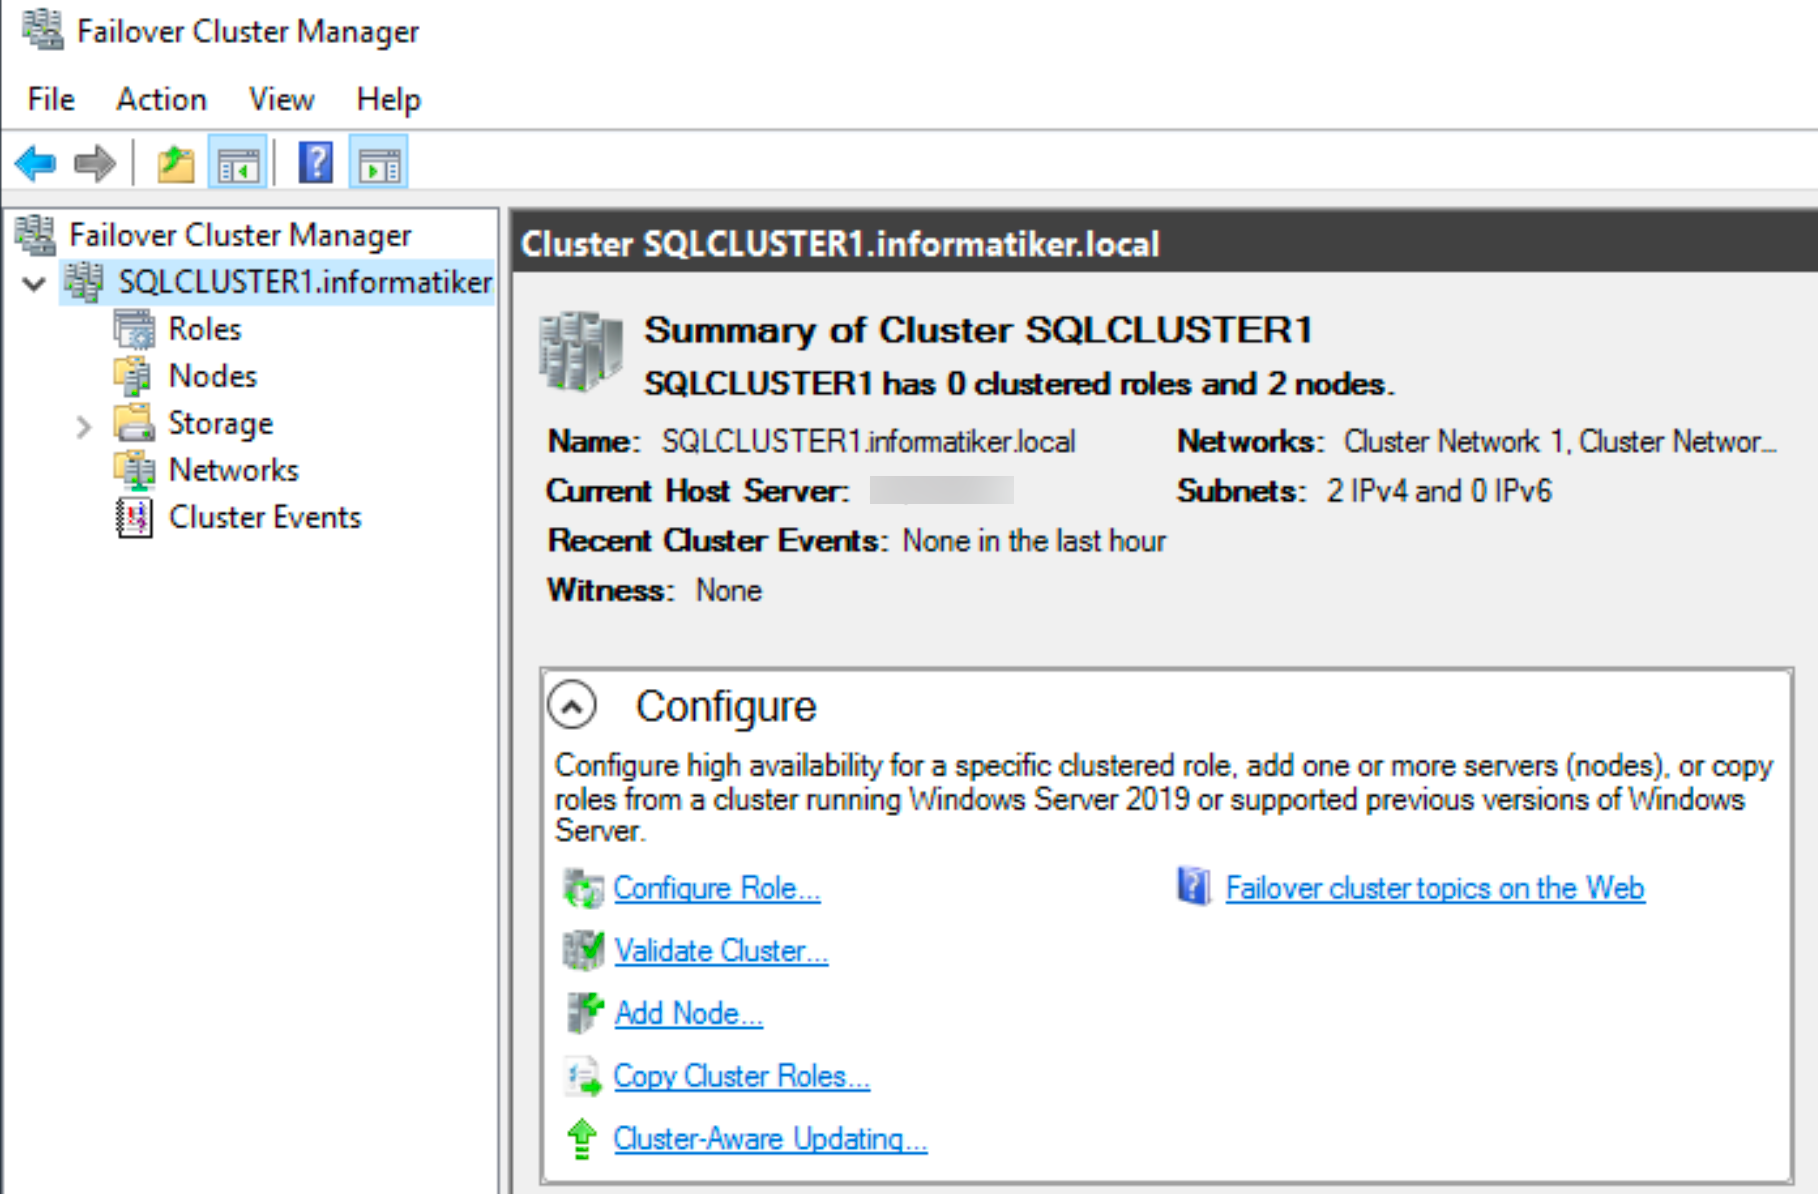
Cluster is created. I will add cluster witness to this configuration…
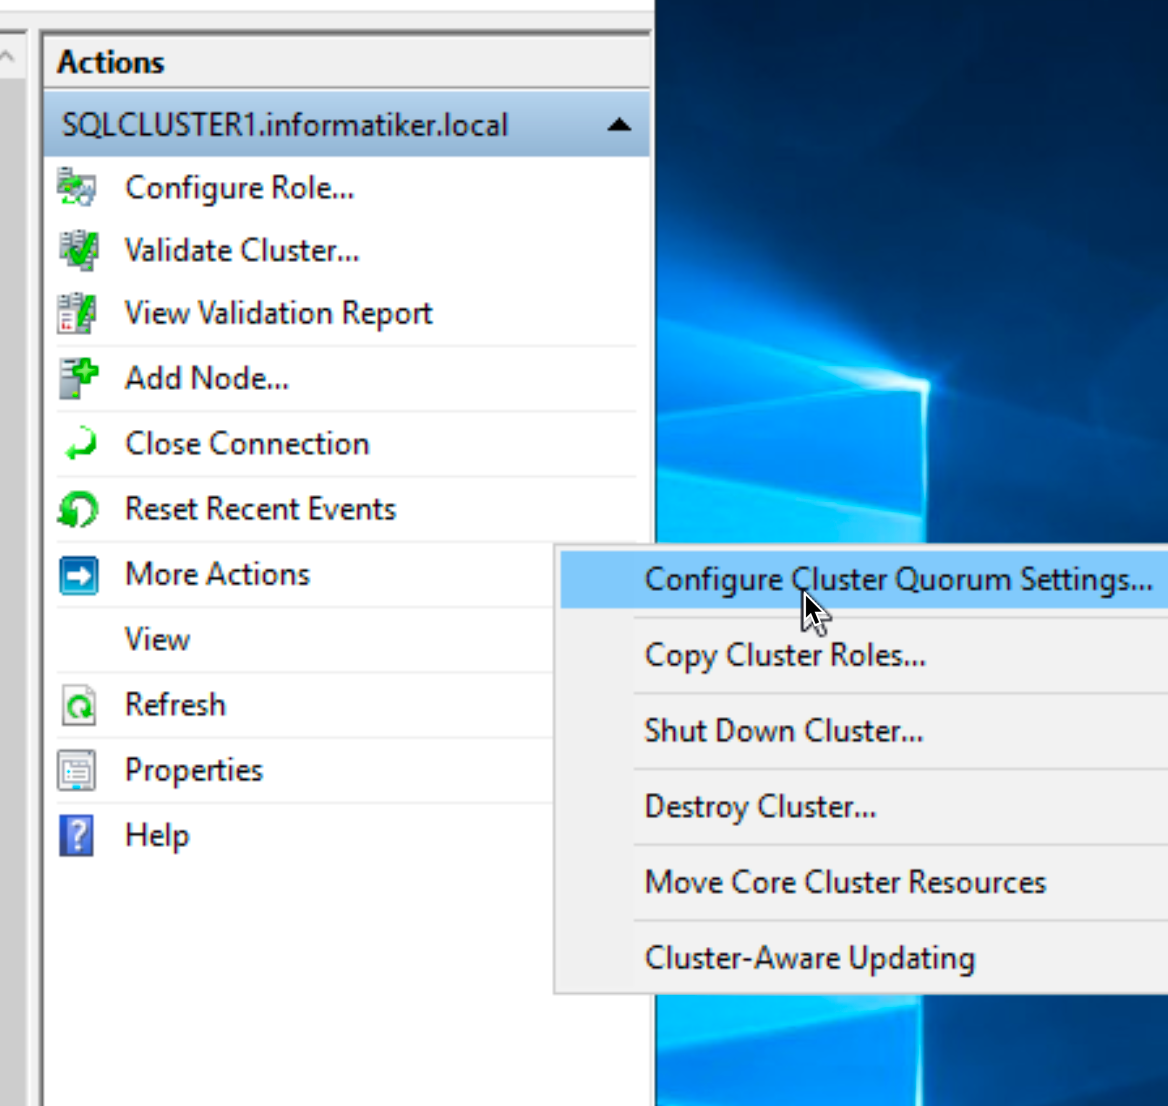
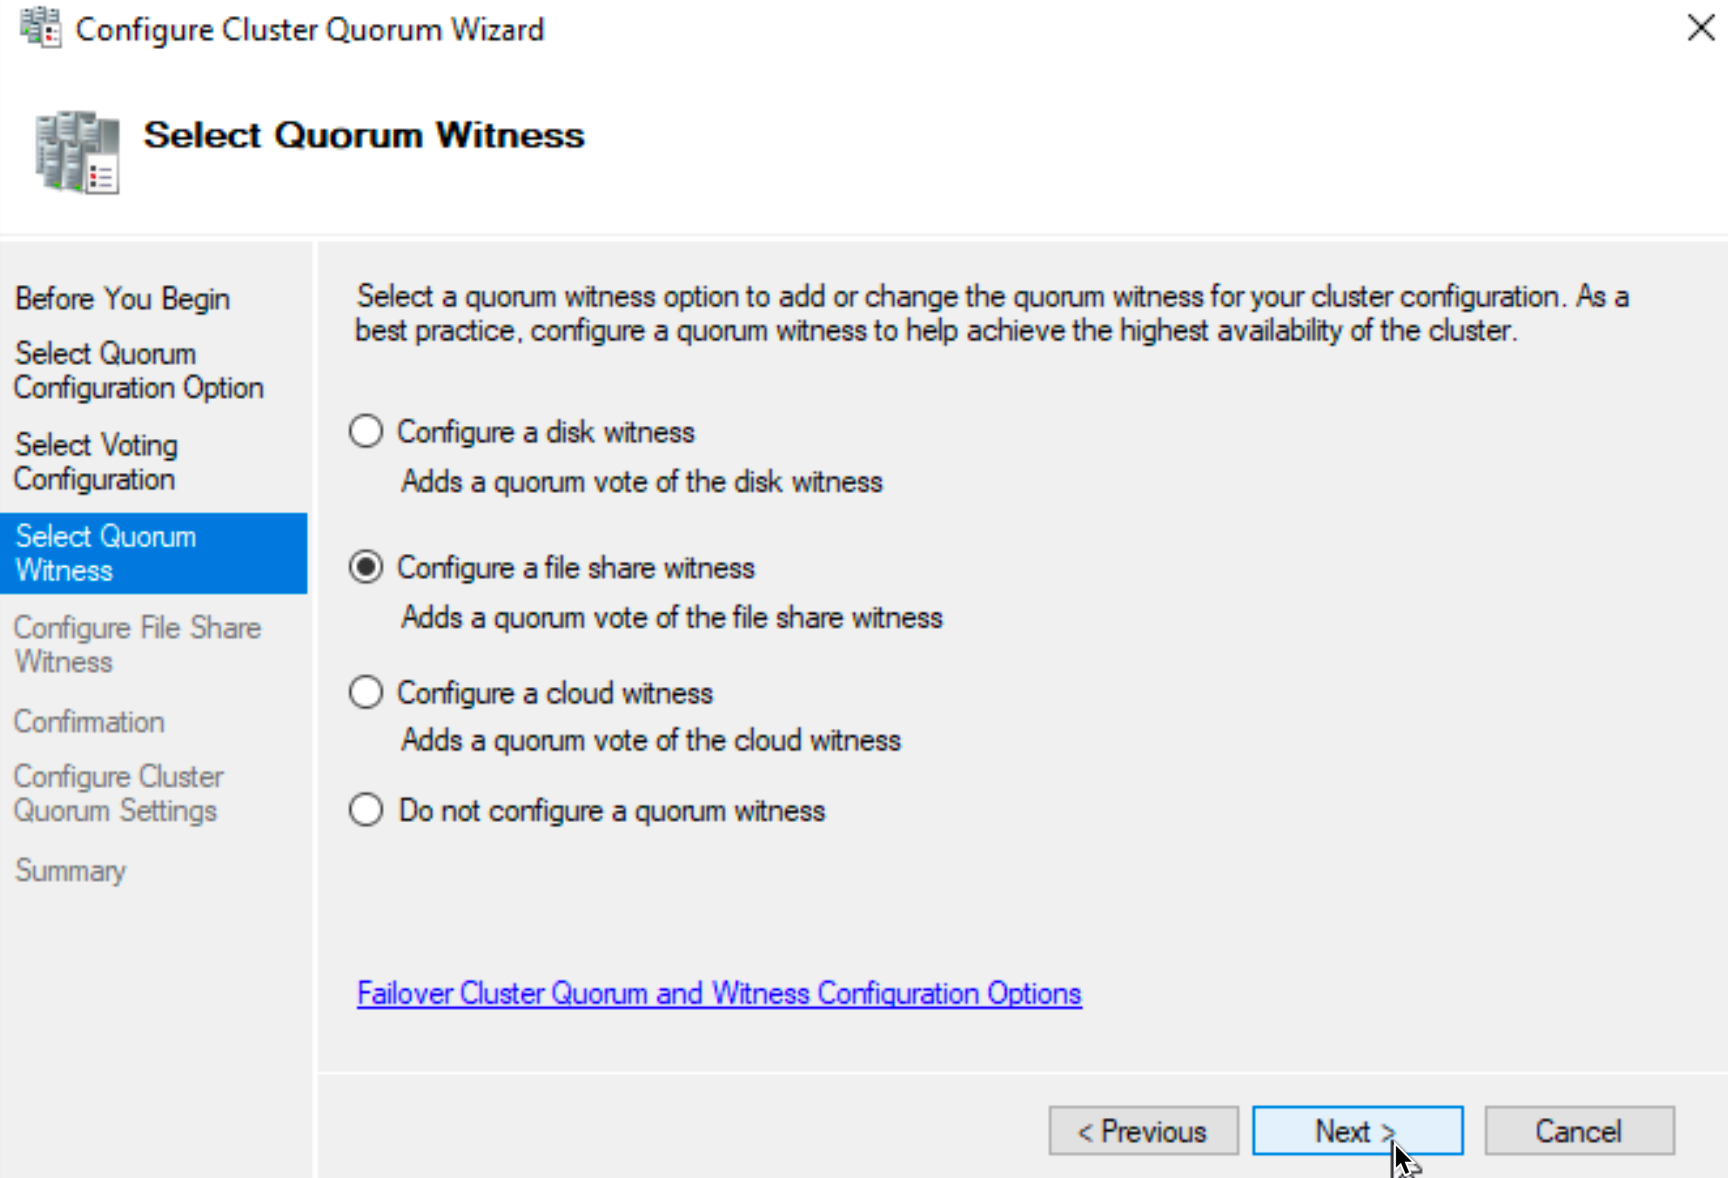
In Failover Cluster Manager from Actions menu select More Actions | Configure Cluster Quorum Settings…
Select Advanced quorum configuration and select both SBDB1 and SBDB2 servers
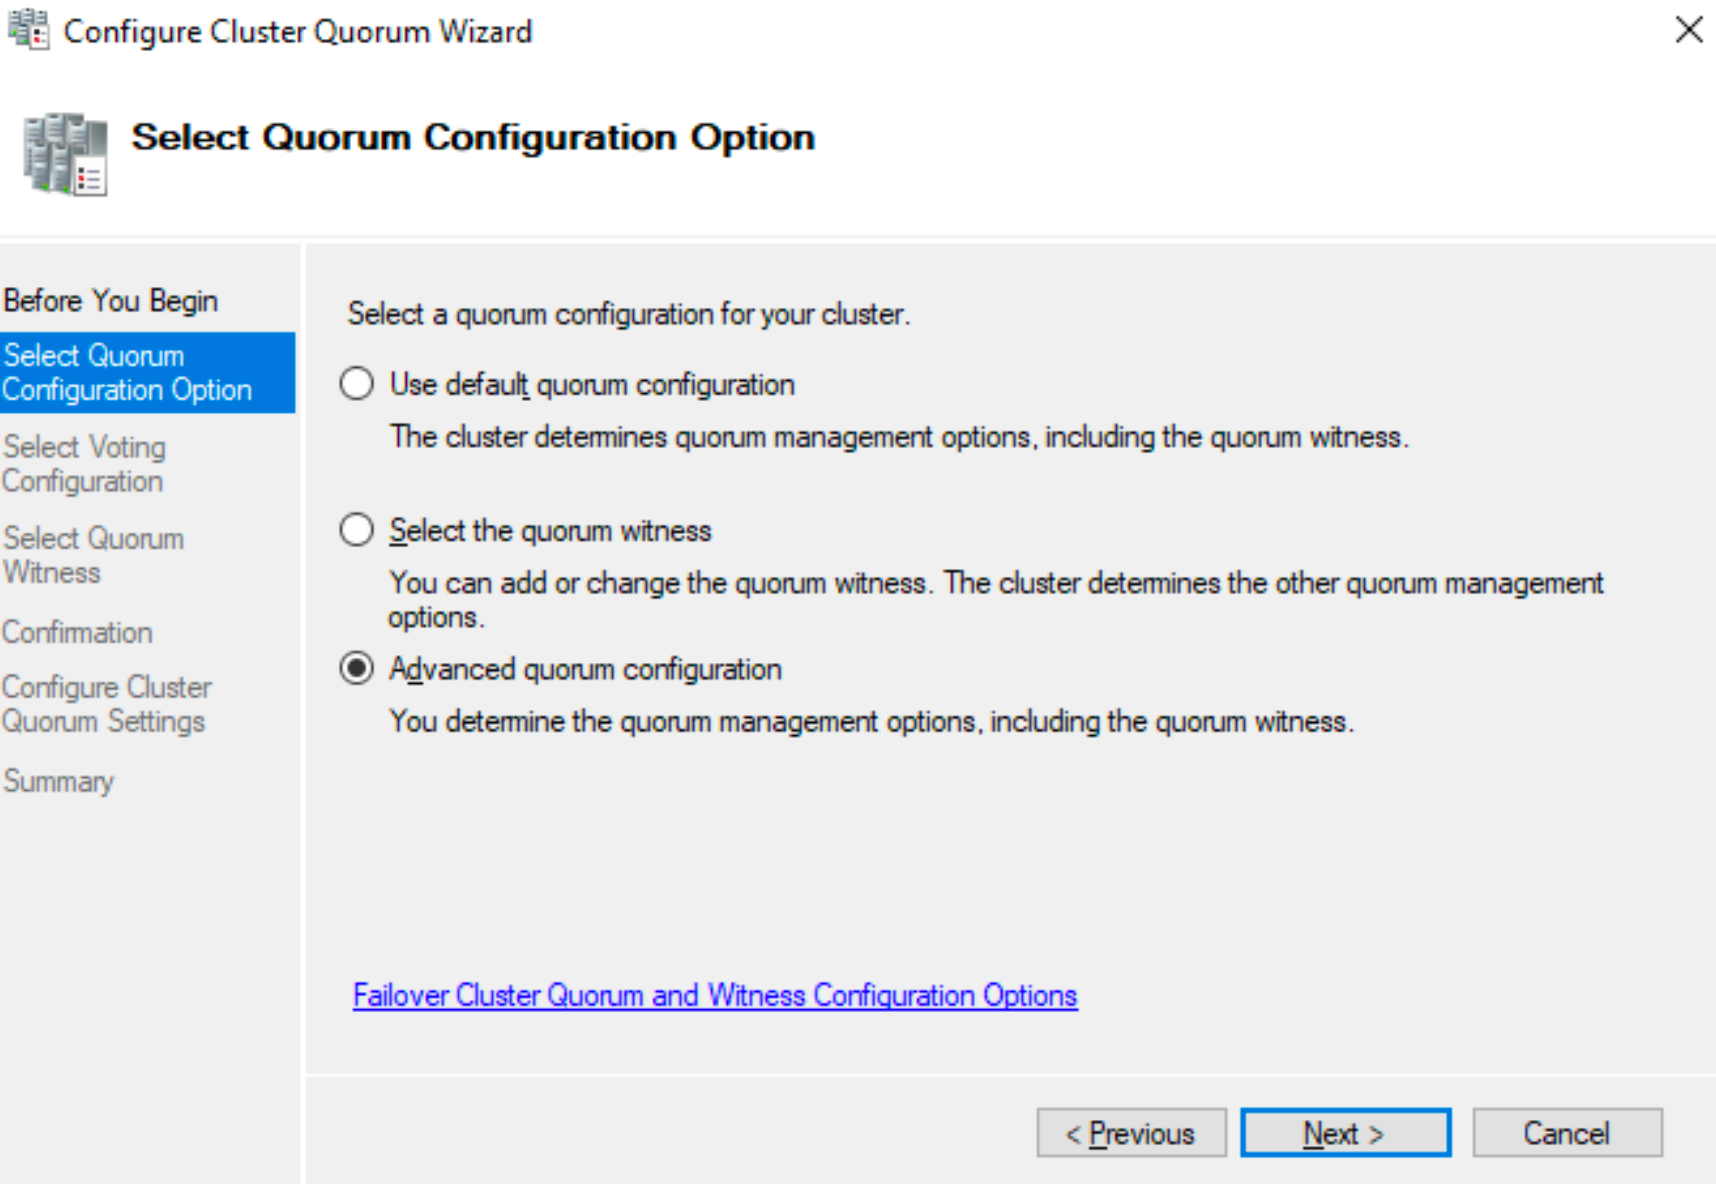
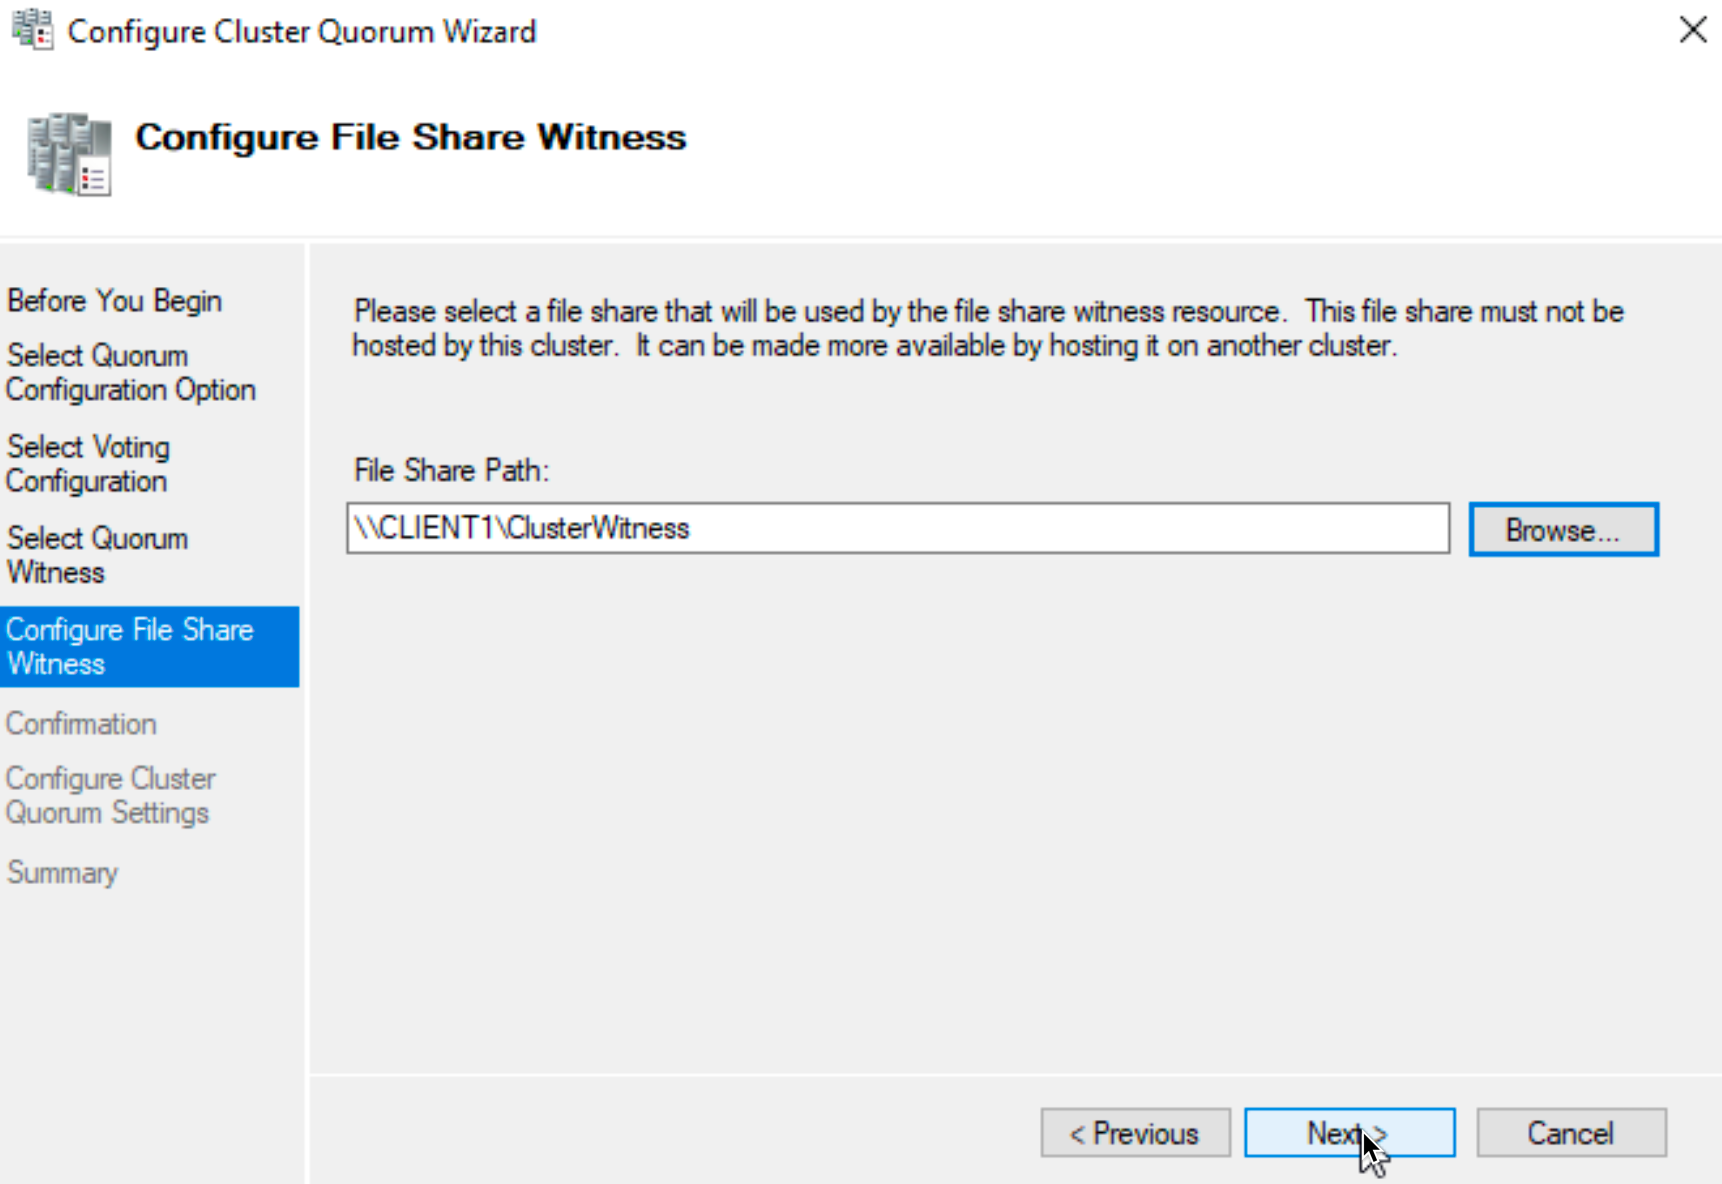
I will configure a file share witness
I will specify file share from third machine in a network.
Again, I covered Failover Clustering in a detailed guide on my blog, make sure you look it up.
Before you proceed to next step, make sure you backup existing DBs if you have anything important on the DB servers.
Enable SQL Always ON availability group
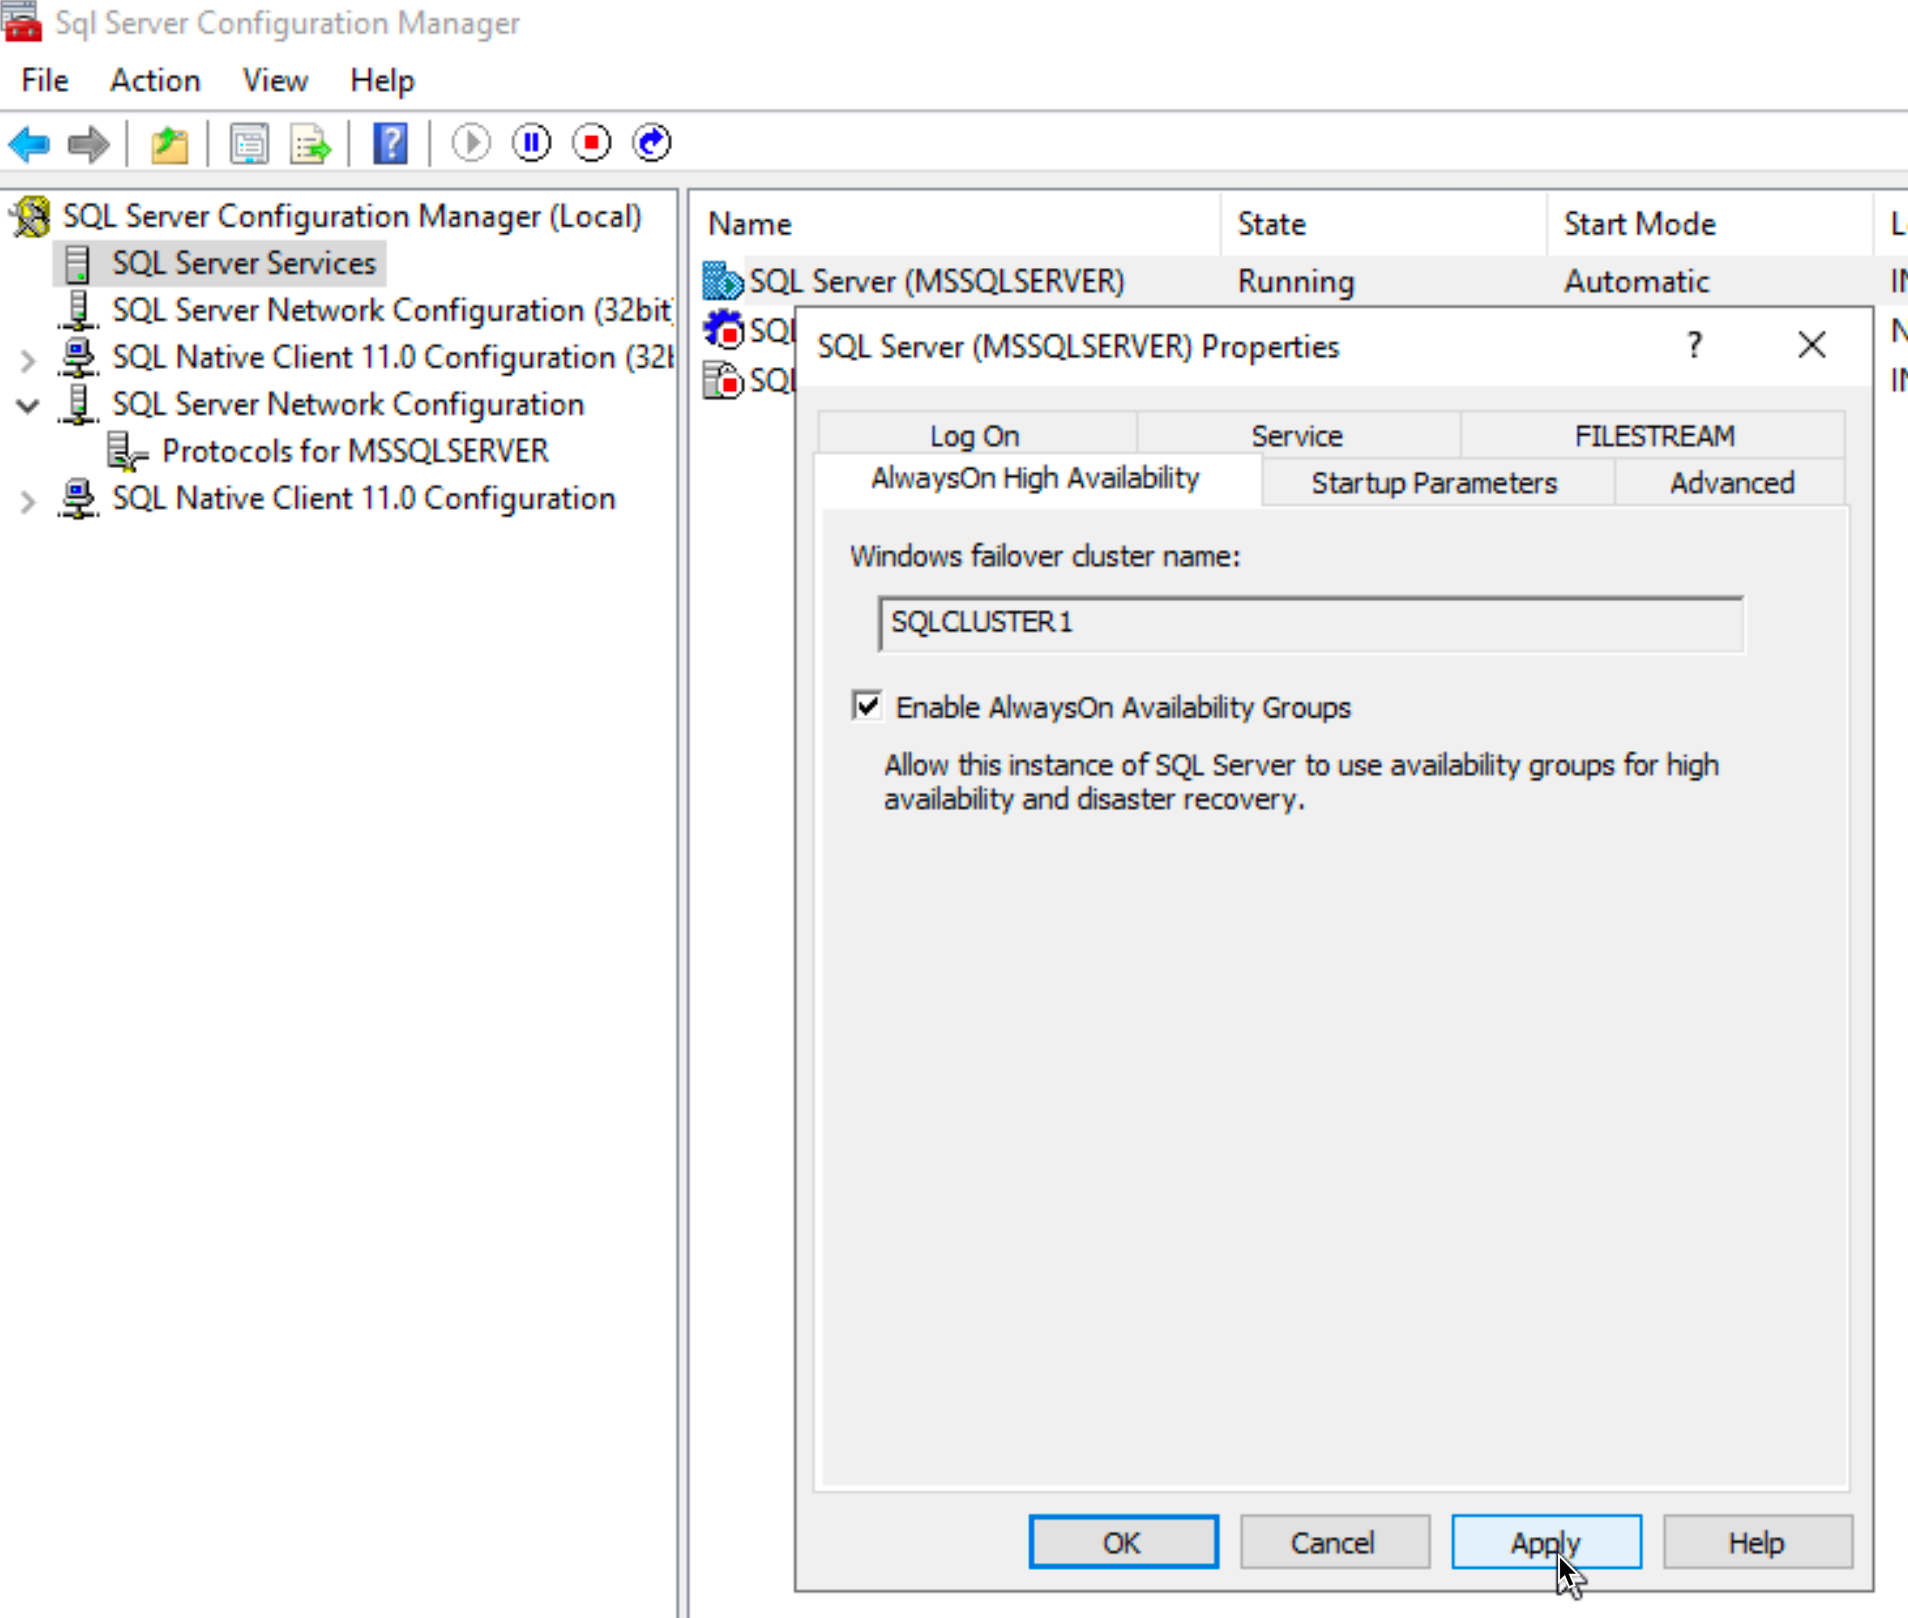
I will run this on SBDB1 – Run SQL Server Configuration Manager | Select SQL Server Services | right click on SQL Server (MSSQLSERVER) and select Properties | Select on AlwaysOn High Availability tab – and click on Enable AlwaysOn Availability Groups – Apply, OK
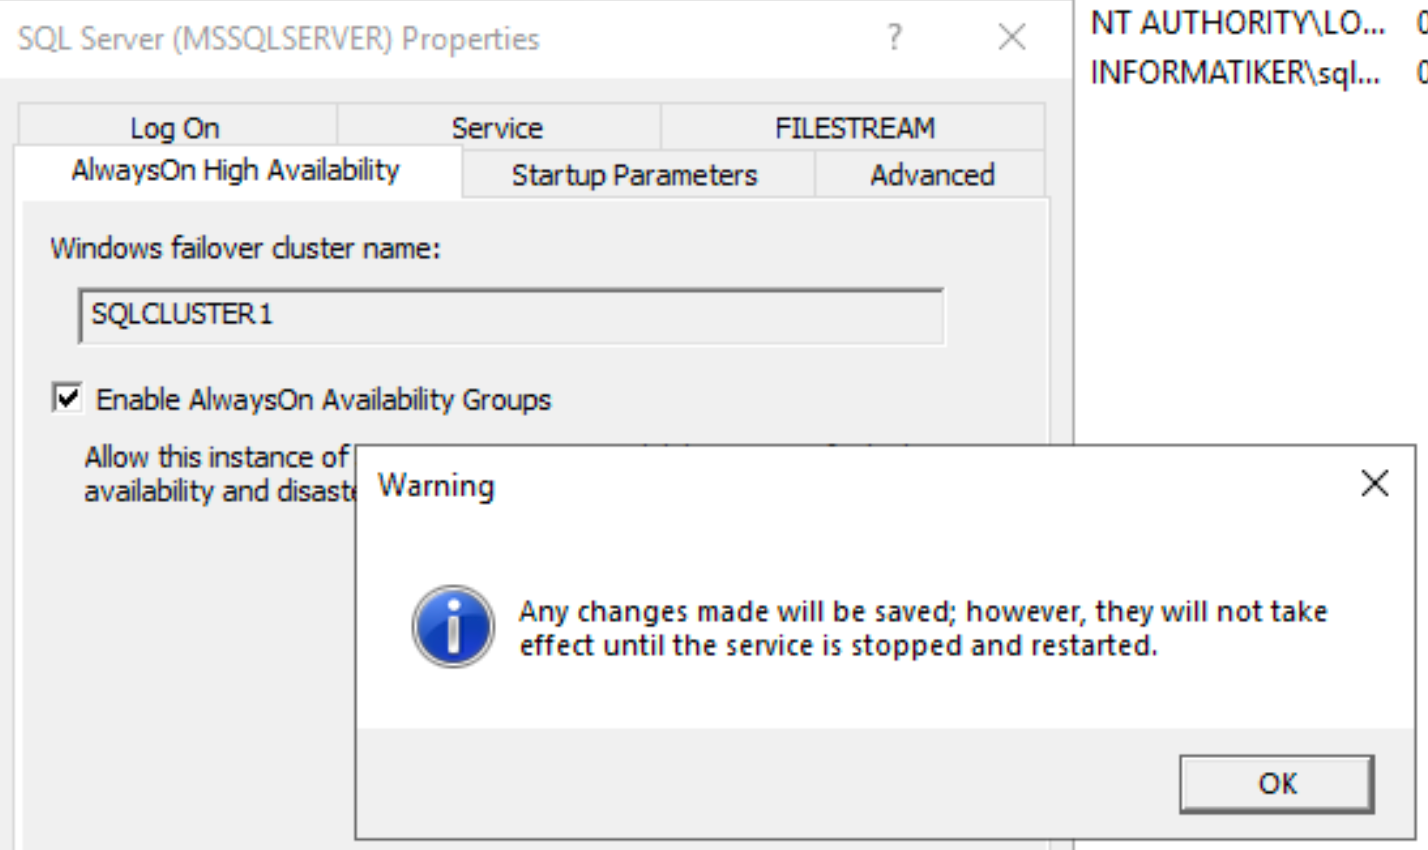
Confirm with OK. I rebooted server after I confirmed with OK.
Do this step on the second SQL server you plan to use (SBDB2 in my case)
Create and configure Always ON Availability Group
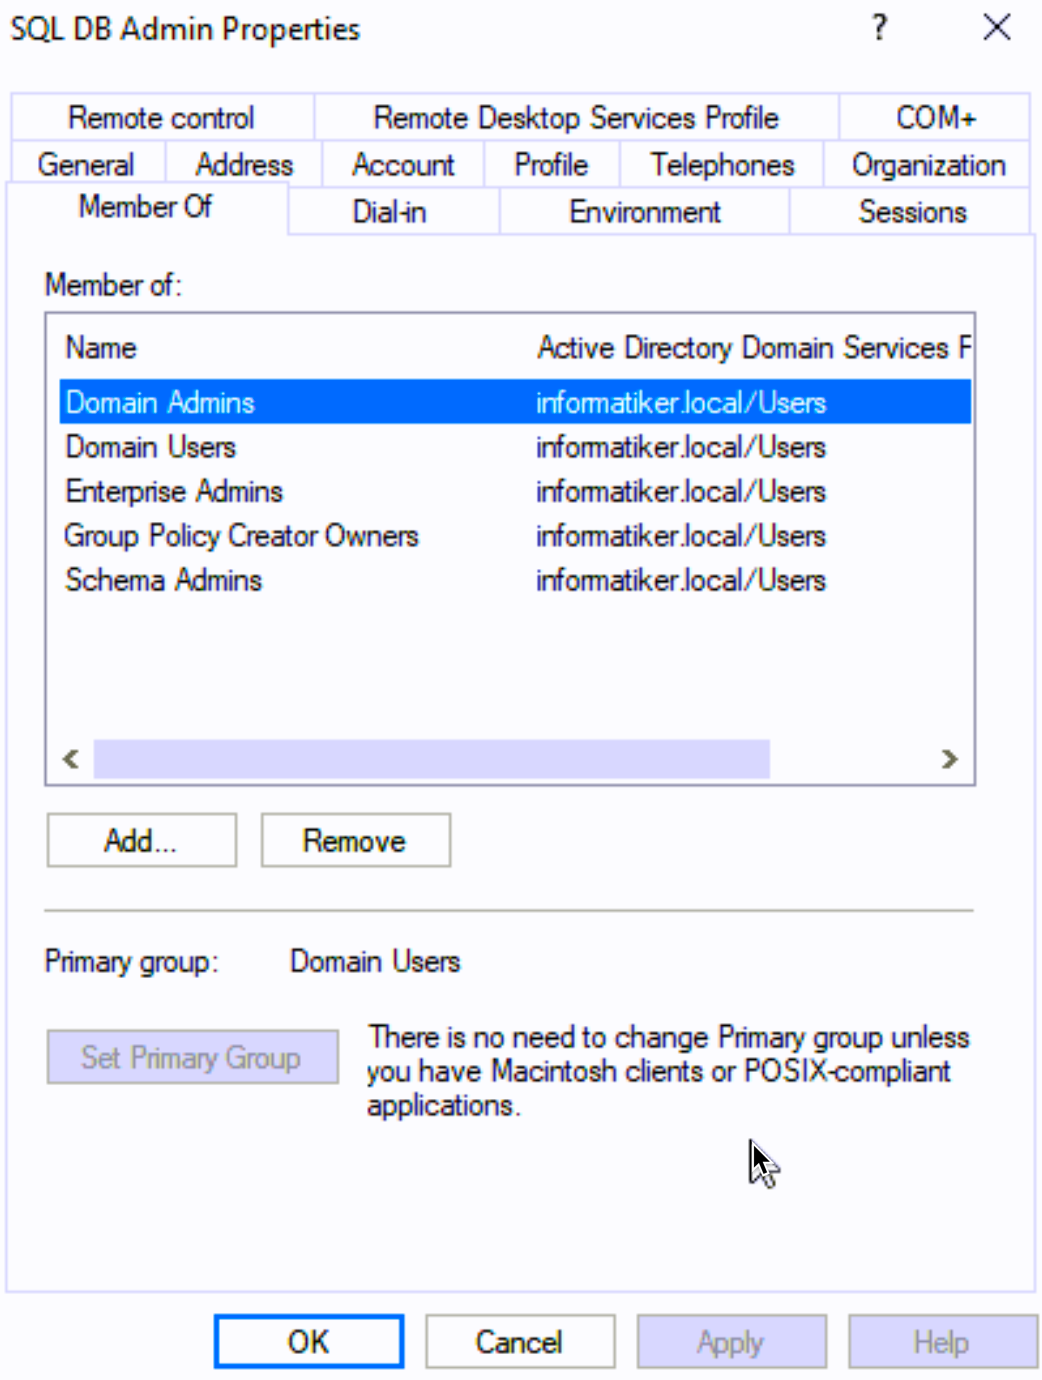
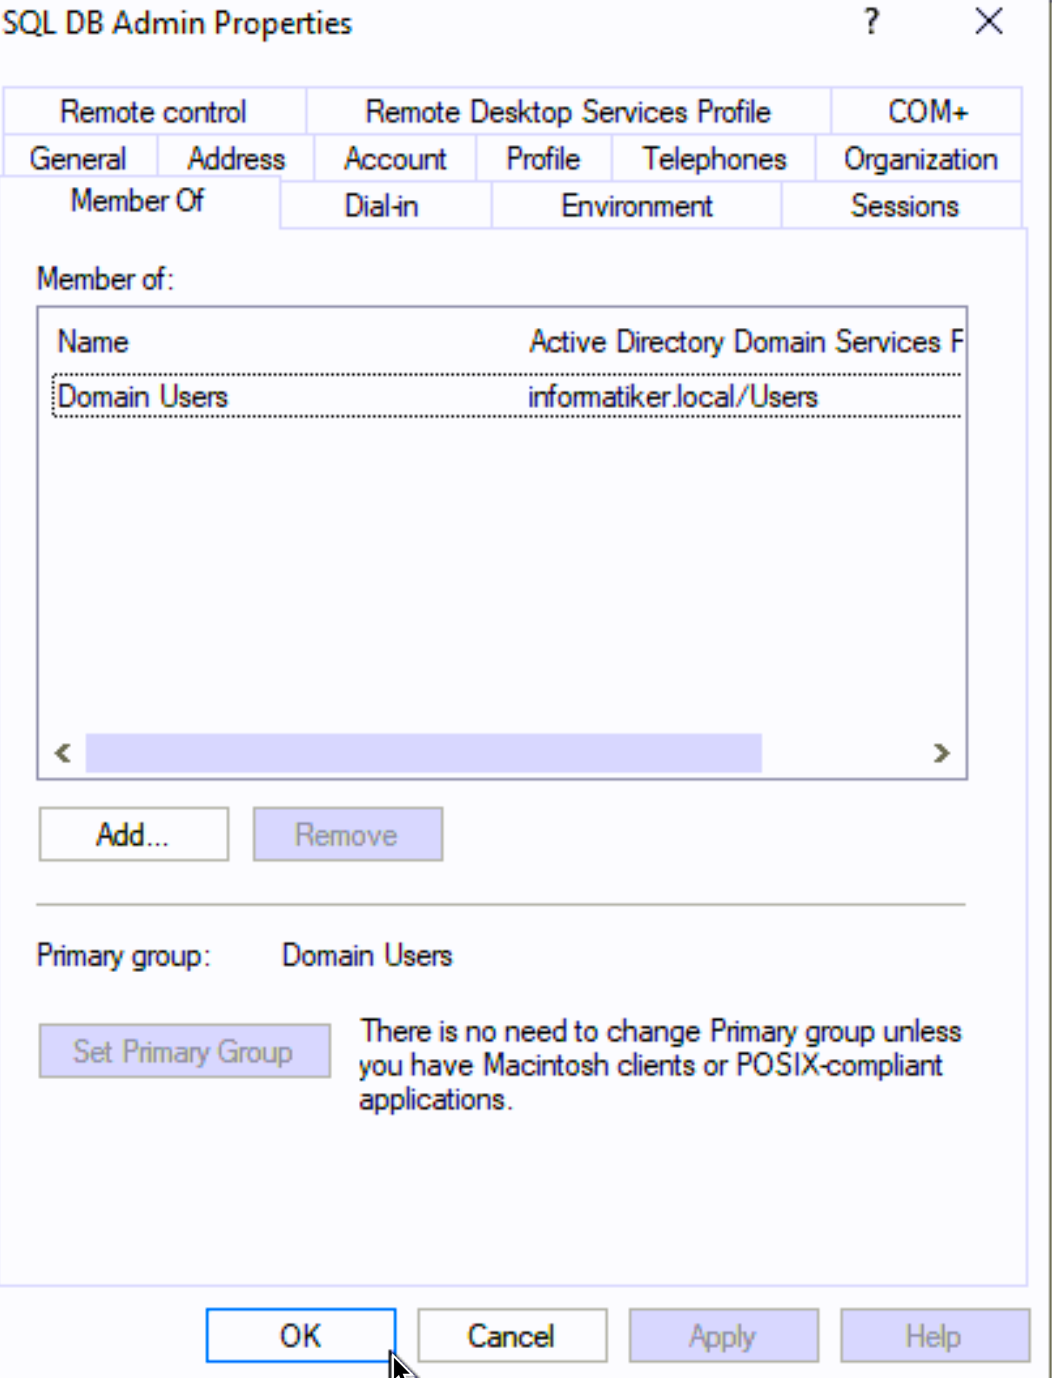
So, in case you are going the hard way, and not using your domain admin for SQL (which is very smart security decision) before you proceed:
I used Windows Authentication and created simple domain account that I assigned as SQL admin. This account is named sqldbadmin1 and I’m using it through out this guide. It differs from the Administrator account I’m using on Windows Server 2019 – so it is not always convenient to manage SQL when you are using different account from the one you are logged in to.
Through this process we are going to go next, I’m again going to use sqldbadmin1 account. At one step we are going to create listener for our Always On availability group. Creation of the listener is going to fail, if our sqldbadmin1 does not have enough privileges. Listener will need to create object in our AD, and our sqldbadmin1 does not have adequate rights.
So, I will only temporary assign sqldbadmin1 to Domain Admins, Enterprise Admins, Group Policy Creator Owners and Schema Admins AD groups in the AD.
Ok, back to SBDB1…
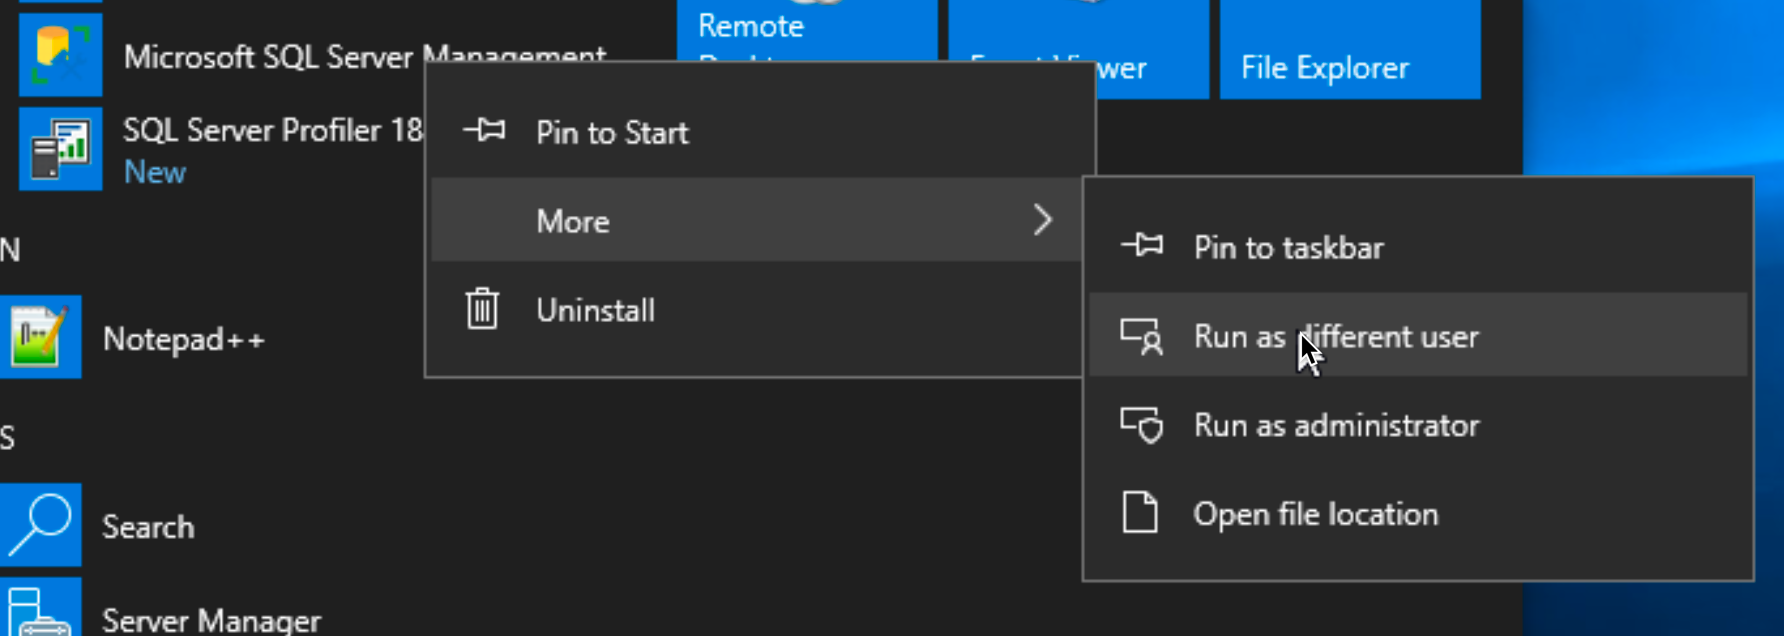
Run SSMS (SQL Server Management Studio). I run SSMS with different user (sqldbadmin1) from the one I’m logged into Windows Server (Administrator) so, I have to start SSMS with “Run as different user”. If you used same account for everything, then you don’t have to do this. Also you can login with you SQL user to Windows and then you can skip this step.
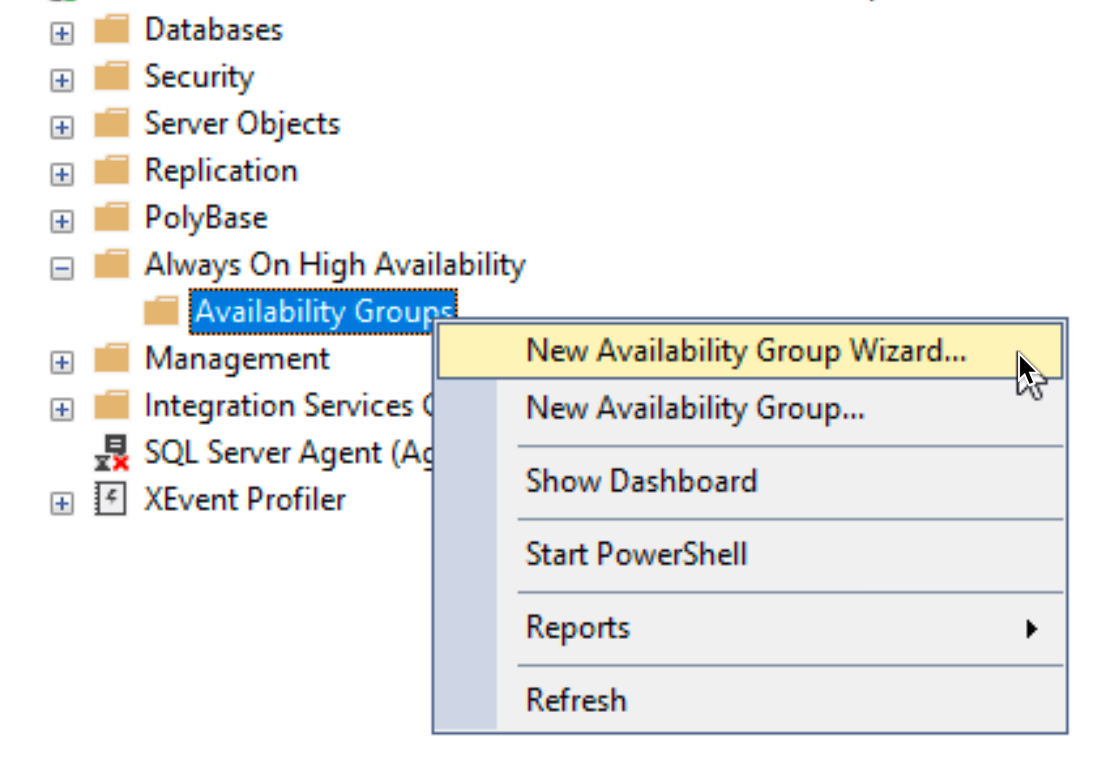
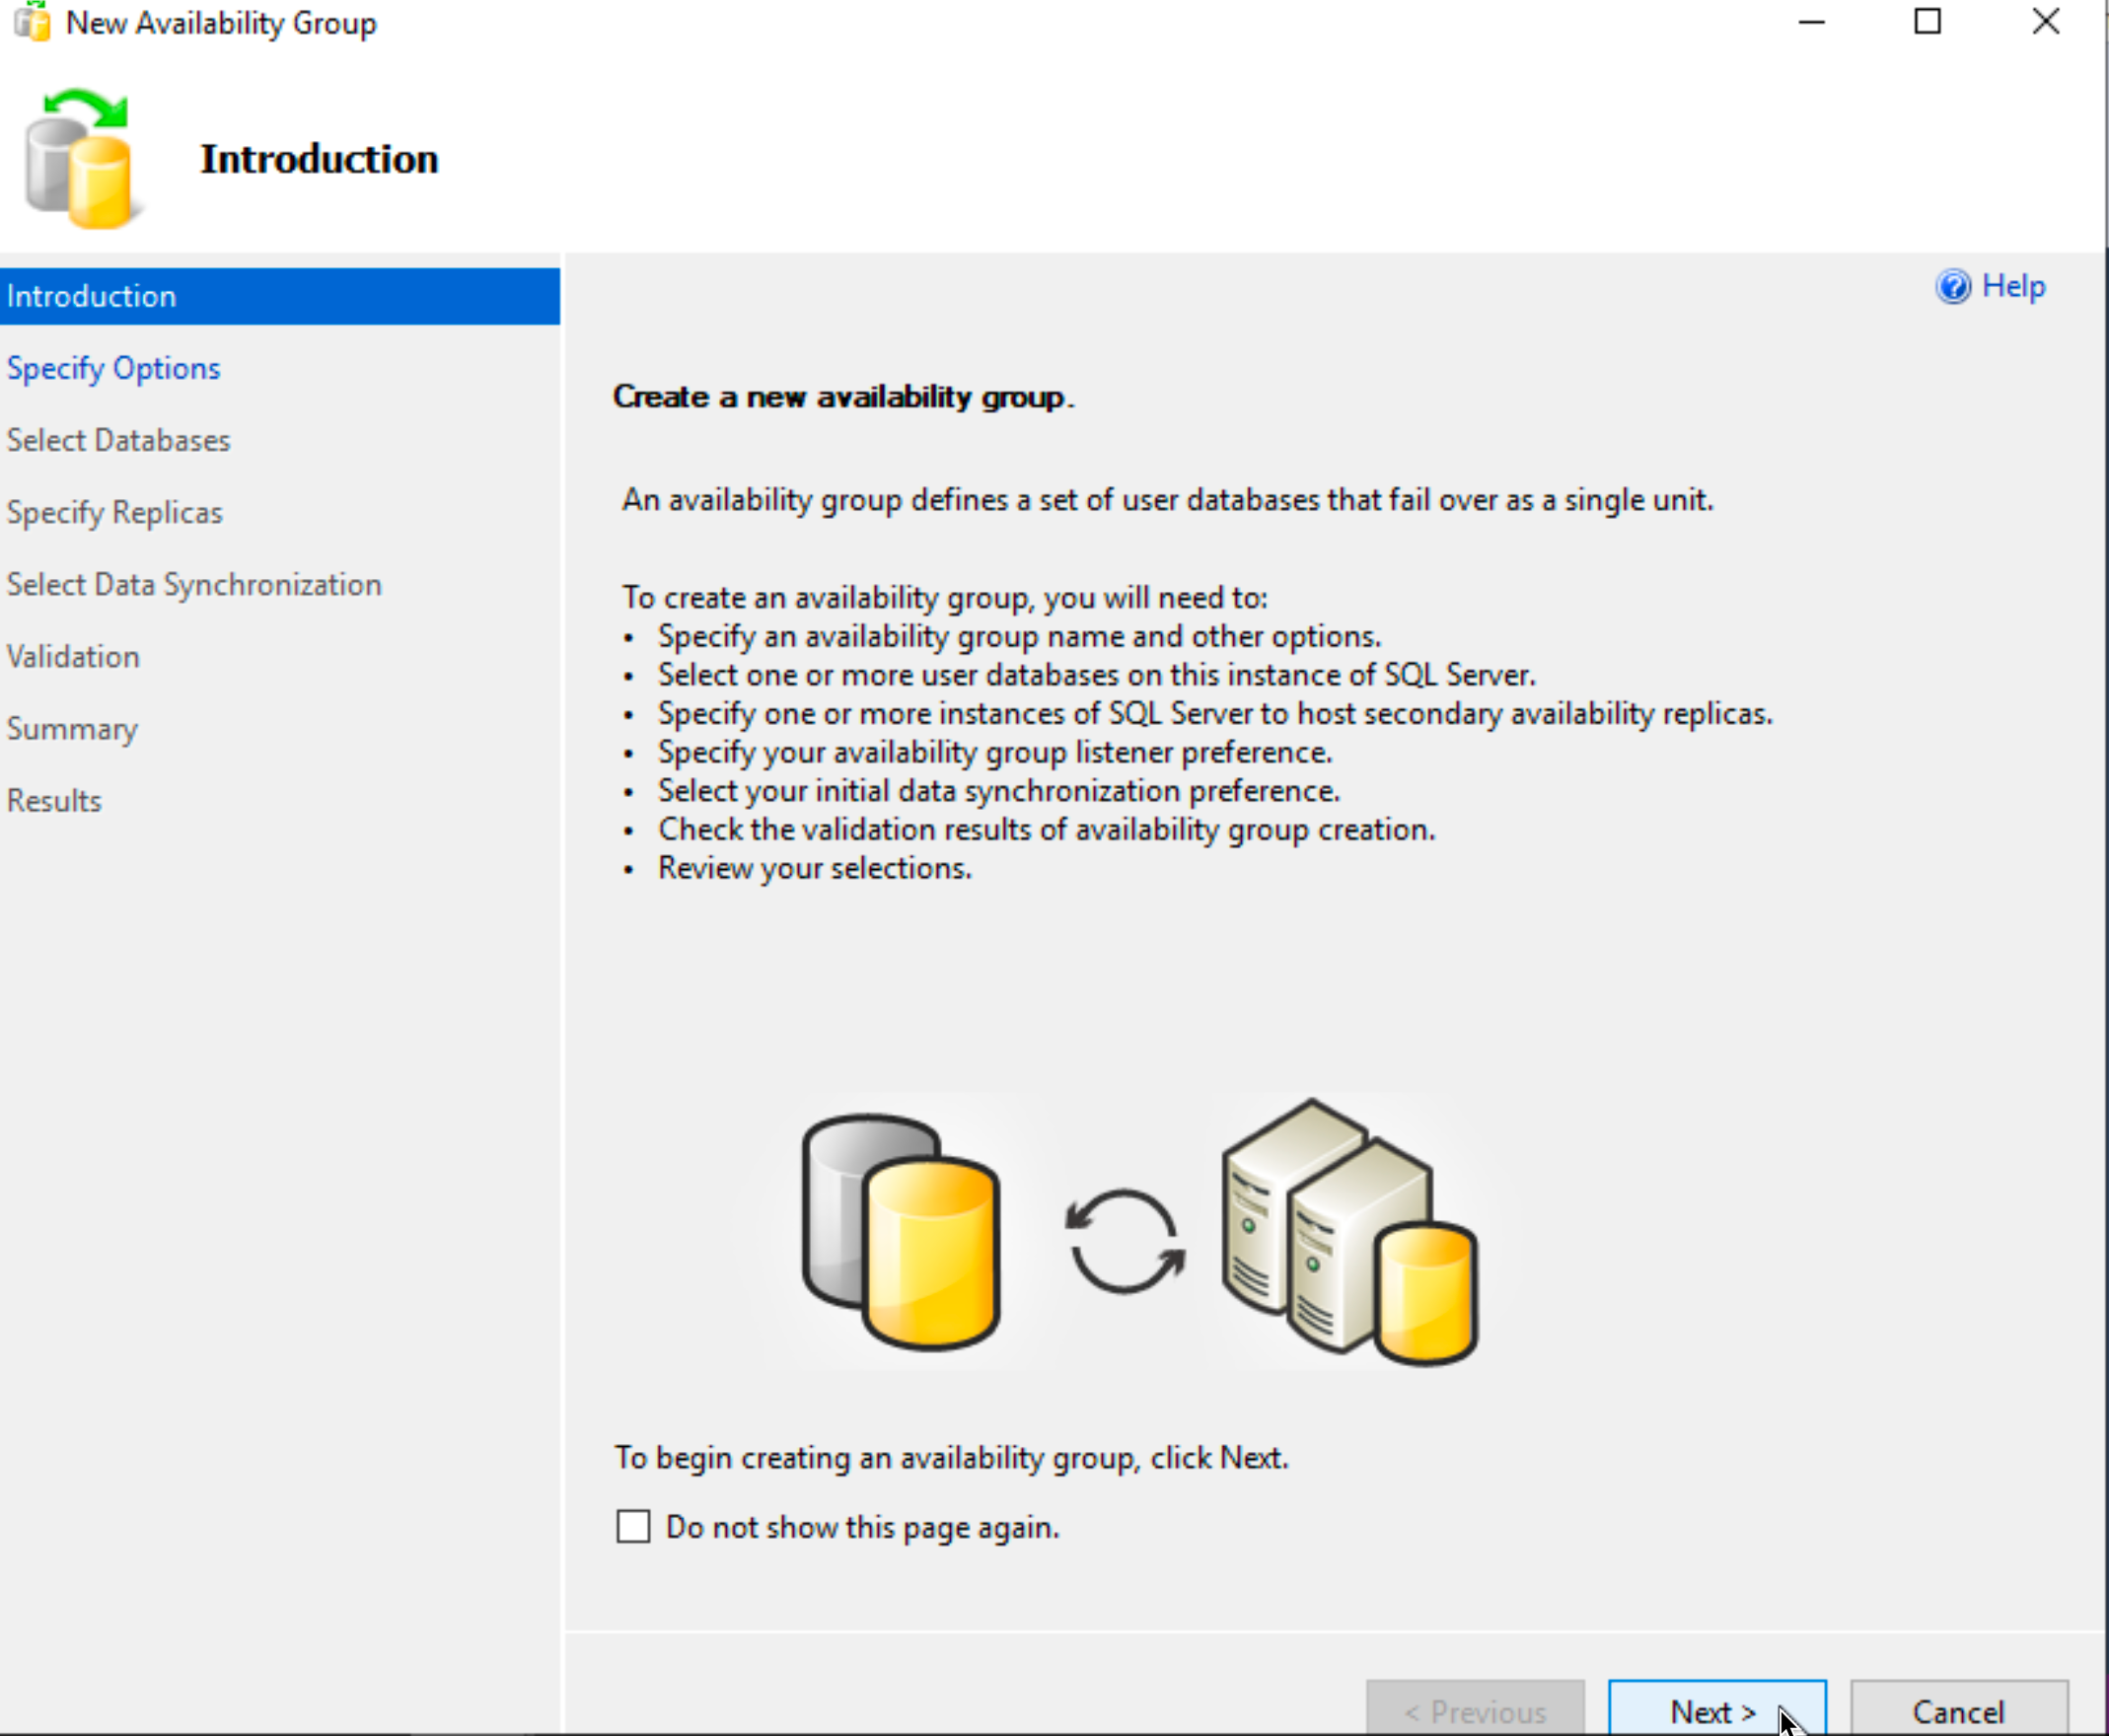
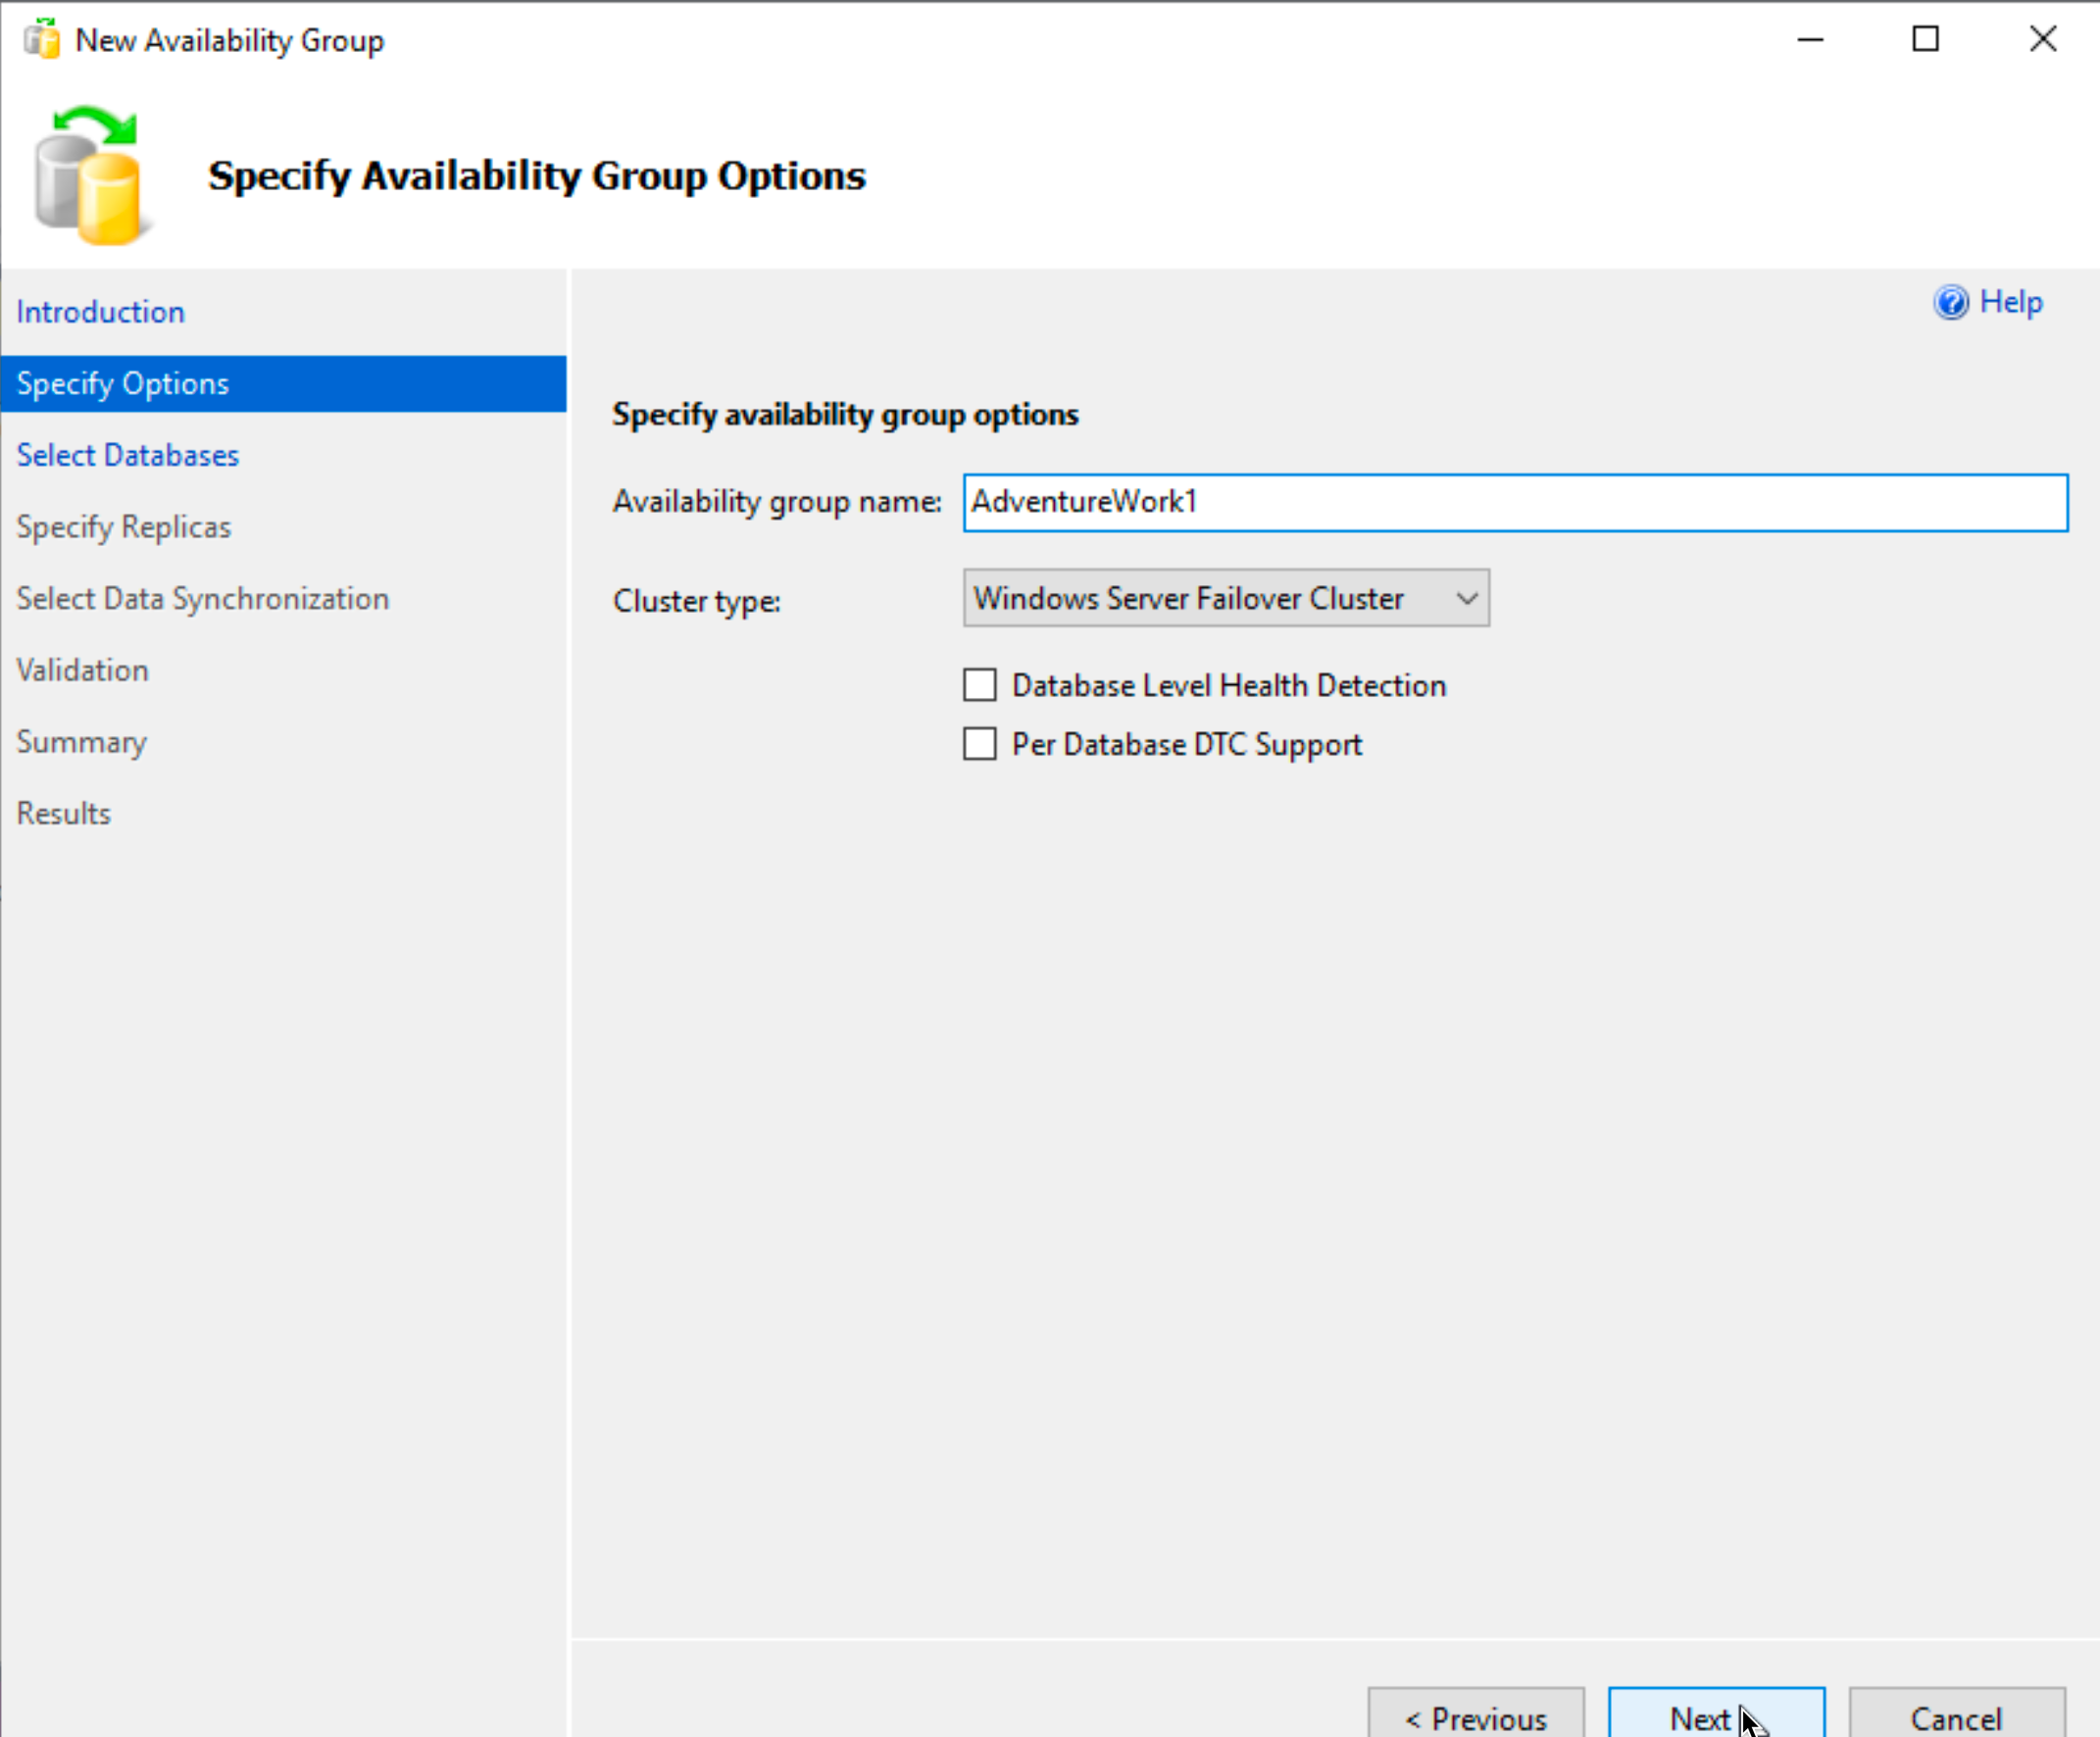
After you log in into SSMS, you will see that we now have Always On High Availability at our disposal. Expand it, so you see Availability Groups, right click on it, and select “New Availability Group Wizard…”
Next
I will name my availability group “AdventureWork1” leave cluster type as Windows Server Failover Cluster | Next
On the next step we got warning that “Full recovery mode is required” for the database I wish to select
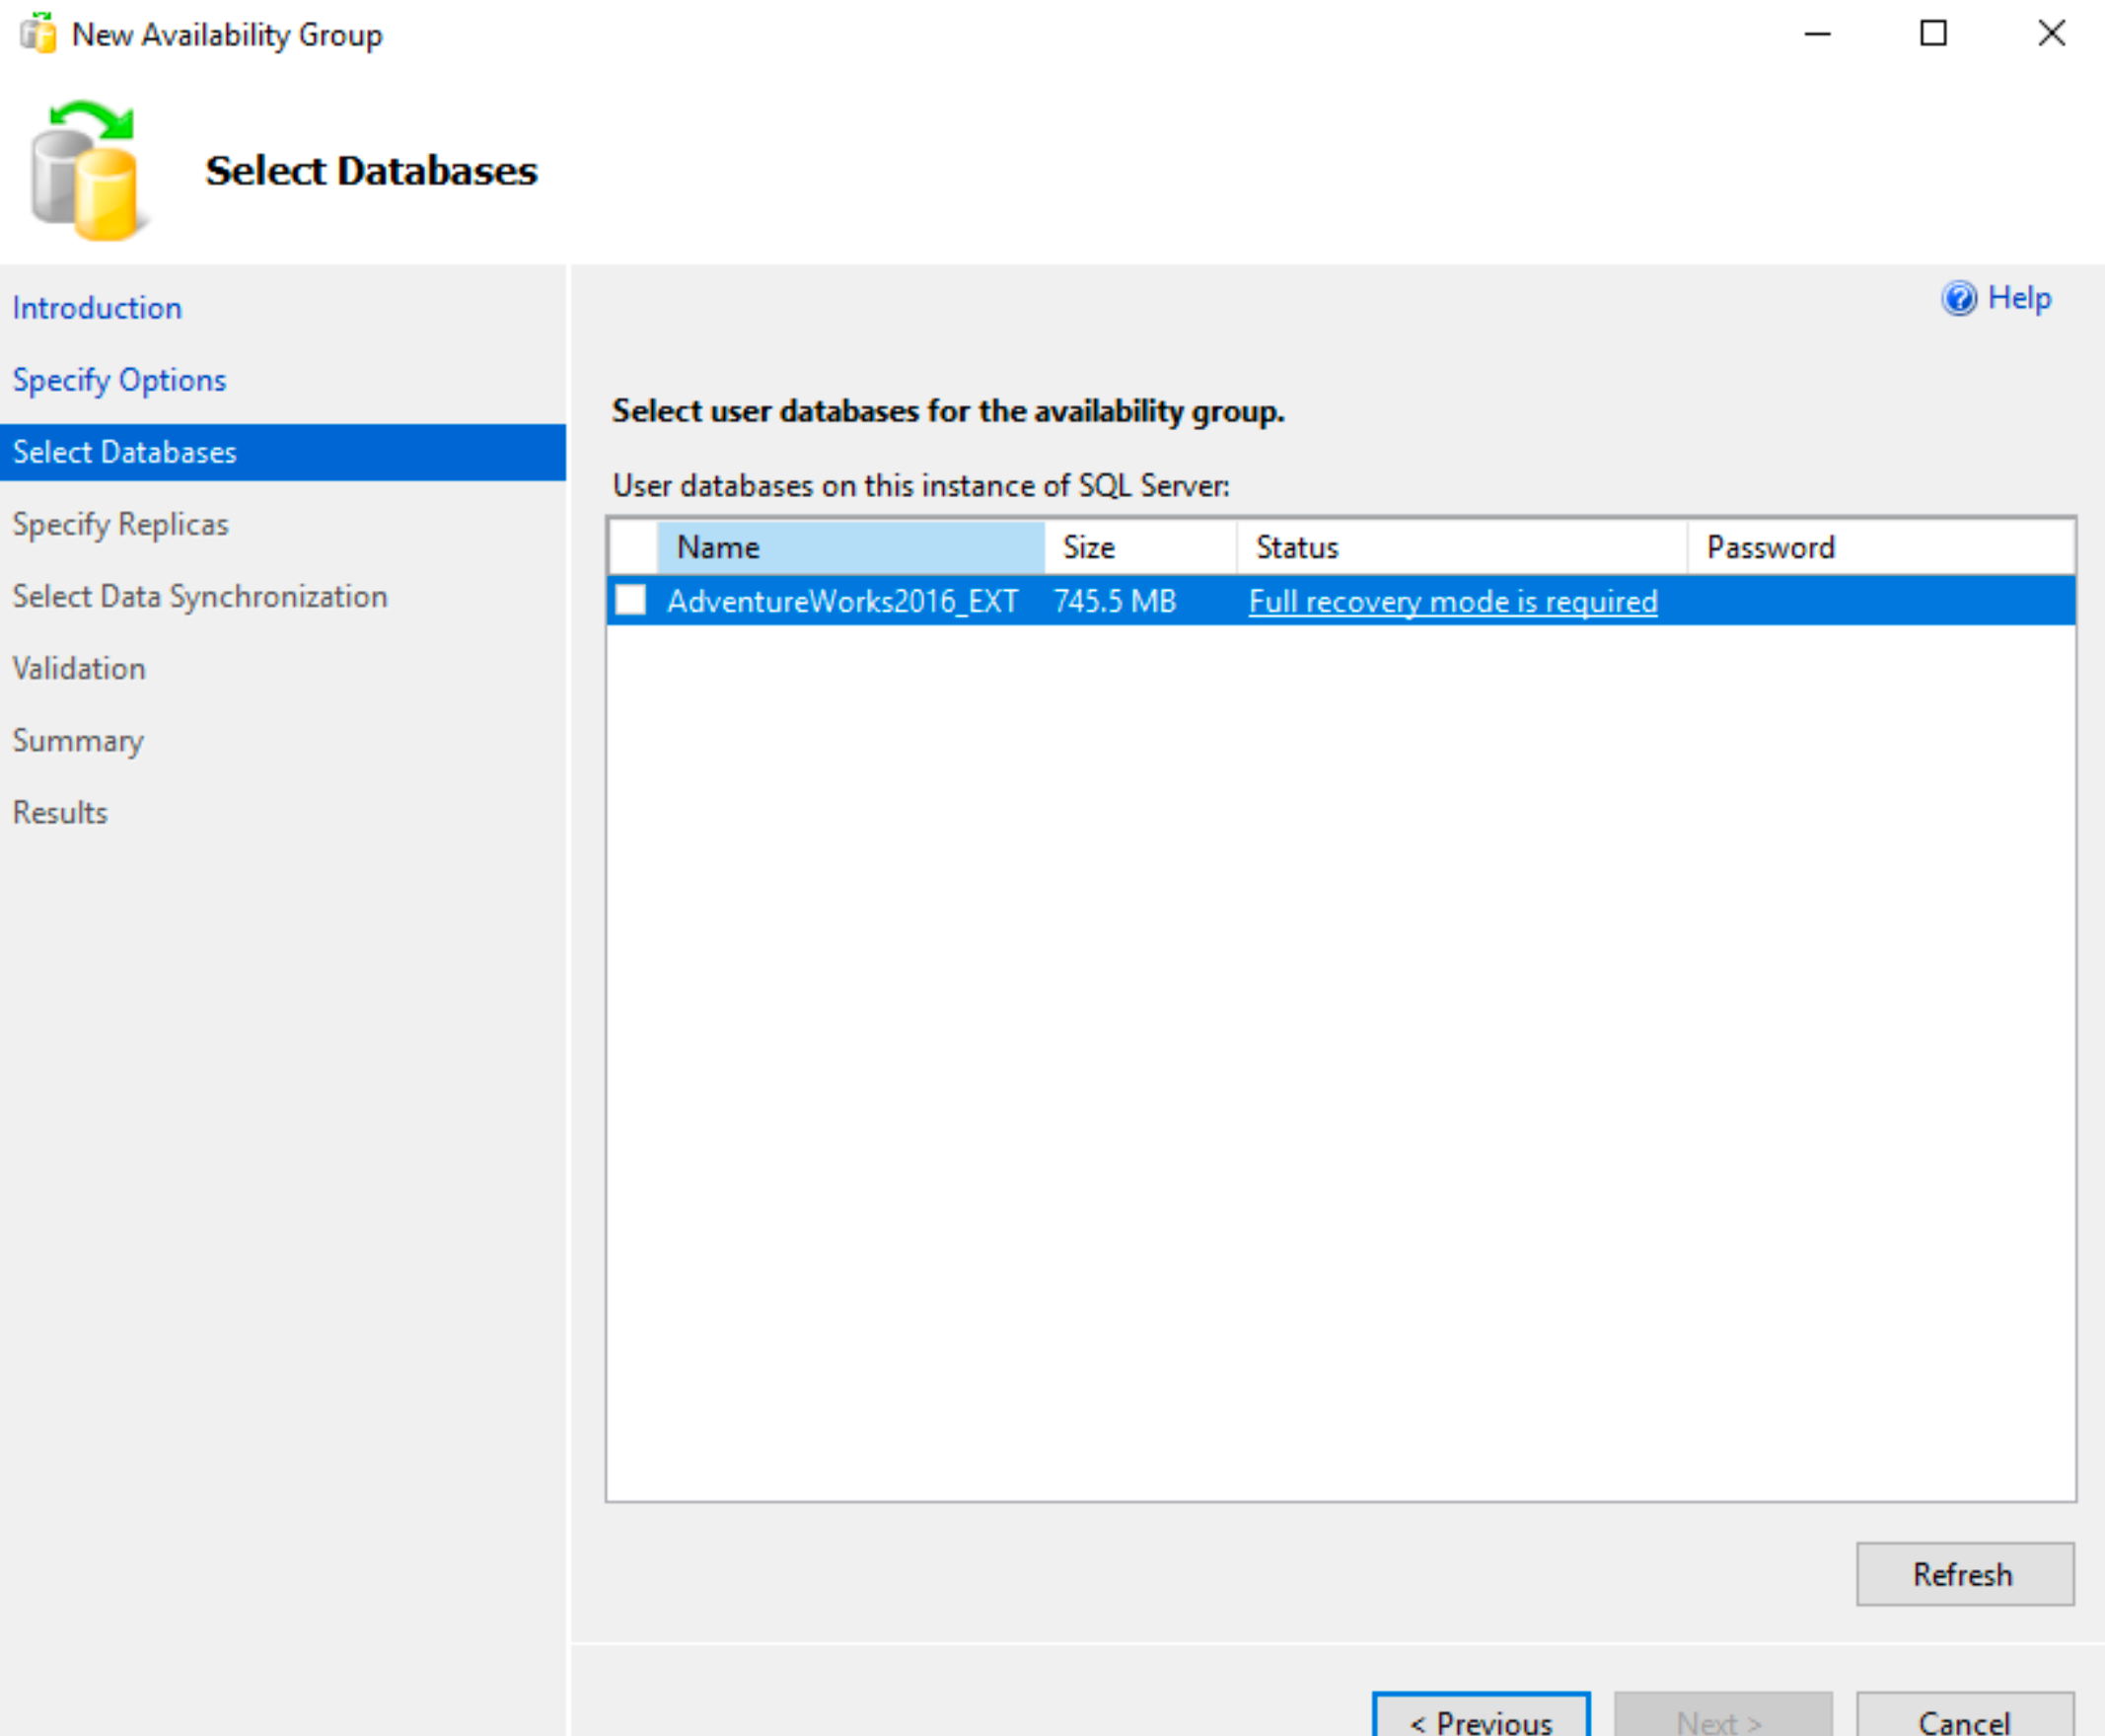
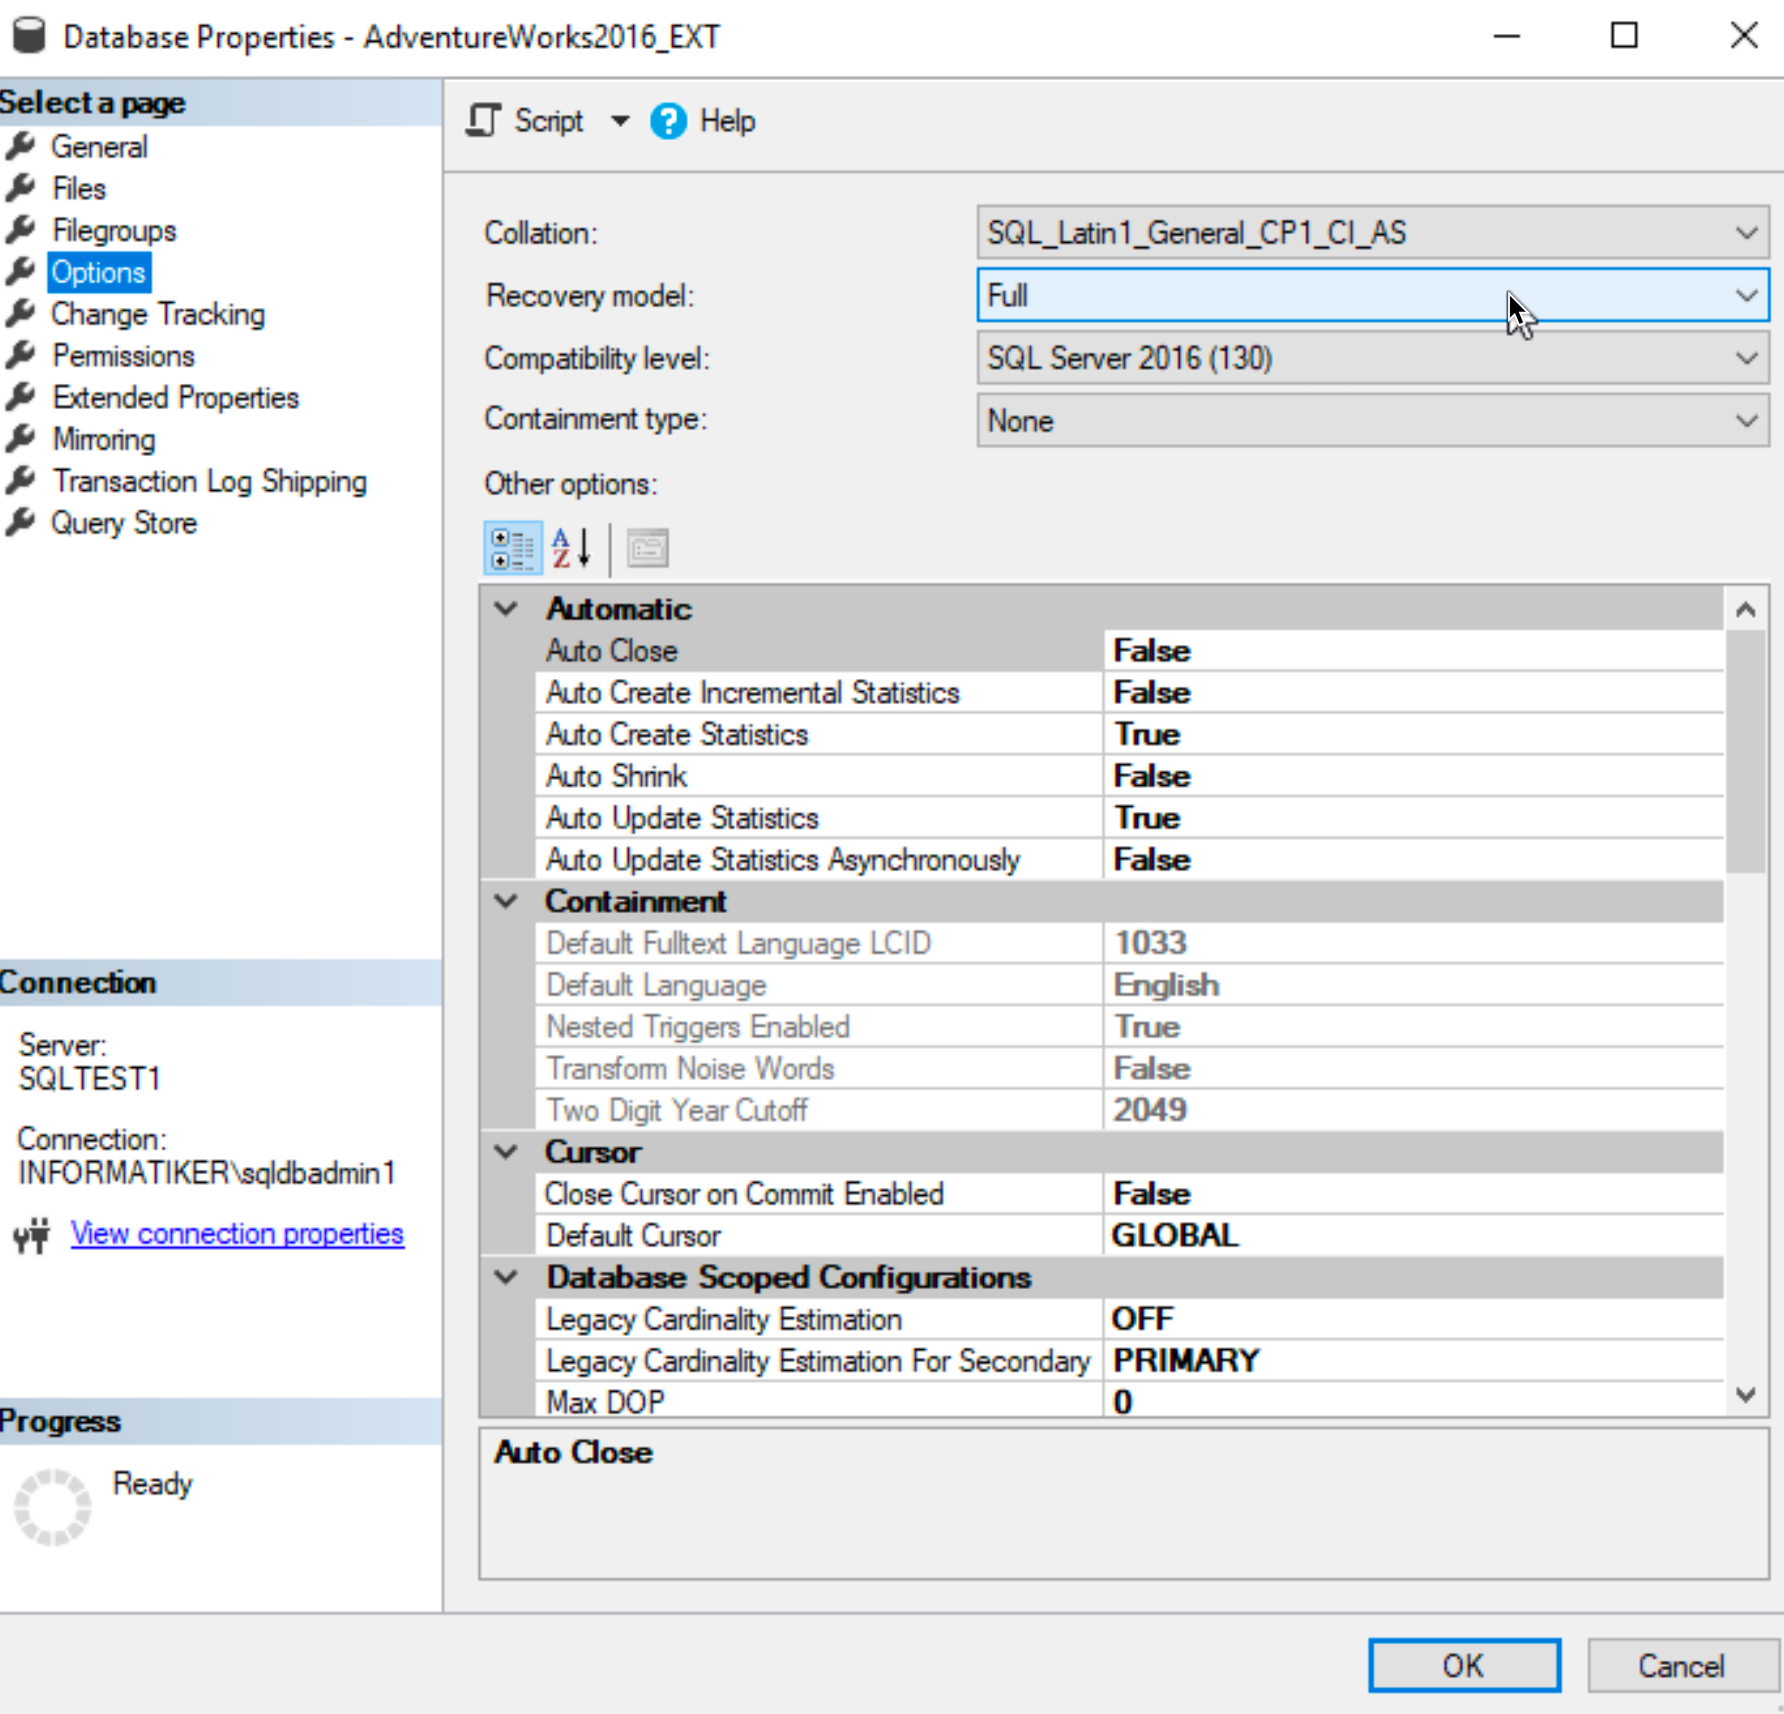
Ok, we need to close the Wizard, under Databases section in SSMS, right click on database you wish to do Always ON | select Properties | click on Options and under Recovery model select Full.
Click OK
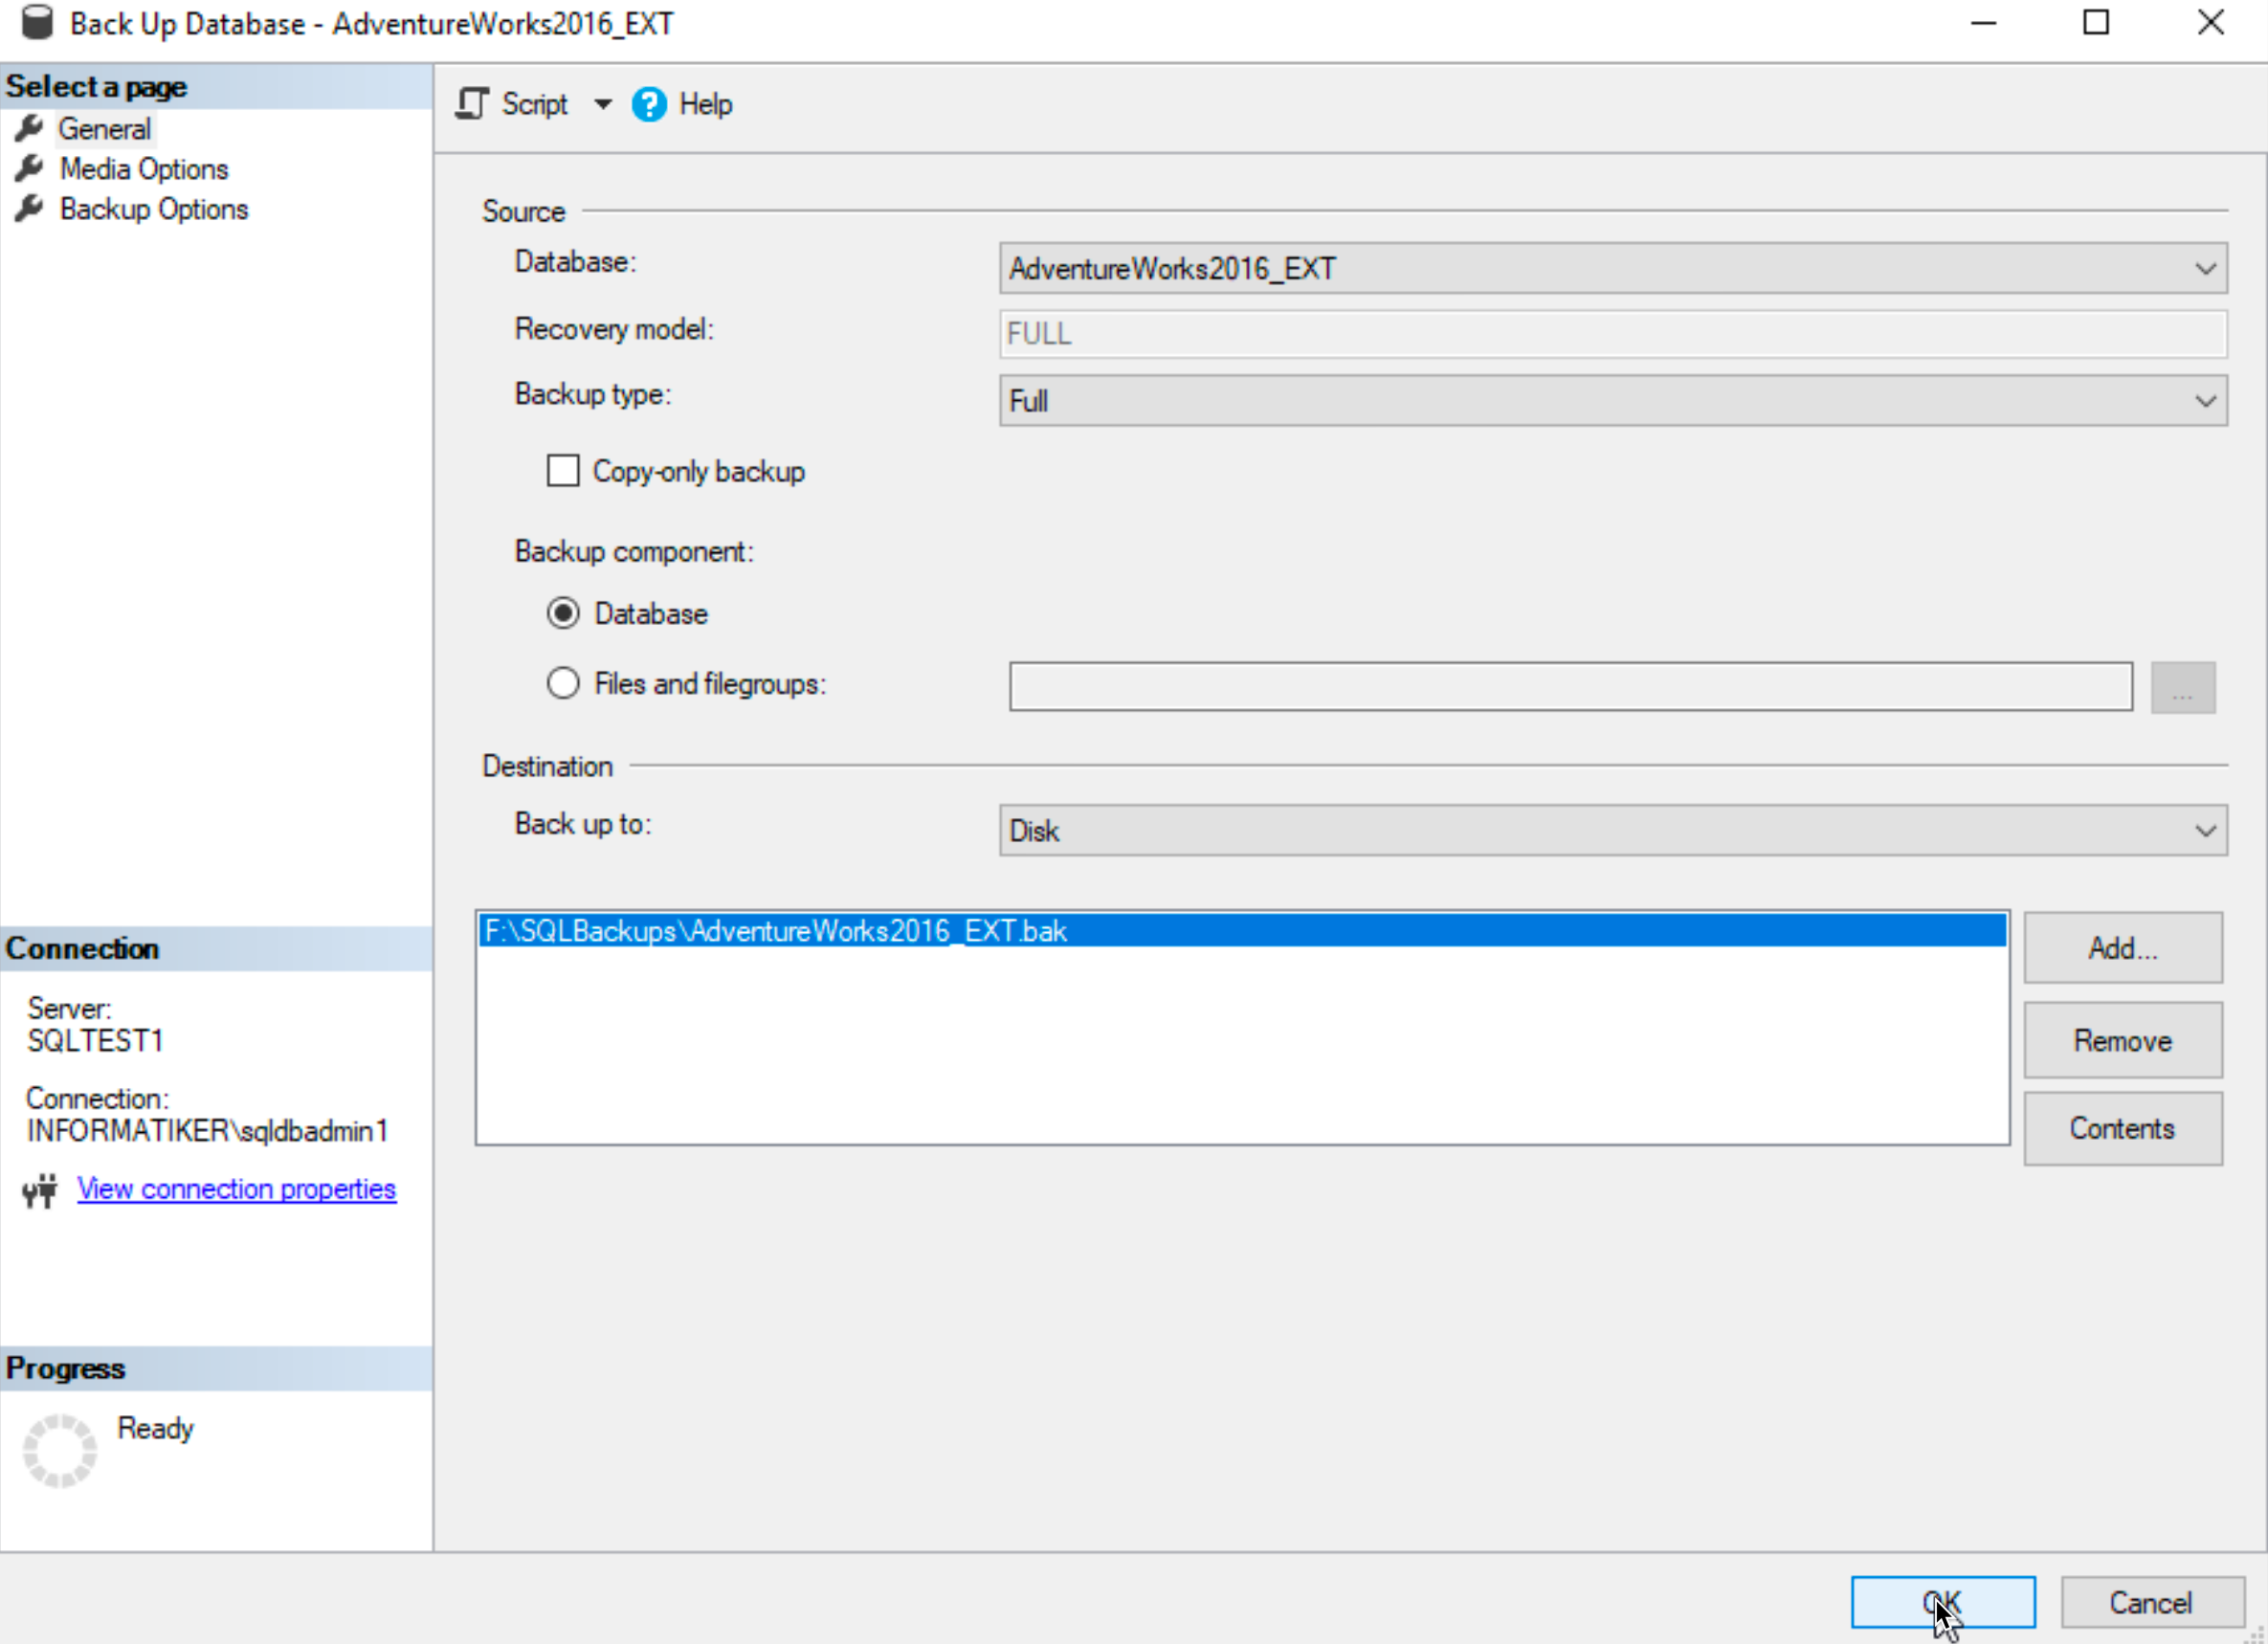
Stay in Databases section and on right click on your Database you wish to make highly available | select Tasks | Select Back Up…
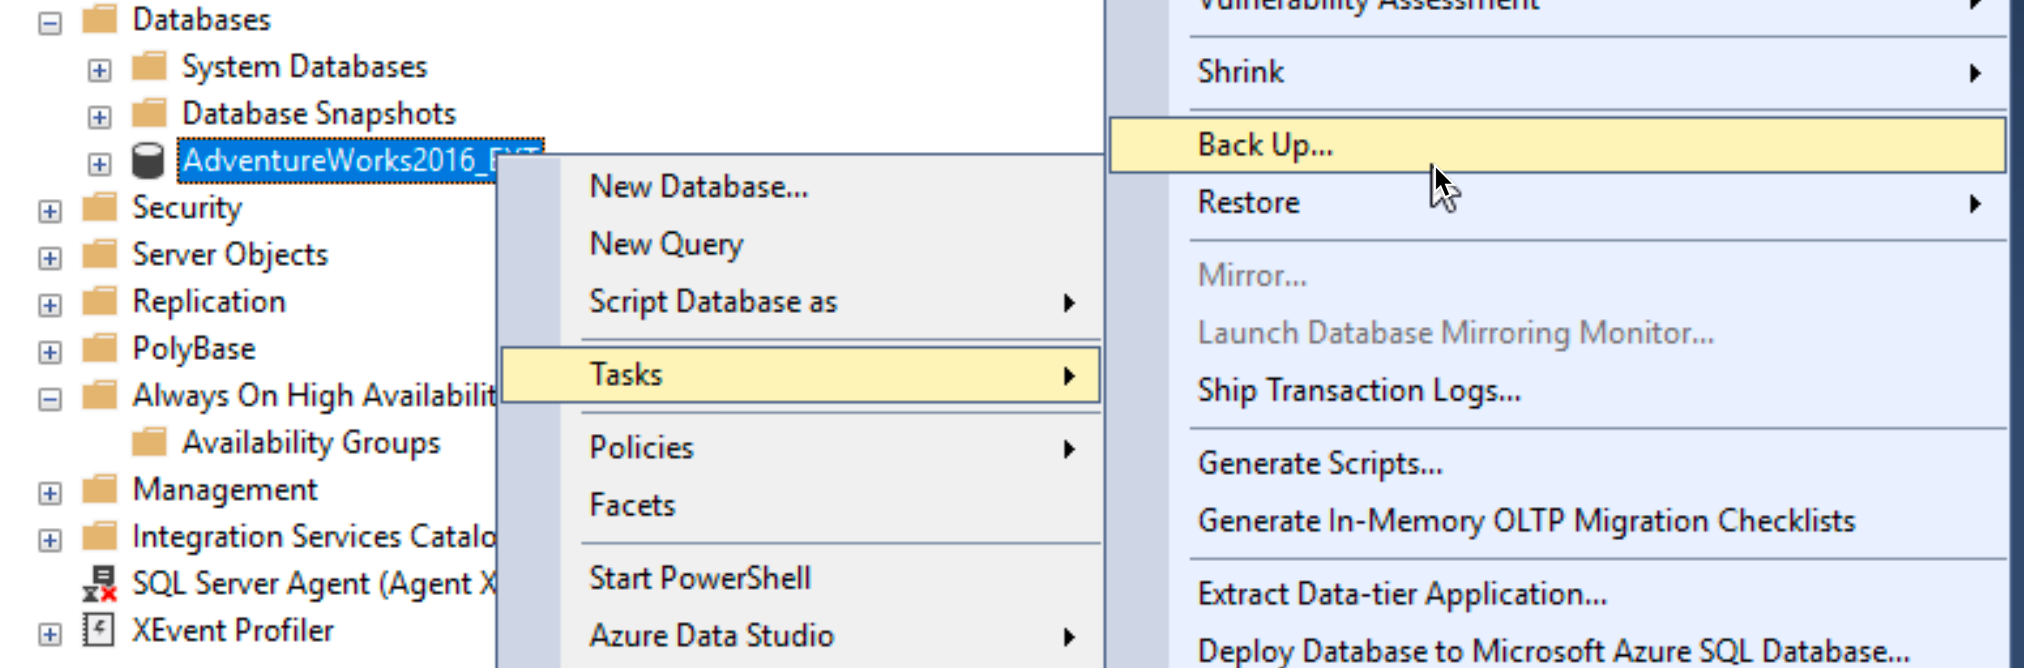
Select Backup Type – Full | select location for your Backup and execute.
After these two steps are done, restart the Always On wizard again.
Our Database now meets prerequisites – Next
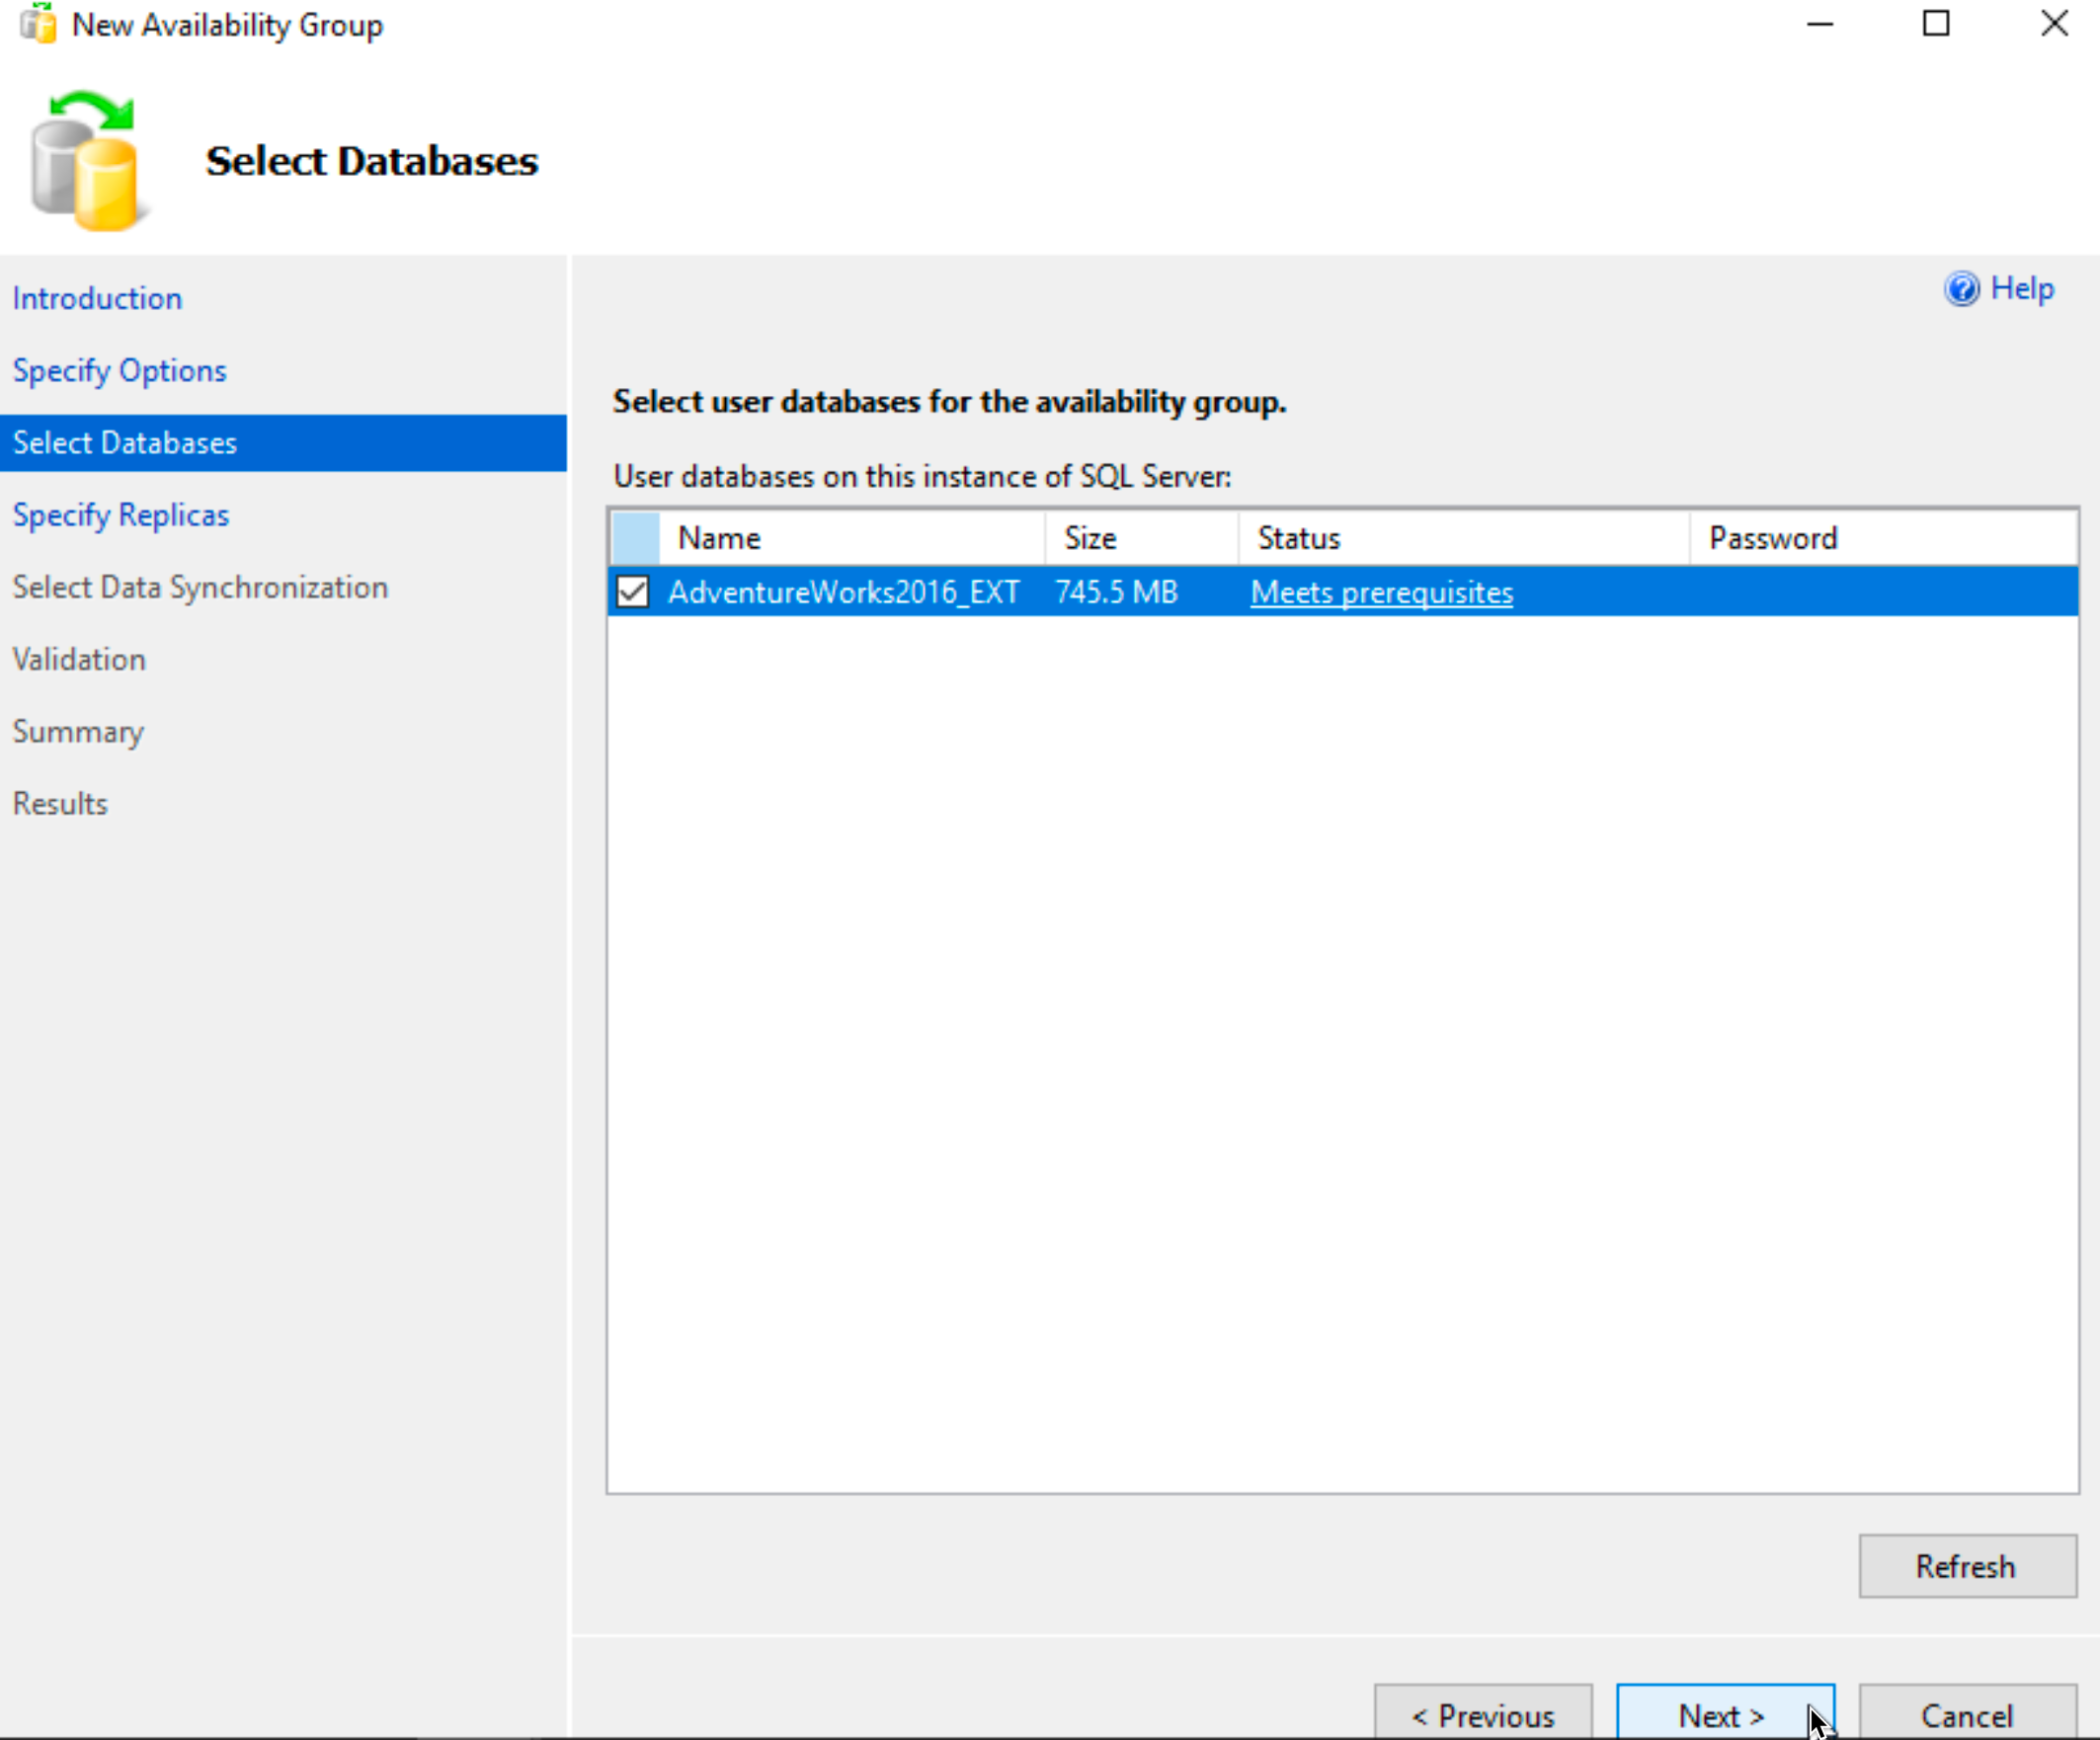
Screenshots show SQLTEST1 (equals SBDB1) and SQLTEST2 (equals SBDB2) – sorry for the inconvenience, I got to work on new LAB, so screenshots are different…
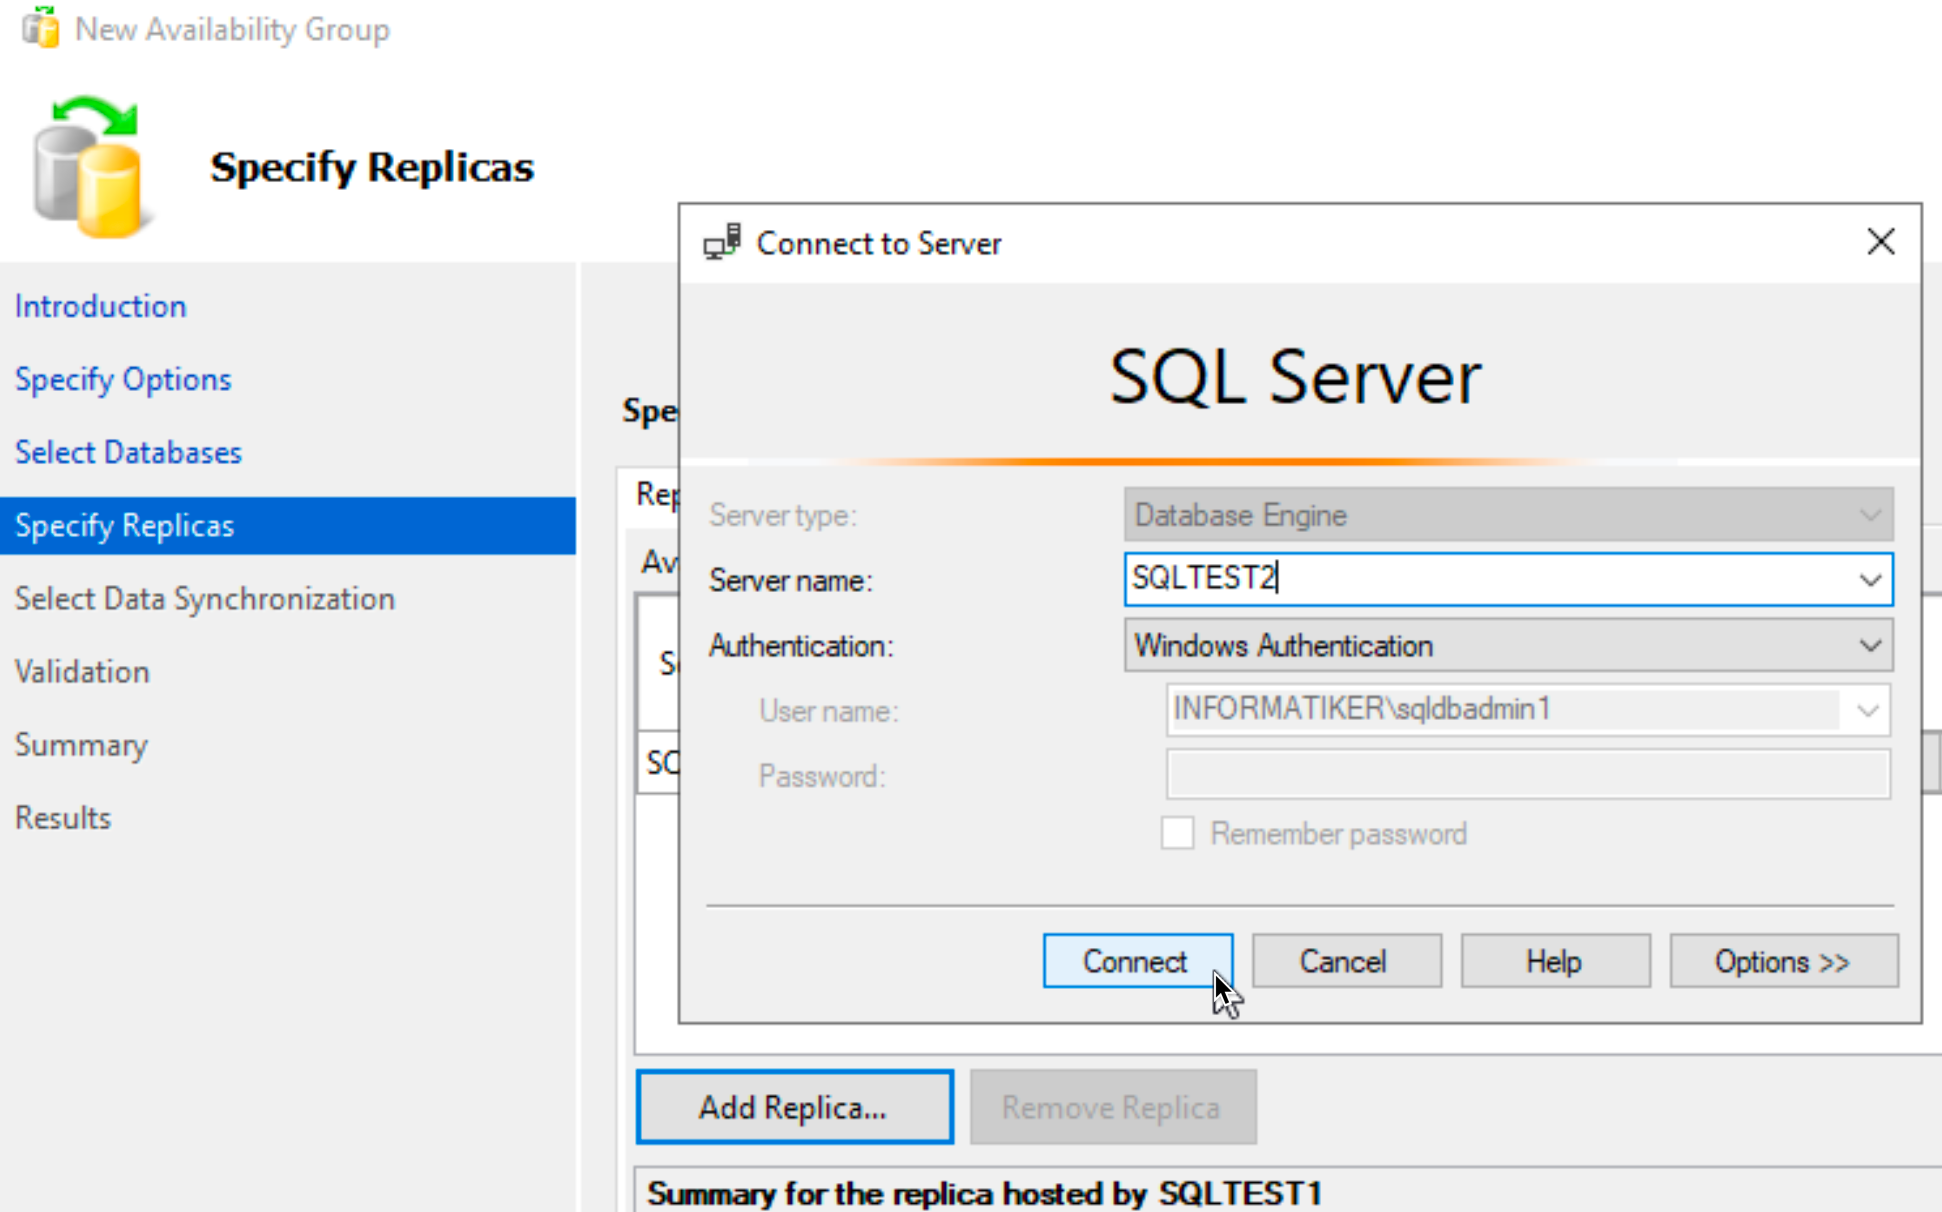
On Specify Replicas screen | on Replicas tab SBDB1 should be primary, we should click on Add Replica and add SBDB2 (SQLTEST2 depicted in screenshot).
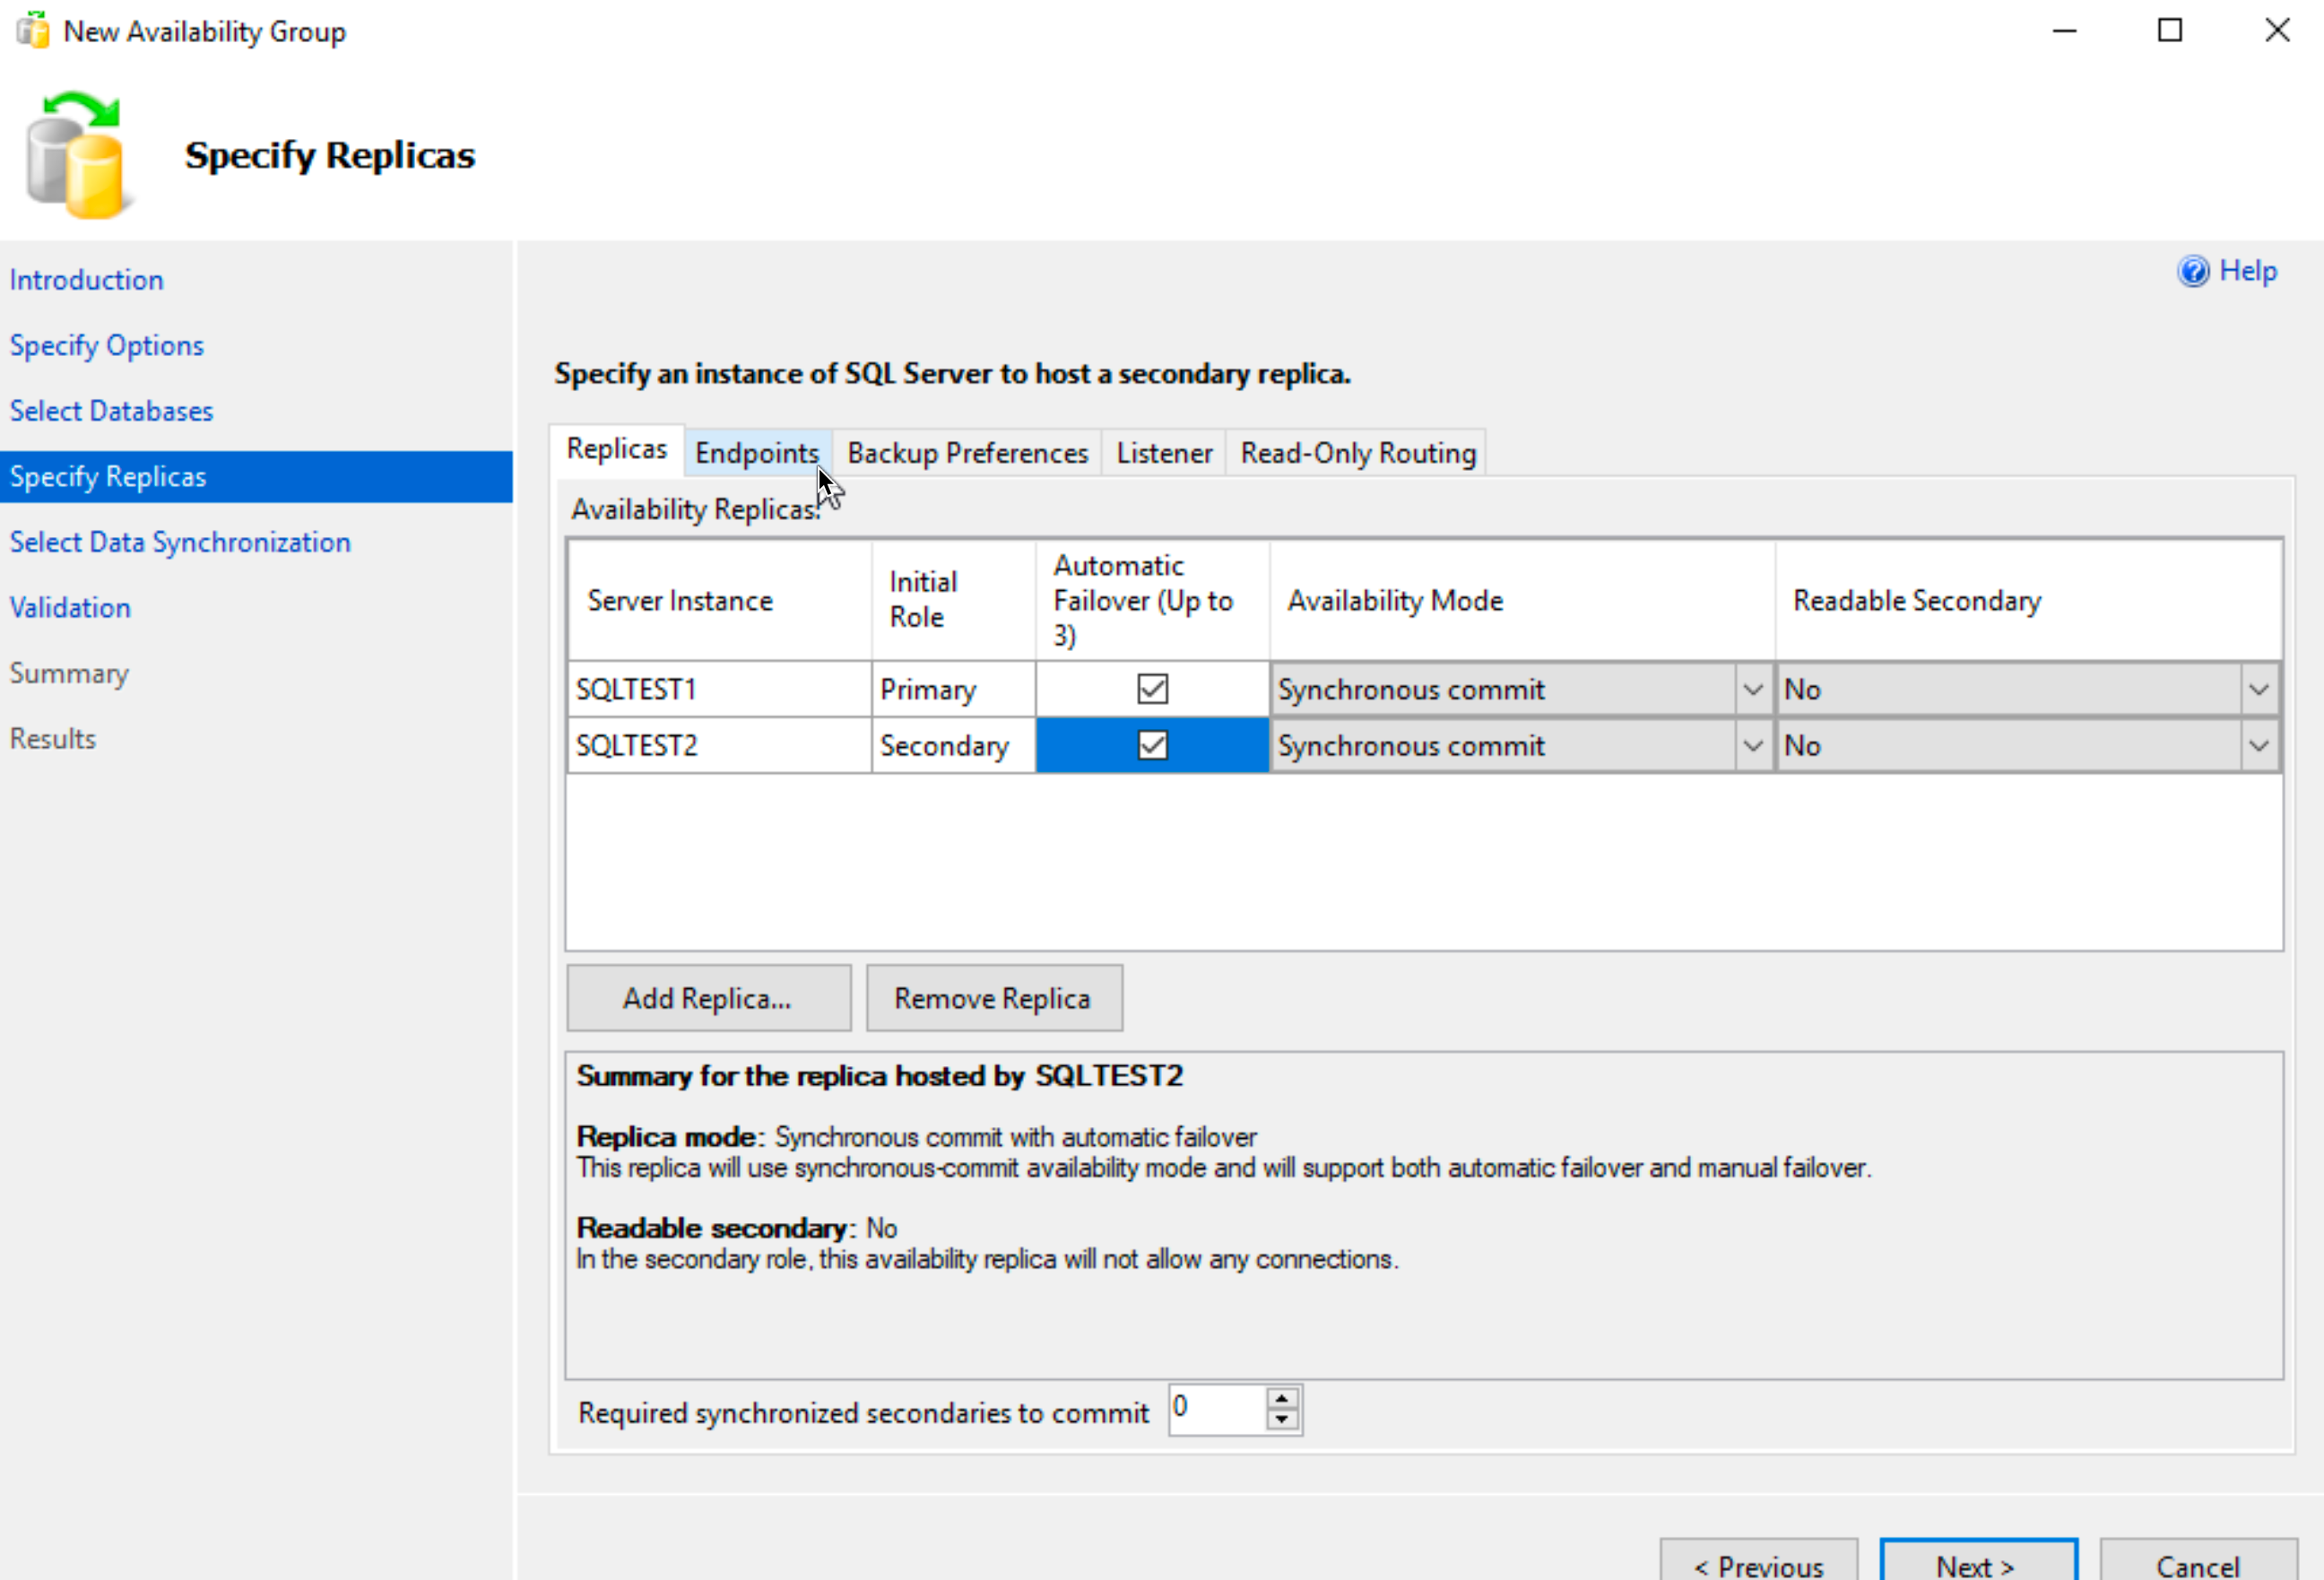
We now added both nodes as replicas, SBDB1 (SQLTEST1) is primary and SBDB2 (SQLTEST2) is secondary | Automatic Failover should be checked | Availability Mode should be Synchronous commit | Readable Secondary – No.
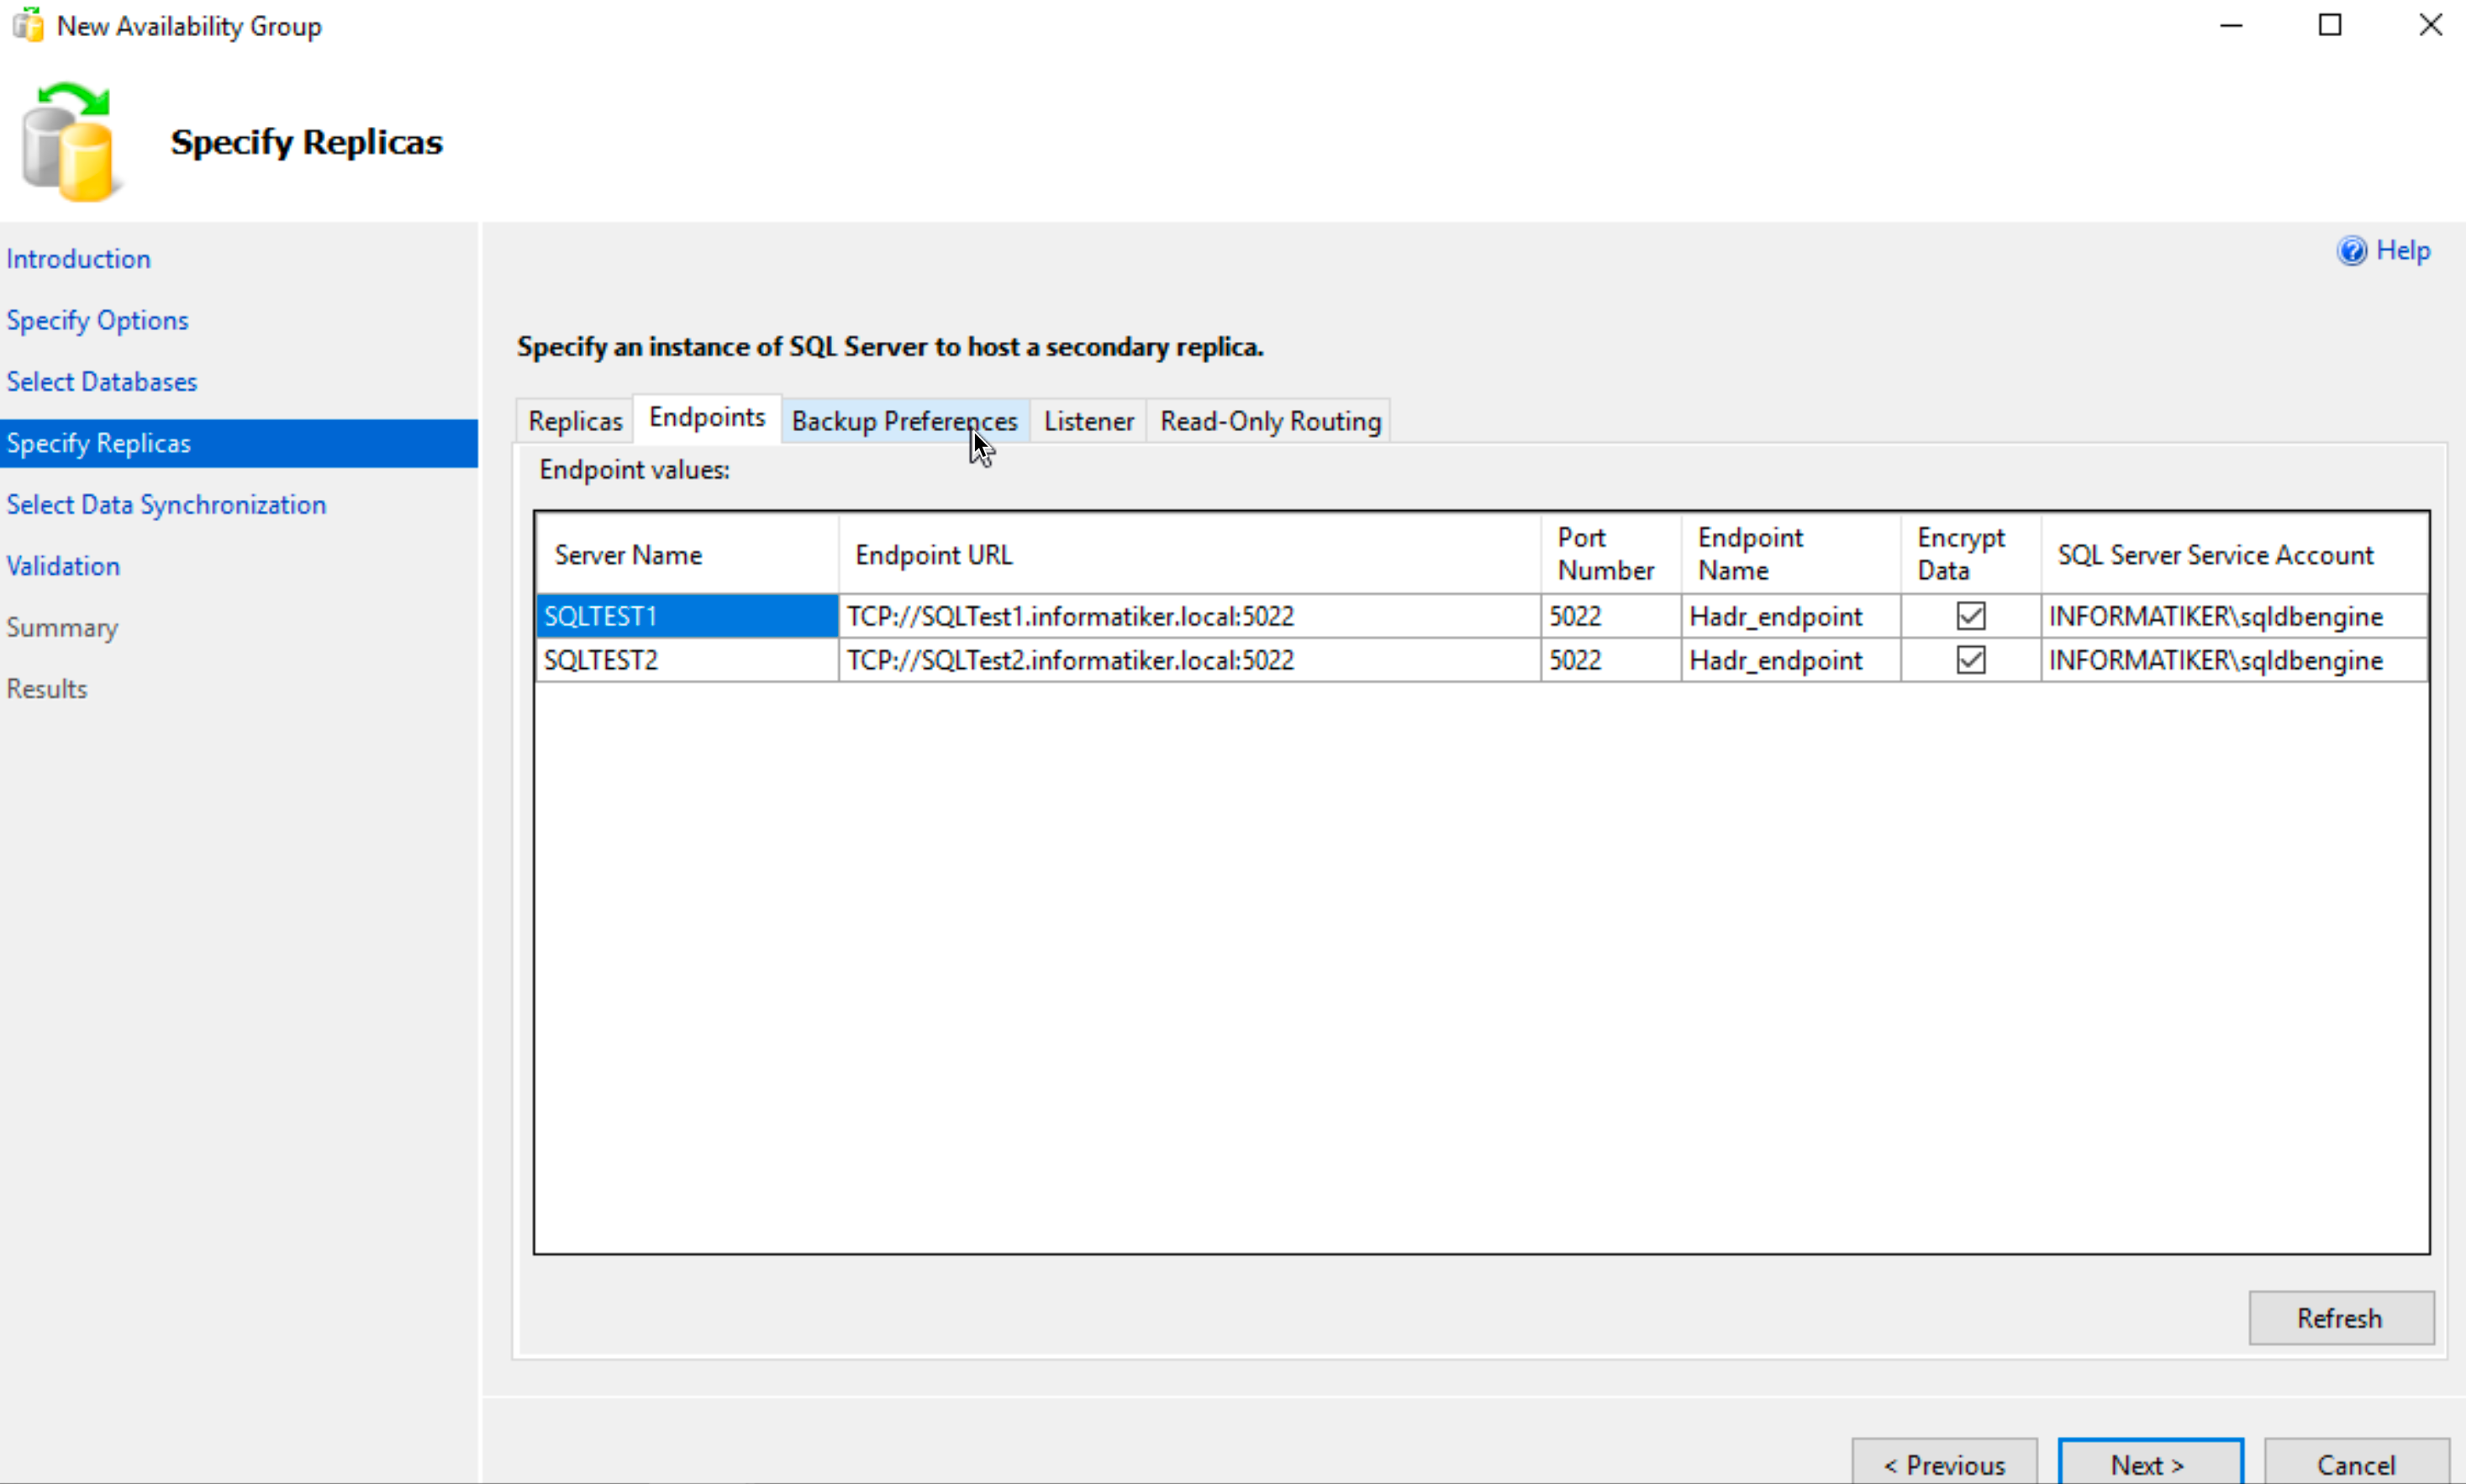
Click on Endpoints tab
On Endpoint tab, make sure Port Number is 5022 and everything else checks out. Next will be Backup Preferences tab
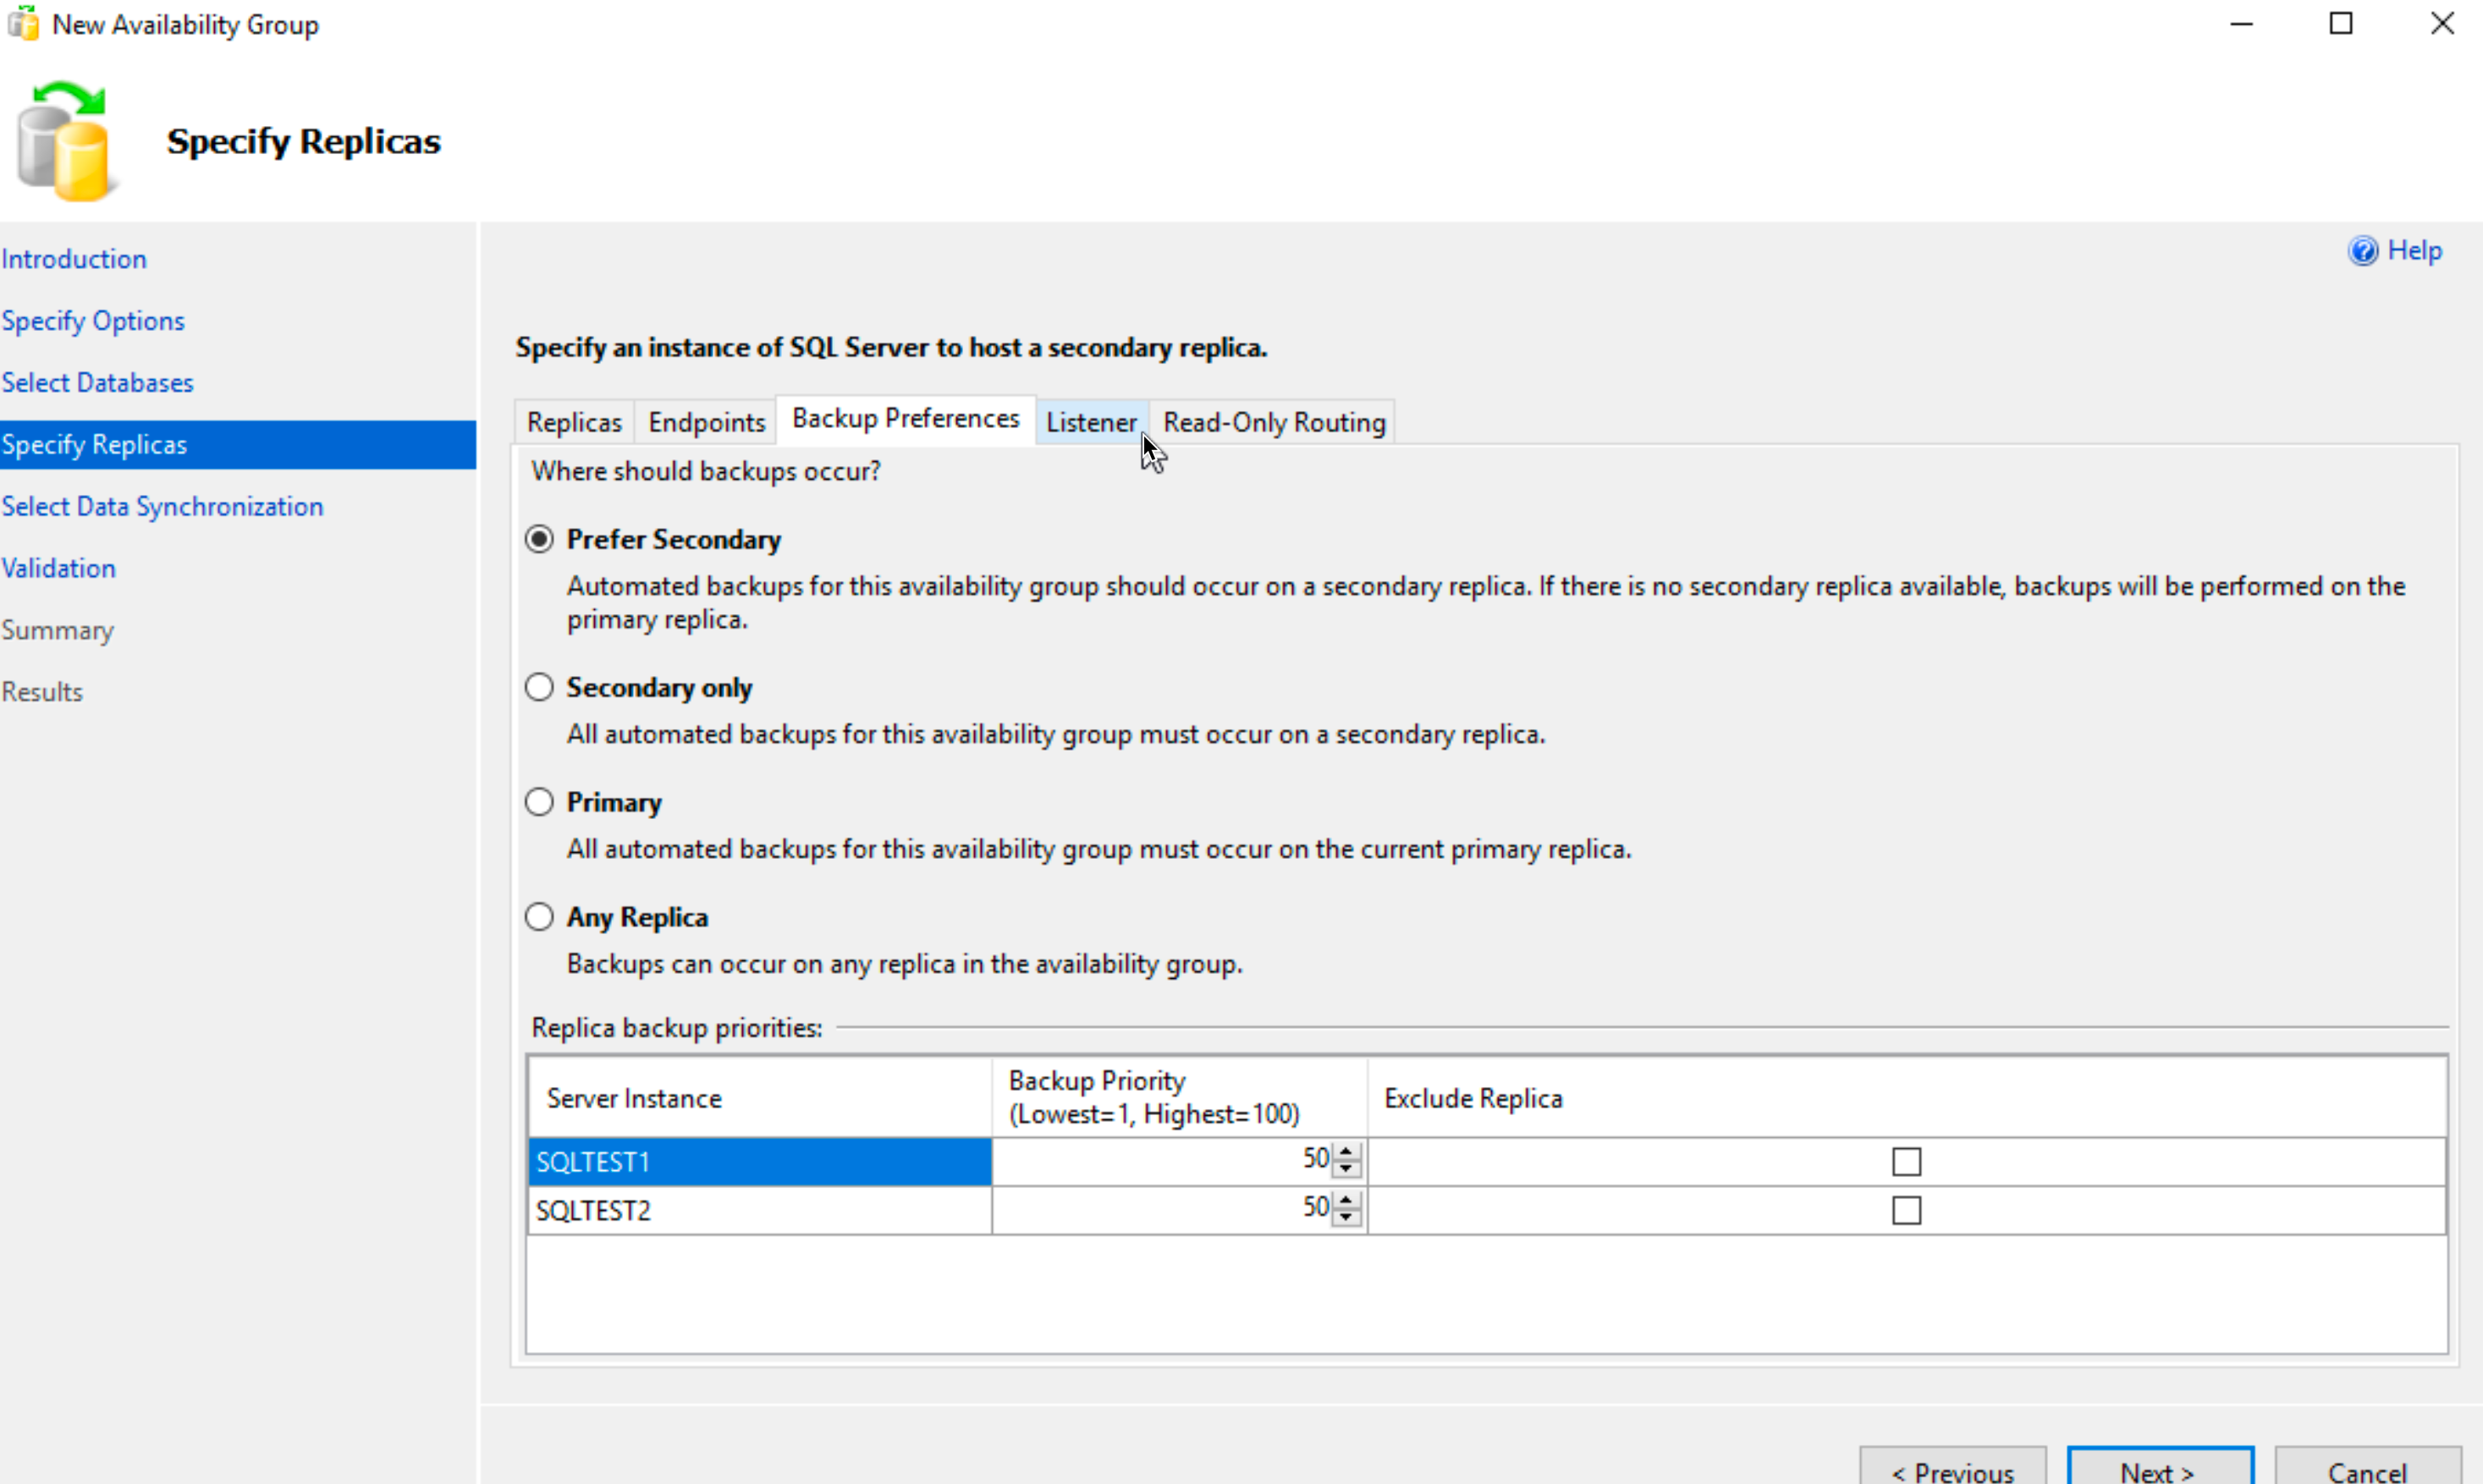
Backup Preferences tab – You should decide here according to your backup strategy and plans. I will leave prefer secondary, since it is logical in my case. Next – to Listener tab
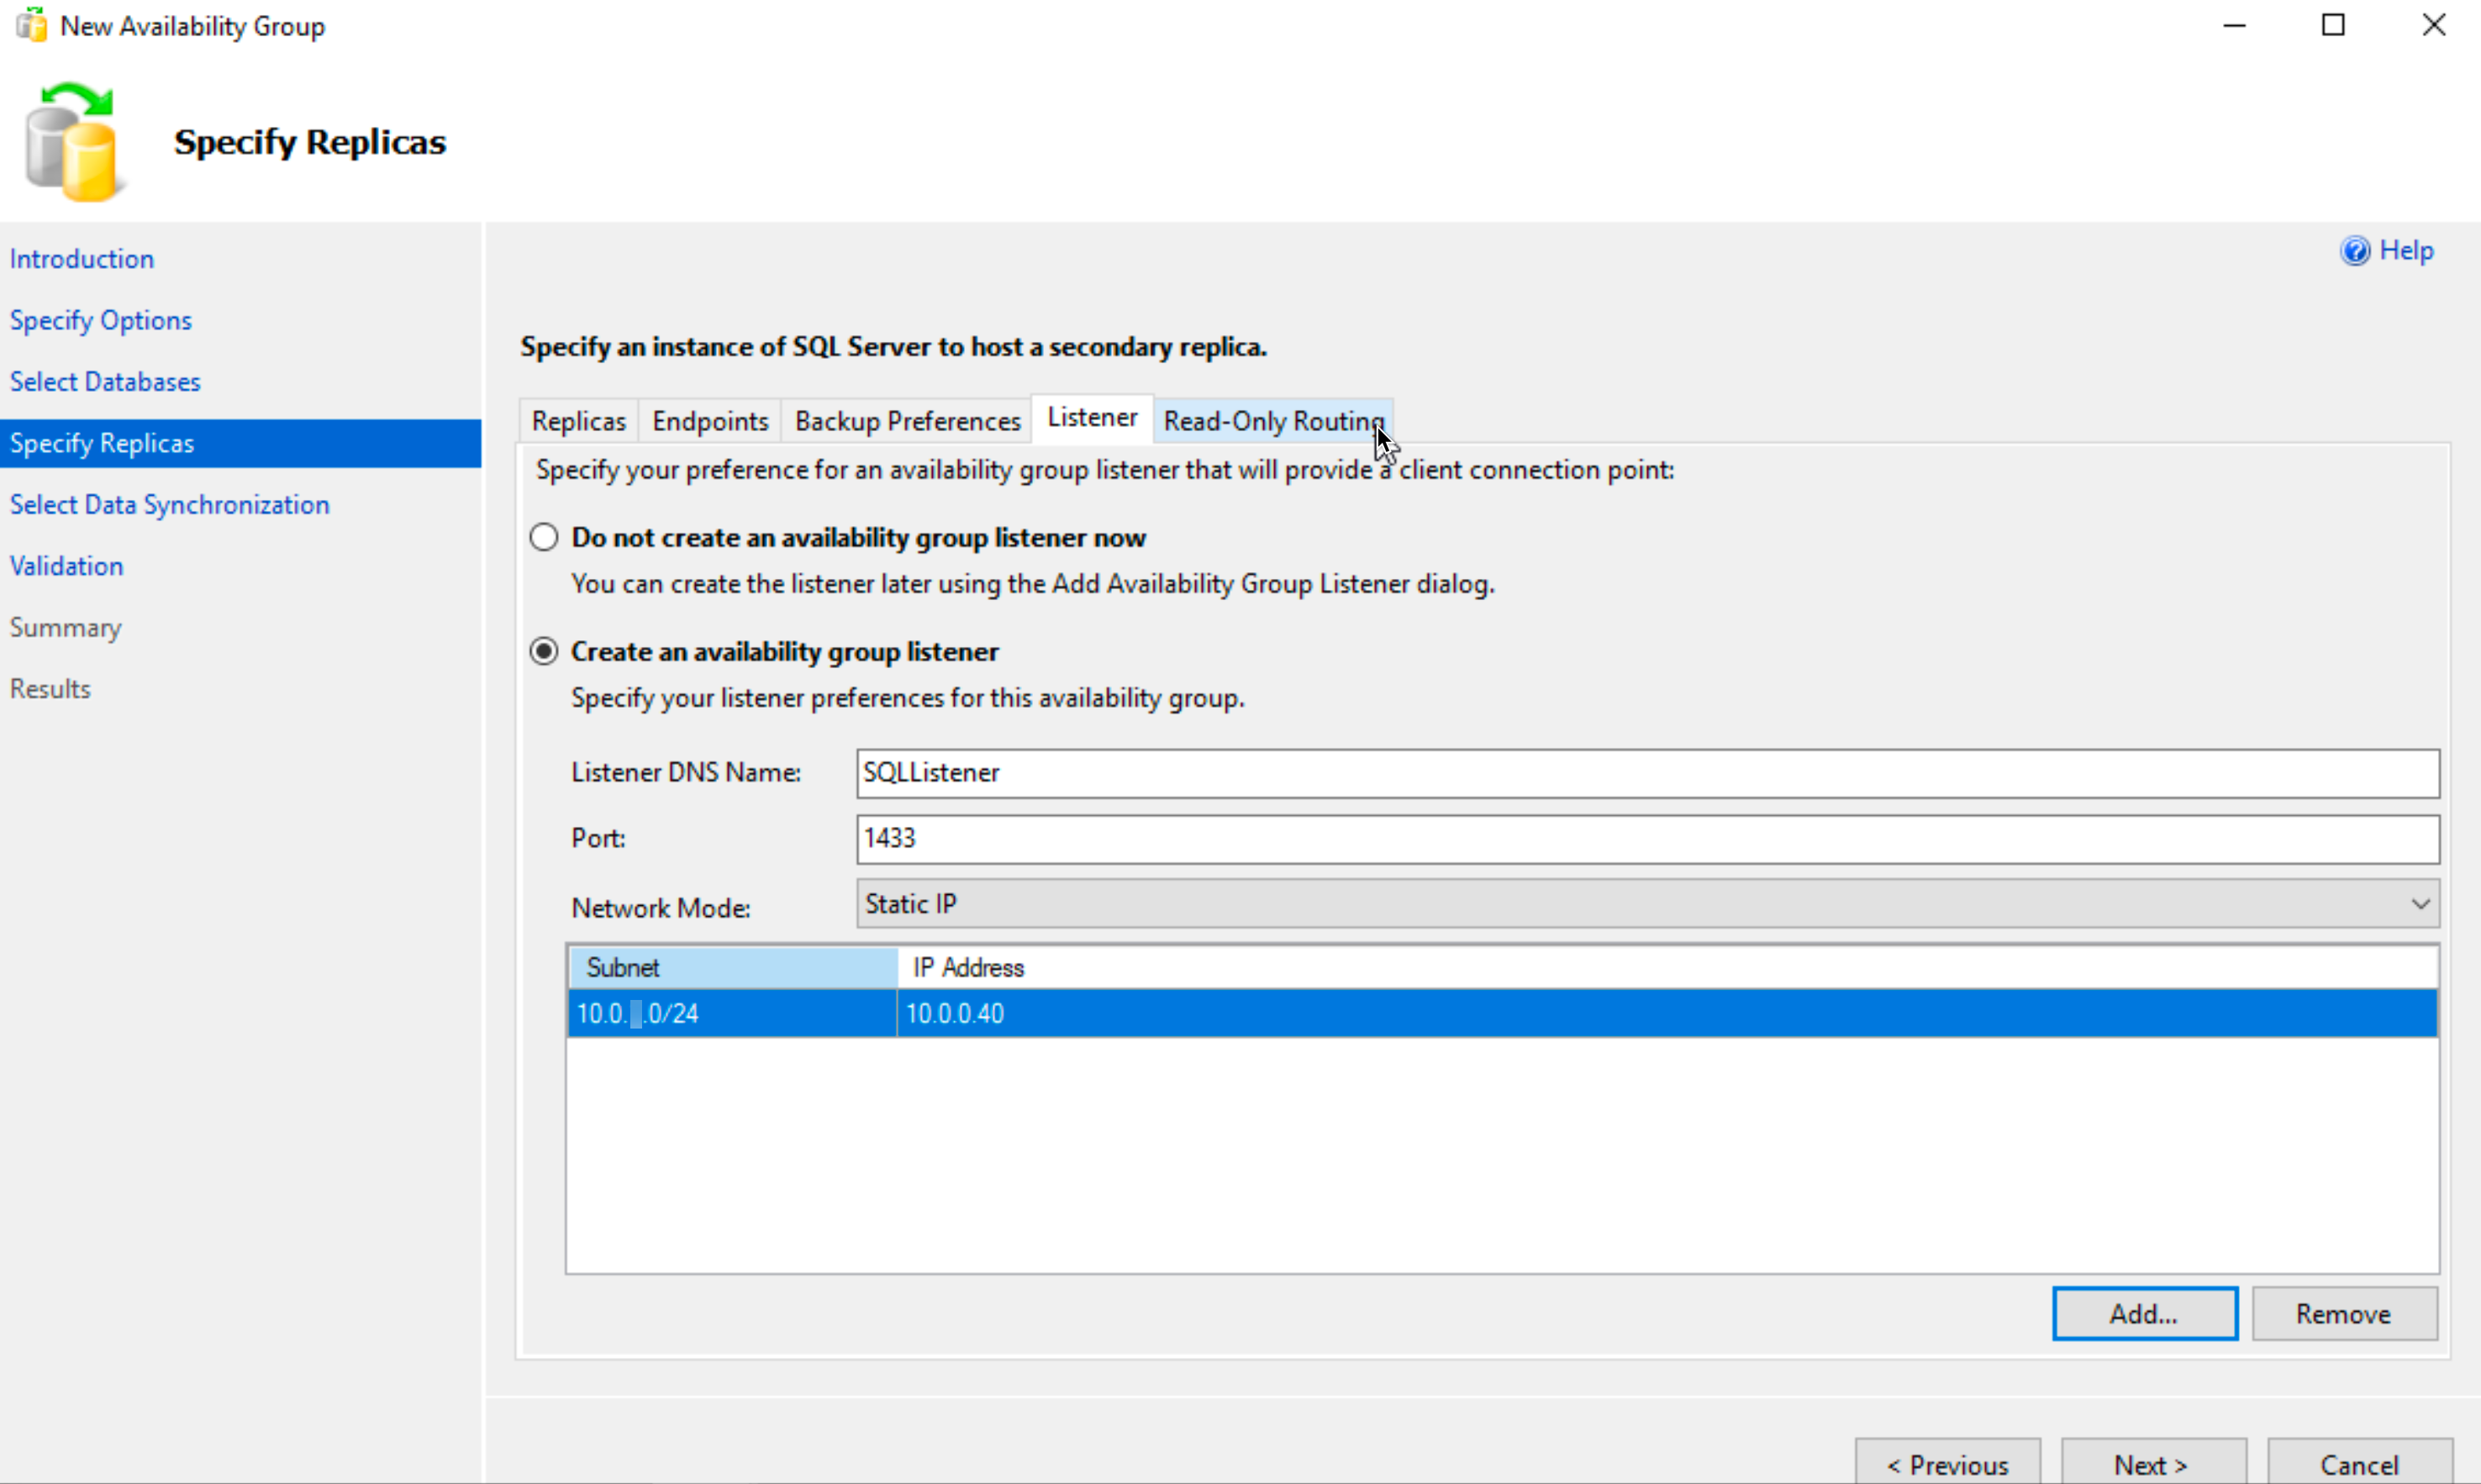
Listener Tab – important one, you can find many more details here – https://docs.microsoft.com/en-us/sql/database-engine/availability-groups/windows/availability-group-listener-overview?view=sql-server-ver15
Basically, we will define name for our SQL and IP address through which client will be able to reach our SQL. Clients won’t need to know IP addresses of the DB1 or DB2 server, they can access services through listener name\IP. This is very convenient, since DB1 or DB2 can be down, and it won’t affect clients.
For a port enter 1433.
Again, if you are running this same as I am – with account that is only domain user – your listener setup will probably fail. Have a look at top of this configuration portion of the guide, to see what you have to do in AD. If you are running this with domain admin account, you can ignore this advice.
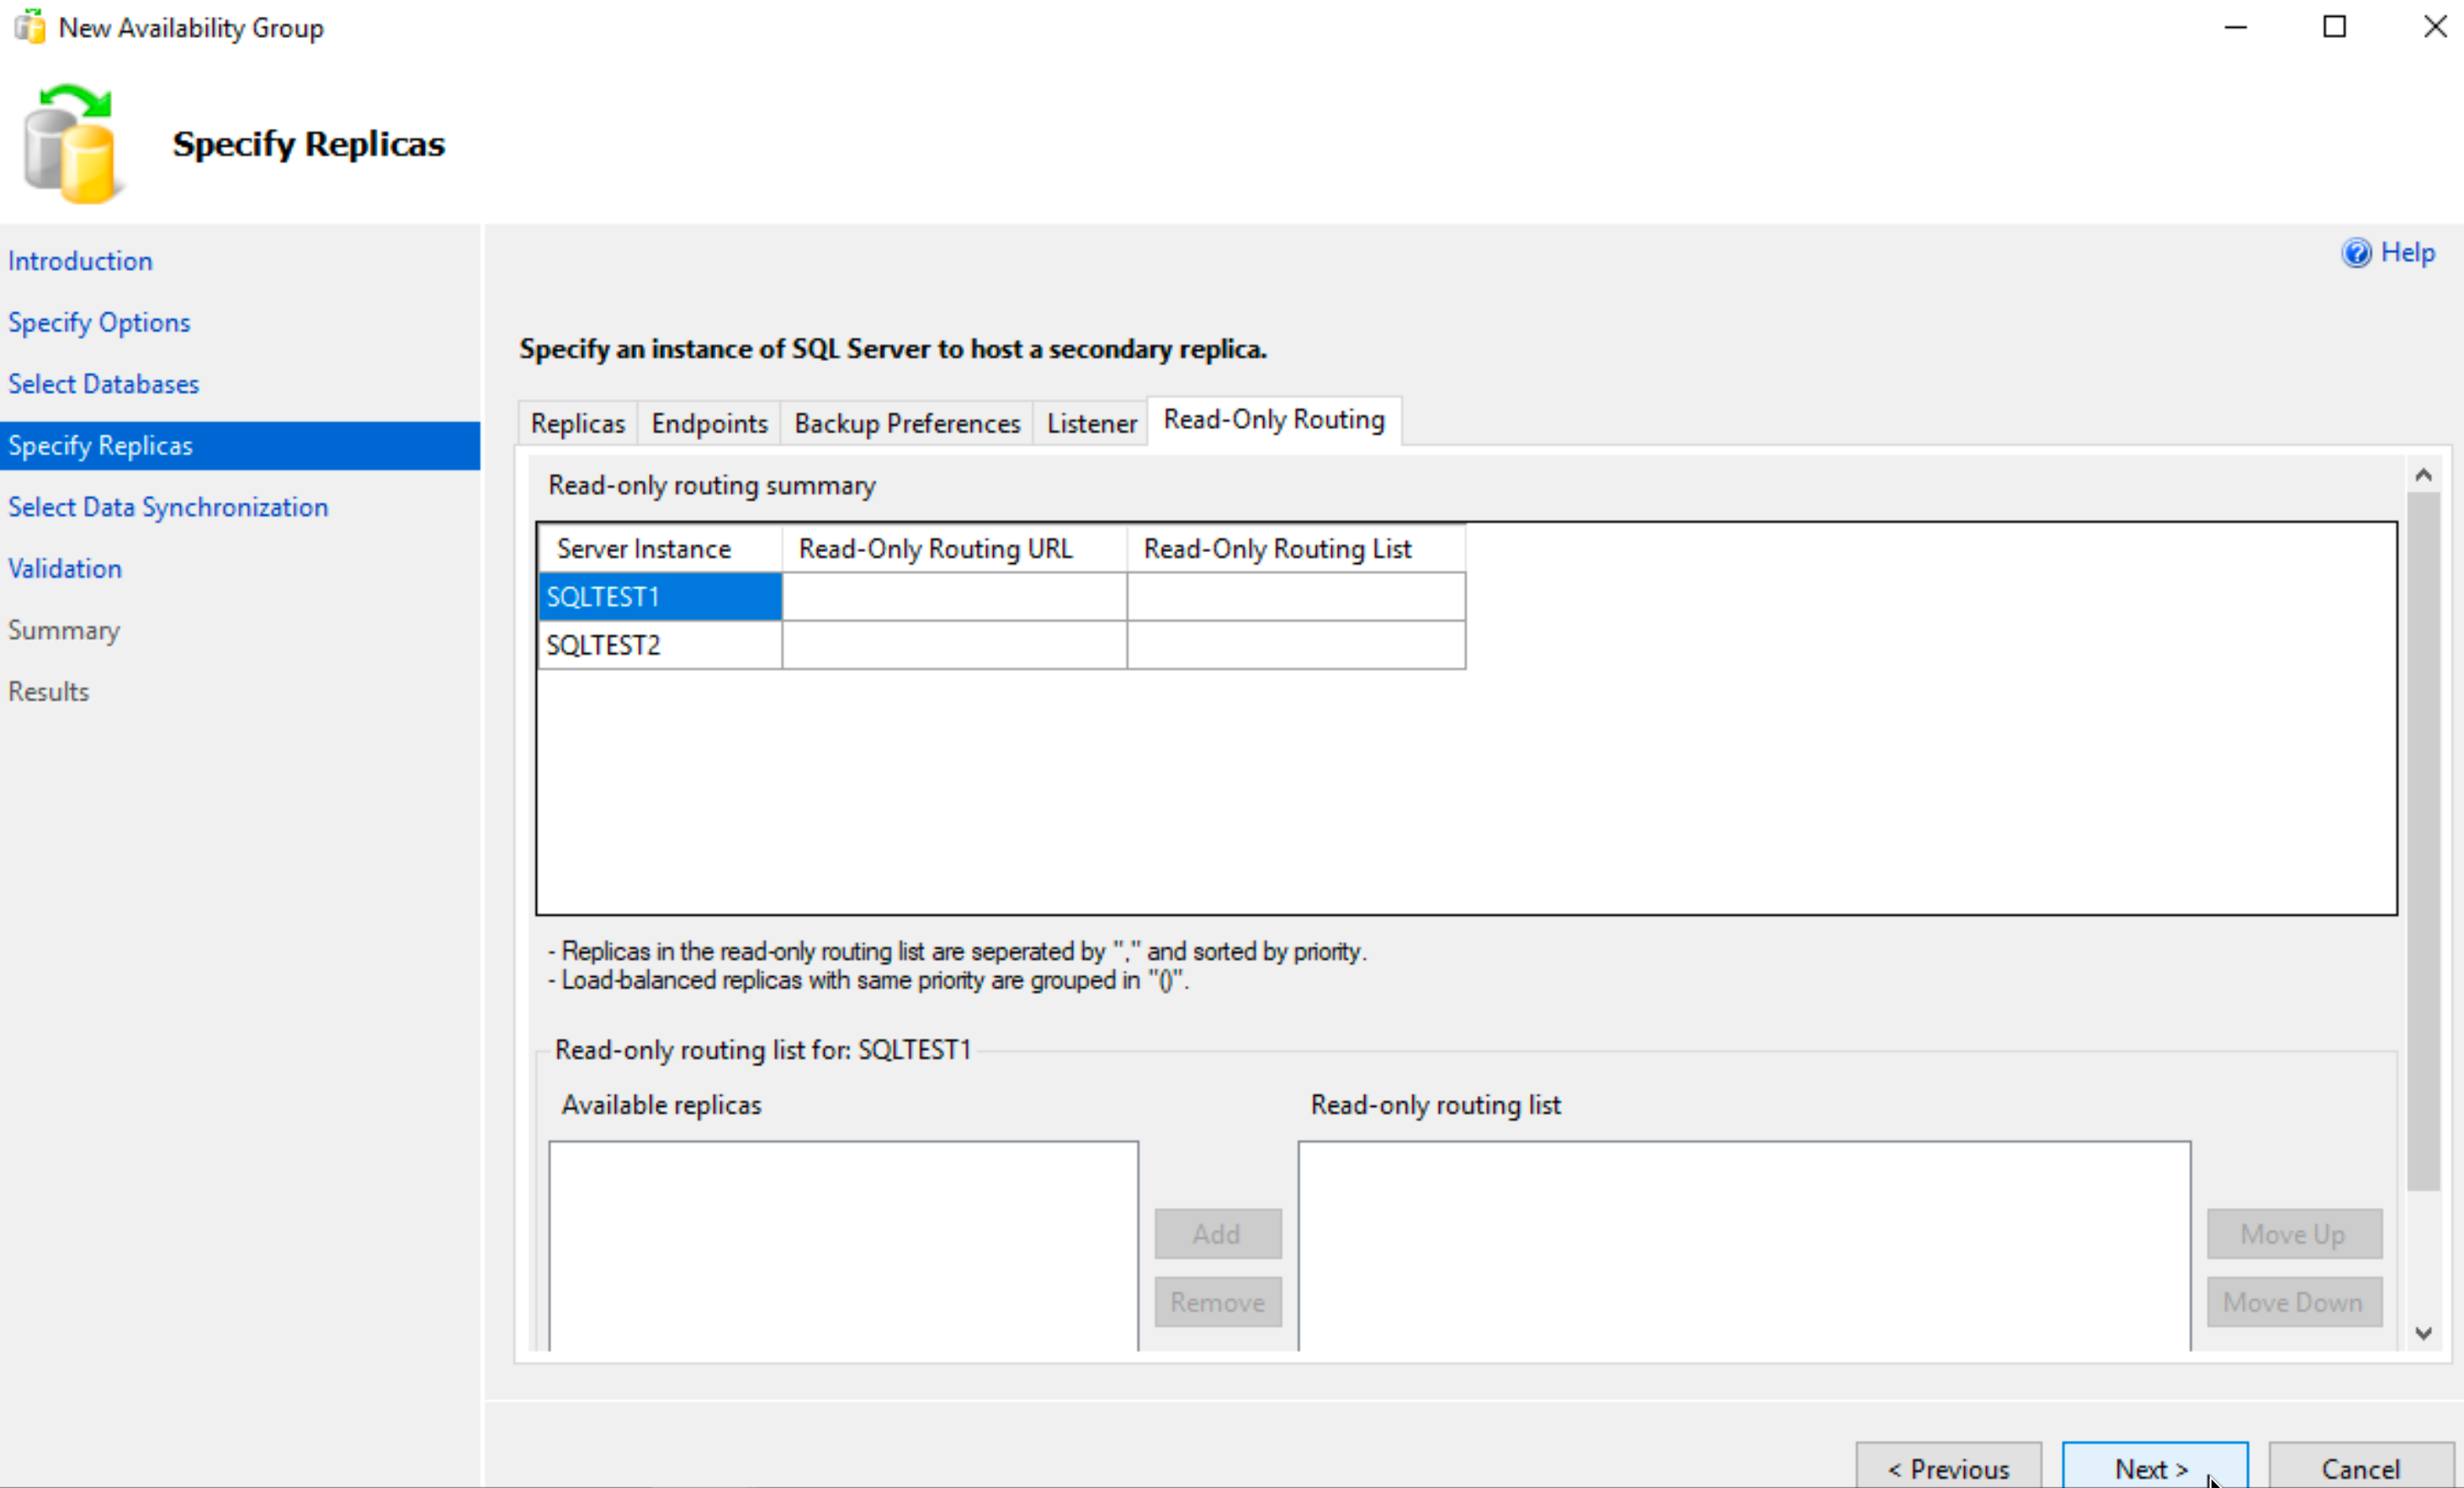
Read-Only Routing will be left as is | Next
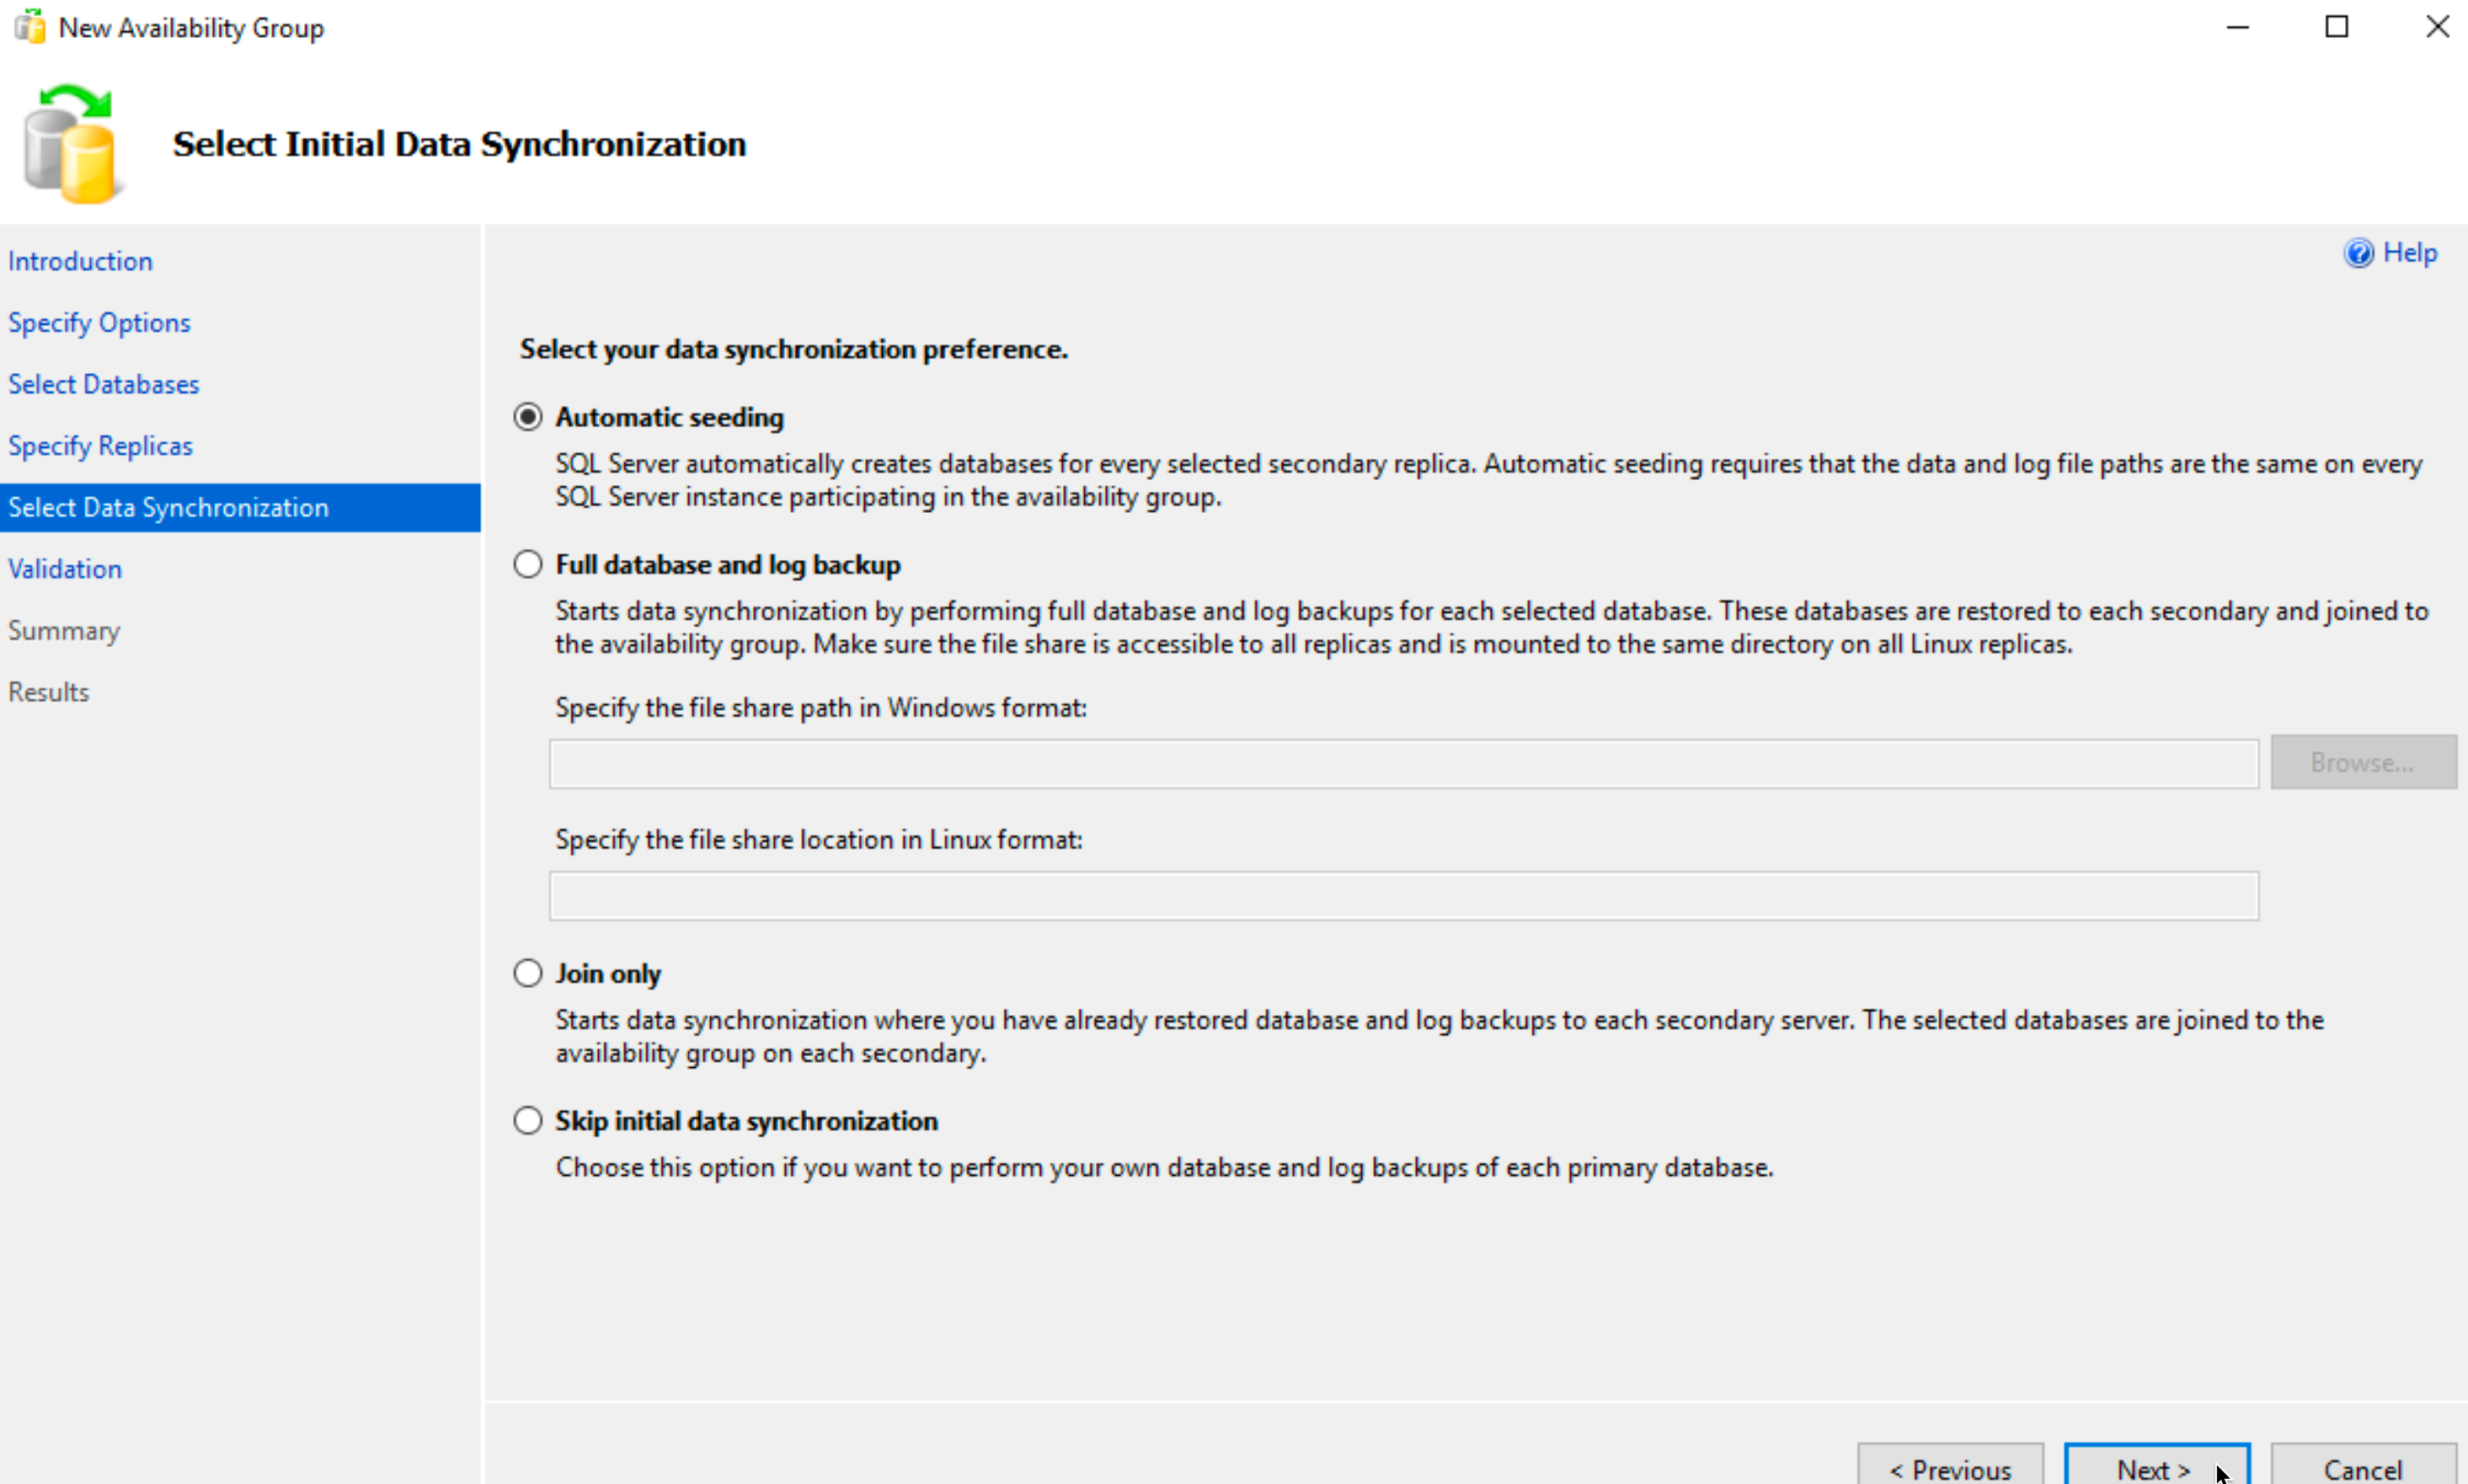
Ok, if we done everything correctly so far, we will be able to use automatic seeding. I’ve done everything in the same way on both servers (file paths, directory names, drive sizes…) We’ll see how this goes. Next
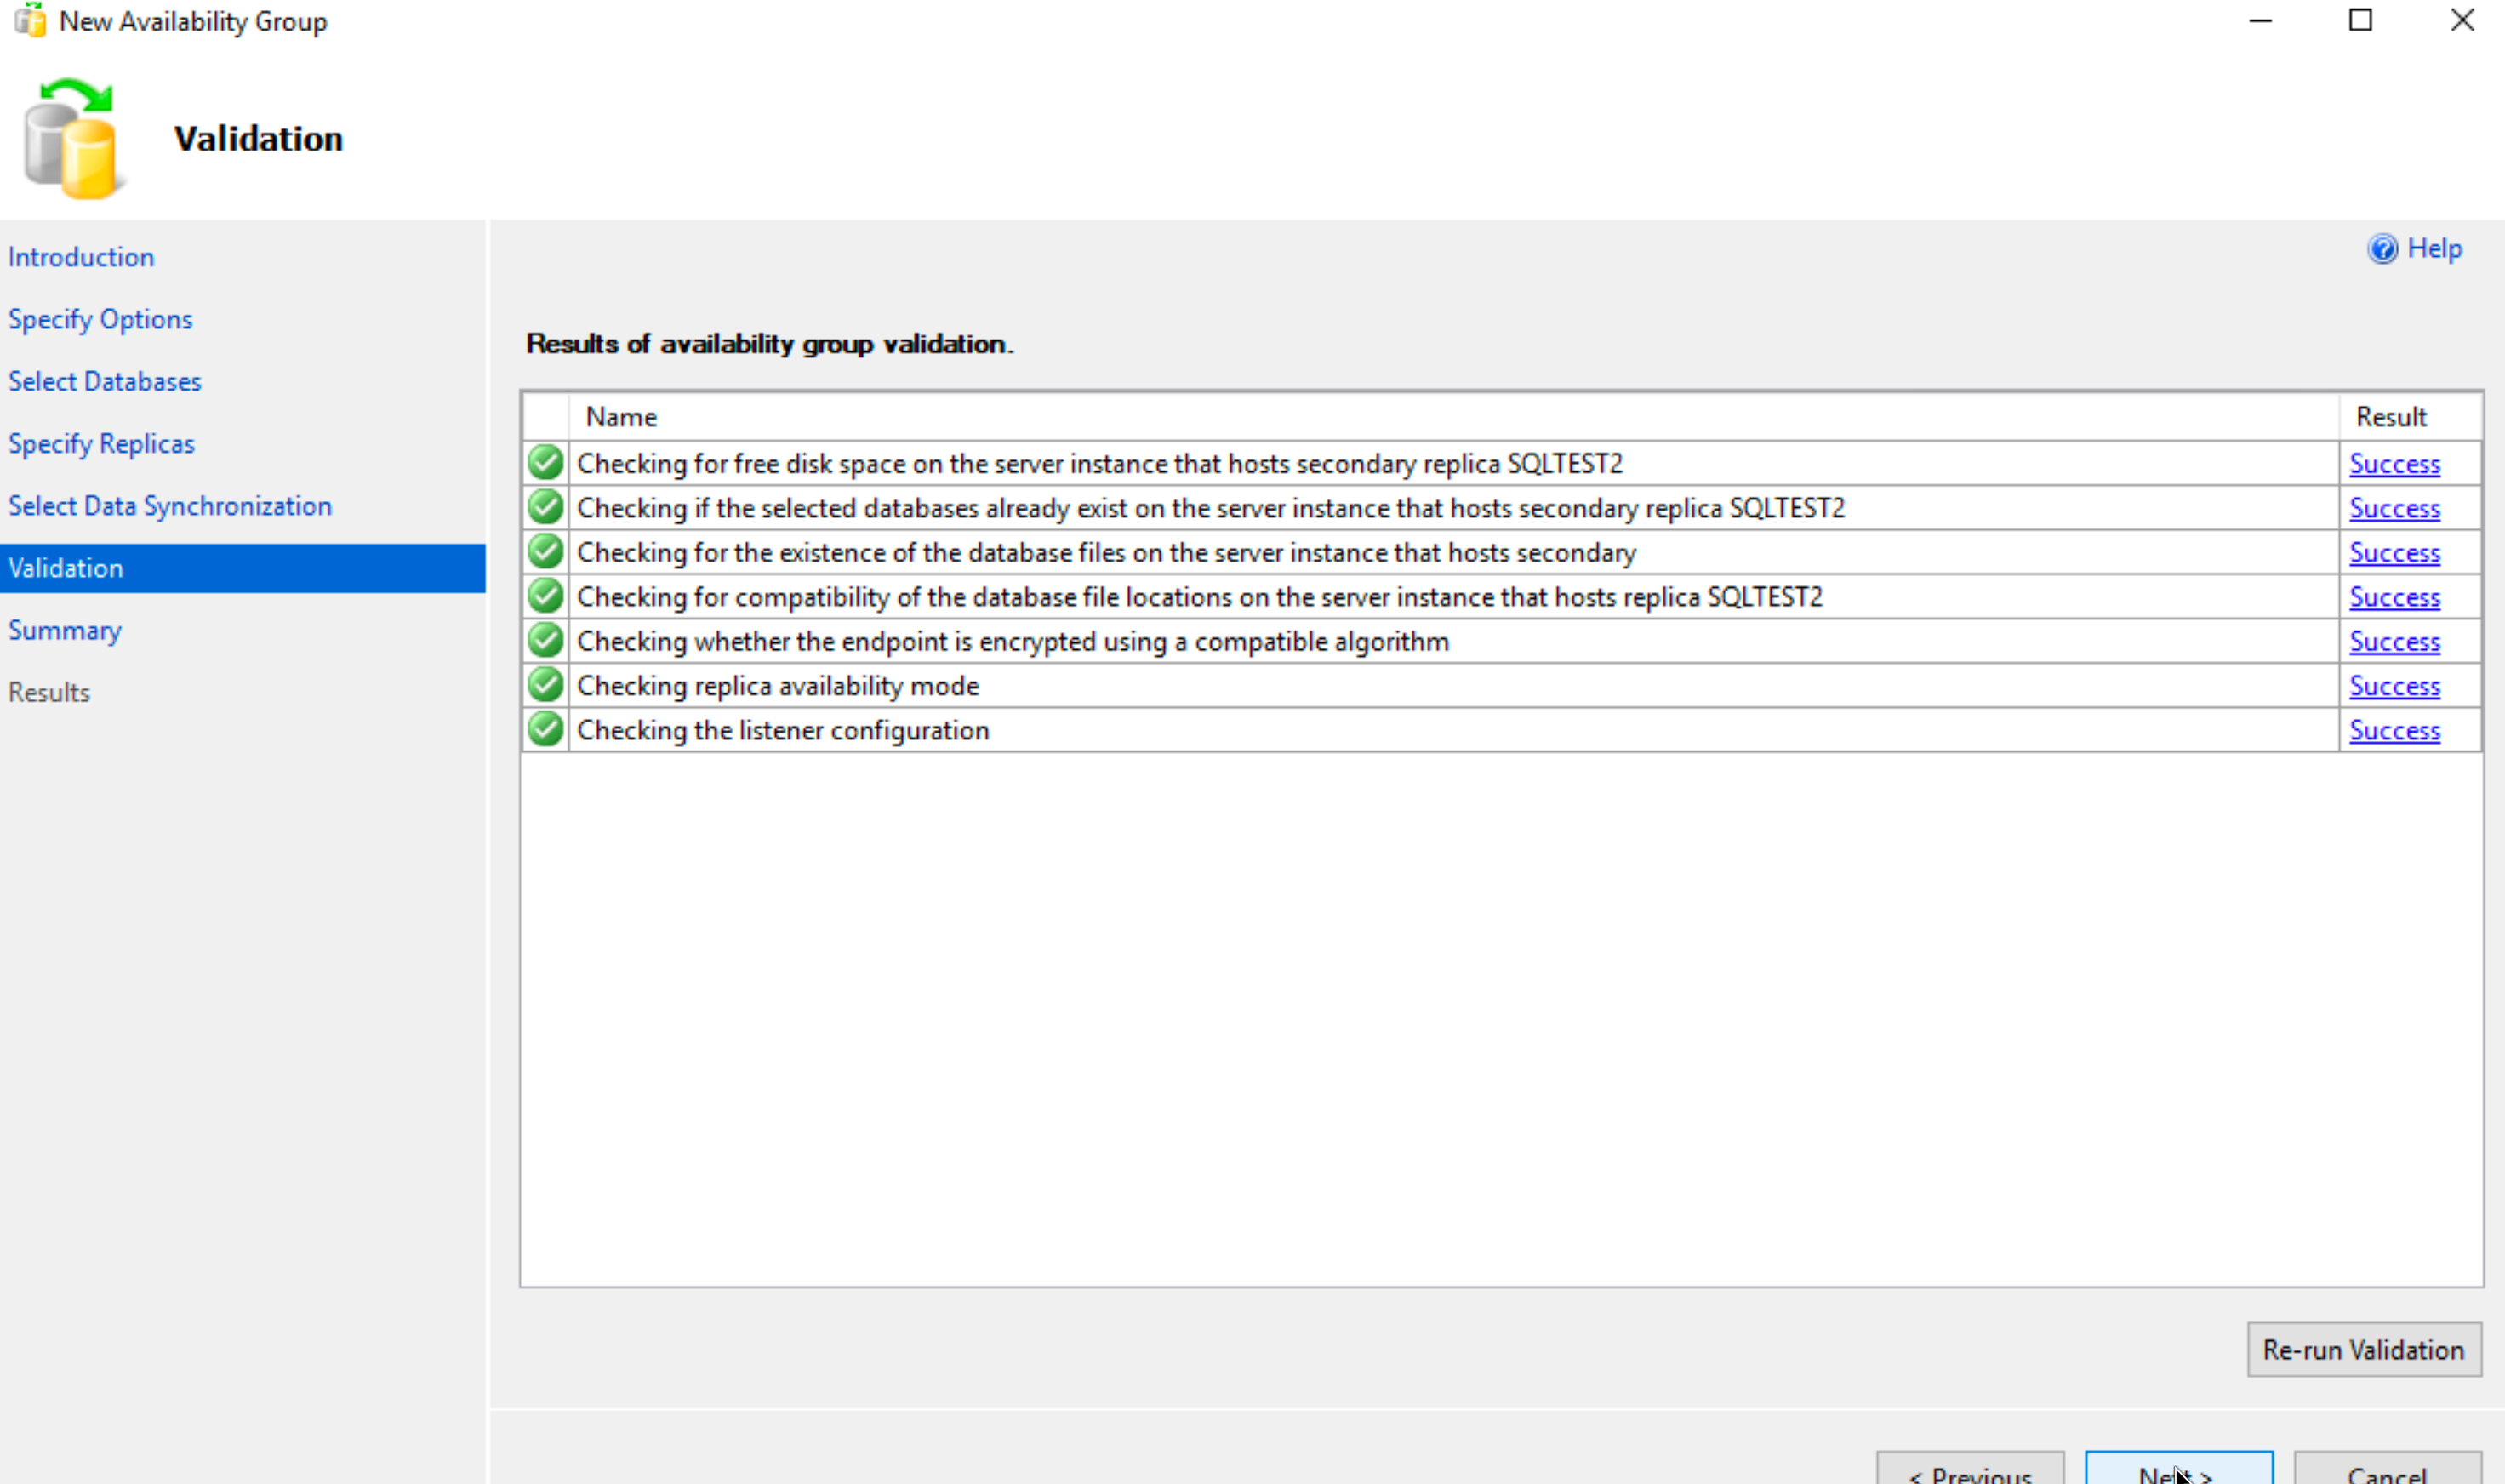
We passed flawlessly our validation test and SBDB2 (SQLTEST2) is good to go. Next
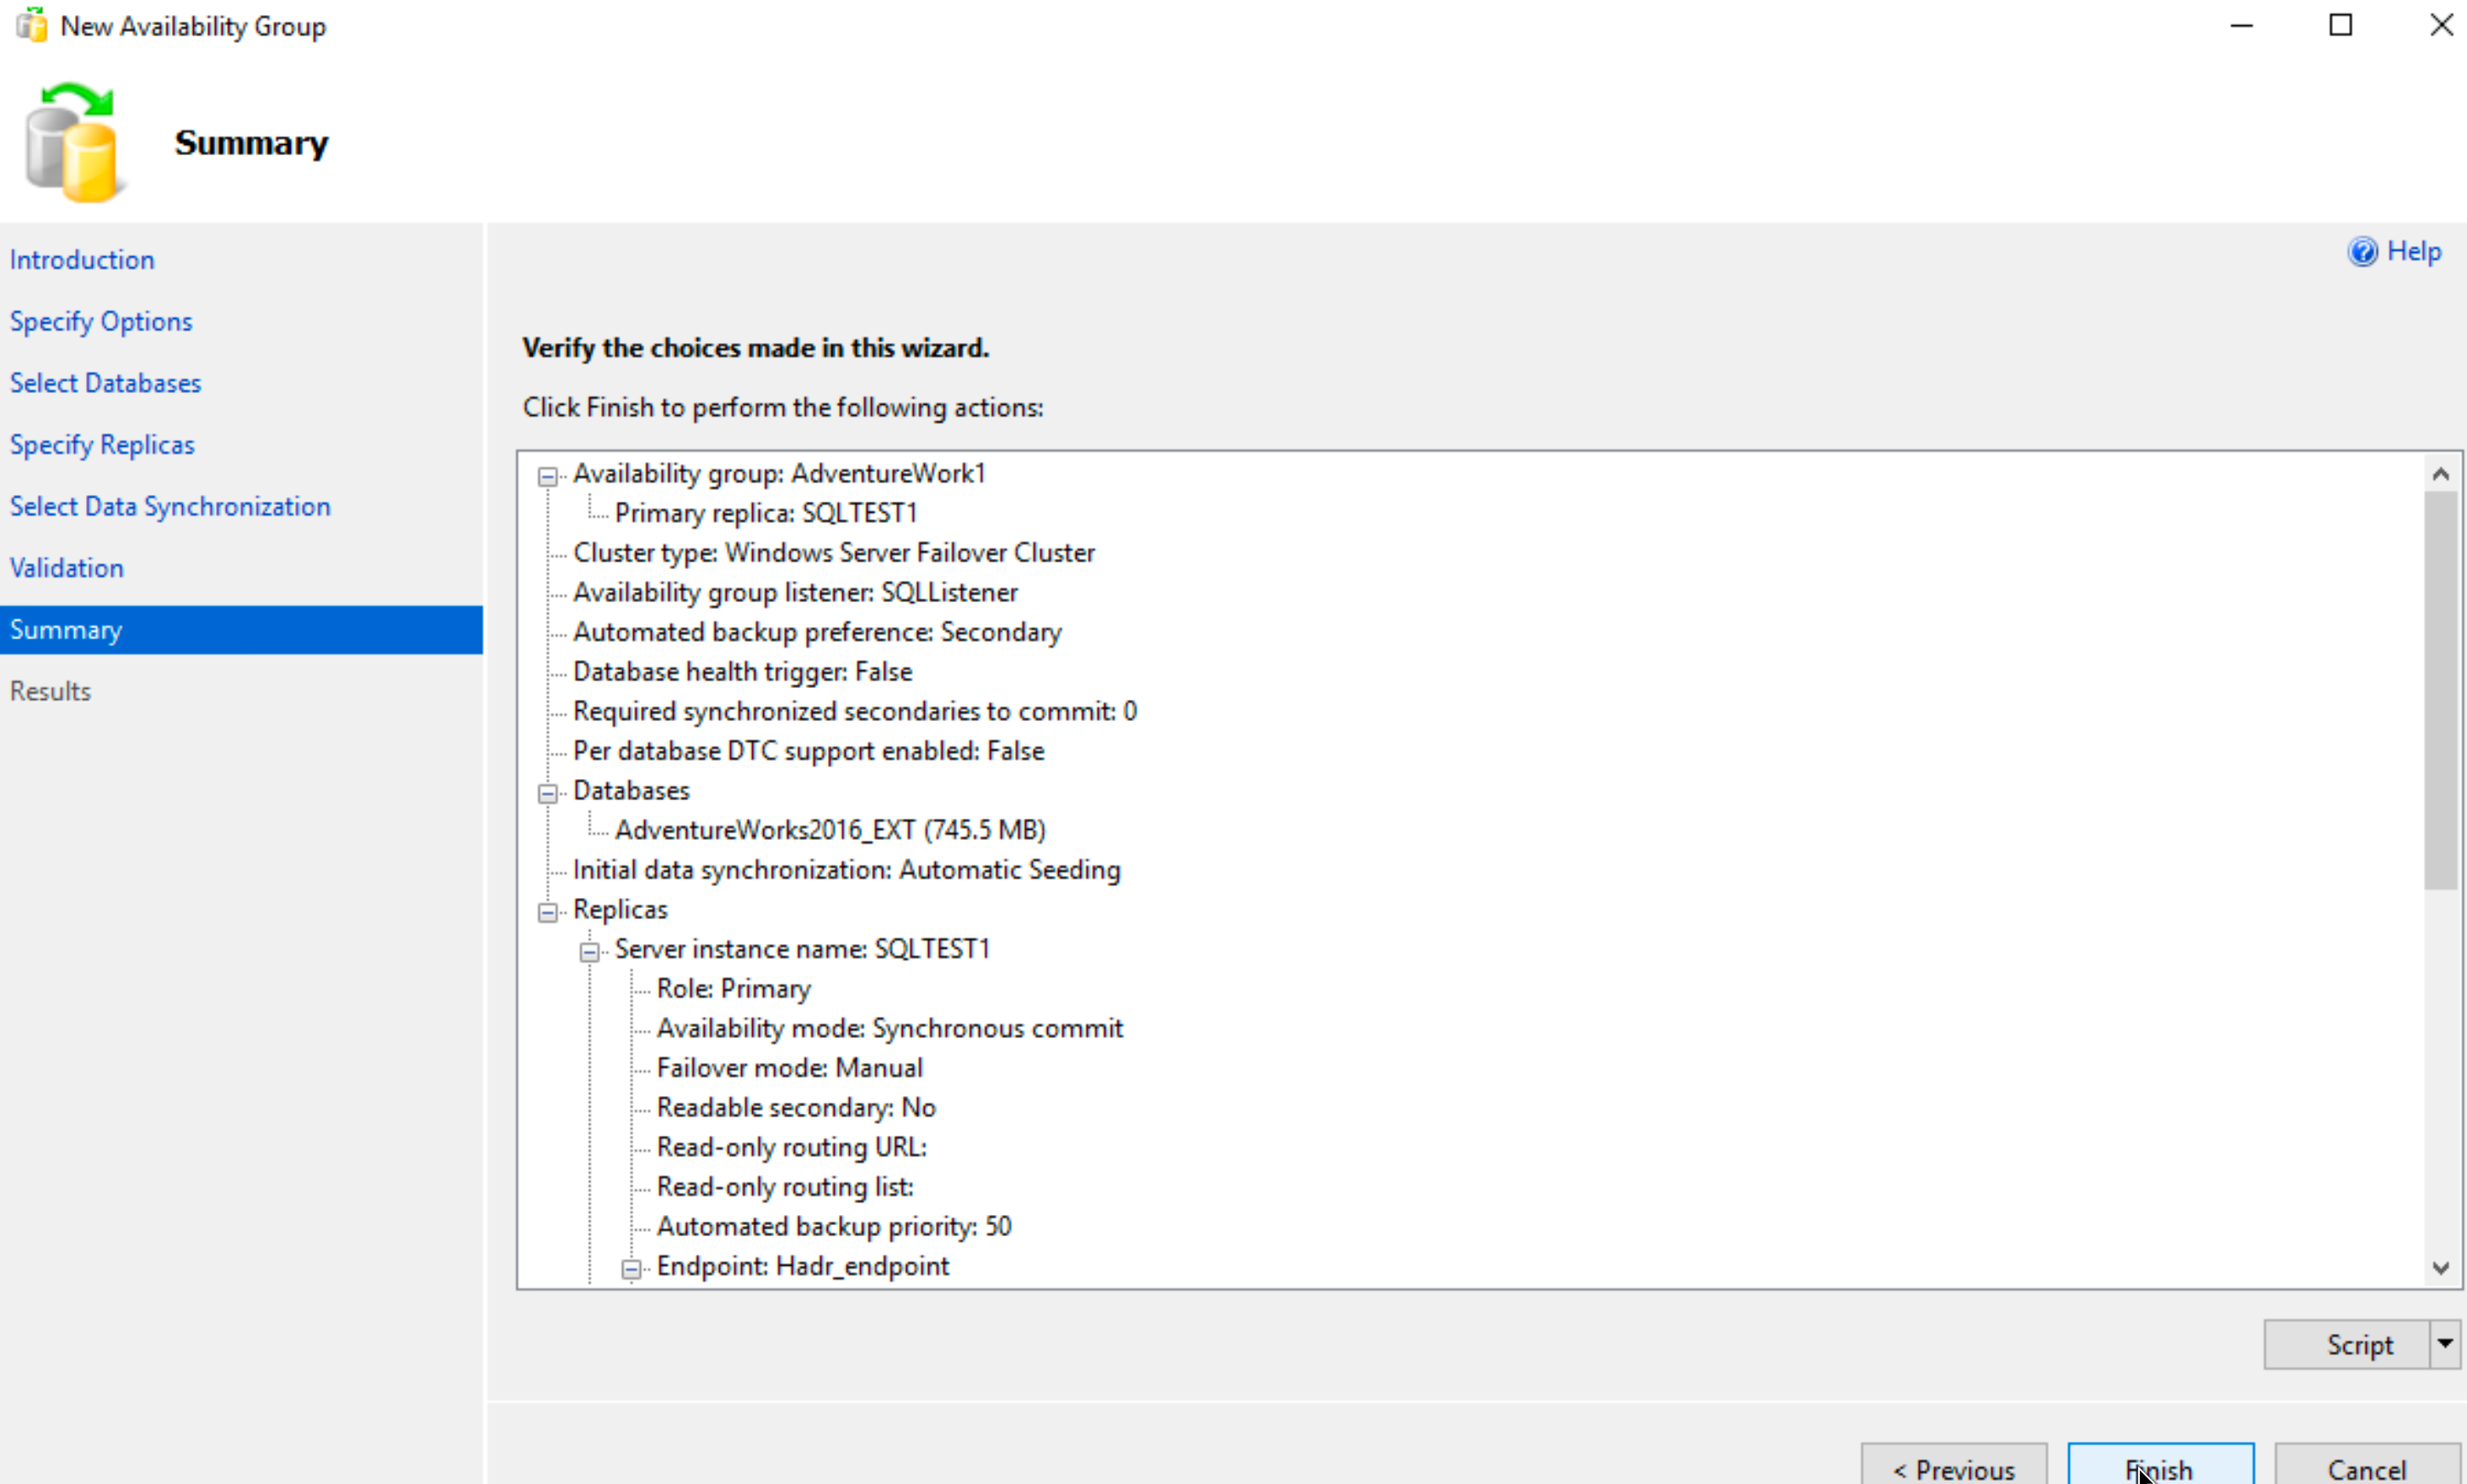
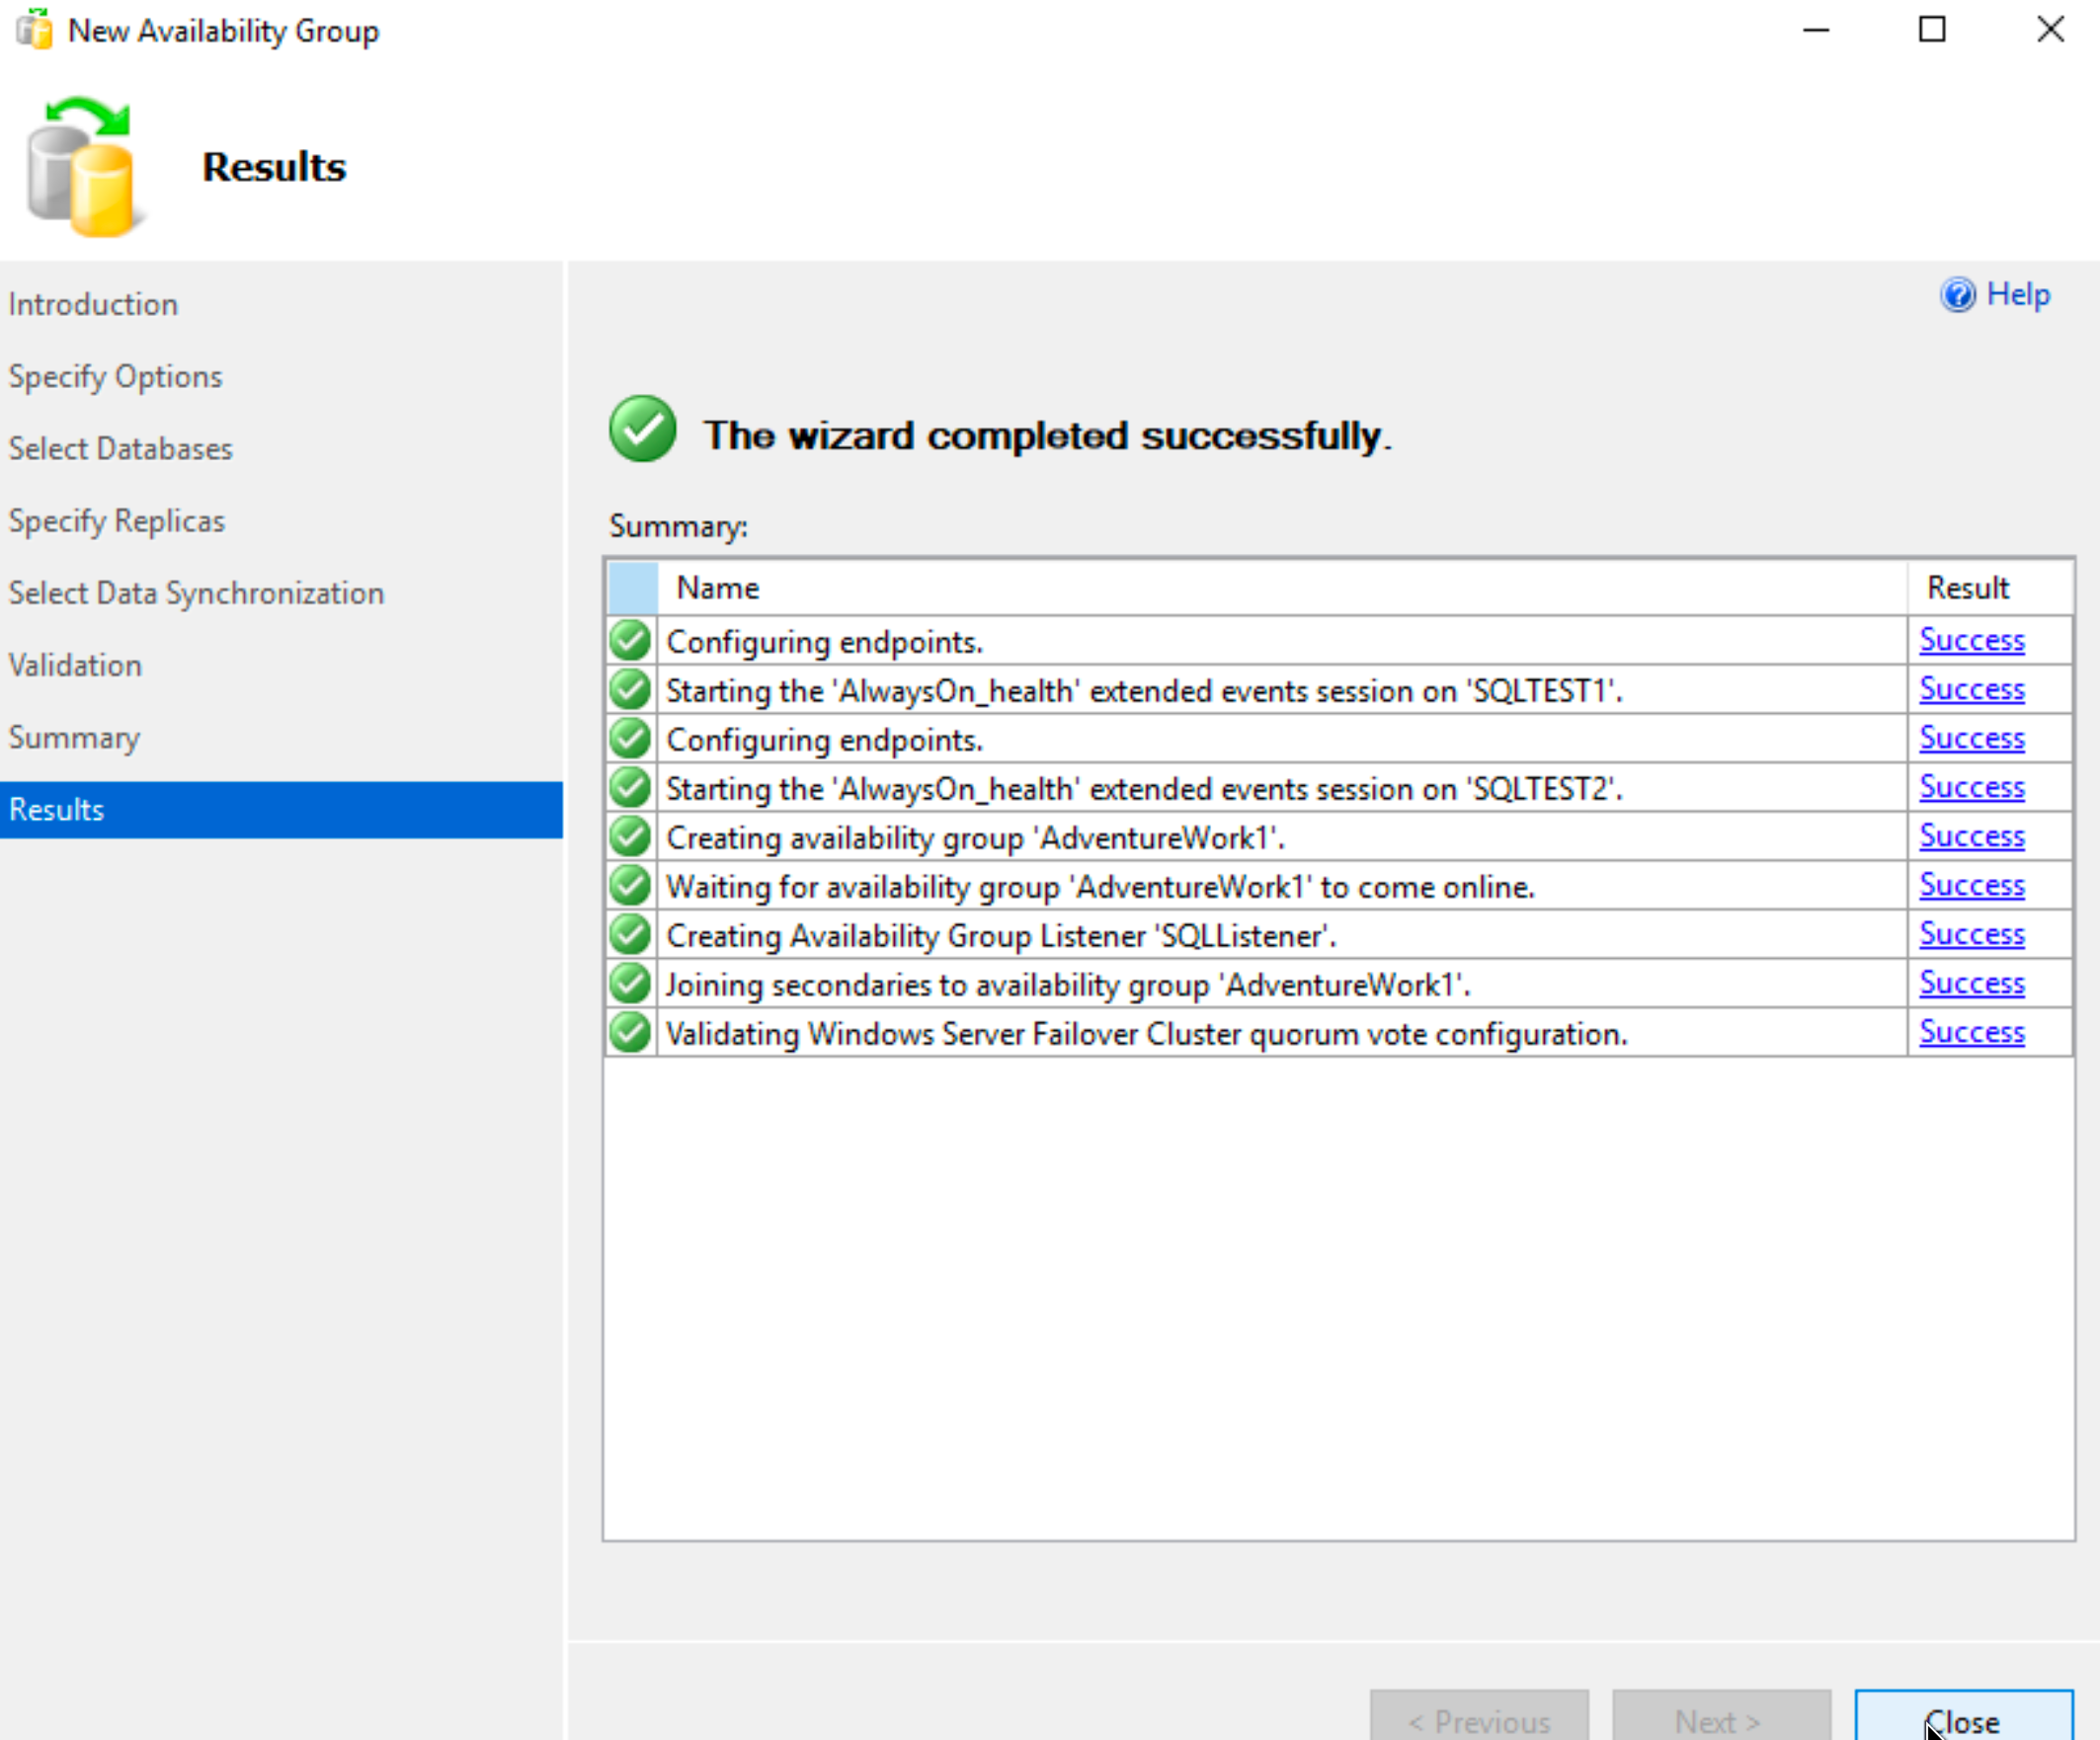
Check your script | Finish
…
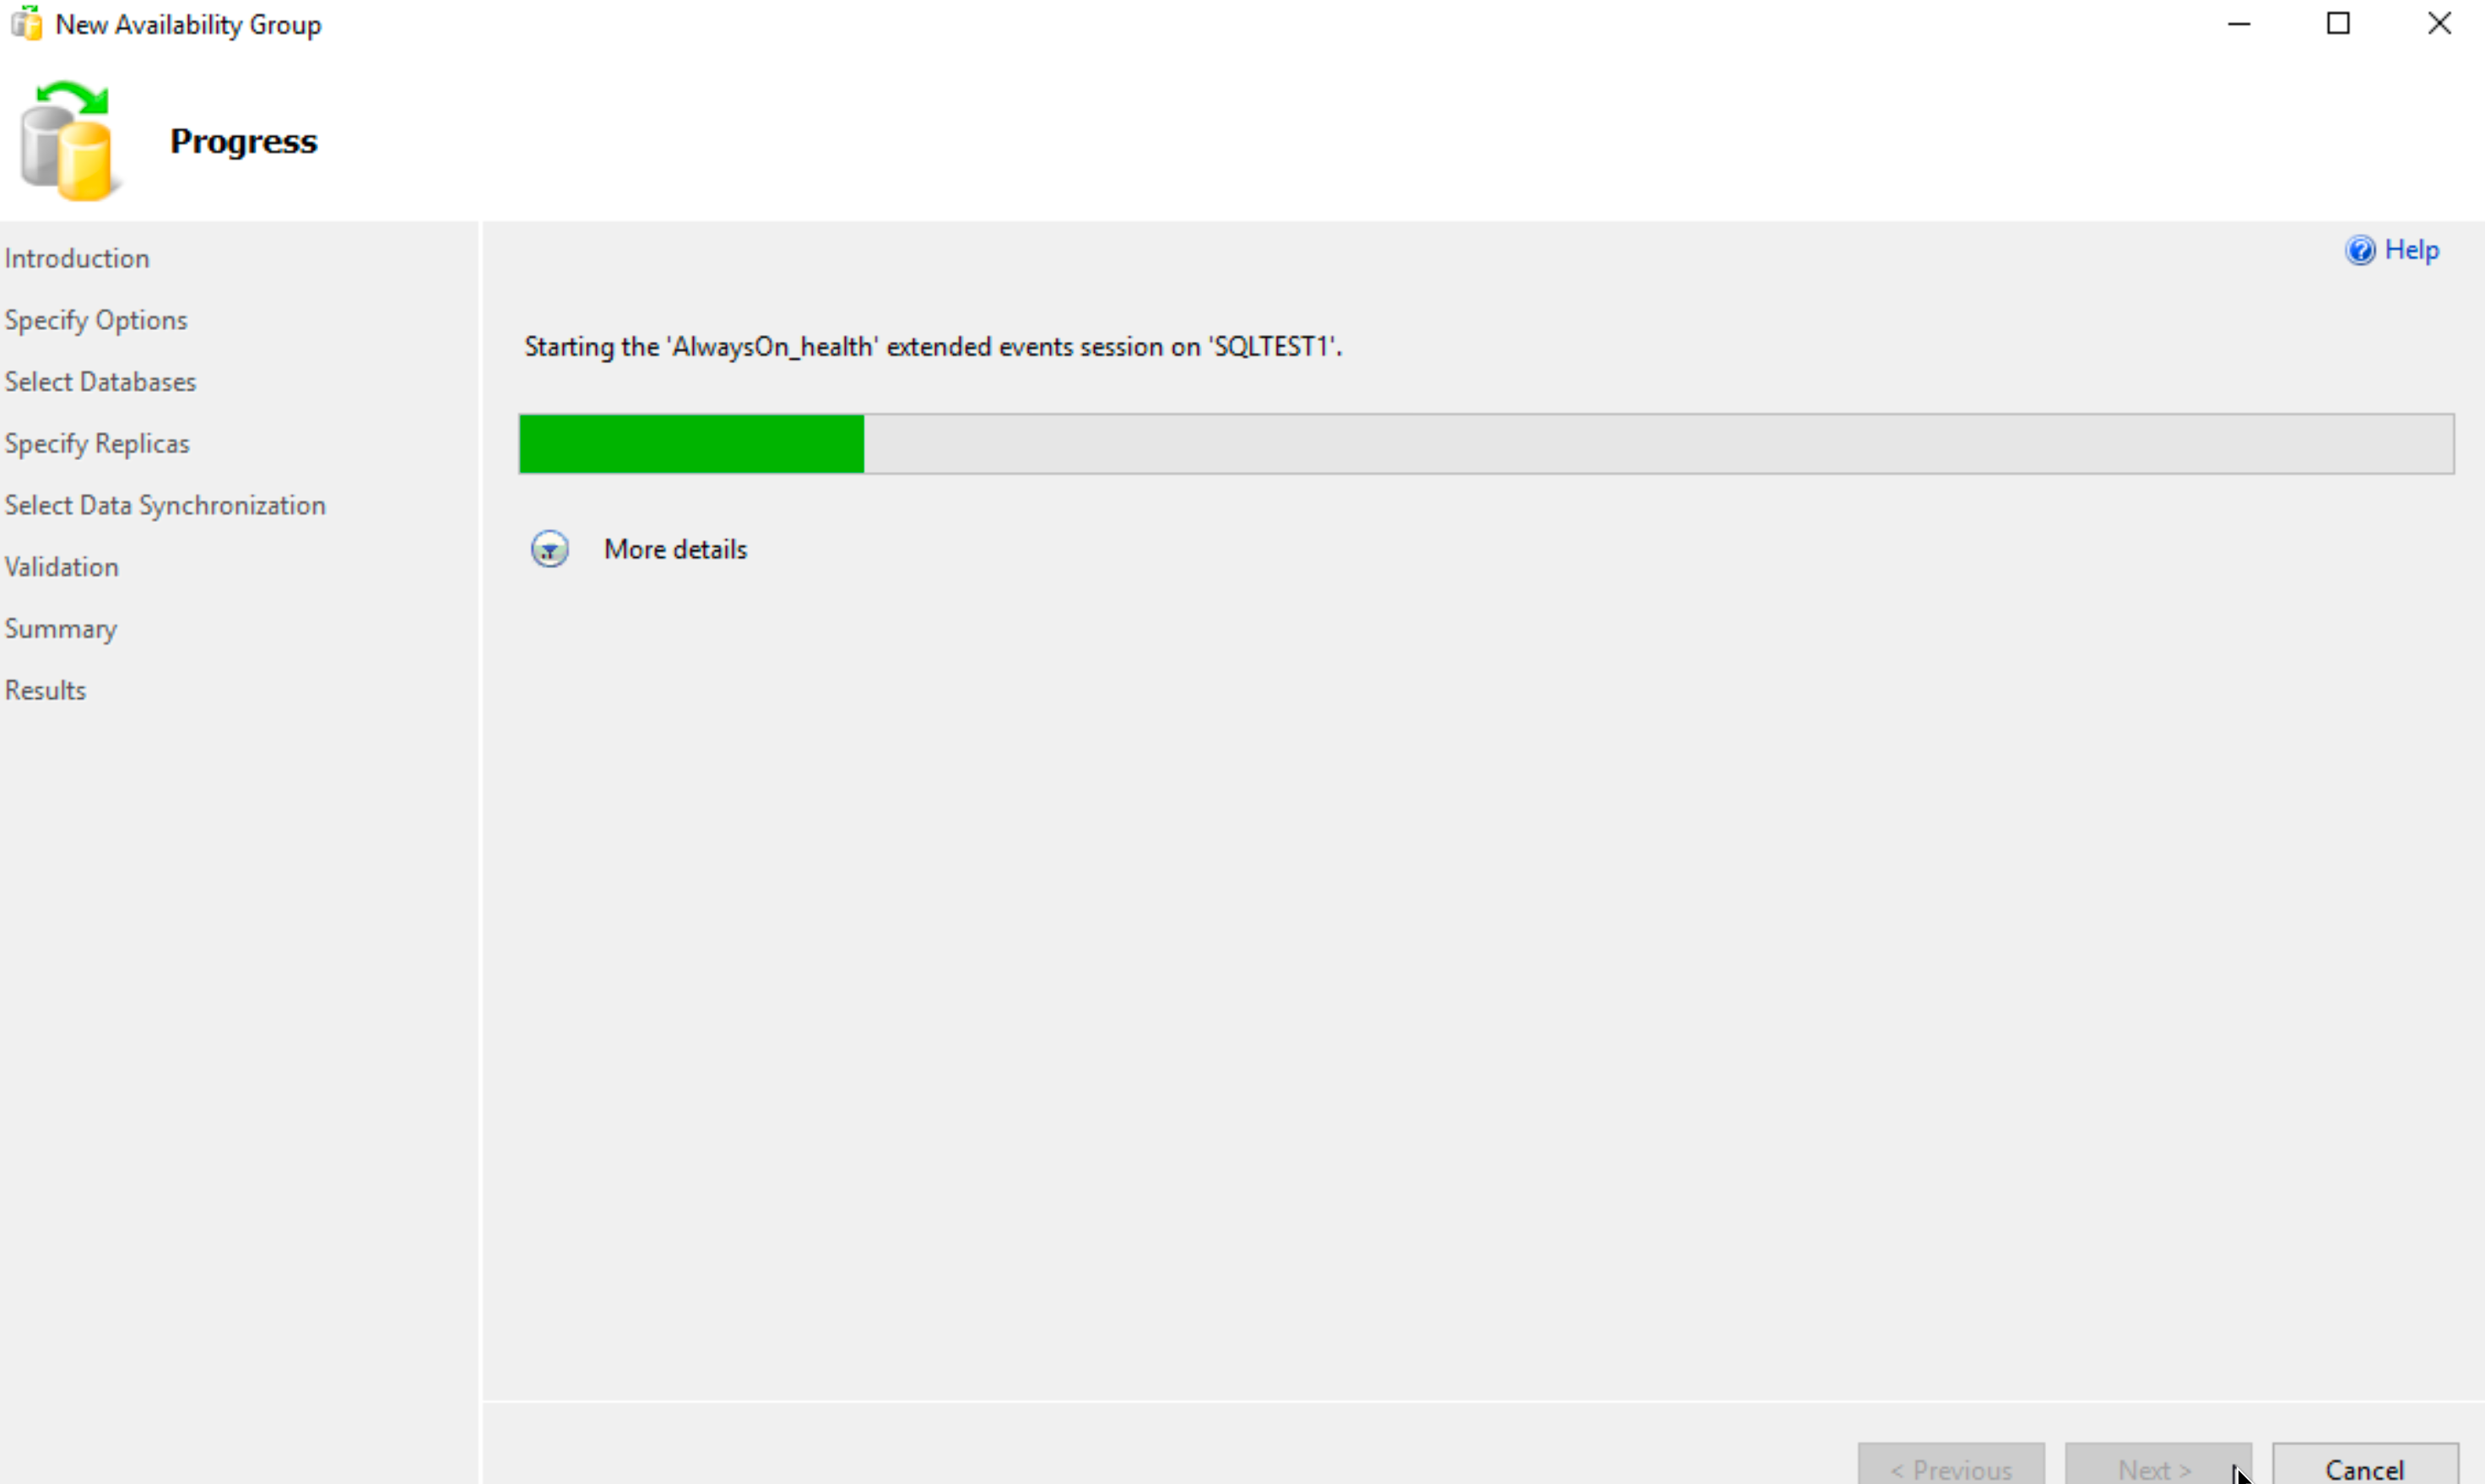
We did it!!
Ok, now that the process is done, we can quickly jump bac to AD and remove all the additional rights we added to our sqldbadmin1 account. Leave the account only in domain users group.
Ok, let’s check how our SSMS on SBDB1 looks like now
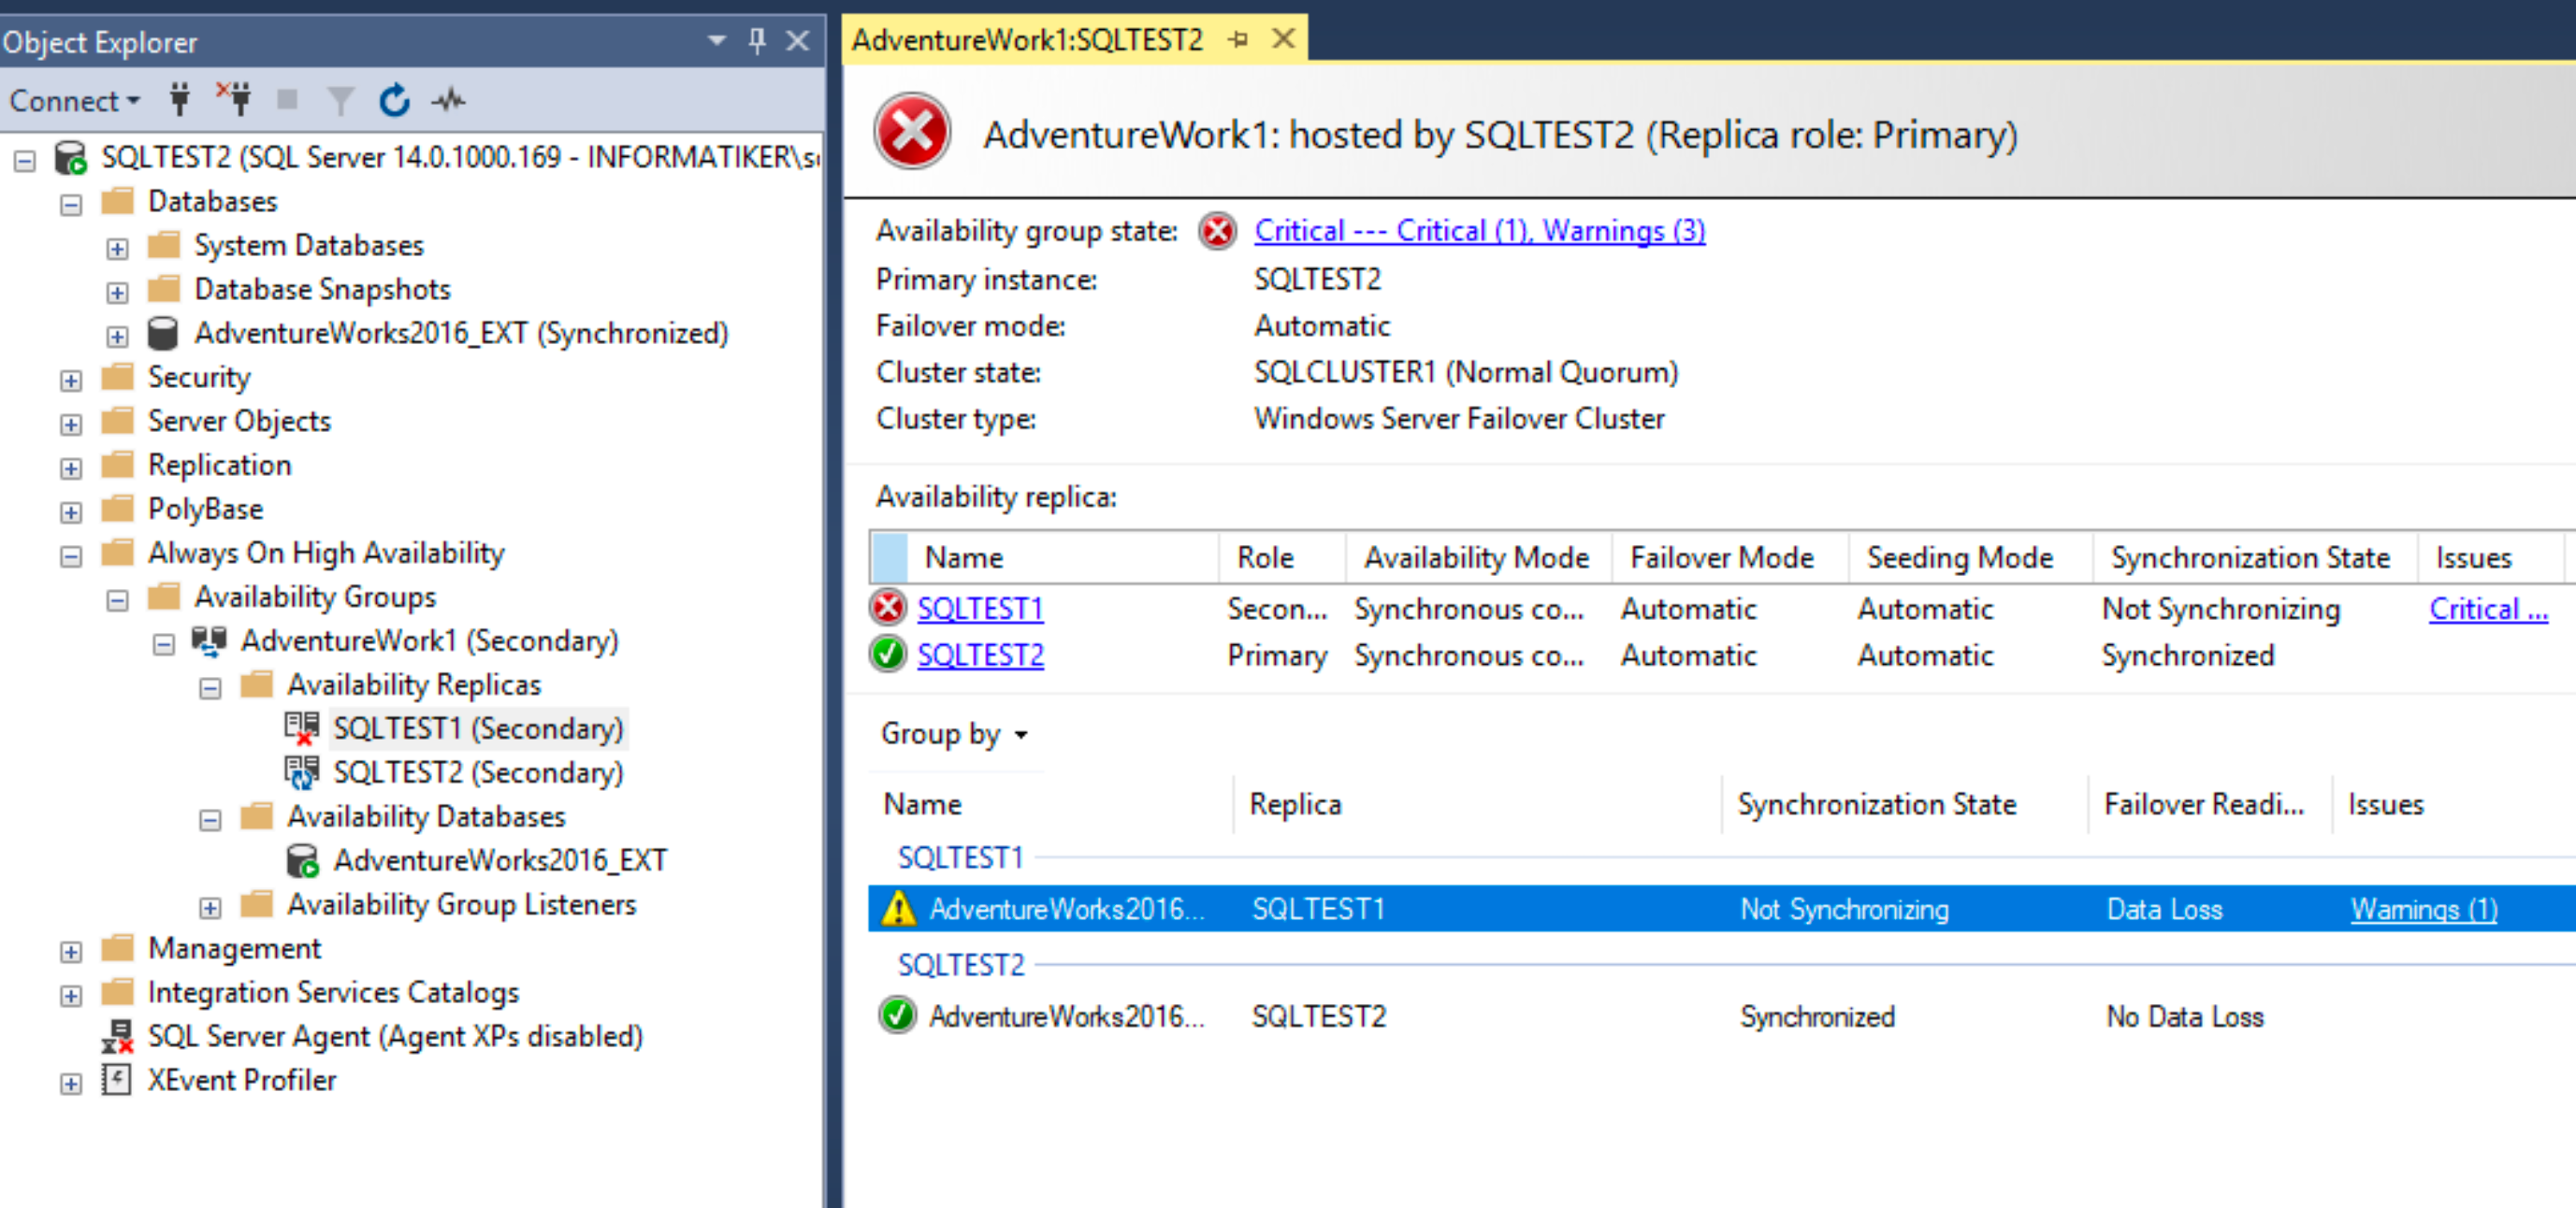
Ok, there is Availability group named AdventureWork1 and if we right click on it and select “Show Dashboard” we will actually see the details of our Always On group. We can see which one is primary and which one secondary, we can also see that our SQL servers are synchronized and without data loss. Great.
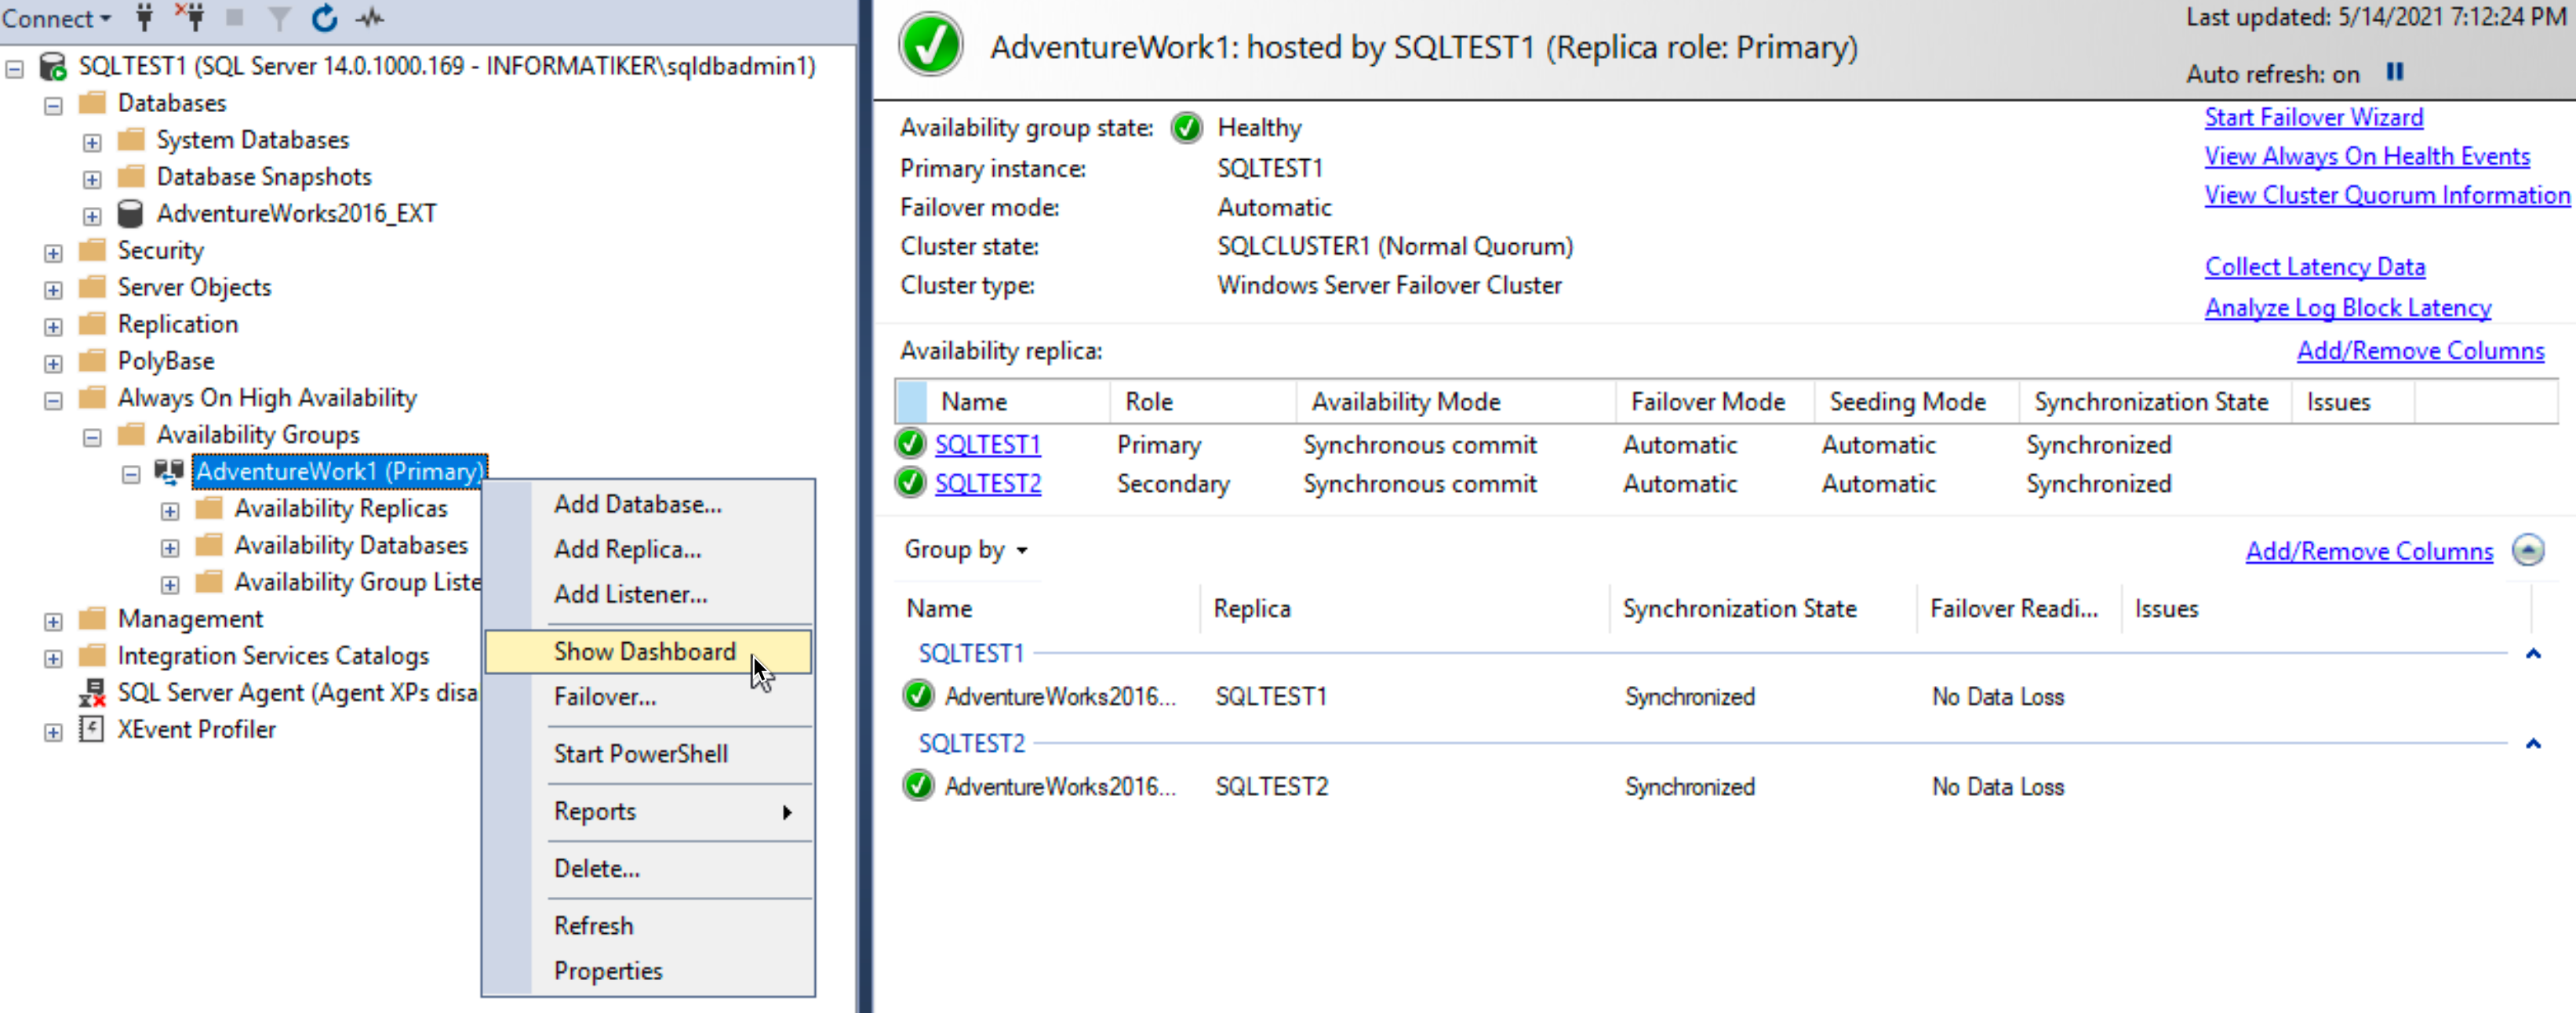
On SBDB2 I will also open SSMS, to see status there. Everything looks ok – status of the DB is – Synchronized. We can also see that SBDB2 (or SQLTEST2 as depicted) signals that it is secondary node.

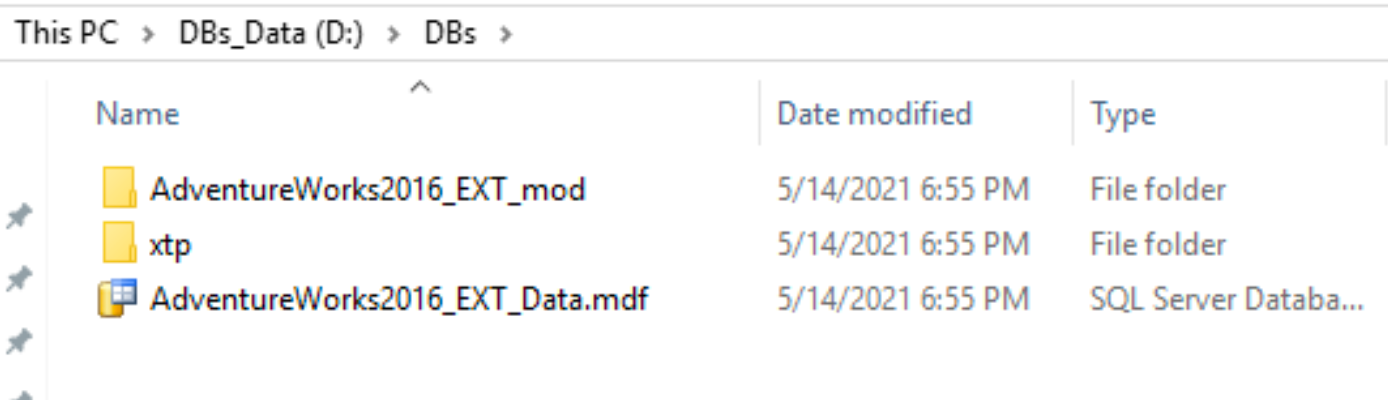
Also, I checked physical paths to DB on SBDB2 server – I created everything the same way as on SBDB1 – and it works nicely. Everything is identical.
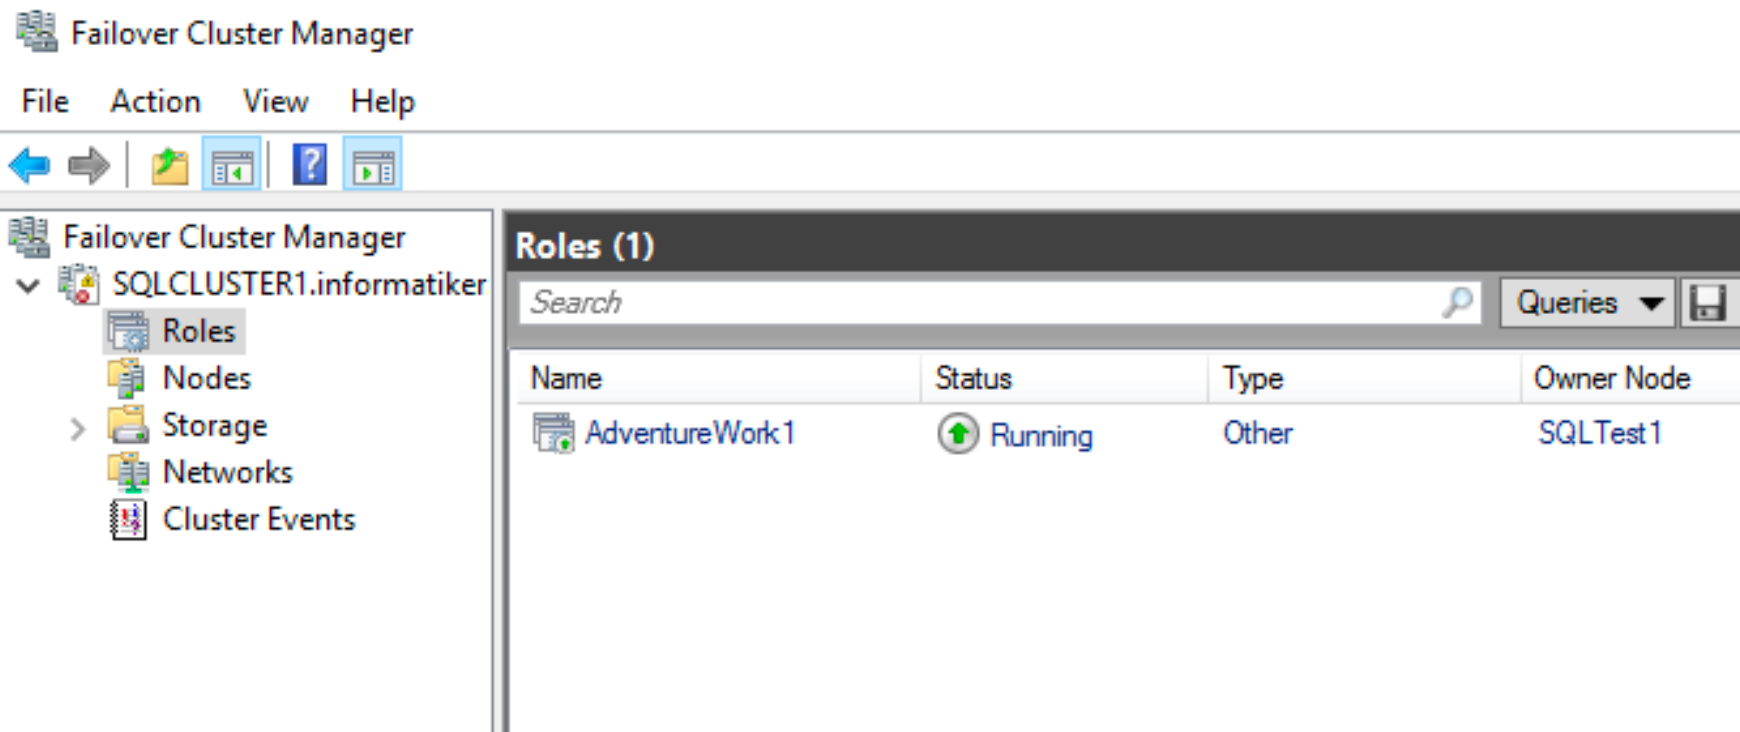
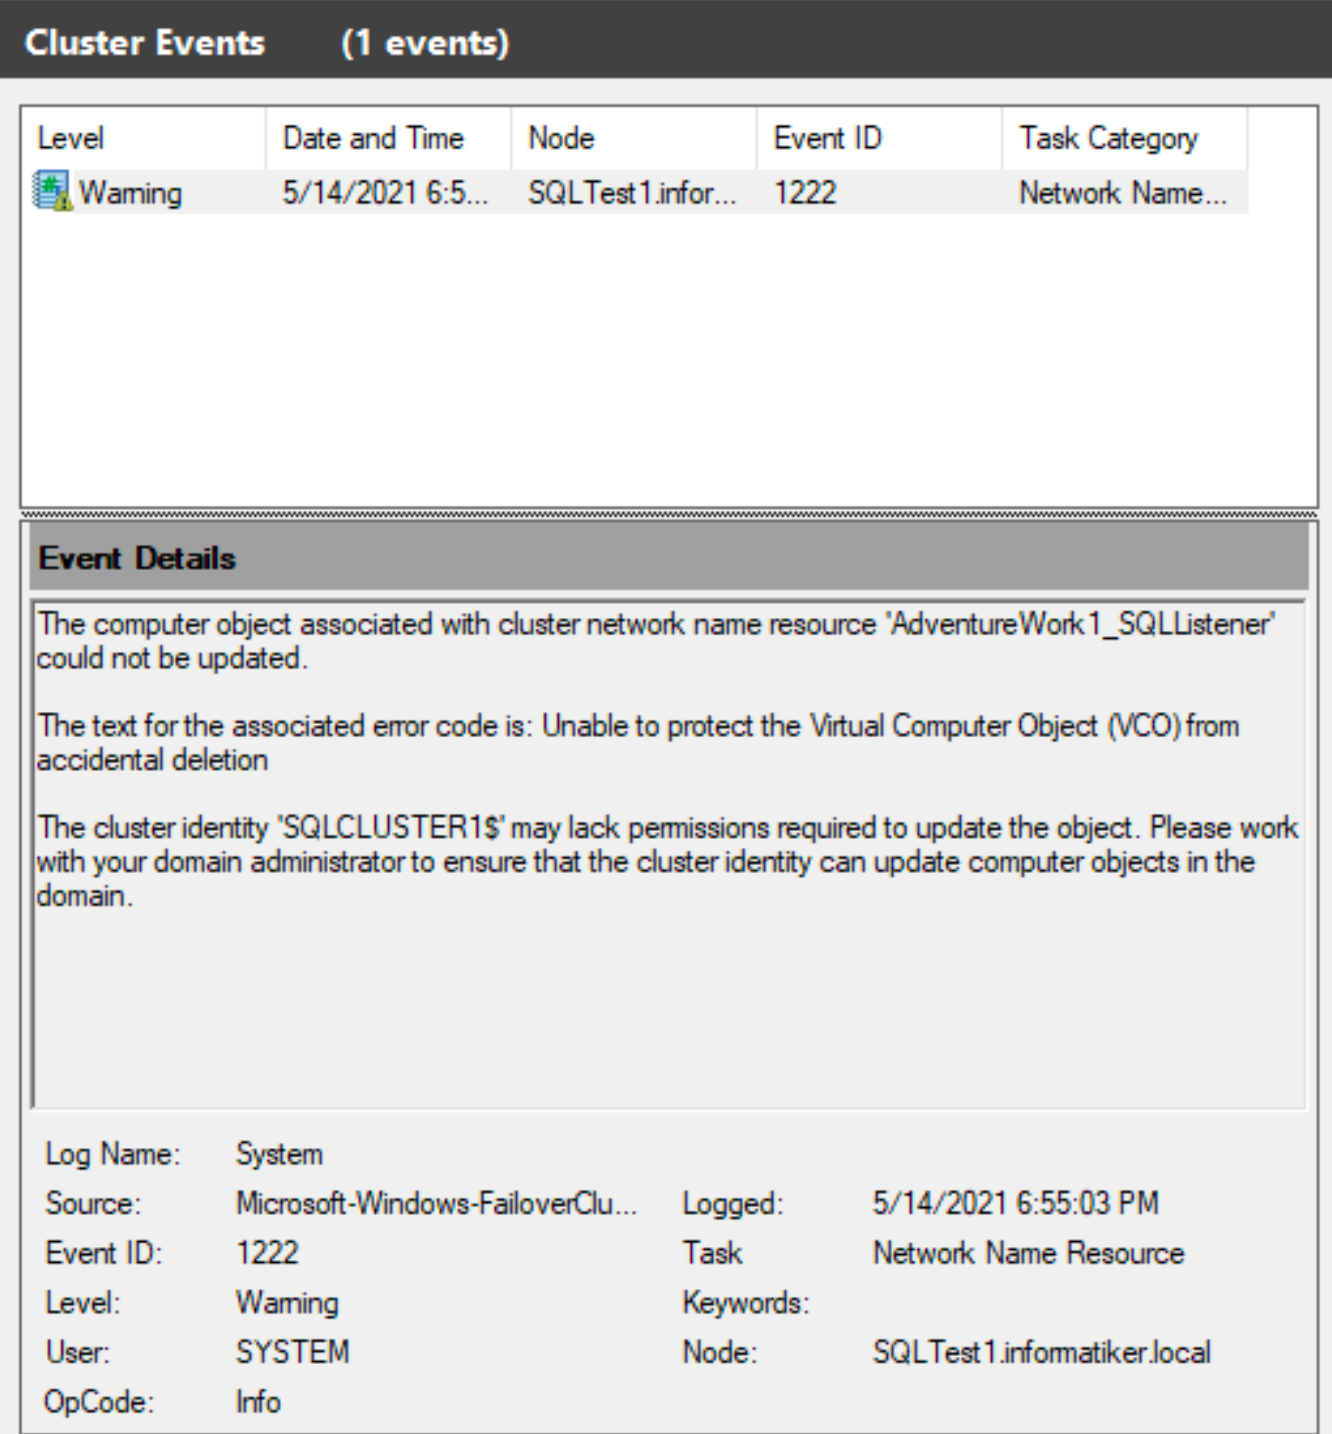
If we look into Failover Cluster Manager – we can now see that we have role configured. That is also good. But I also see that there are already some events in the log, which is strange, since cluster is fresh.
Cluster Events shows error 1222
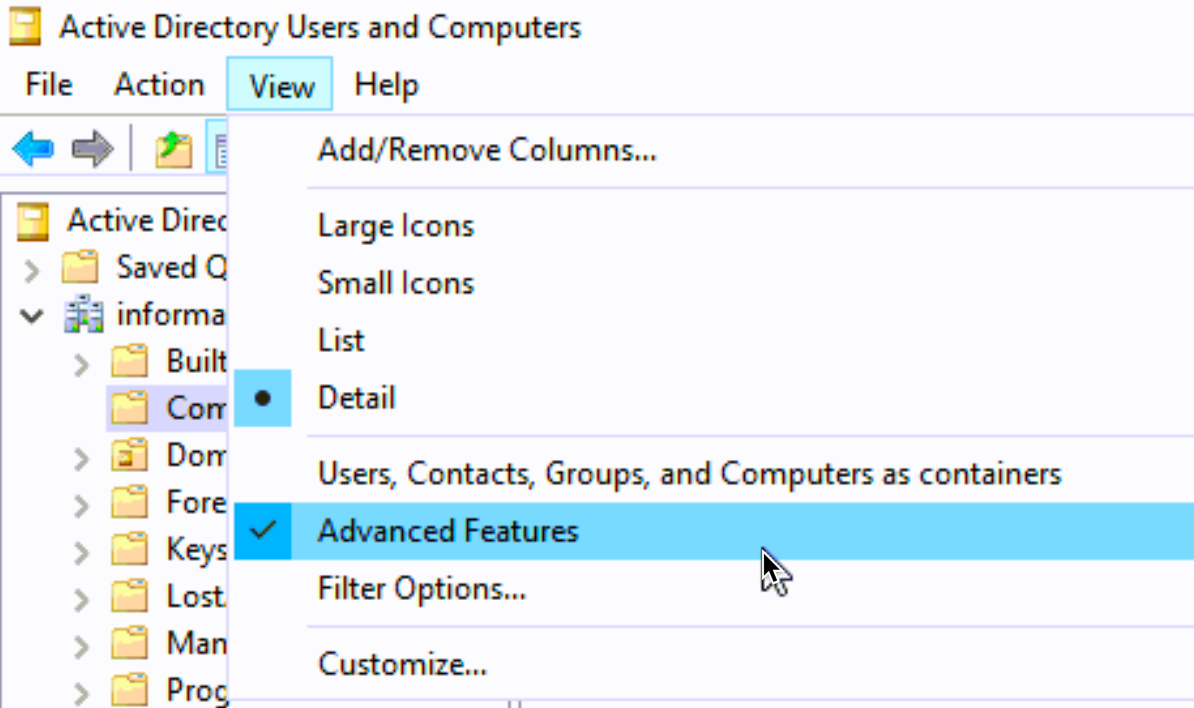
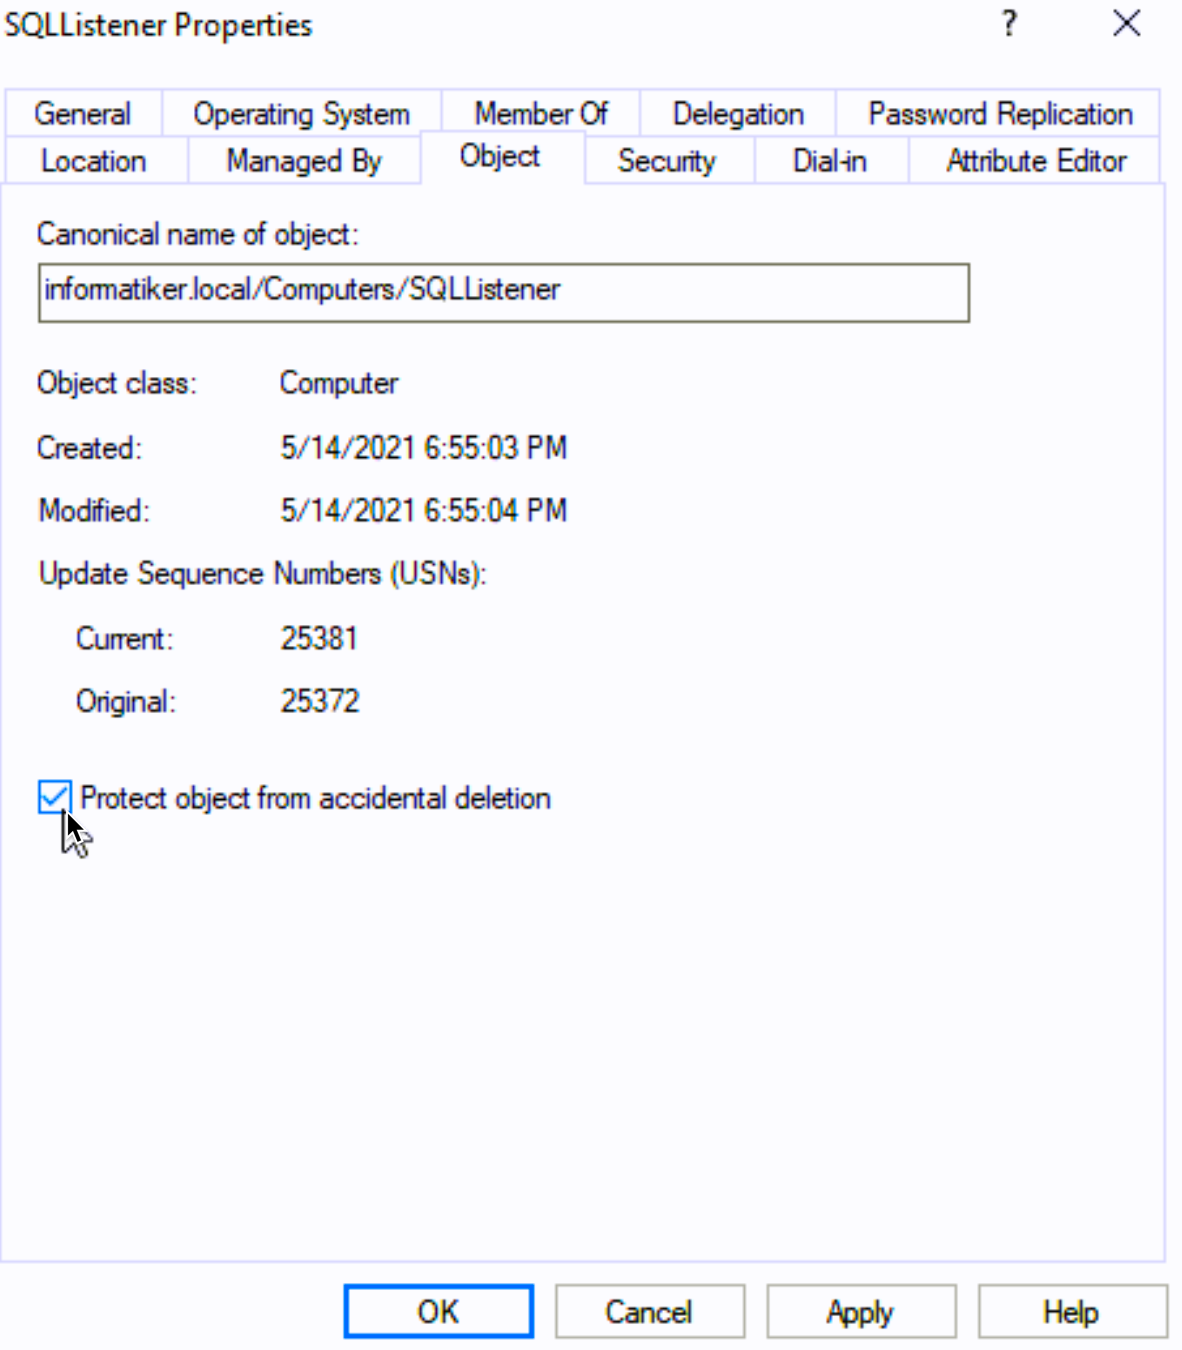
We will quickly jump back to our AD server and open Active Directory Users and Computers. From View menu select “Advanced Features”
Select your listener object in AD | right click on it and select Properties
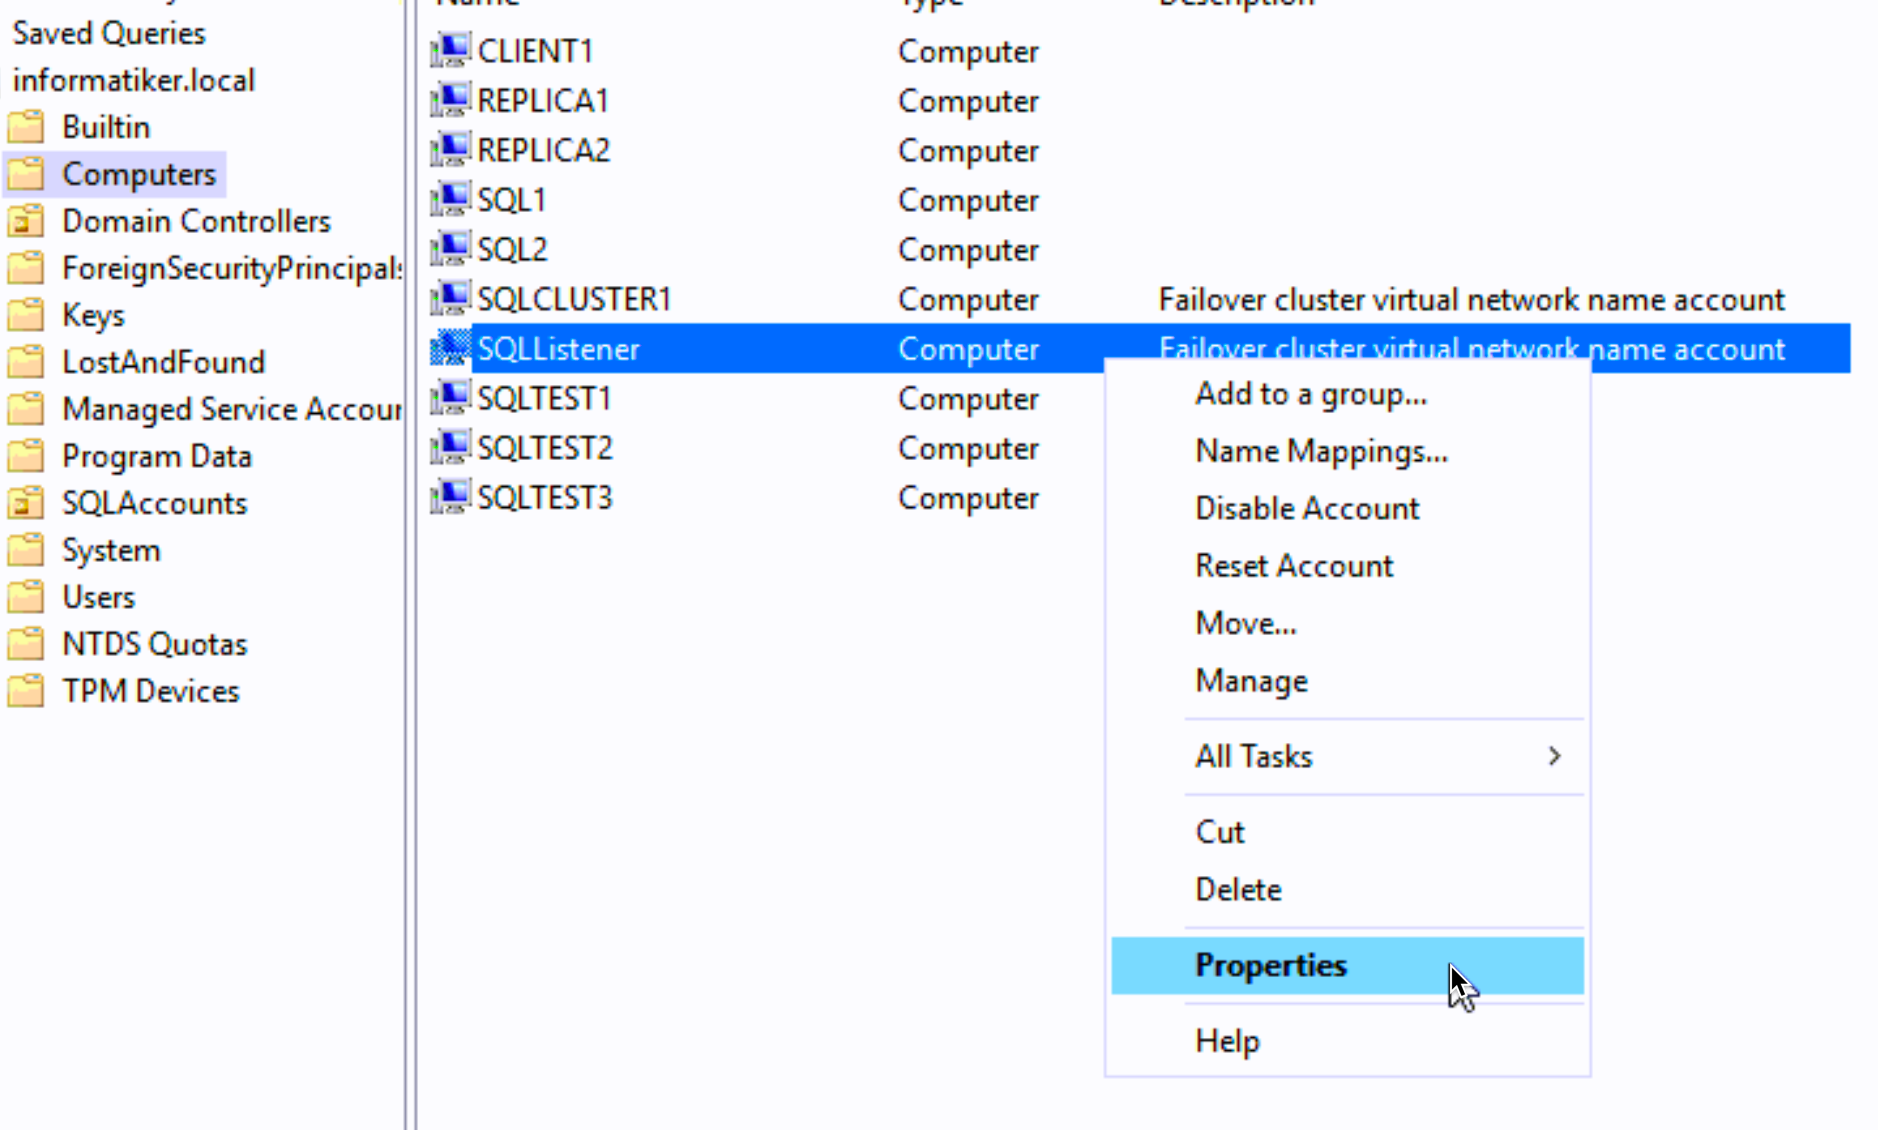
On Object tab select “Protect object from accidental deletion” Apply | OK
You can now close AD and go back to our SBDB1 server and clear the cluster logs. It should be fine now.
Ok, that is more or less that in short, we have successfully created Always ON HA Group.
Testing
Ok, we will do simple test here. We will failover from primary to secondary SQL node.
But, before we do failover – we will do some changes on our database on SBDB1 which is now primary SQL server.
Idea is to see if these changes will replicate to our secondary SQL server SBDB2.
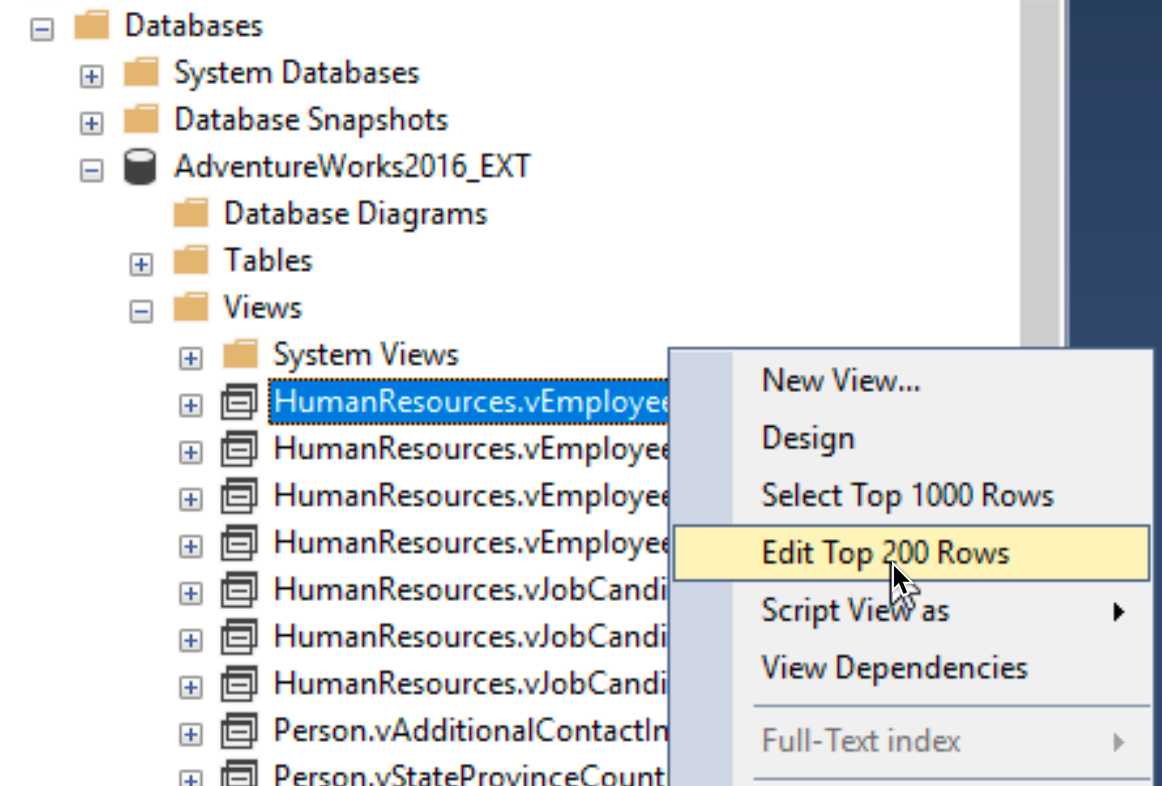
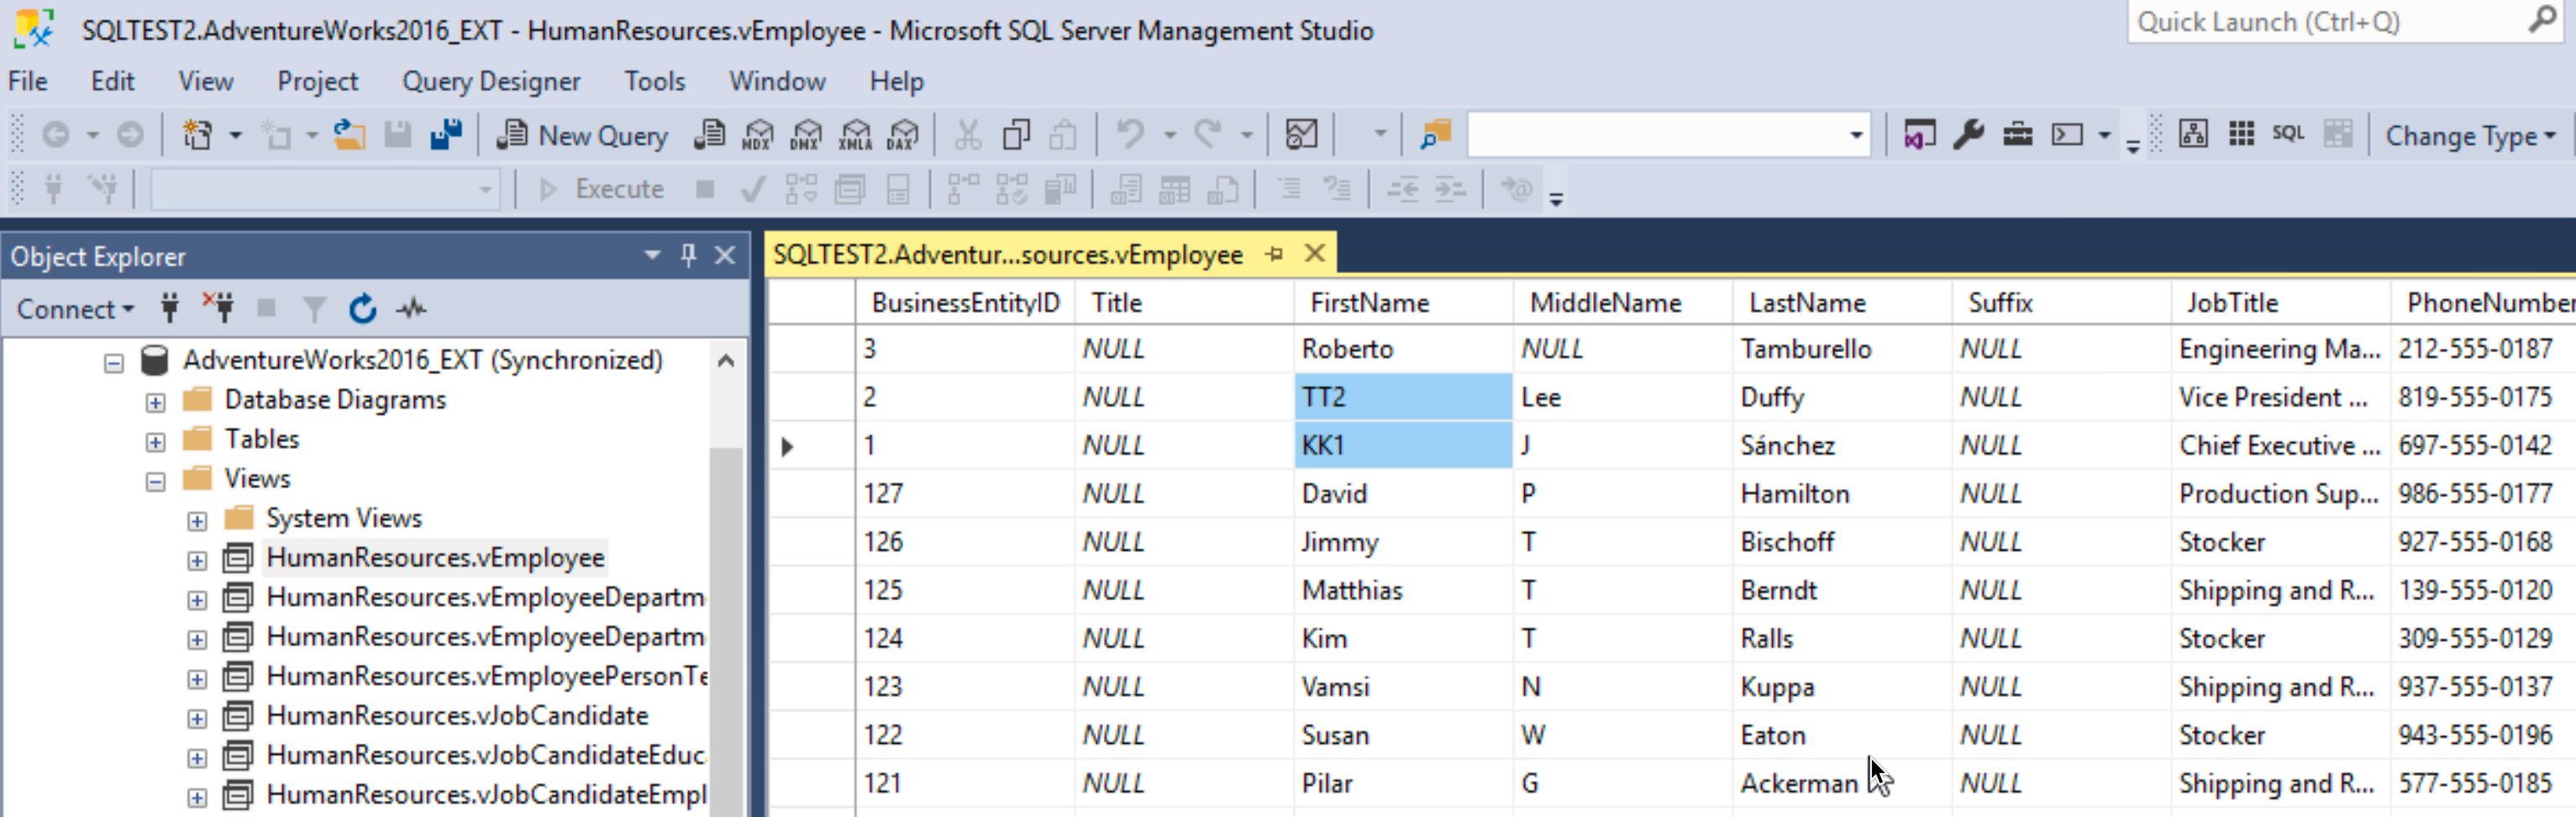
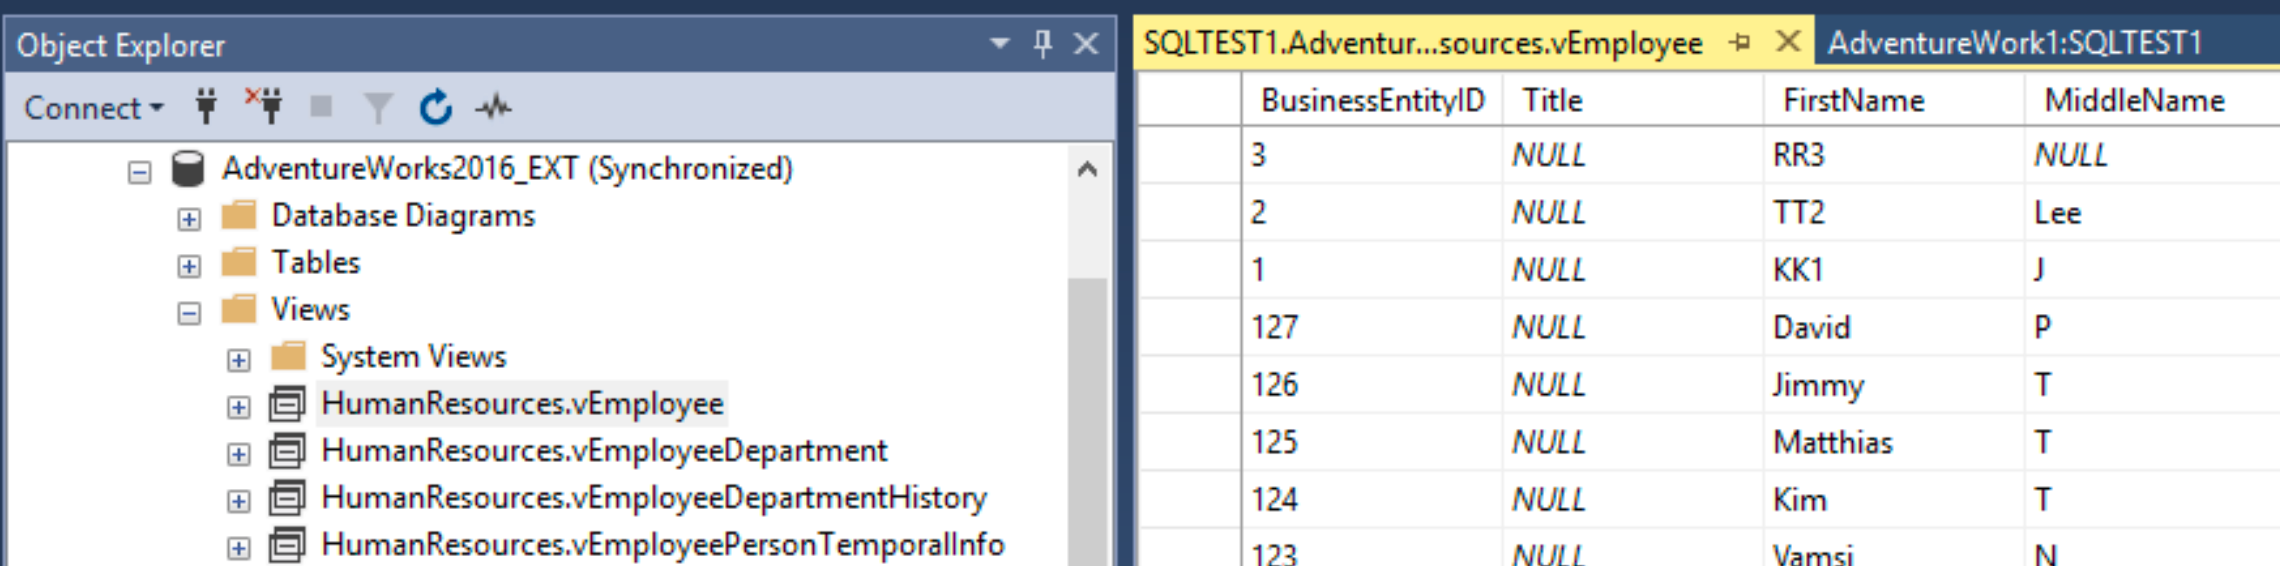
We will do this the simplest way possible. On SBDB2 under Databases, select AdventureWorks2016_EXT, expand Views, select HumanResources.vEmployee – right click on it and select “Edit Top 200 Rows”
If you don’t have the database sample I’m using, feel free to do that on your sample database (don’t test with production databases!)
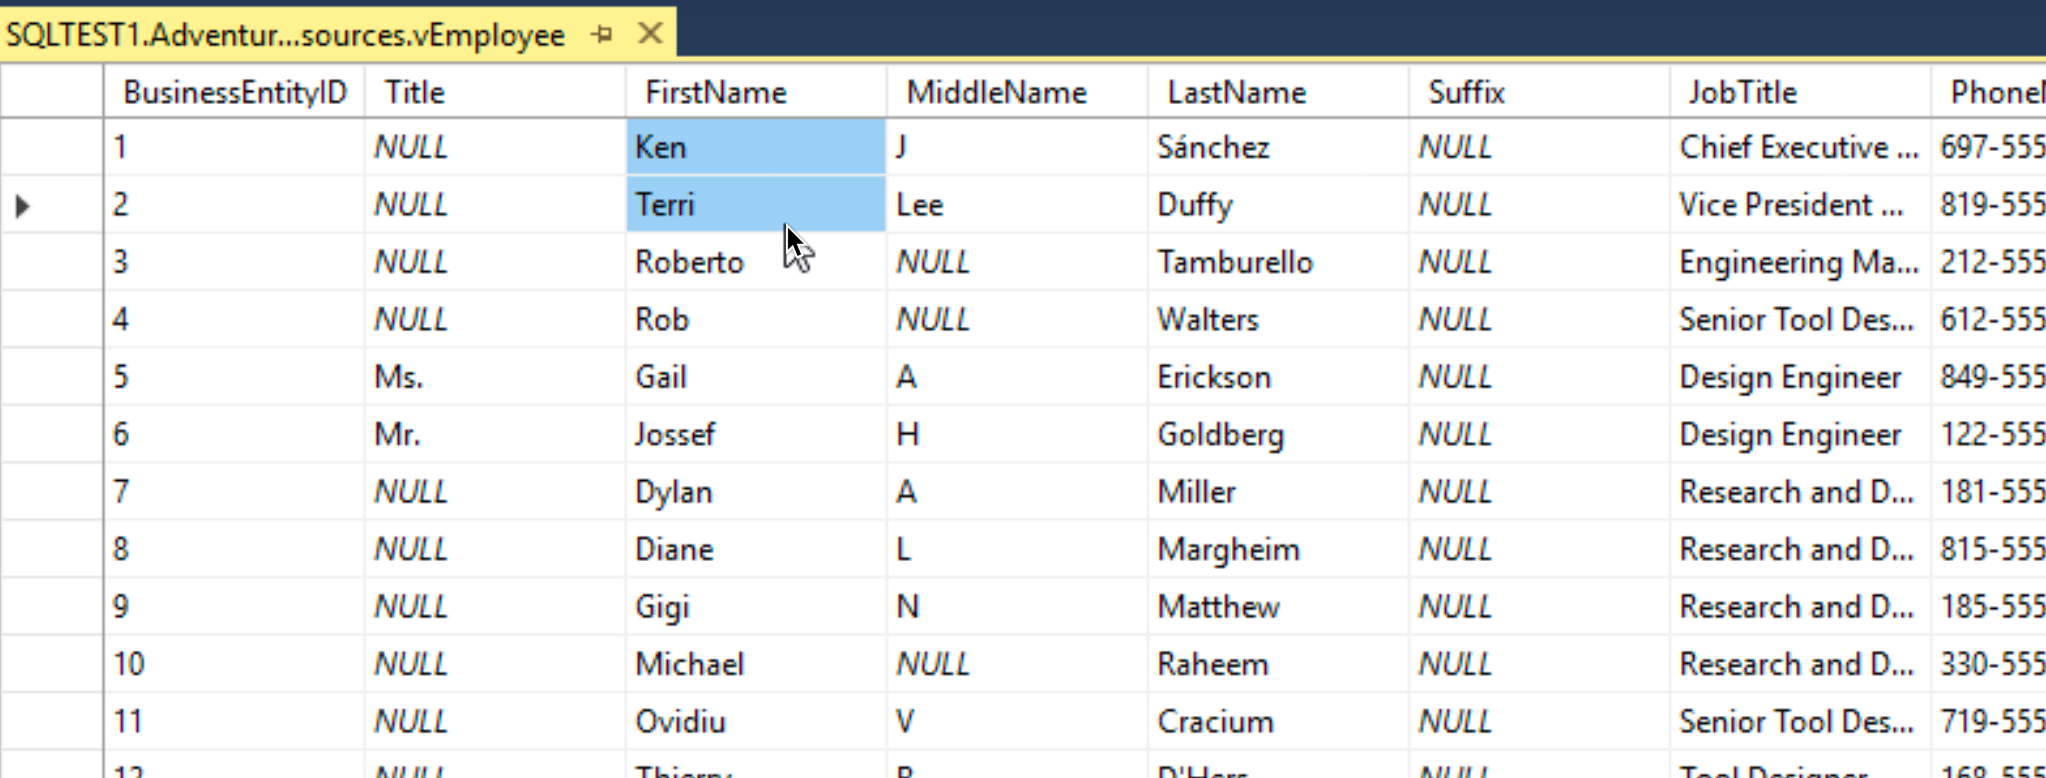
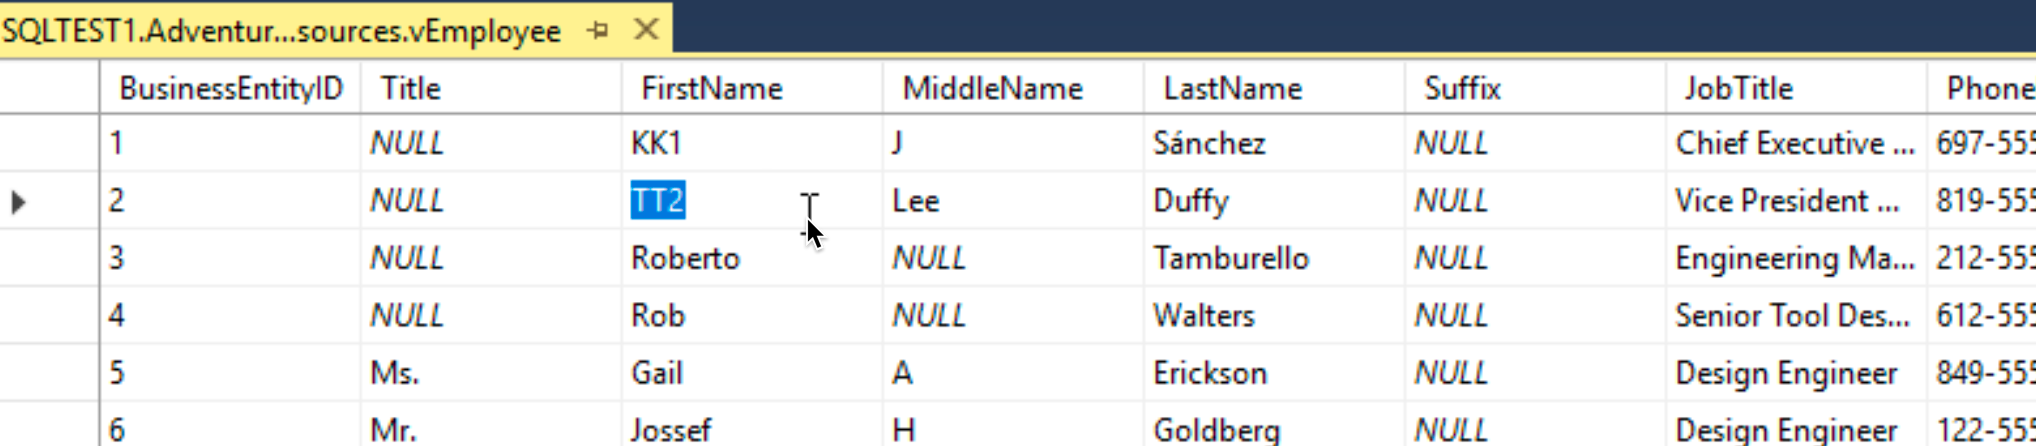
Ok, I will select rows 1 and 2. I will change first name from Ken to KK1 and Terri to TT2.
Change is done
I will now close this window and simply shut down SBDB1 server on which Ive done these changes.
On SBDB2 which is still up, I can see that it became primary node, and that SBDB1 (SQLTEST1) is down.
Let’s check the same table on the SBDB2 now, to see if the changes from SBDB1 are replicated.
They indeed are!!
These are great news.
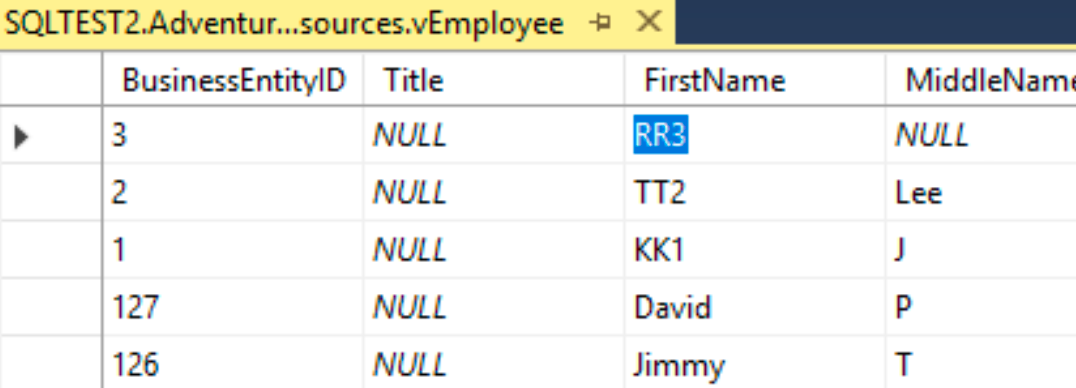
Ok, let’s now edit one more row inside that table while our SBDB1 server is down.
This way we will see if our DB will properly synchronize when it is back up.
I’ve changed line 3 from Roberto to RR3.
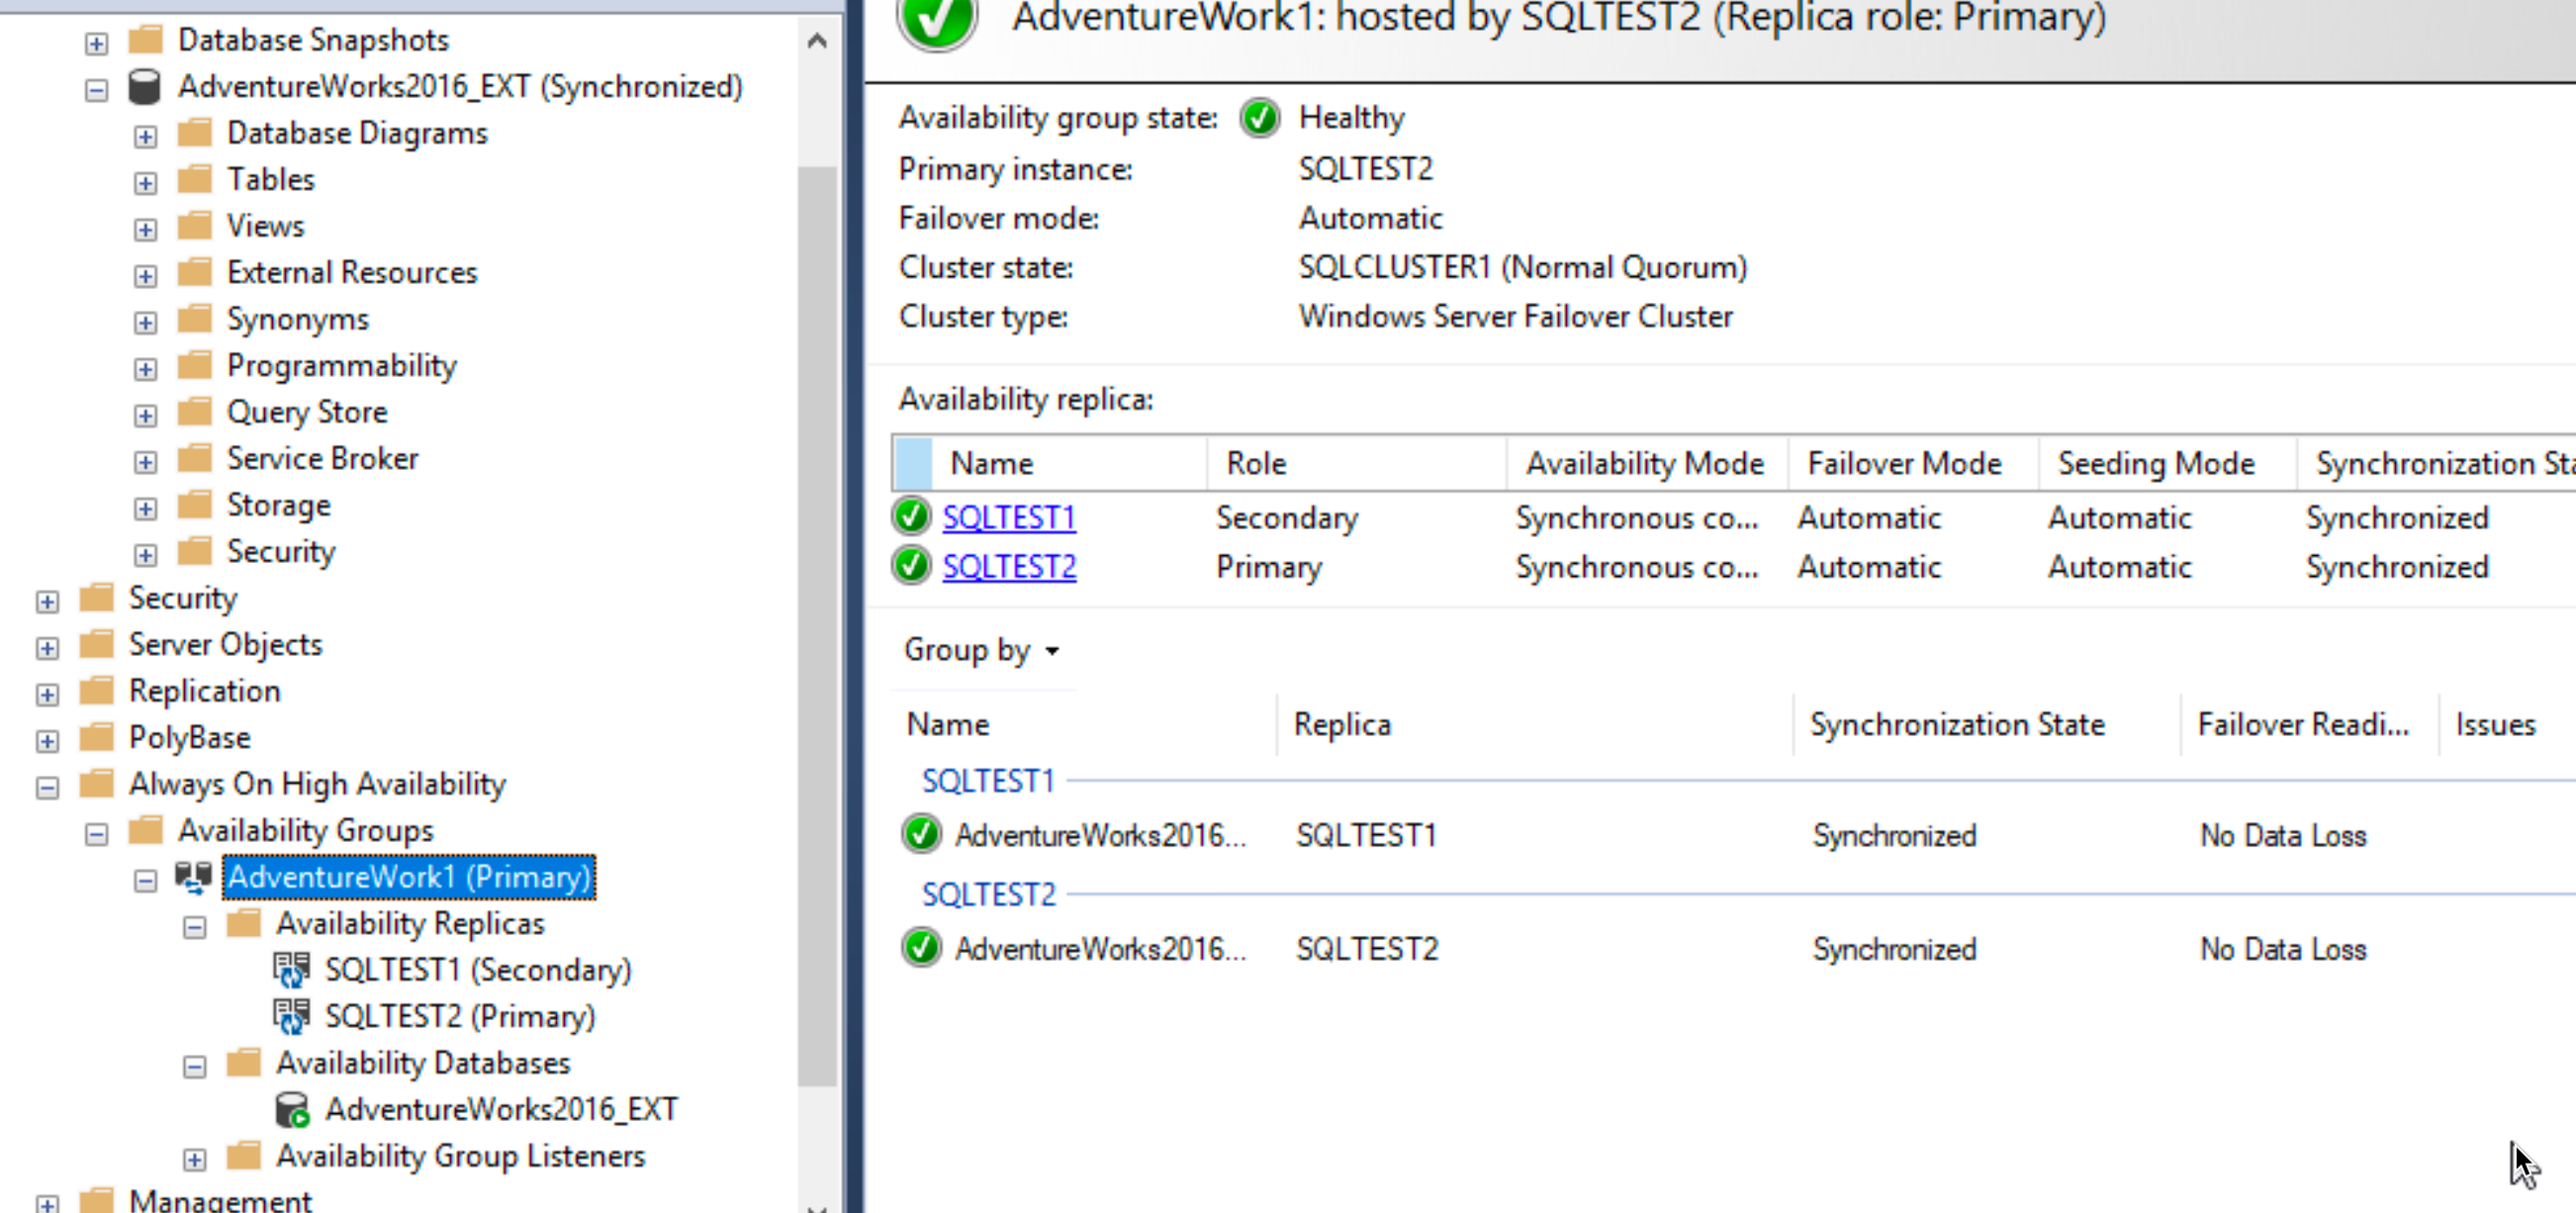
I will now bring back up SBDB1
Ok, we are back in green. SBDB2 (SQLTEST2) is now primary and SBDB1 (SQLTEST1) is now secondary.
I will now simply turn off SBDB2.
I then went to check if changes which are done after SBDB1 was done are now replicated to SBDB1 – they are.
Ok, that is it, more or less, we done our simple test. It is working – everything is fine.
This is now very long guide, so we will wrap it up here.
Conclusion
SQL Always ON is great piece of technology – before you do a deep dive and implement it, make sure you know what type of workloads your databases are, so you can prepare good for it. Always ON can be pretty network and disk intensive, so make sure you test everything good before you proceed to production.