You host your own email servers, you made sure that everything is redundant and works 24/7, but still, what if something fails and you lose email functionality and cannot receive new email for few minutes, hours…?
Backup MX record is way to go. It is simple, inexpensive service that makes sure emails are not lost when your servers are down.
I read a lot on the subject of Backup MX, and opinions are different. Some say that Backup MX is obsolete since many mail servers today retry to deliver email for some period of time. Some say that Backup MX will attract spammers and is security risk (since backup MX can be less secure)…
In my experience having Backup MX is good option.
You can try and get backup MX from your ISP, if you have your own VPS (with simple mail server like hmail) you can set it up there…
There are many options for this simple setup.
I decided to go with http://www.dnsmadeeasy.com/mail-services/
Backup email service is $13 per year for 1 domain. One domain is what I need, so it is good enough for me.
There are also limits for how many emails, bandwidth or days you can use with service so be sure to choose service that suits your needs.
Catch with dnsmadeeasy is that you cannot buy just email backup service. You have to buy Managed DNS Service which is $30 per year and then you add $13 per year for backup email backup. So that is $43 per year for MX backup.
Other services which offer MX backup have same pricing and same shady pricing advertising, so be aware of that.
Your cheapest option is your ISP if you can arrange Backup MX with them.
Now, back to the point. How to setup Backup MX.
It is pretty straightforward and easy. If you bought MX Backup service, all services have similar setup. You enter your domain at their system, and add their MX record with highest number to your DNS.
With dnsmadeeasy procedure is as follows
You need to login to your account
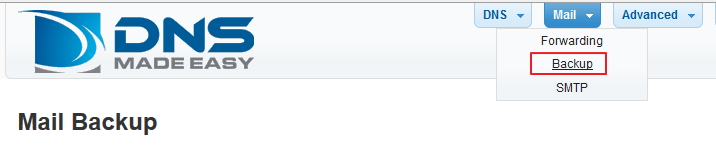
From Menu choose Mail | Backup
From mail backup screen choose + and add your domain
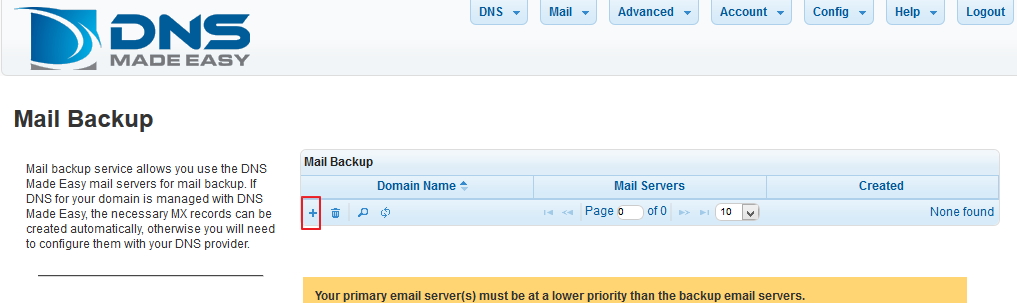
Enter your domain name. Leave Create MX Records checkbox empty, except if you are using DNS services from dnsmadeeasy (which I`m not, so I`ll leave it empty) |Click submit

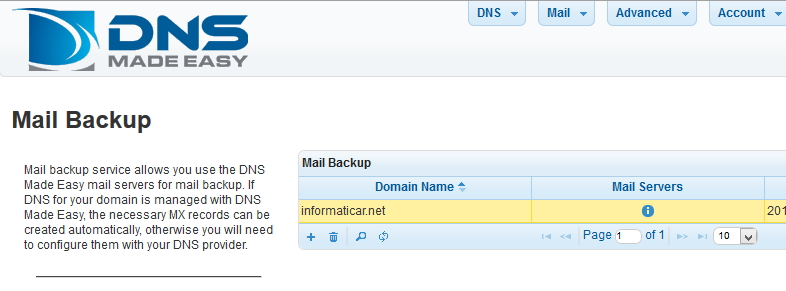
Your domain is added
Next step is to add mx records from mxdneasy into your DNS
I`ll show how to add MX record to Windows Server 2012 R2 installation
I won`t show you full screenshots of my DNS since it is my production environment. But you`ll get directions on where and what to enter in your DNS.
So, in your Control Panel on dnsmadeeasy you`ll get example of how to configure your DNS with MX records.
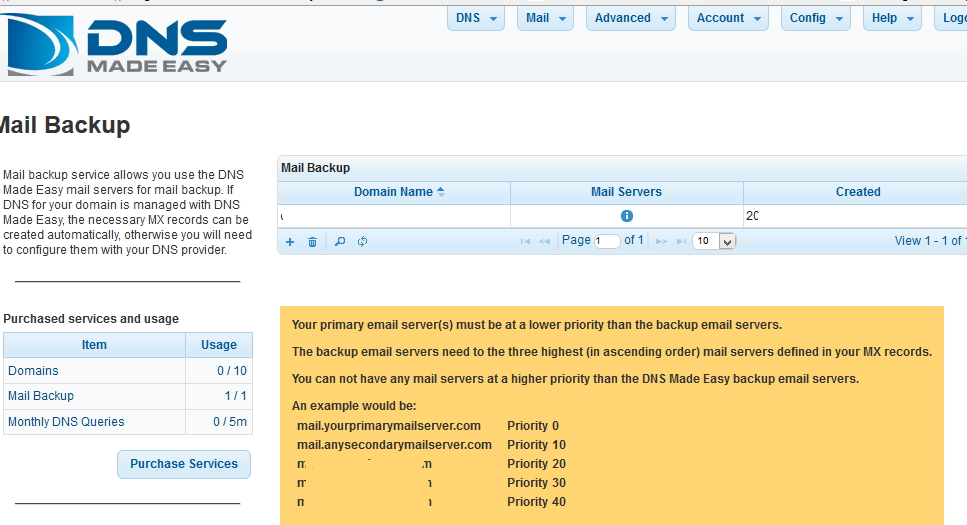
MX records from your production domain should have highest priority for mail delivery (lowest number). For example mx record mail.informaticar.net should have priority 0, mx record mail1.informaticar.net should have priority 10
and mx record for dnsmadeeasy should have priority 20.
So, mail sender will first try your mail server with priority 0, then next one with priority 10, and when there is no response, it will try backup MX record with priority 20.
So, you should enter mx records from dnsmadeeasy into your DNS.
Control Panel | Administrative Tools | DNS | choose your DNS server | Forward Lookup Zones |choose your domain zone | right click somewhere in the right portion of the screen of your zone and choose New Mail Exchanger (MX)
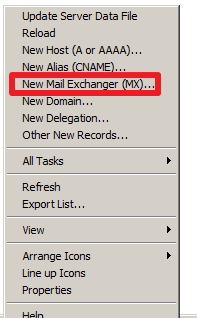
Leave host or child domain field empty | In FQDN of mail server enter mx records that your backup mx provider gave you and under priority enter higher number than your current email servers, as I already described before. | Confirm with ok.

Your MX record in DNS should look like this
![]()
Now, give some time for DNS records to refresh (it can take up to one day) and test it by shutting down your onsite mail service.
Mail should be received when you power up your mail servers within few minutes of power up.