I recently configured HPE MSA 2050. Here is a short tutorial of how to do basic configuration.
Tutorial will cover basic system setup, storage and notification configuration.
Default IP address of the controllers (if you don’t have DHCP server on network) is:
controller A: 10.0.0.2/24
controller B: 10.0.0.3/24
username: manage
password: !manage
Here are some official HPE resources for the MSA 2050:
I have a model with 24 SFF drives and 8Gb FC ports.
For this tutorial I will be connecting FC ports directly to Windows Server 2019 on one of HPE Gen 10 servers.
This storage is pretty powerful and simple to configure, it has its quirks, but overall looks like a good choice.
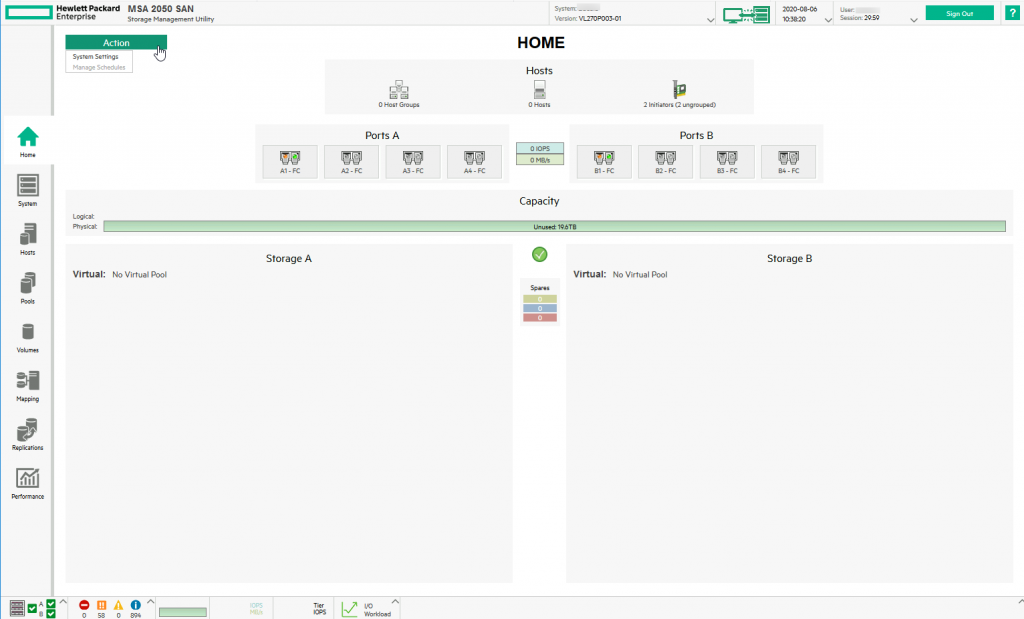
Home screen
Here is how a home screen looks like. Nothing yet to see. Click on Action button – it will reveal System Settings. Click on System Settings
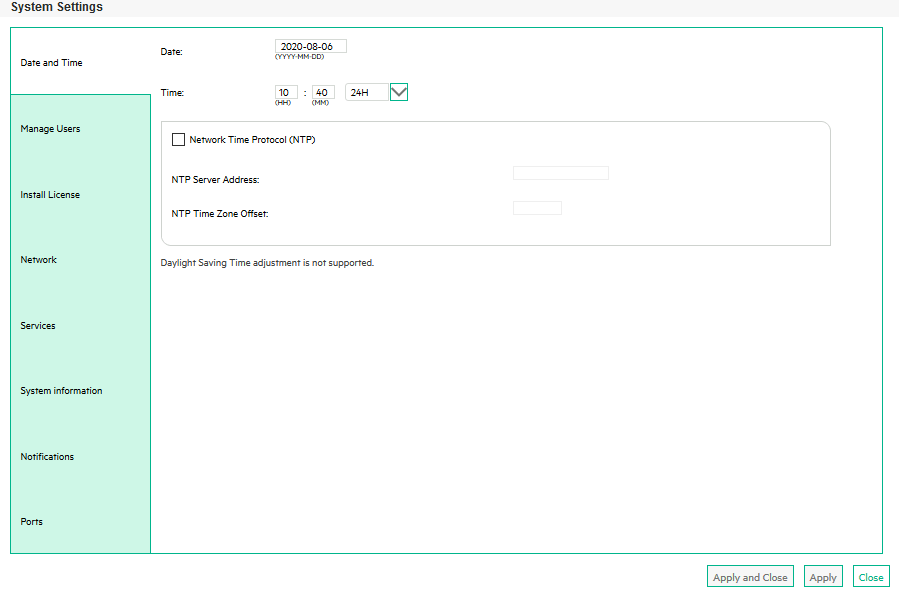
There are a couple of thing here I would like to point out.
Date and Time – configure this correctly, you will need correct time. Enter NTP server if you have it locally, or if storage is allowed to the internet, enter public NTP.
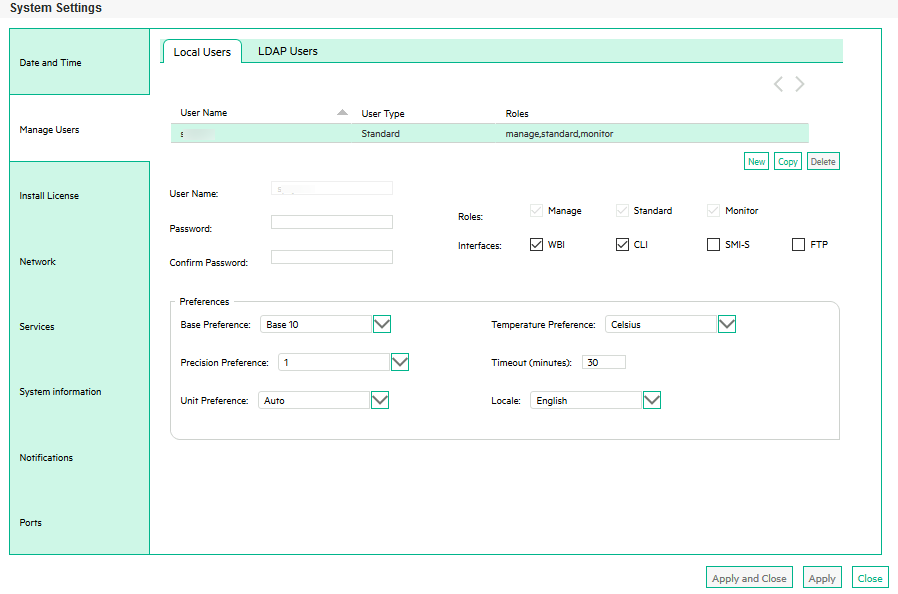
Manage Users – You have two tabs – you can specify local user – on storage, on integrate it into LDAP. For this test unit, I will configure local user. Enter username and password, and select roles and interfaces user can access. Make sure you don’t lock yourself out of storage and select Manage, Standard…
You can add additional users with only one (or more) roles or interface access.
In Install License menu, you will add your additional licenses you bought with storage.
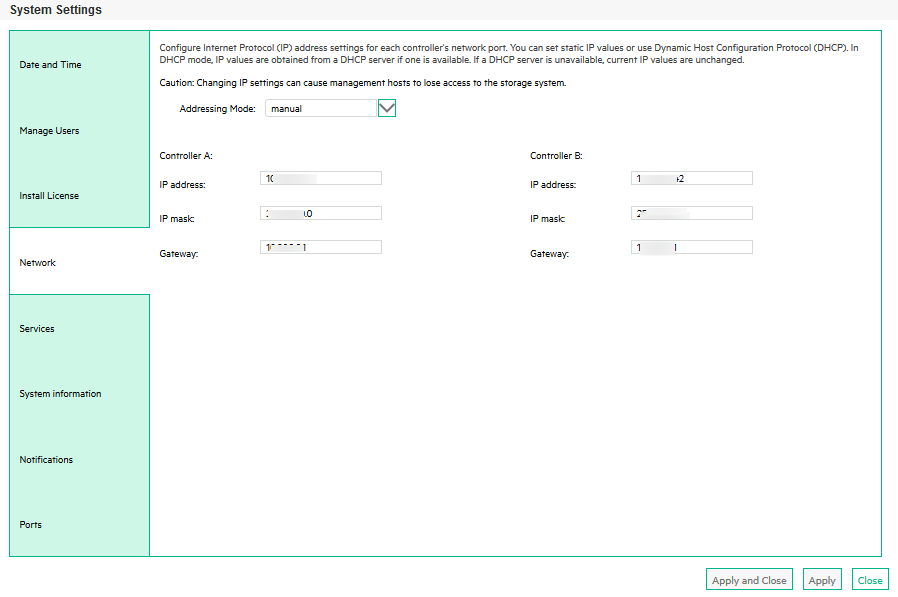
Network – I like to assign manual IP addresses to all the important equipment. Addresses you enter here (if you already haven’t) will be addresses through you manage your MSA 2050.
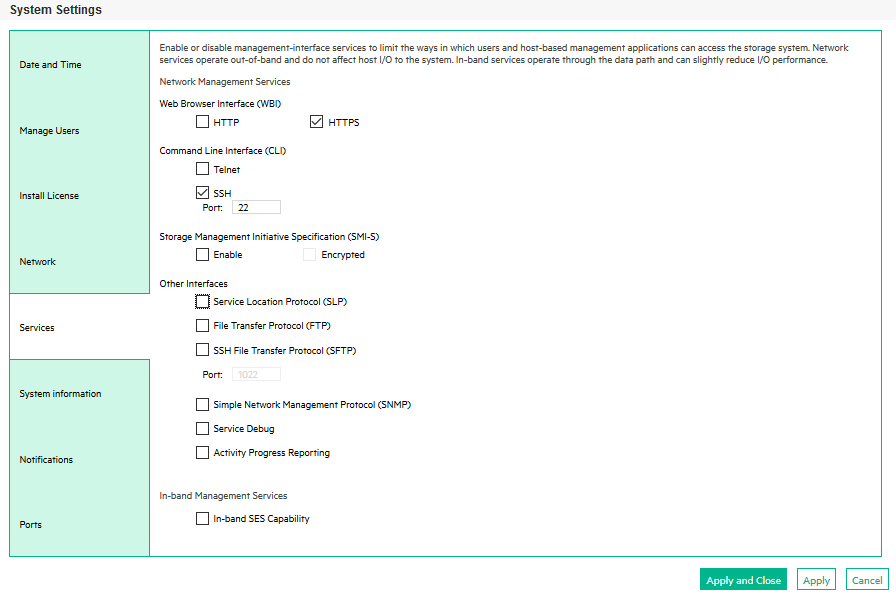
Services – in services menu, you will define – services – you would like to have active on your storage. I would recommend HTTPS access only, SSH also for CLI… Only thing that I would not recommend is plain HTTP and FTP services – use them only if you must. As for other services – if you need them, go ahead and enable them.
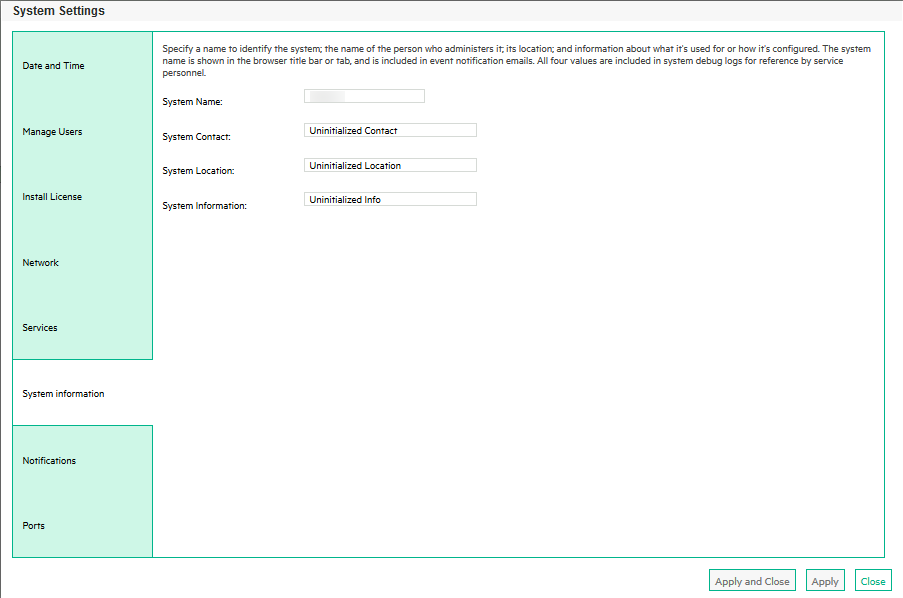
System information – enter System name (that will be your storage name) and all the other information you will find useful.
Notifications – very important part of the interface, configure this so you can get information on time if there is a warning or error on your storage.
There are few tabs here, and you will configure them according to your needs and services you already have.
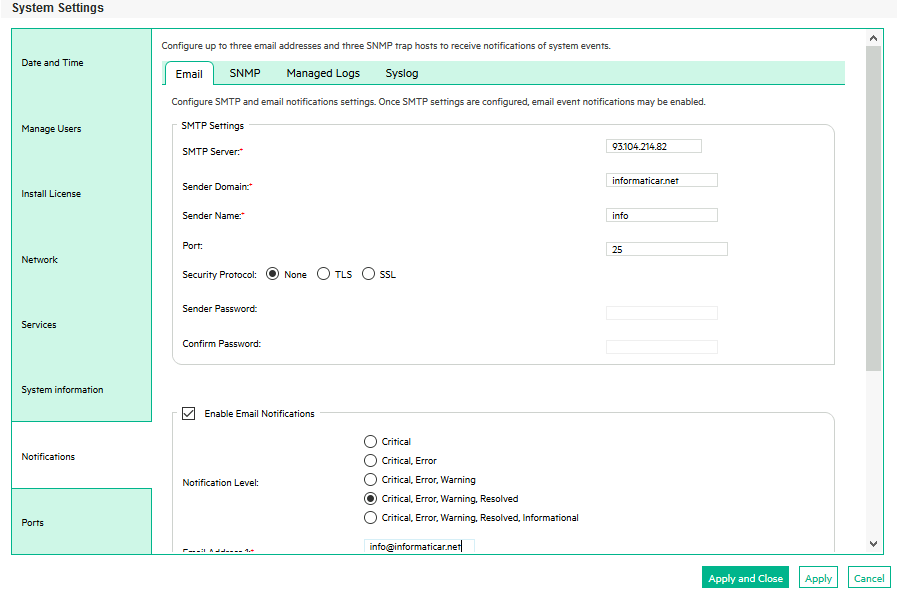
I would like to stress importance of first tab – Email. It is also very quirky, and would not work as expected in my case (even with latest patches).
Here is configuration that worked for me:
SMTP server: instead of server name, I had to enter IP address of my SMTP server. So, instead of mail.informaticar.net I needed IP address of that address.
Sender Domain: your domain name, in my case informaticar.net
Sender Name: instead of full email address, I had to enter only name of the email address.
Port: only port 25 worked for me – not ideal.
Security protocol – nothing worked for me, no TLS or SSL, although I would very much like to have it secured, but in my production it is isolated so this will be ok for me. Check if this is acceptable to you, from security standpoint.
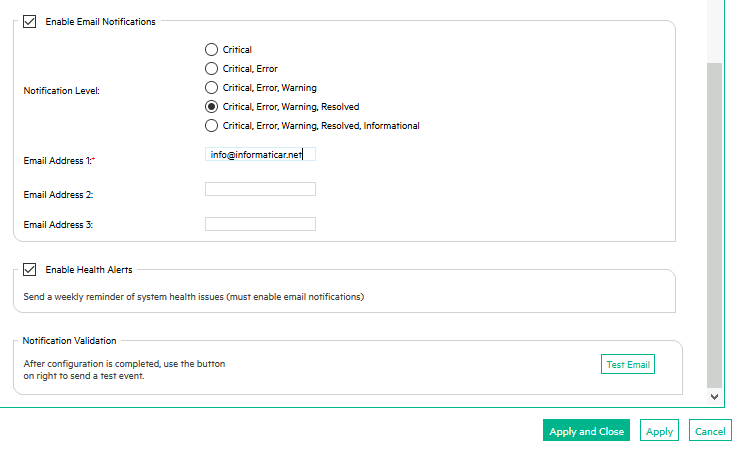
I enabled Critical, Error, Warning and Resolved notifications and entered email on which I would like to receive notifications.
I also enabled Health Alerts and clicked on Apply. After that I clicked on Test Email, and got nothing – no test notification on my email!
To be honest I lost a lot of time troubleshooting this, since it is crucial part of my system to get notifications in time through every channel possible.
In the end, Test Email button does not work in my case, setup is good, but Test Email will not trigger notifications. Notifications work, but Test Email button does not work.
In the end, I tested notifications by unplugging one of the cables of power supply – it worked.

So, notifications work with this rather odd setup, in which you will not get test emails.
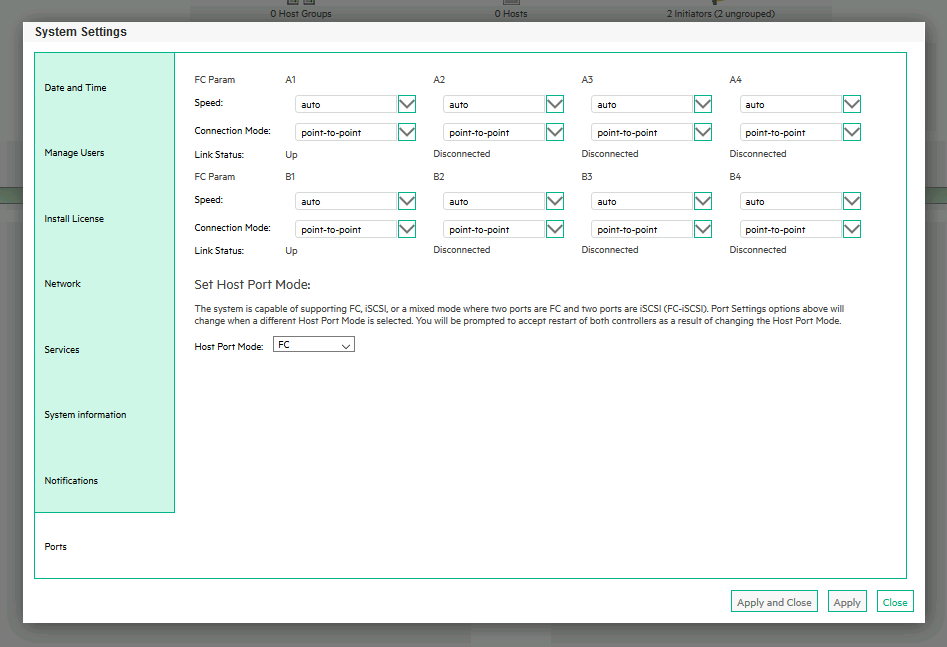
Last setting is Ports – you can fine tune port speeds here, according to your needs. I left everything on Auto in this scenario.
That is it, we did simple system setup.
System
Under System menu you can preview your MSA 2050 disk/module population and status of components.
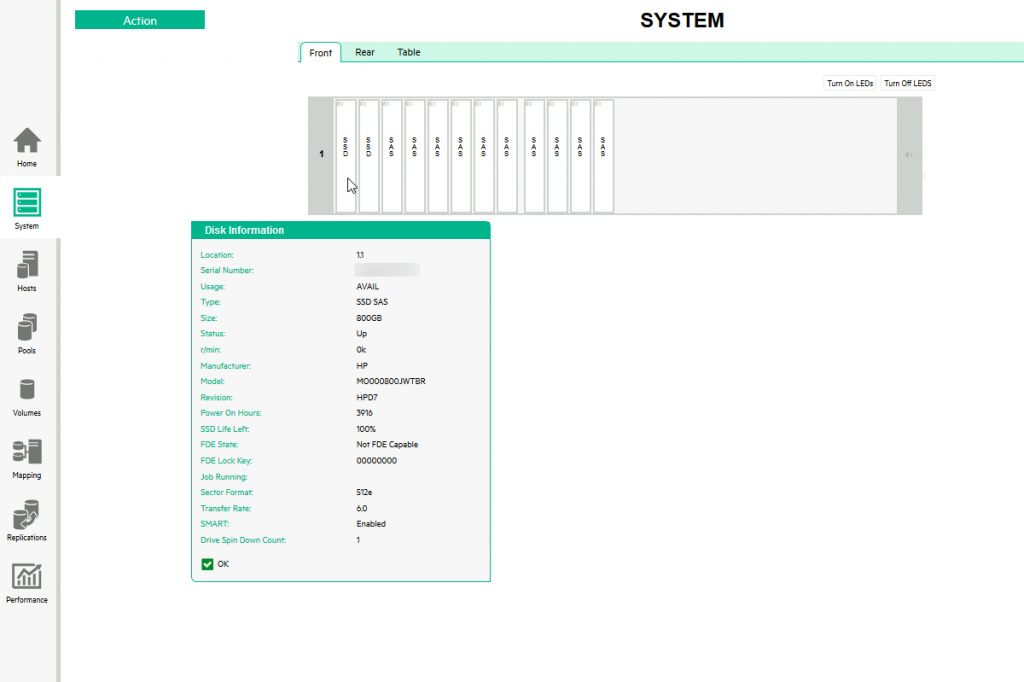
Front view – if can see how much disks you have in your storage and details about every disk if you click on it.
Rear – you can see ports, IP addresses, status of the ports and PSUs – same as in Front view.
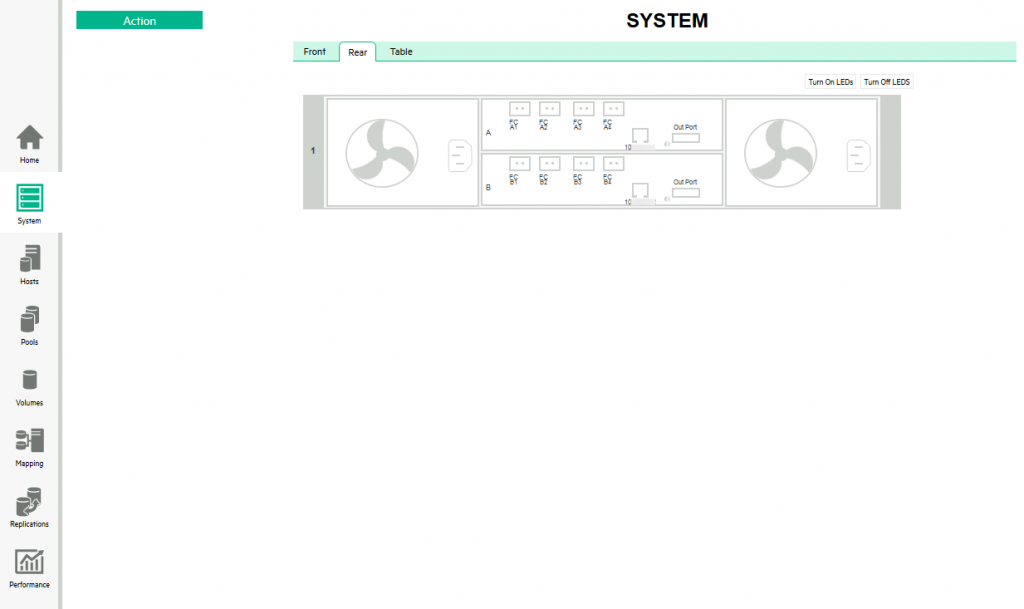
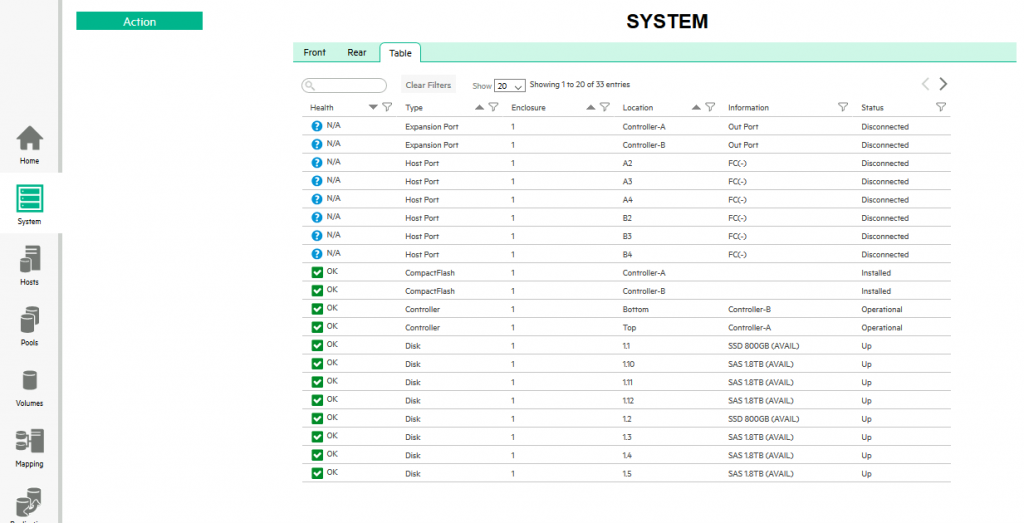
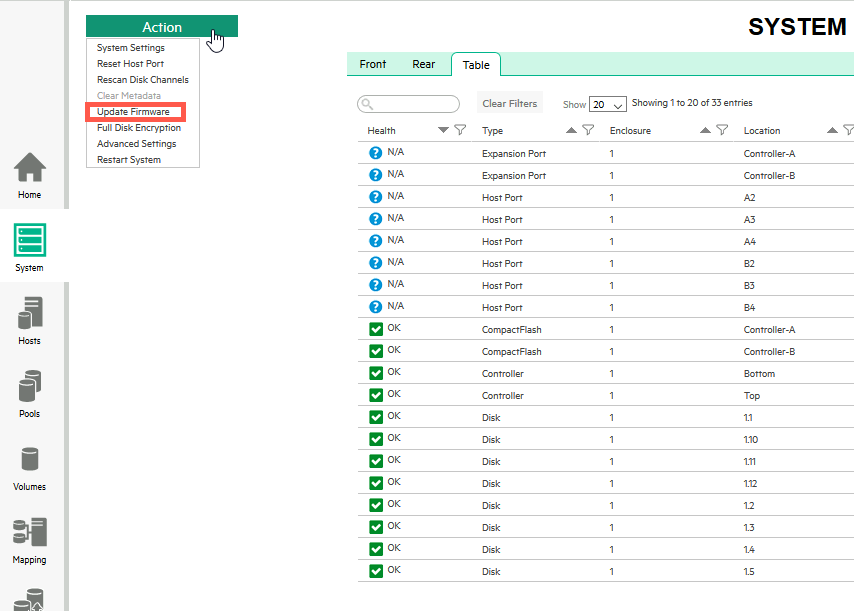
Table view will get you status of all components in comprehensive view.
If you click on Action button – you will get System Settings – same as on Home menu, but you will also get a few new options. I would like to point out Update Firmware here.
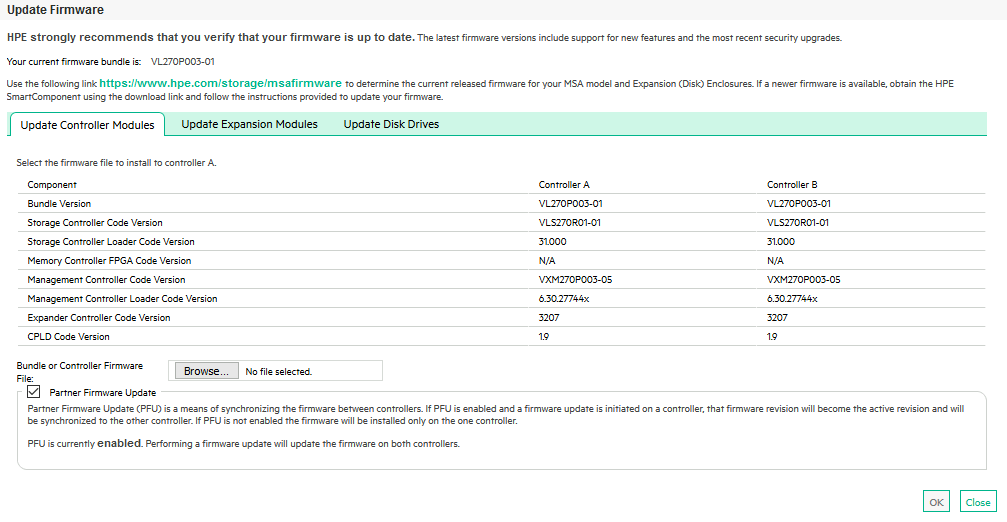
Update Firmware menu
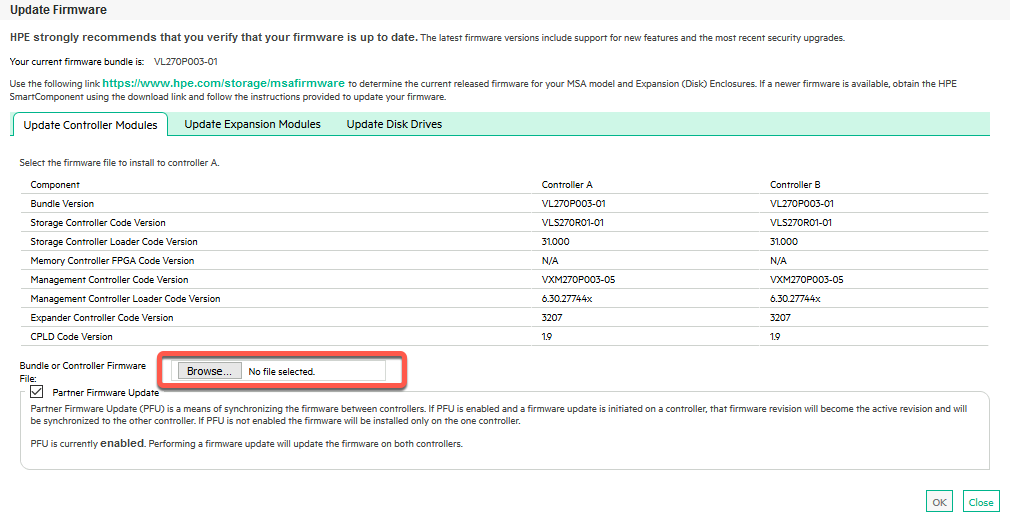
At the time of writing this, my firmwares are all up to date. I recommend updating all firmwares before proceeding with configuration. If you have multiple storages that will work together, in cluster – make sure that they have same firmware versions on them.
How will you check if you have latest firmware, and how will you update you MSA 2050 firmware?
Here you can find information on latest firmware for MSA 2050
https://h41111.www4.hpe.com/storage/msafirmware.html
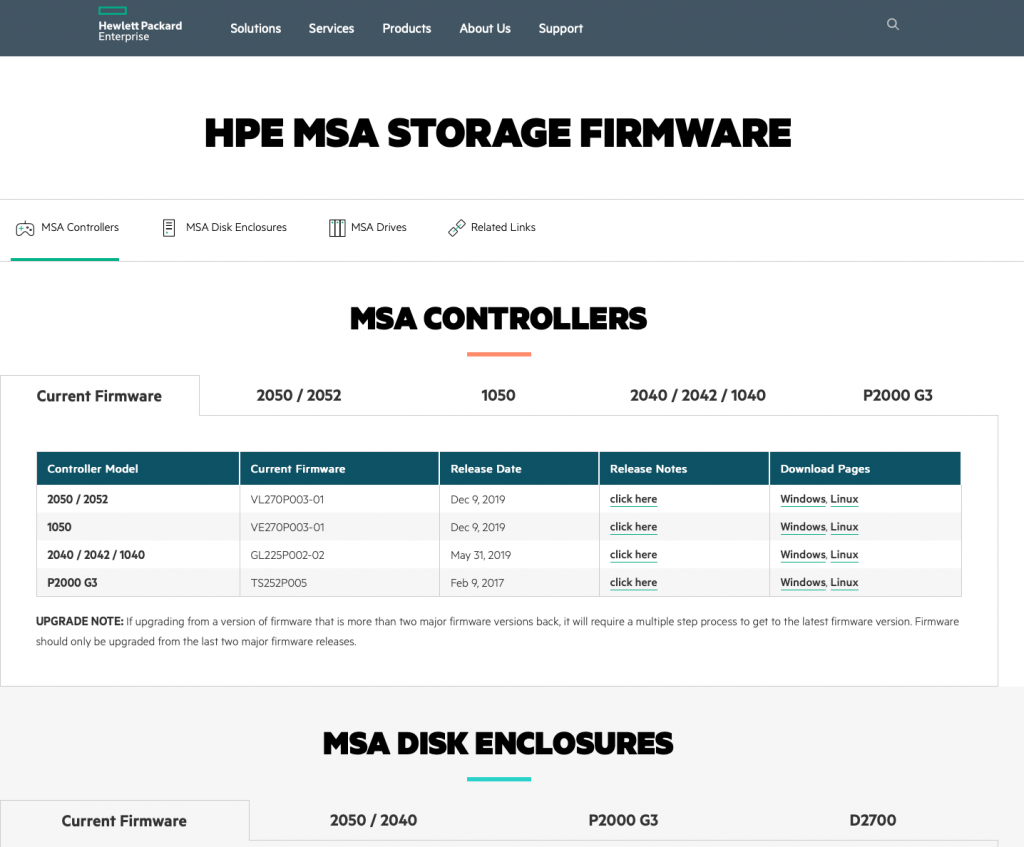
There are controller, enclosures, disk firmwares on this page.
Under Download Pages you can find links to the firmware
I will click on Windows download for 2050/2052 MSA Controller firmware version VL270P003-01
Here is how page looks like. There is a Download button, but it has green padlock next to it, what does it mean? You will need to login to HPE website (create HP Passport, if you don’t have account already) and register your storage.
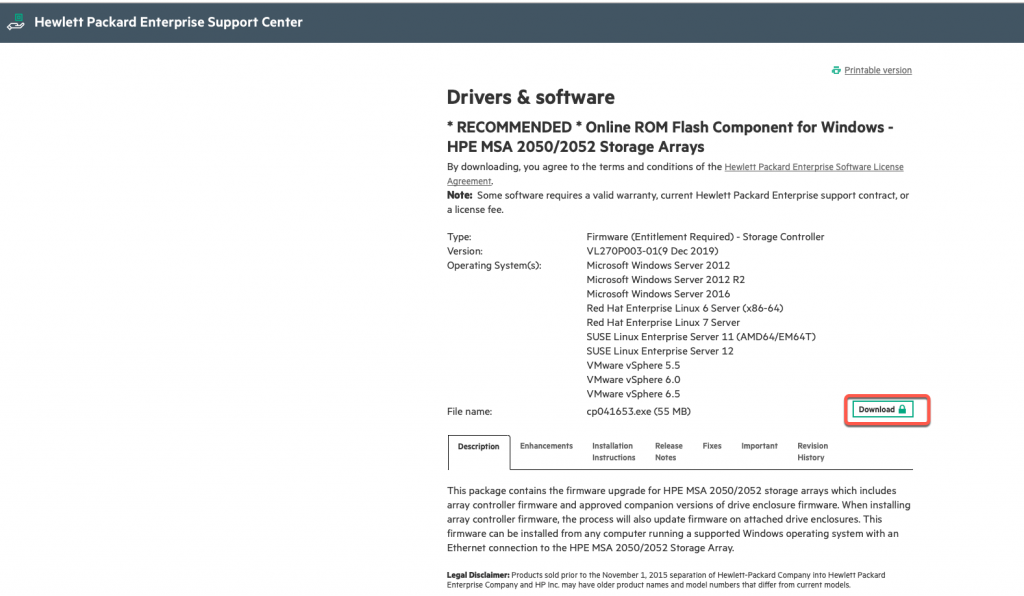
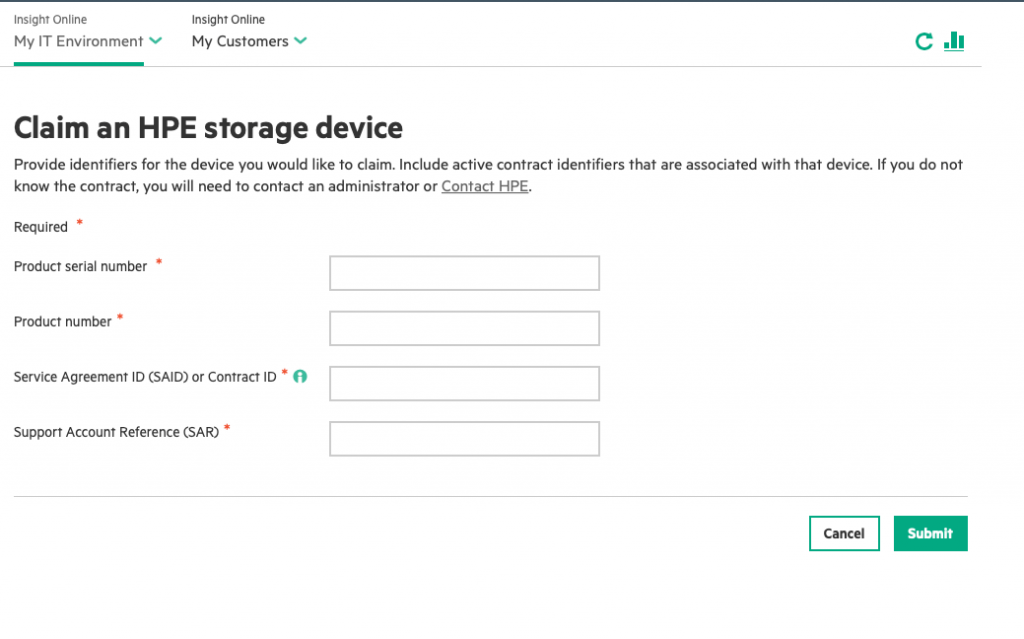
After you logged in to your HPE account (I won’t provide link, since links are changing) you will need to “Clam an HPE storage device”. You will need serial number, product number, SAID and SAR – SAID and SAR IDs you can get from the company you bought your storage from. We had to ask for these, since our supplier did not initial gave these numbers to us, and this info is not on the controller itself.
After you registered your storage you can proceed and download your firmware.
After you downloaded firmware files you can upload them to your controller by clicking Browse on the bottom of your Update Firmware page. You will ned to repeat this procedure for Expansion Modules and Disks, if there are firmware updates for them.
In case upload doesn’t work, you can upload files via FTP or SFTP and update that way.
More details on firmware updates can be found on page 67 of this manual:
https://support.hpe.com/hpesc/public/docDisplay?docId=a00017707en_us
Hosts
Hosts part will probably differ in you case if you don’t have FC enabled MSA 2050.
On host tab I will create connection between MSA 2050 and my server. Through this connection server will get storage from MSA 2050.
Here is my setup for Hosts part:
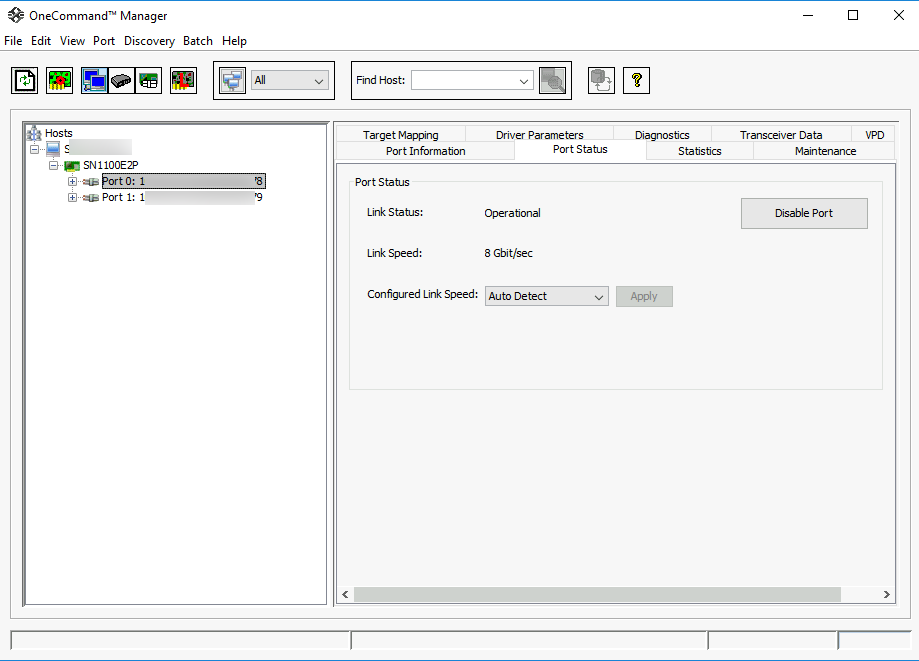
For this tutorial I connected MSA 2050 to my HP Gen 10 server. To connect MSA 2050 with FC ports to your server directly you will need HBA card in your server. HBA card in my case is HP SN1100E2P.
You will also need to install piece of software on your server so you can control installed HBA card.
For SN1100E2P card that software is OneCommand Manager and it is installed in Windows Server 2019.
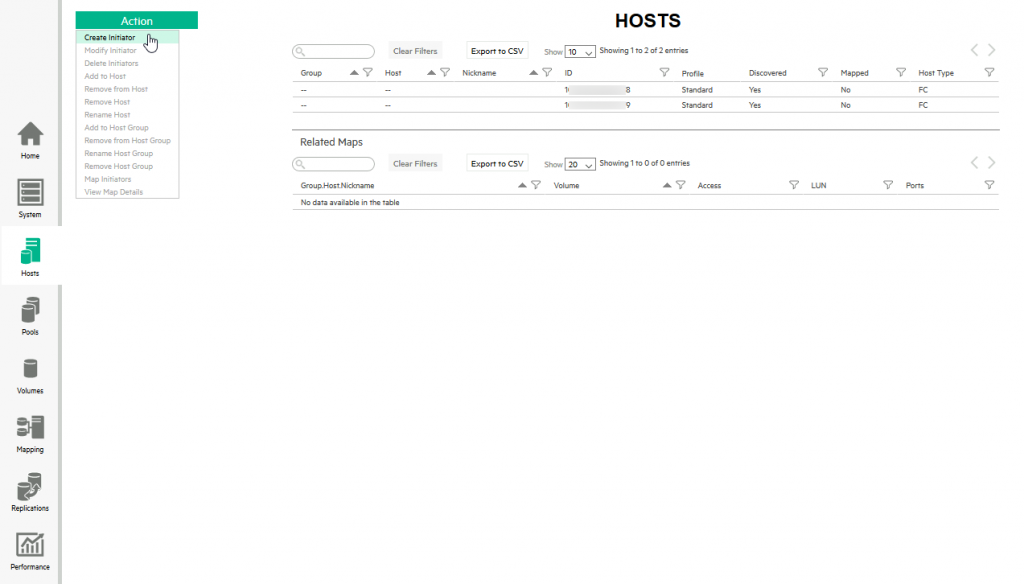
Ok, back to the MSA 2050. In the screenshot above, you can see that I already opened Actions menu, and only possible option is
Create Initiator
Ok, so lets create Initiator ( I already did it as you can see from the screenshot above, but lets repeat.)
Initiator ID (WWN/IQN) – where would you find it?
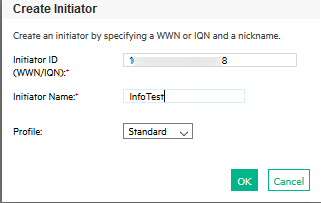
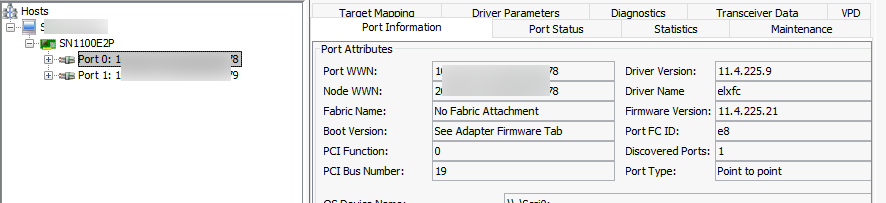
You will head back to your server, and open you OneCommand Manager, there under the port you connected ( I connected port 0) under Port Attributes tab you will find Port WWN. Enter port WWN into MSA 2050 Initiator ID as I did above. Initiator Name can be of your liking. When you are done, confirm with ok.
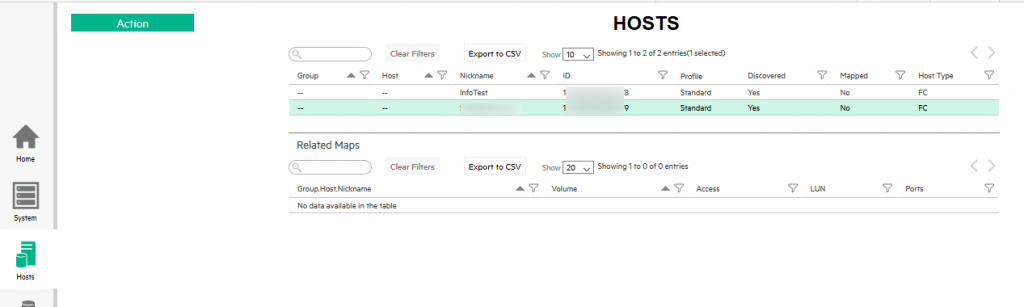
Now, your Hosts menu will look like this when you created Initiator connections.
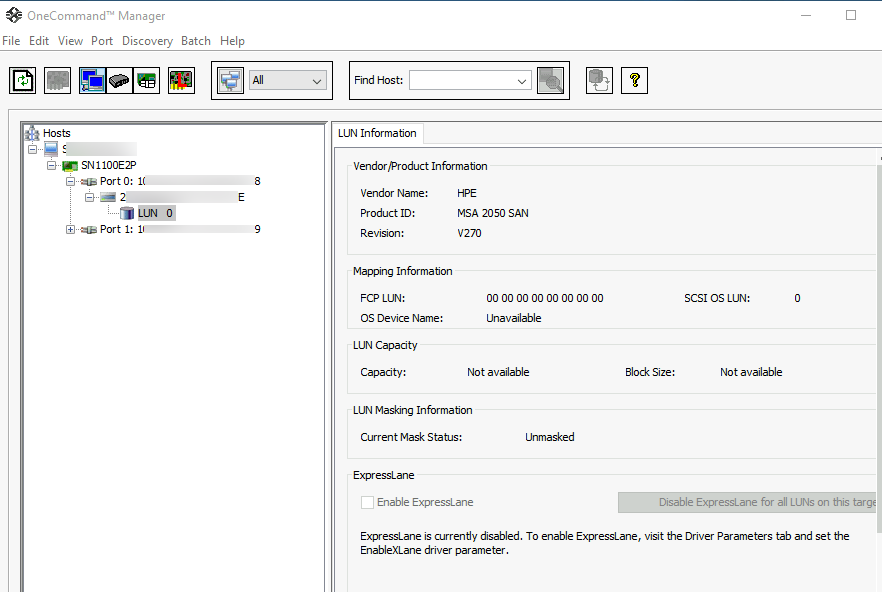
In OneCommand Manager on your Server, you will also get new additions under your ports (connection details from MSA 2050)
Ok ,that is it. You now have connection between MSA 2050 and Server, we will head on to configure storage.
One little note, it is very possible that Hosts will get automagically configured after you plug in SFP cables from your MSA 2050 controllers to your server/switch.
Pools
In Pools sections we will create RAID groups from our disks. I will show you procedure, but you will have to decide what is best for your scenario. Your disk setup may vary, and purpose of MSA 2050 you bought may vary.
How will you configure your RAID group depends on how much data will be written or read on your MSA 2050 – what is more important to you – speed or extra reliability…
Ok, my Pools screen is empty, so let’s configure it.
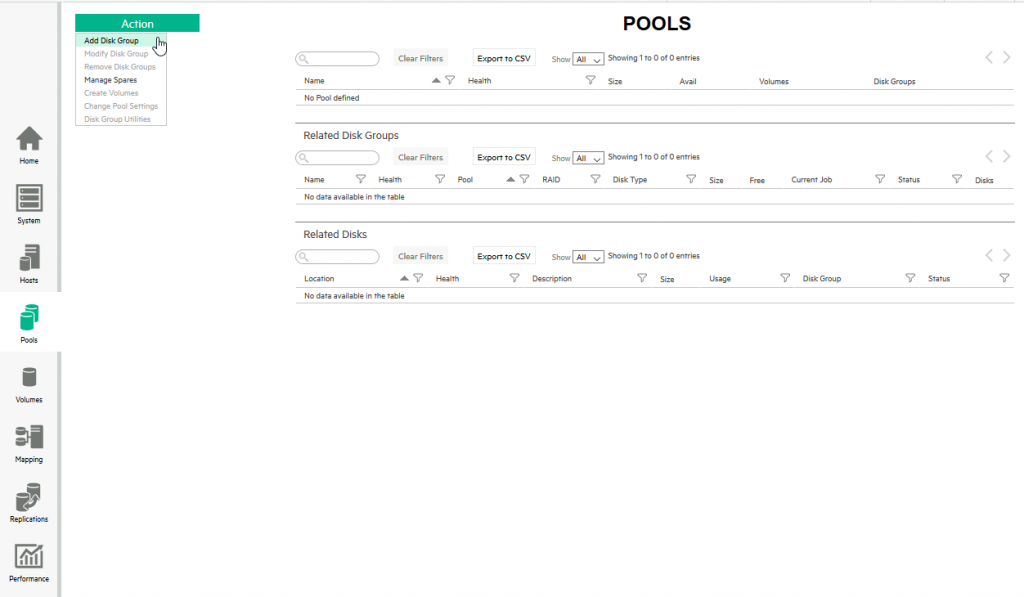
Add Disk Group – so, lets see what I did – I selected RAID 6 – I got to select from RAID 0, 1, 5,6, 10. I selected RAID 6 – why did I selected RAID 6 – for this setup speed is not from utmost importance, and I want extra layer of security. I “wasted” 3.6TB of space because of this decision.
Also, I left out one SAS disk in slot 12 from this configuration. I will make it my spare drive for this configuration.
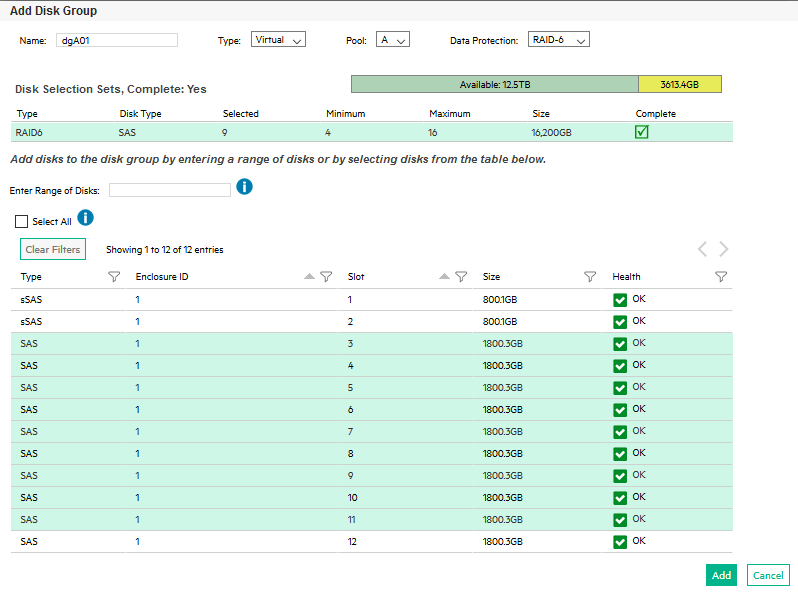
FYI – I couldn’t mix 800GB SSD drives with this configuration – I left them out (on purpose).
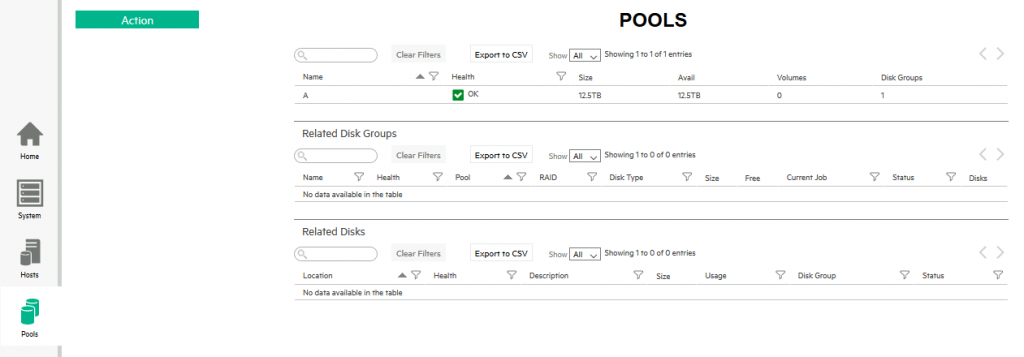
Pool is created.
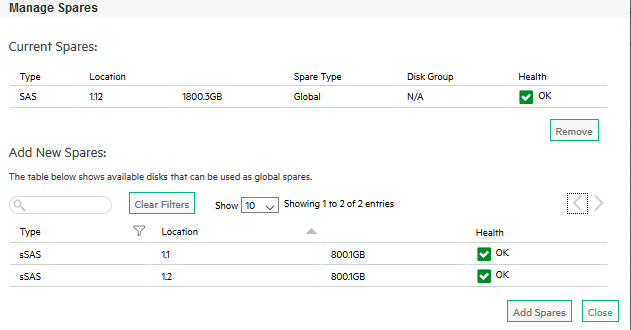
Next, from Action menu I will select Manage Spares
I will select 1.8TB drive in location 12 and make it global hot spare. Confirm with Add Spares
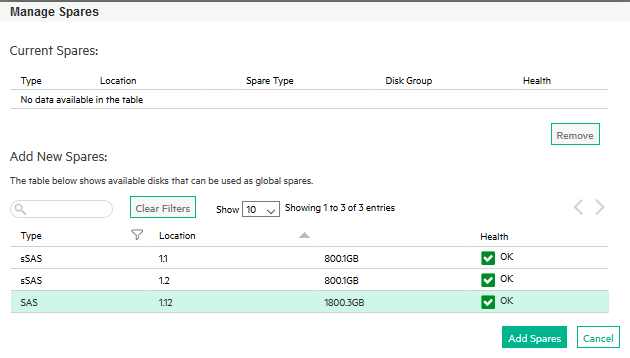
After I reopen Manage Spares, we can see that disk is assigned as global spare.
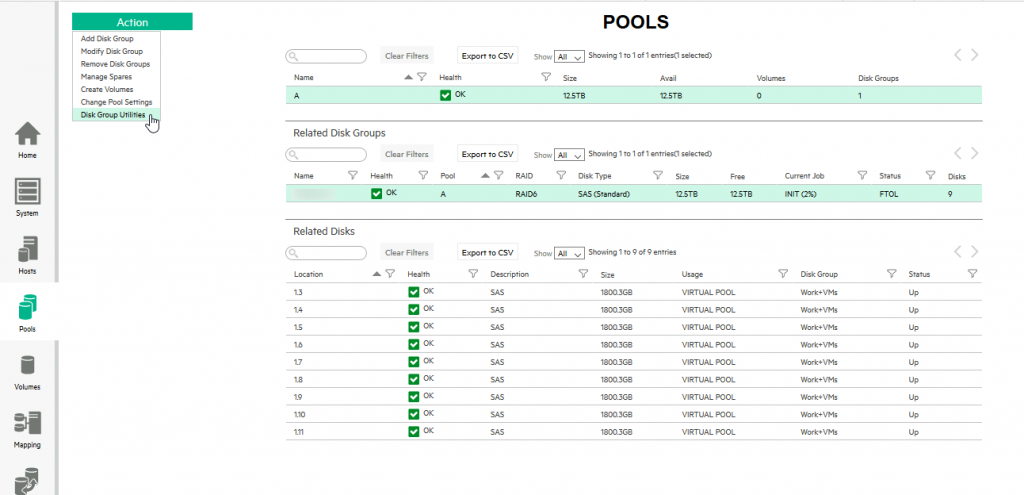
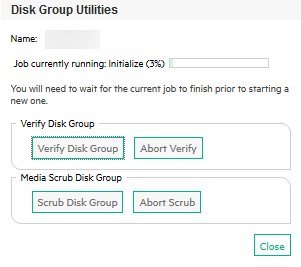
After you created Pool, if you select Pool and then click on Action button, you will now get options to manage it. I will select Disk Group Utilities because it will show me how far did my Pool initialisation is going so far…
Ok, so I’m at 3% of disk initialization.
Under Pool Thresholds menu in Action you can define thresholds for your pool, and set them according to your needs.
Now, before we leave Pools menu, we will have to do one more thing. If you noticed, I left out two SSD drives of 800GB size. I have done it on purpose. I want these SSD drives to act as a cache for MSA 2050 RAID group.
Back to Action – Add Disk Group
Now, all I got are two 800GB drives in slots 1 and 2. I will select them, and then under Type I will select Read Cache. Add
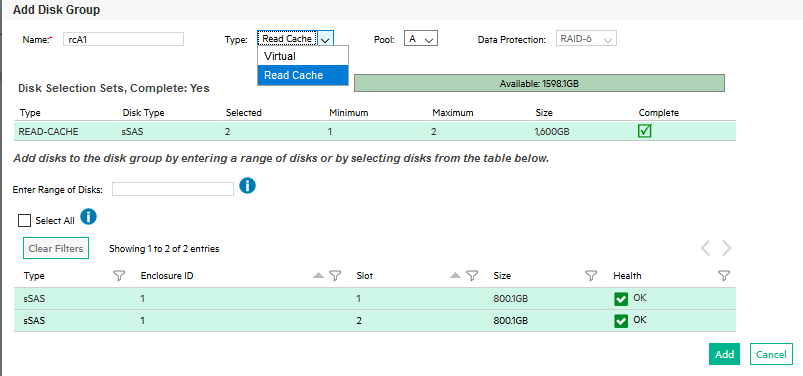
Ok, we are now done.
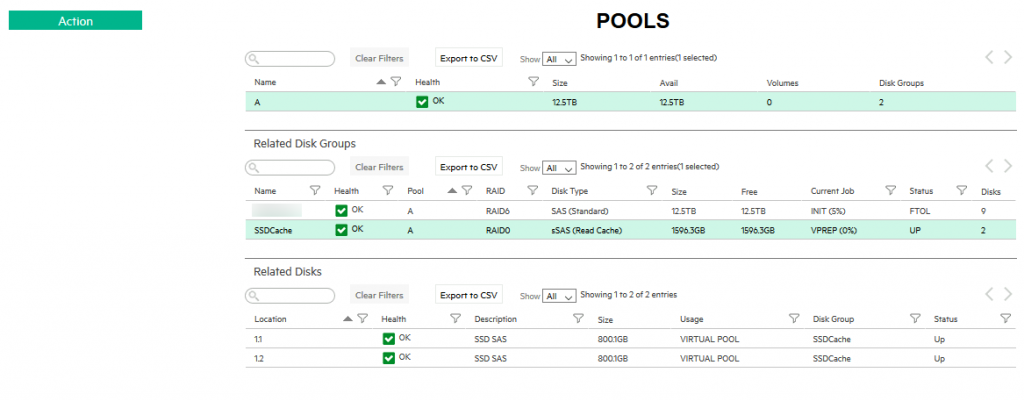
To recap, I created RAID 6 group with the size of 12.5TB, I alocated 1.8TB disk in bay 12 as a global hot spare, and 800GB SSDs in bay 1 and 2 as Read Cache drives.
This is the configuration that will be great for my scenario.
Volumes
After we created Pool, next we will define Volumes on created Pool.
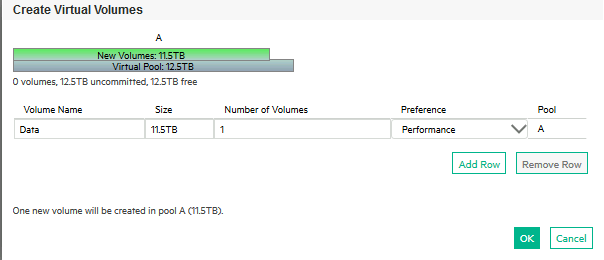
I will create two volumes – one will be 11.5TB in size for data, and one will be of 900GB size for VMs and such. I left a bit of space empty just to be sure in an unknown situation (disks almost full for example)
Action – Create Virtual Volume
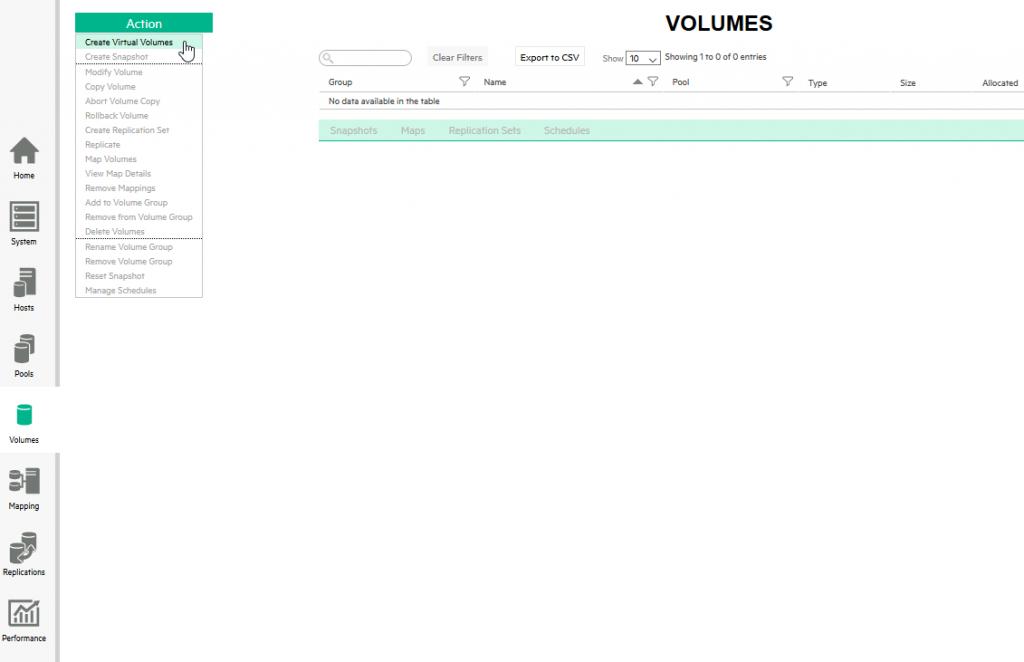
I defined name for the volume, size as I already said, you can set preference to your liking, as archive, performance or no affinity. When you are done – OK
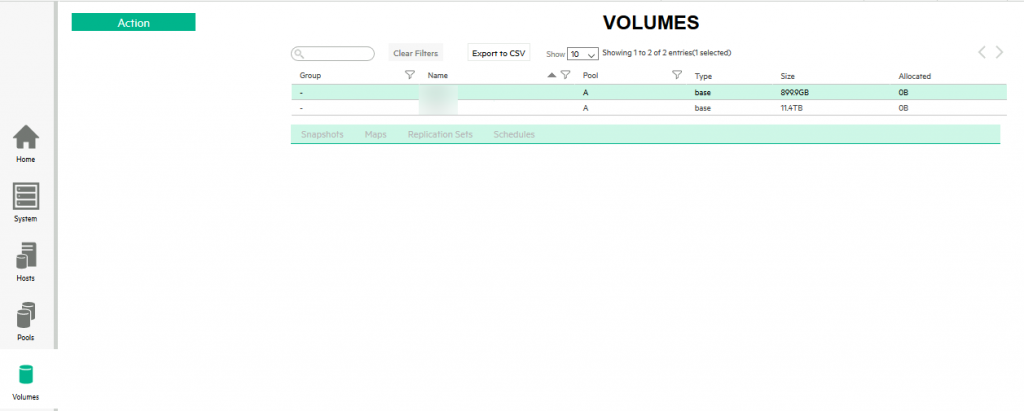
I created two volumes, as I already mentioned, and this is how that looks like.
After you select created volume, there are a couple more options that you can configure.
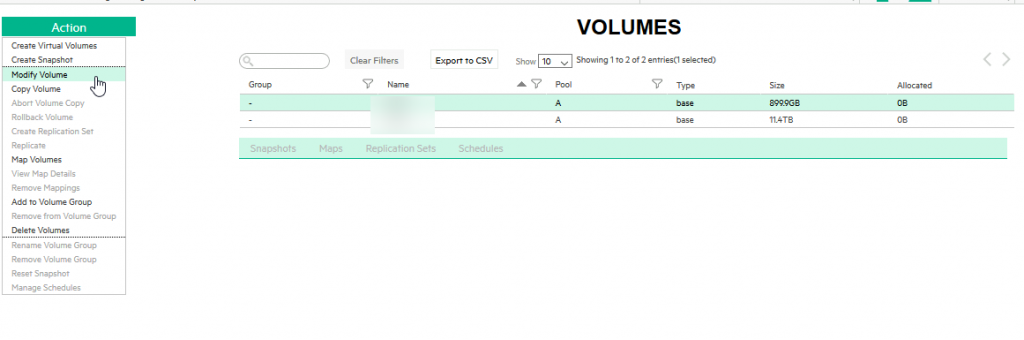
I will just mention Modify Volume, mainly because it is menu in which you can expand your volumes – I will need that in the future for sure. That is also place where you define caching options.

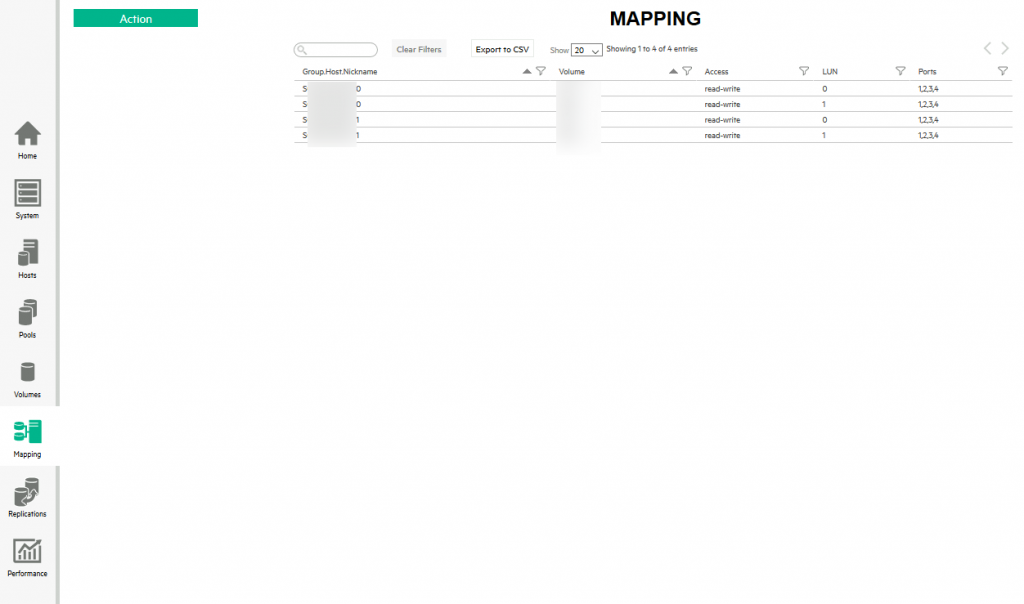
Mapping
In the end, MSA 2050 is very intuitive – we connected it to server via FC, created pool of disks, created volumes of those pools, and now we will map these volumes to the server we connected earlier.
Action – Map
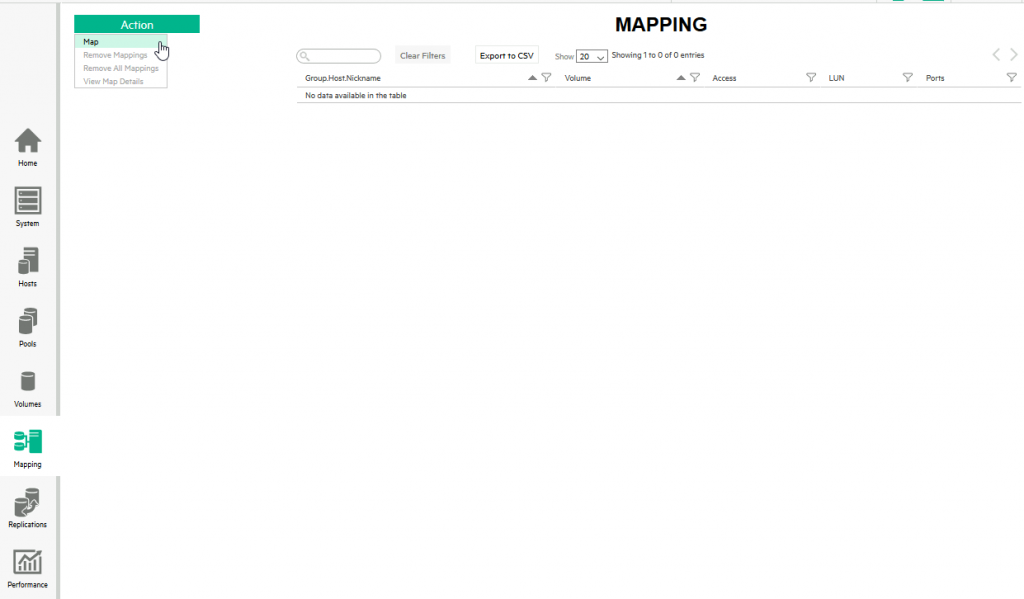
From the left side I will select both initiators I created in Hosts menu, and from Volumes, I will select both volumes I created. Click on green Map button below them
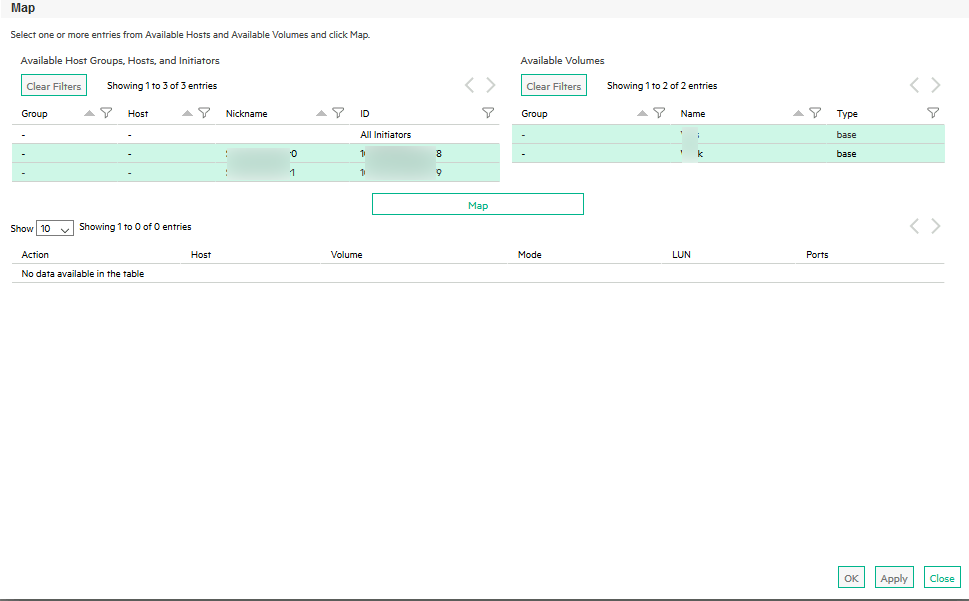
After you clicked on Map, this is the result, modify settings according to your needs. I’m done so I will select Apply – OK
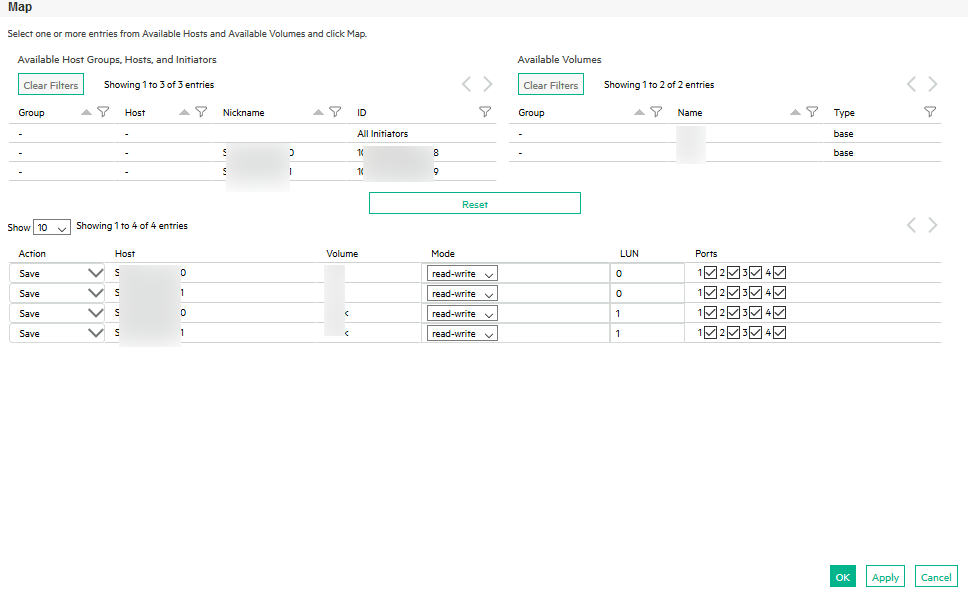
Mapping is done
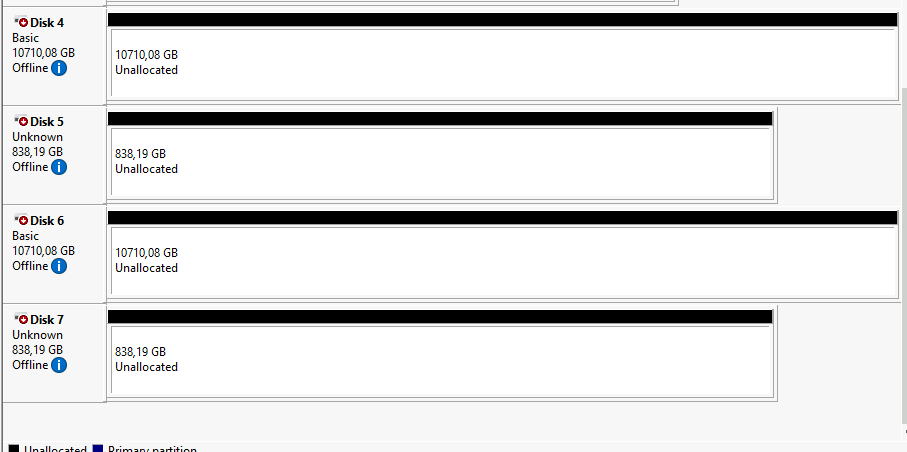
Now, quickly from MSA 2050 to Windows Server…
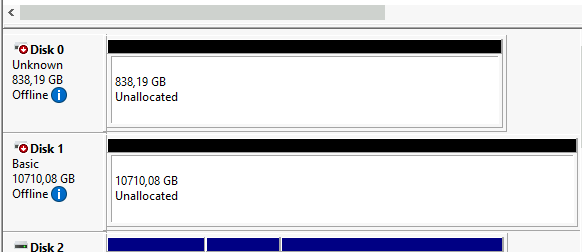
In your Windows Server machine you will now probably have situation like this. Great, Windows Server can see disks, but this is also not good.
We will need to enable multipathing in Windows (MPIO). I won’t go into details with this procedure, this is only a short reminder what needs to be done.
In Control Panel, click on MPIO, go to Discover Multi-Paths, select MSA 2050 SAN and click on Add.
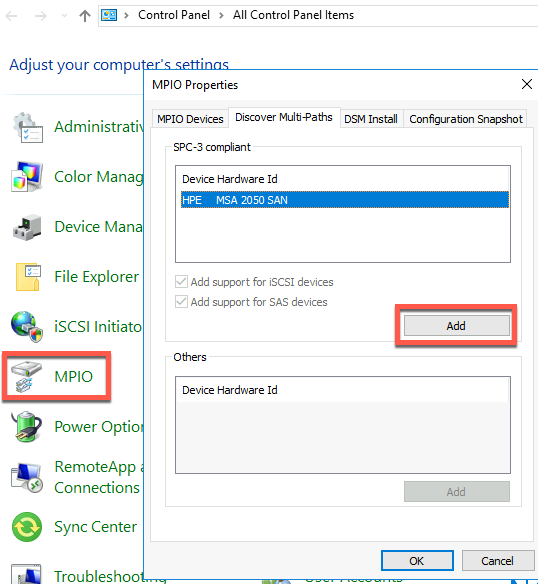
You will also be asked to reboot server for changes to apply – have that in mind and schedule a reboot.
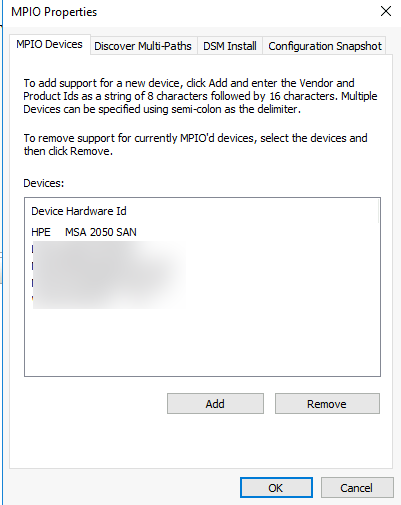
After Reboot if you go back to Control Panel – MPIO, you will see HPE MSA 2050 SAN on the MPIO Devices list.
Also, if you go to the Disk Management, you will now only see one disk of 838GB and 10.7TB size – MPIO is working.
Replications
I really don’t have anything to show here, since in this test scenario I won’t be configuring replication of MSA 2050

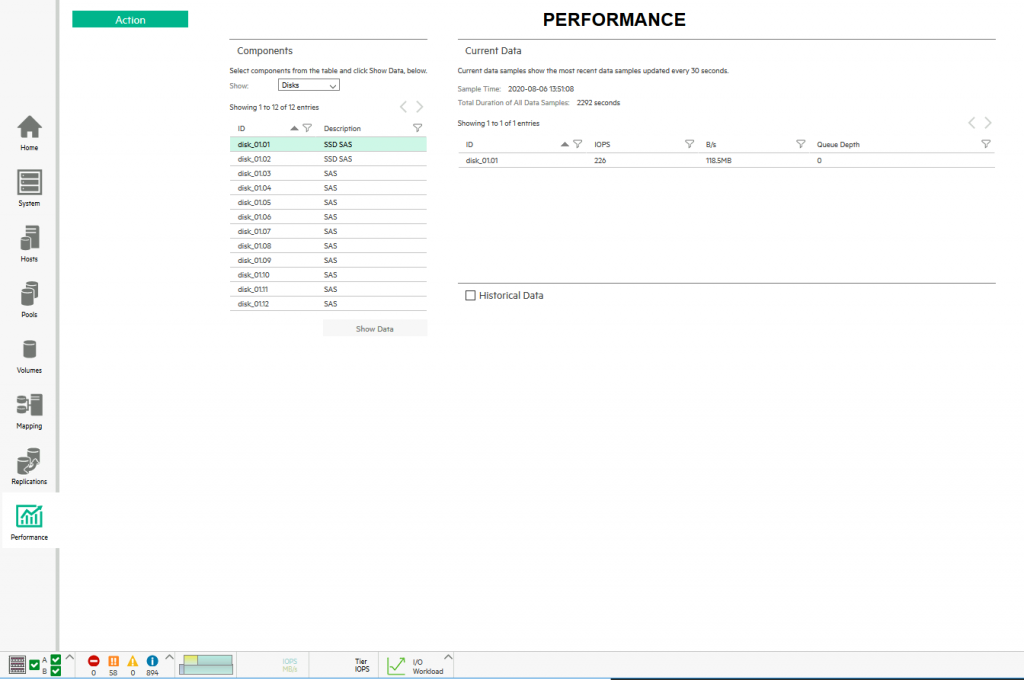
Performance
In Performance menu you can see stats for your disks, volumes, pools, host ports… Really useful statistics for monitoring…
Bottom of the screen
Bottom row of the screen shows status of enclosure, controllers, warnings, errors, informational logs, storage capacity and I/O performance at glance.

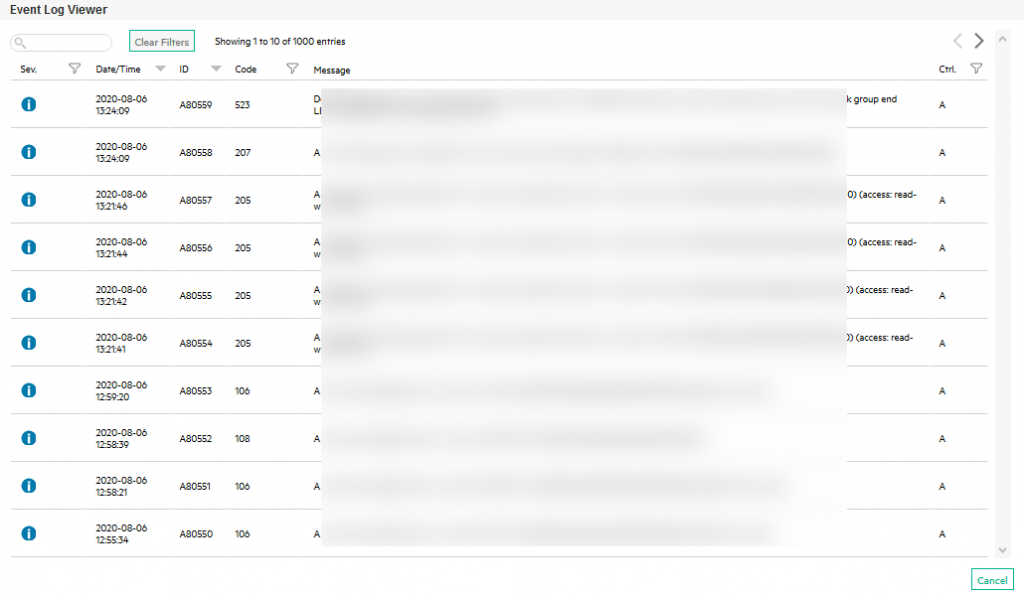
If you for example click on little triangle next to events portion of the screen, you can select to Show Event List

Event list will show warnings, errors, info from your MSA 2050
Conclusion
This was simple MSA 2050 configuration scenario, this system is much more capable, but I hope this gave you a rough overview of simple functions on it.