As of today (March 2021) we still have more than two years to use Windows Server 2012 R2 server. Smart thing to do would be to plan your exit strategy and make sure your services are on supported Windows Server version when support for WS 2012 R2 is near its end. I use WS 2012 R2 for years now on daily basis, and it has been great and rock solid software, but it’s time to move on :(
In this guide we will be moving our Domain Controller to Windows Server 2019 which I found to be also great product and very good choice for production environment.
Before we begin
Make sure you first test this scenario, and that you test it good, DO NOT rush into production and do it immediately there!! First test this, and when you are confident enough, do the switch in your production environment. I cannot be responsible for any type of damage you do, by following this guide.
I currently have domain named test.local and it resides on Windows Server 2012 R2 Standard (WS 2012 R2) machine.
Name and IP address of the machine:
DC1 – 172.21.1.6
For testing purposes I created few users, groups and group policy rules.
Existing domain has forest functionality at WS 2012 R2 level.
I will be adding Windows Server 2019 Standard (WS 2019) as additional domain controller to the existing domain and then we will transfer all the roles and domain to it.
WS 2019 name and IP address (achine should be joined to the domain):
DC2 – 172.21.1.7
For the initial setup make sure that WS 2019 has following DNS servers at IPv4 network adapter
172.21.1.6
172.21.1.7
It is crucial that 172.21.1.6 (IP address of existing WS 2012 R2 DC) is first in your DNS settings on WS 2019 machine for the procedure where we will add WS 2019 as a DC to our test.local domain.
WS 2019 will automatically prepare domain and forest during dcpromo procedure, so we don’t have to do it manually.
If you are not sure how to add WS 2019 as a domain controller and what are necessary steps, it is described here.
Make sure you have a good and fresh backup before starting this process.
Raise Domain and Forest Level – Migrate from FRS to DFS
!!!!________OPTIONAL PART YOU CAN SKIP THIS IF THERE WAS NO WS2003 or WS2008 DCs______!!!!
Before we get into this part (this is optional, but will be required if you have leftovers of WS2003 or even WS2008 in your domain.)
Raise Domain and Forest Functional Level (if it is below WS2008)
please first check your domain and forest functional level – it has to be minimum Windows Server 2008. If it is Windows Server 2003 – you will not be able to continue and add WS2019 as DC to your domain. You can find info on how to raise domain and forest functional level at the bottom of this guide (make sure that you don’t have DCs left behind that are older than domain or forest functional level)
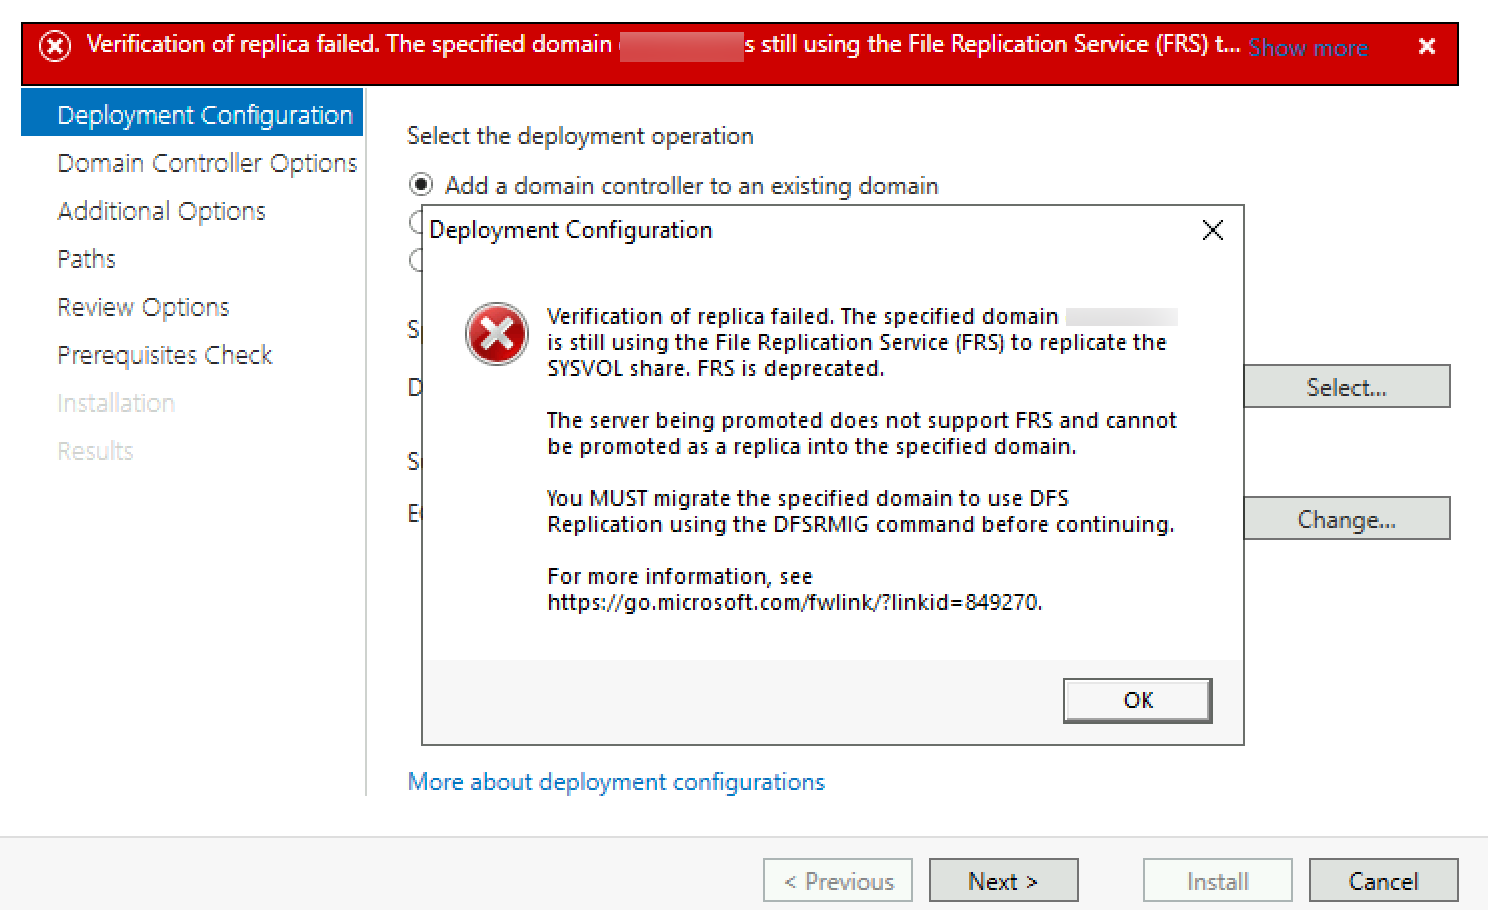
!Not Mandatory step –Migrate Sysvol from FRS to DFS. (You are probably stuck with this if you migrated from WS2003 to ws 2008 and then to WS2012 (or similar situation).
!!You don’t have to do FRS to DFS, you can start process of adding WS2019 as DC below, and if you get error below, then come back to this!!! Also make sure you have enough disk space on you DC before you start with this.
Also, this has to be done only on one DC inside domain, it will replicate changes to other DCs in domain.
If you need more info – check here – https://docs.microsoft.com/en-us/previous-versions/windows/it-pro/windows-server-2008-r2-and-2008/dd639860(v=ws.10)
Run command prompt as admin on your WS2012 domain controller.
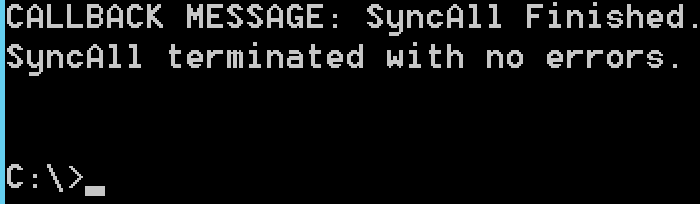
First we will make sure that all DCs are synced
Repadmin /syncall /force /APed
We will start migration by typing in
dfsrmig /setglobalstate 1Check state of the migration by typing in following (do not proceed until you are sure that the command finished)
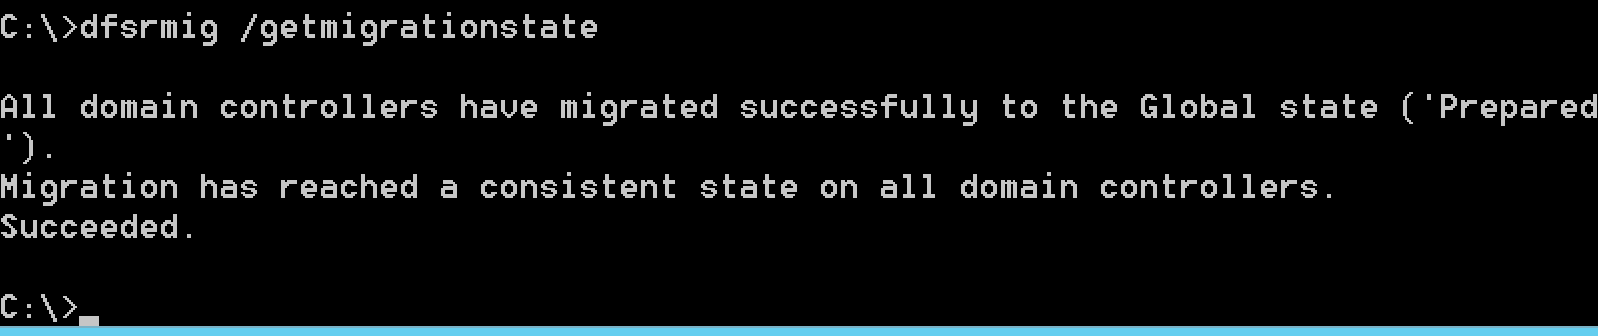
dfsrmig /getmigrationstate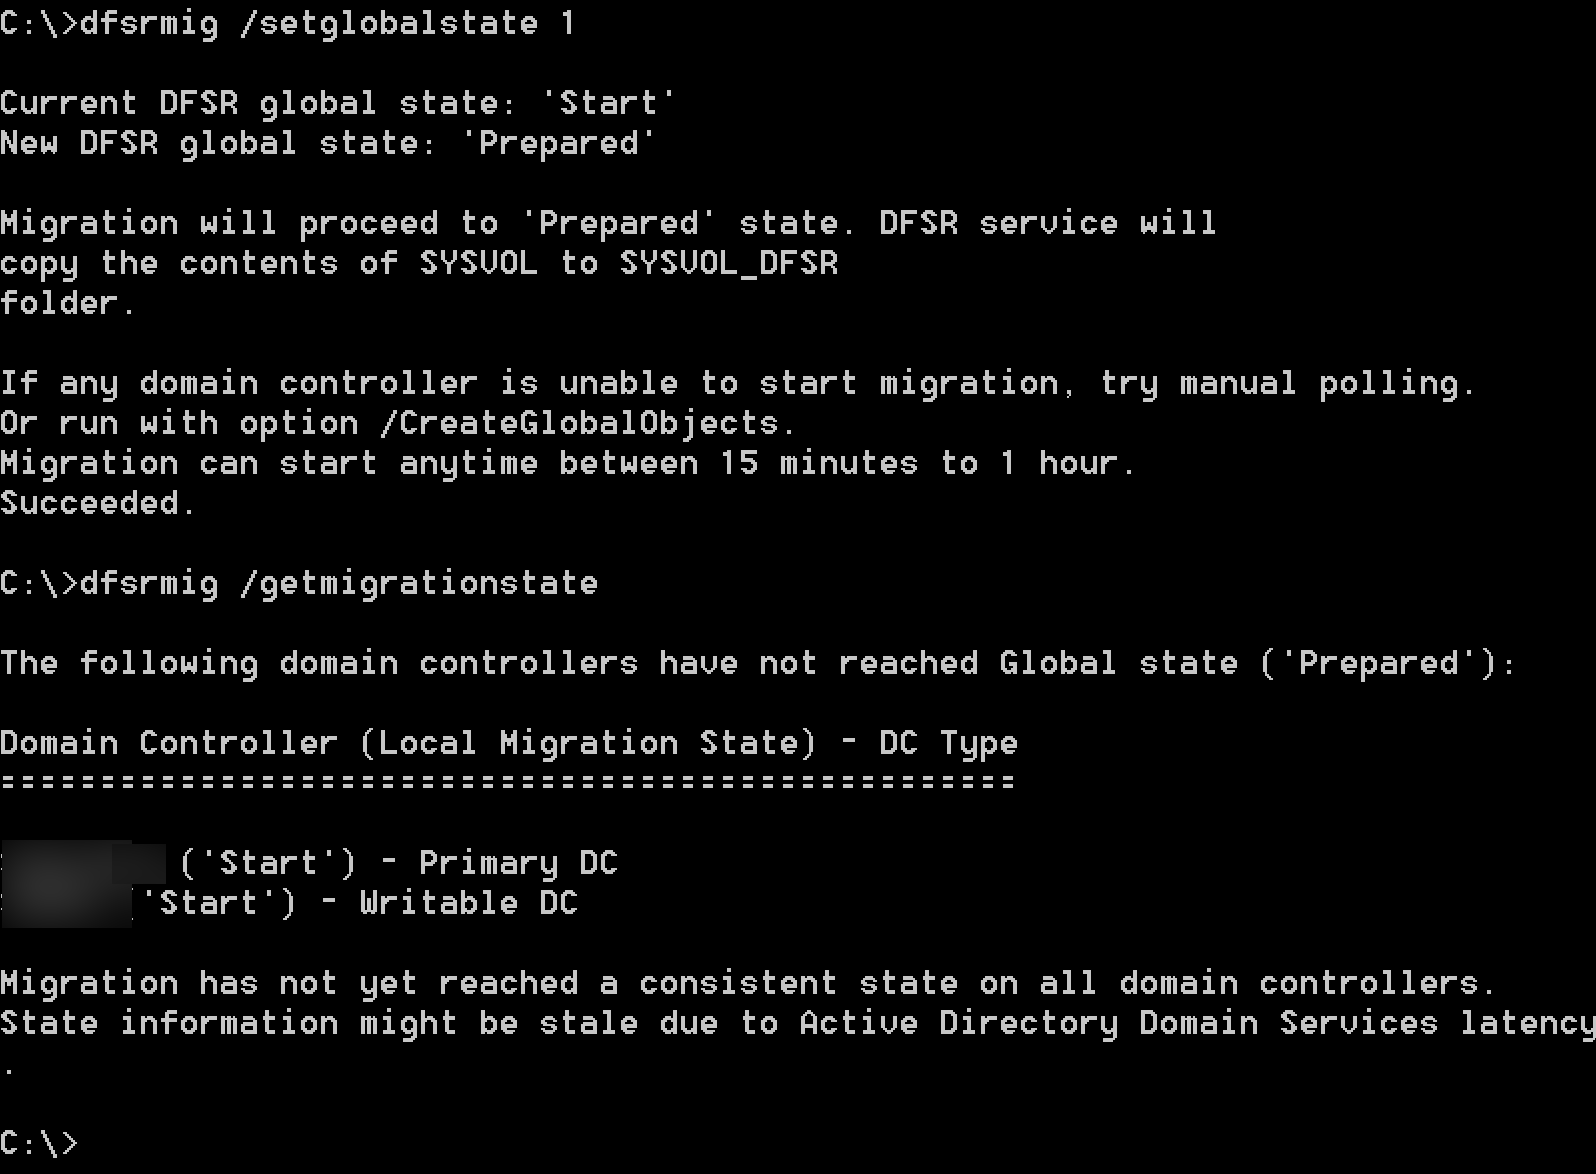
After you get message that all your DCs are in Prepared state, we can proceed.
Let’s continue with next step
dfsrmig /setglobalstate 2Again, check state with
dfsrmig /getmigrationstate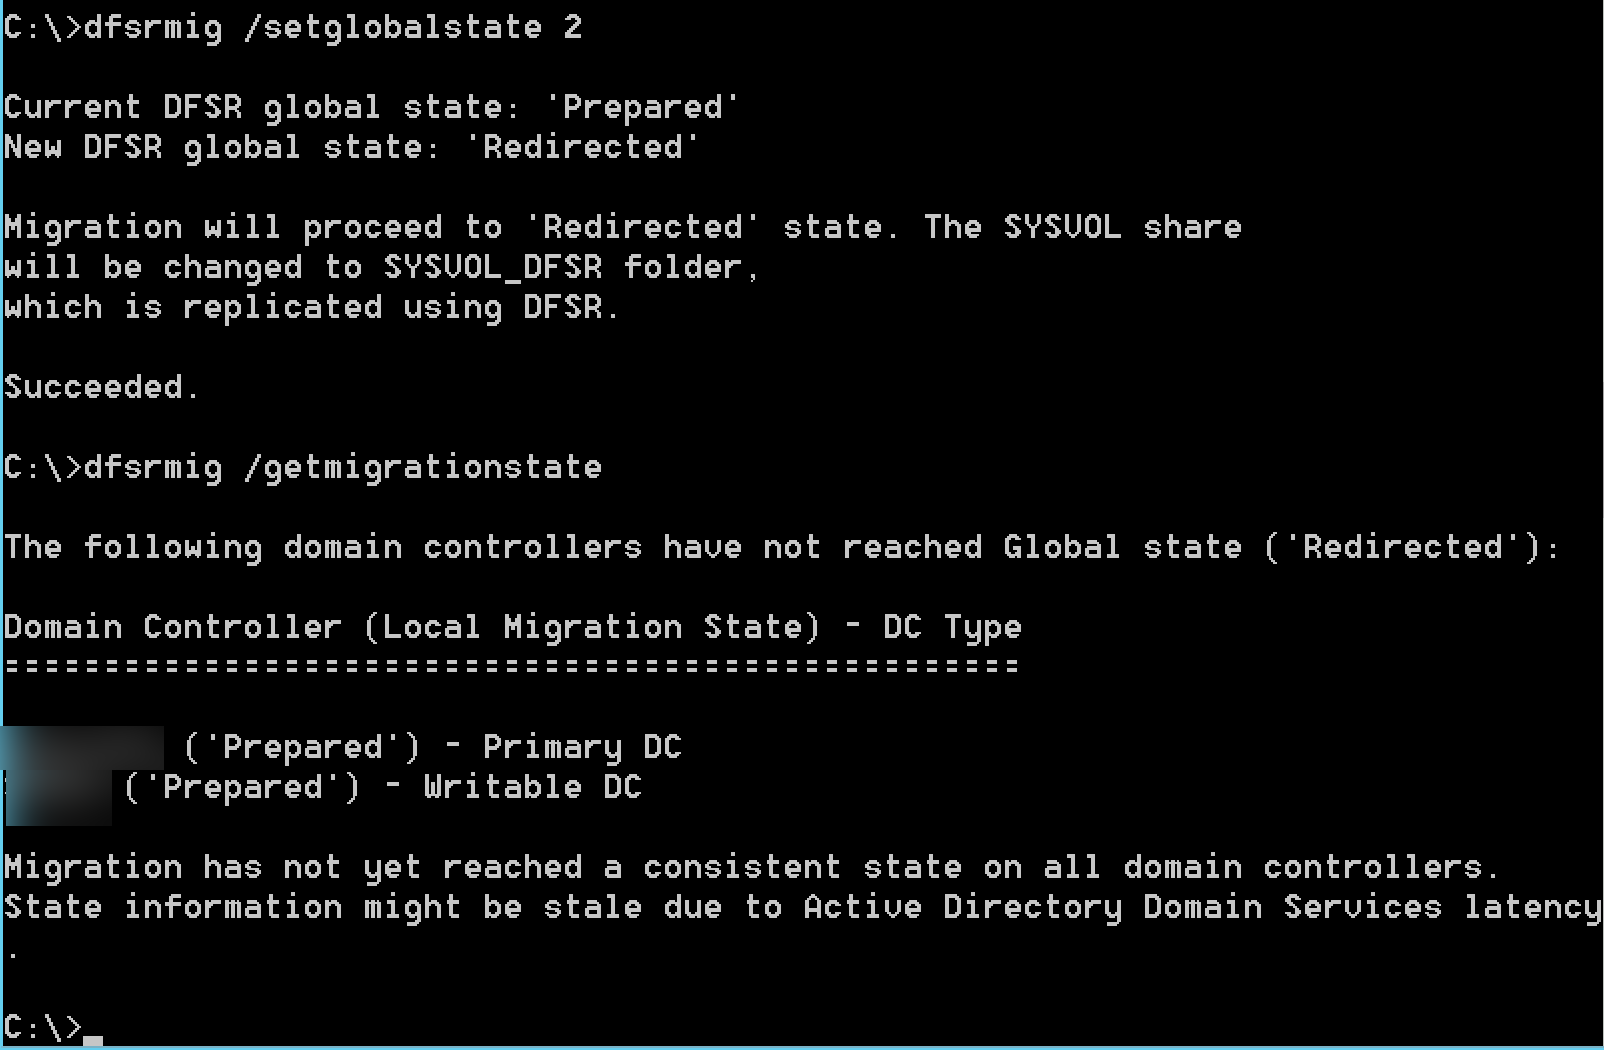
Ok, we reached redirected state, we can continue further
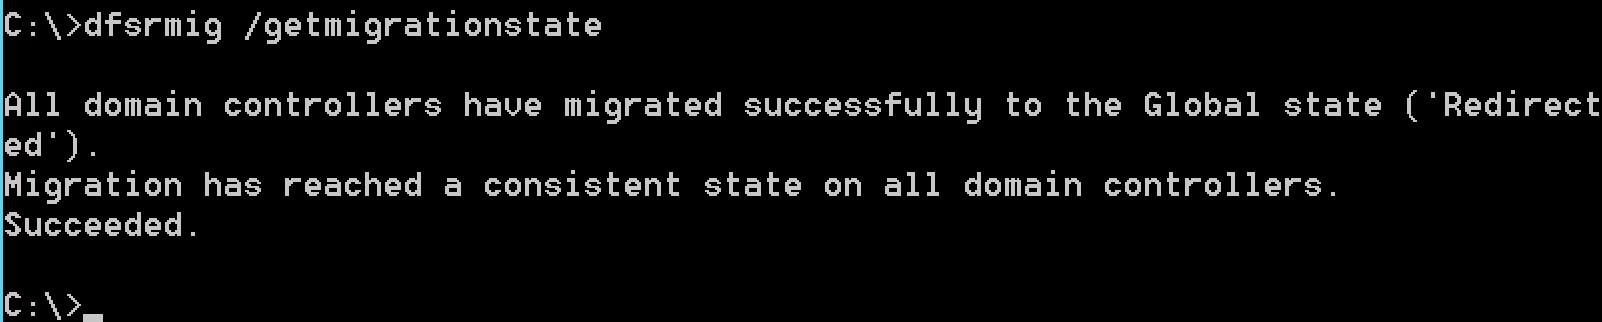
We can proceed now to the final step
dfsrmig /setglobalstate 3Again, check status of the migration
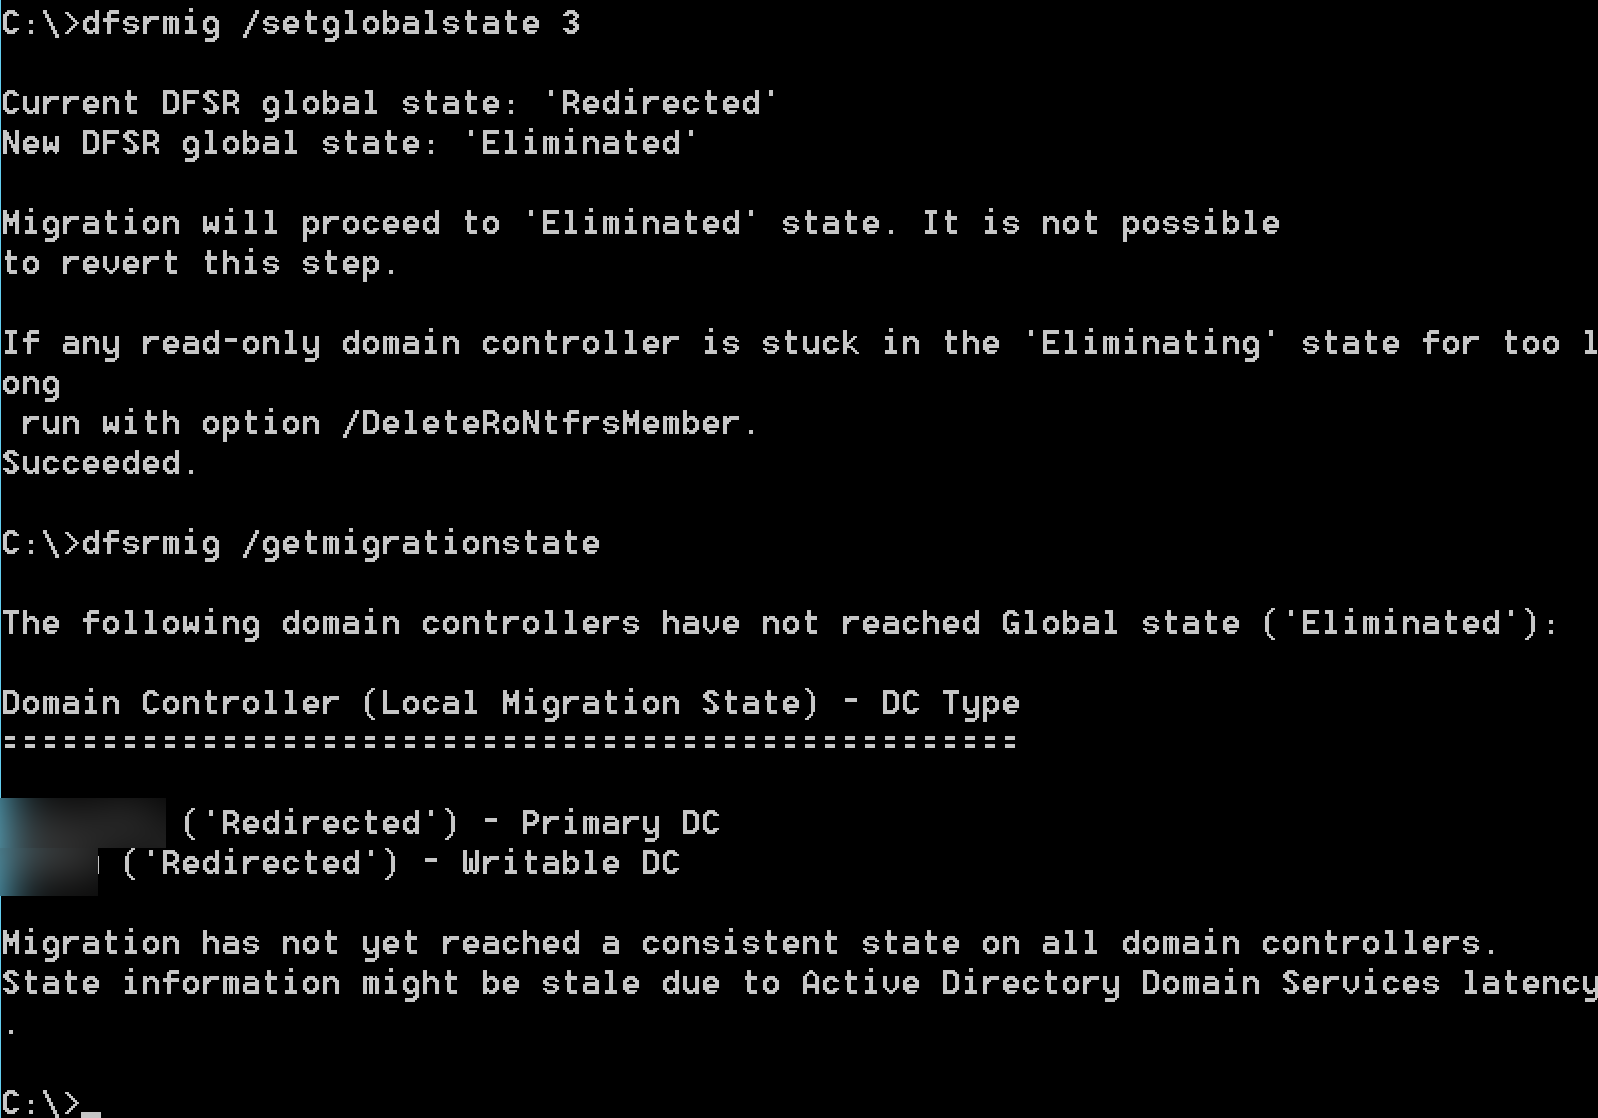
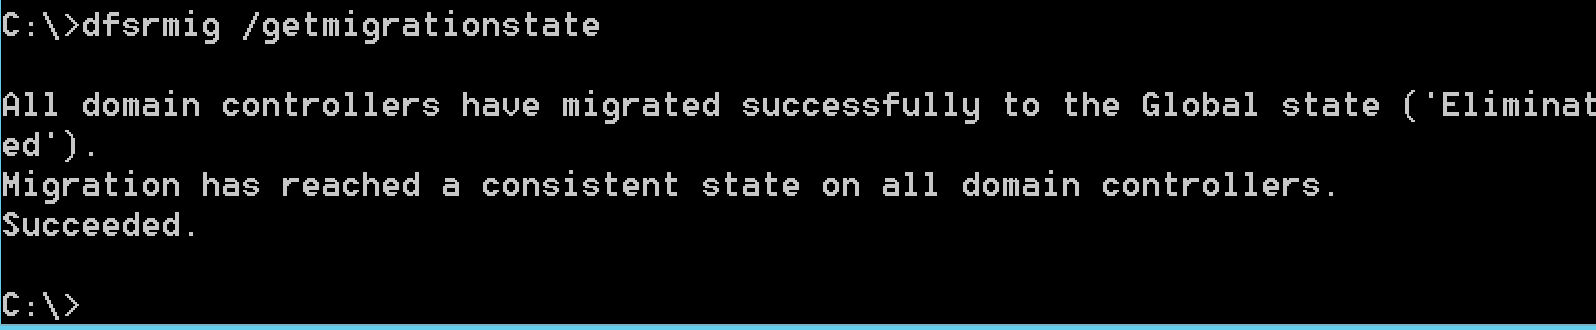
dfsrmig /getmigrationstateWe successfully reached Eliminated state.
While we are in command prompt, we will now issue command
net shareYou should run net share on all your current DCs, and result should be like one below.
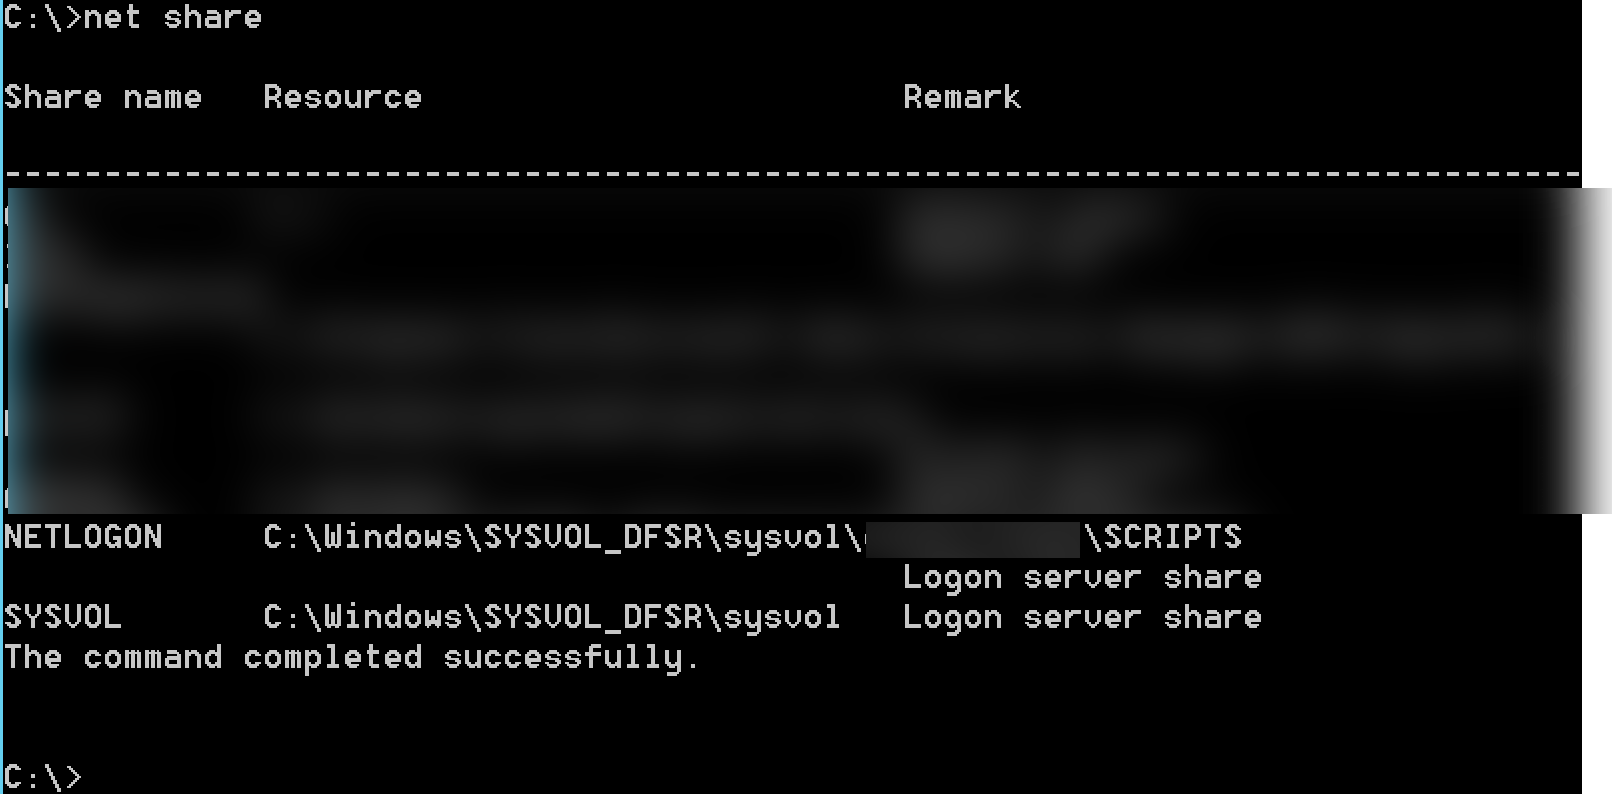
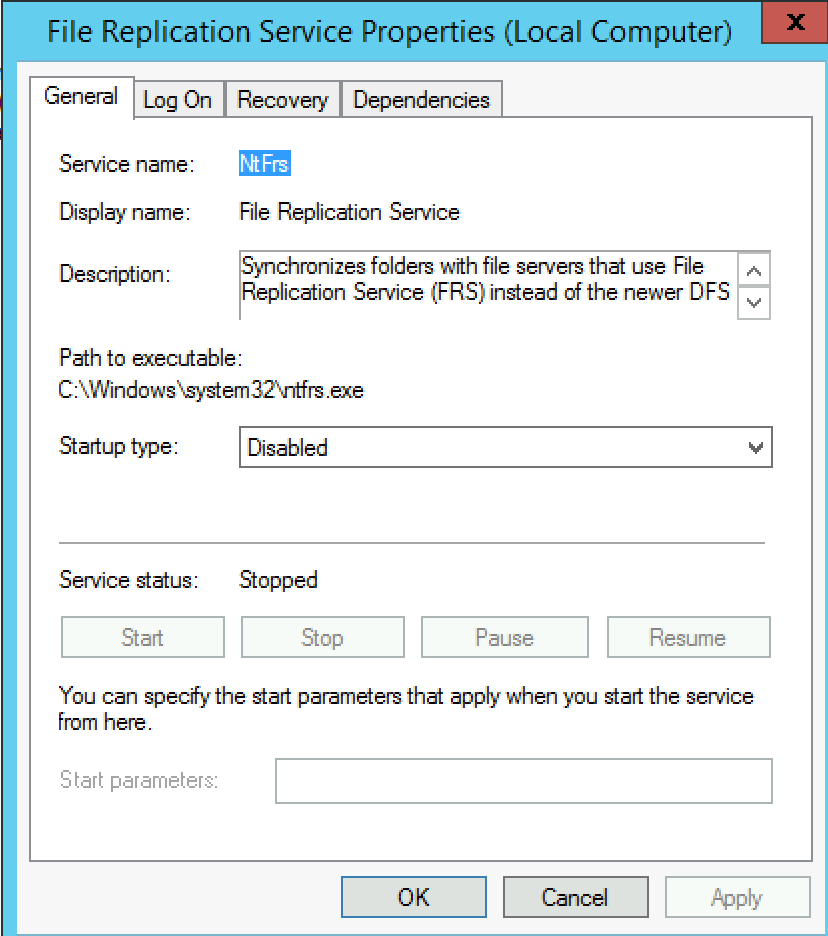
At last, File Replication Service in your services should be stopped and disabled.
Ok, with this we are done with optional part, we can proceed adding our WS2019 as DC to our existing domain.
!!!!!_____END OF OPTIONAL PART______________!!!!!
Add WS 2019 as Domain Controller to WS 2012 R2 domain
YOU CAN START HERE IF THERE WAS NO WS 2003 or WS2008 DCs in your DOMAIN in the PAST.
First step will be to add WS 2019 as domain controller (DC) to our existing test.local domain.
I already described full process here and in this section I will just point out most important parts
These steps are done on WS 2019 that will become additional DC for test.local domain.
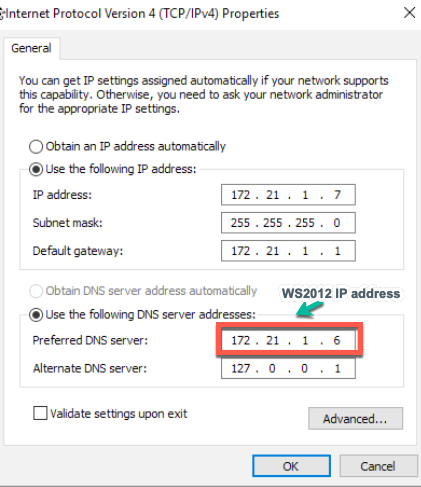
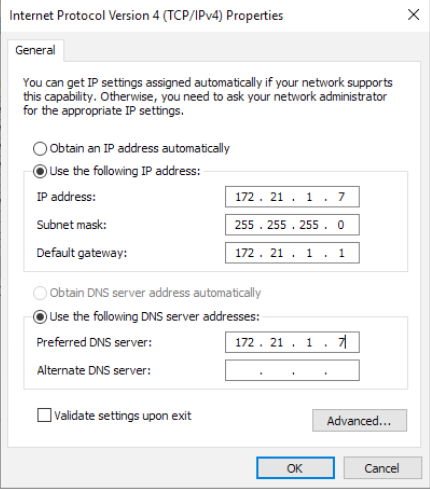
Before you start the process make sure you go to the Network Settings of your WS 2019 machine and set Preferred DNS with 172.21.1.6 (IP of the WS 2012 R2 machine). This is the only way folllowing wizard will go through.
I also uncheck IPv6 on all my network cards, since I don’t use it in production environment.
Start “Promote this server to a domain controller” dialog. Again, how to get to this step on WS 2019 can be found here
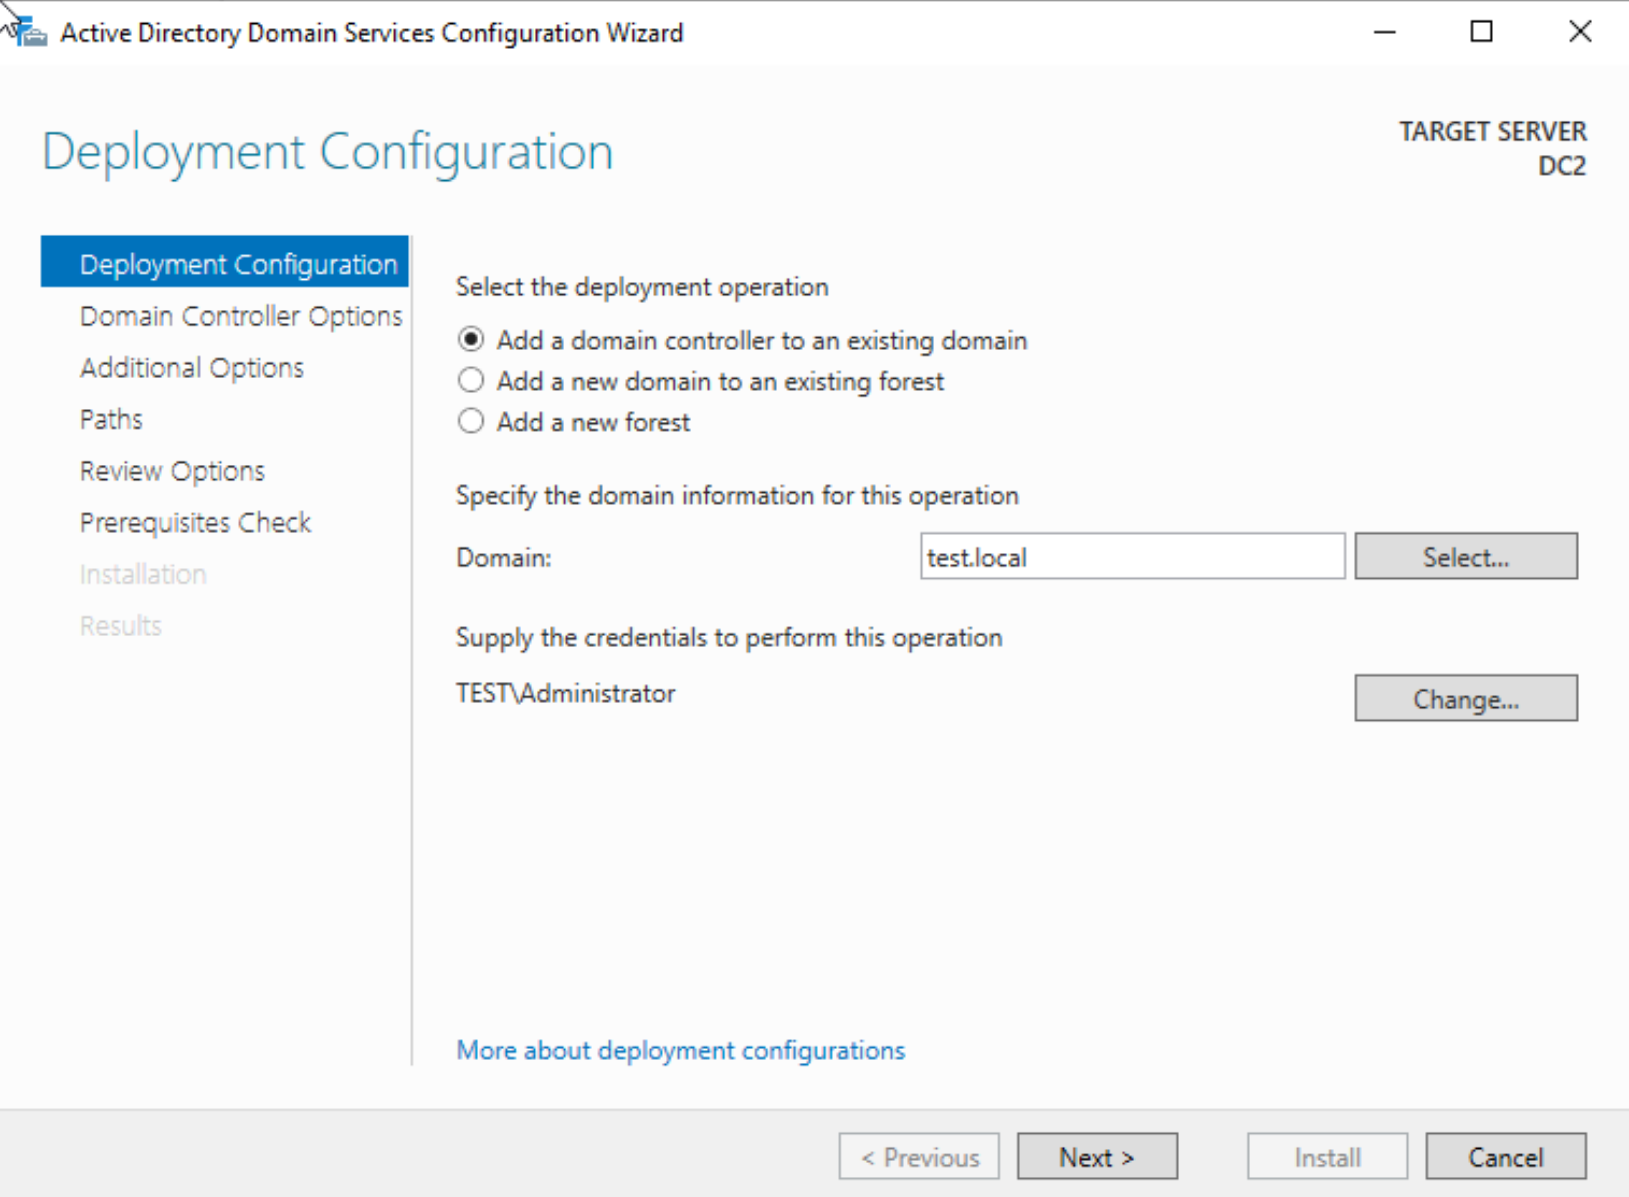
Select Add a domain controller to an existing domain.
Specify domain name to which you are adding DC – mine is test.local
Specify domain admin credentials – Next
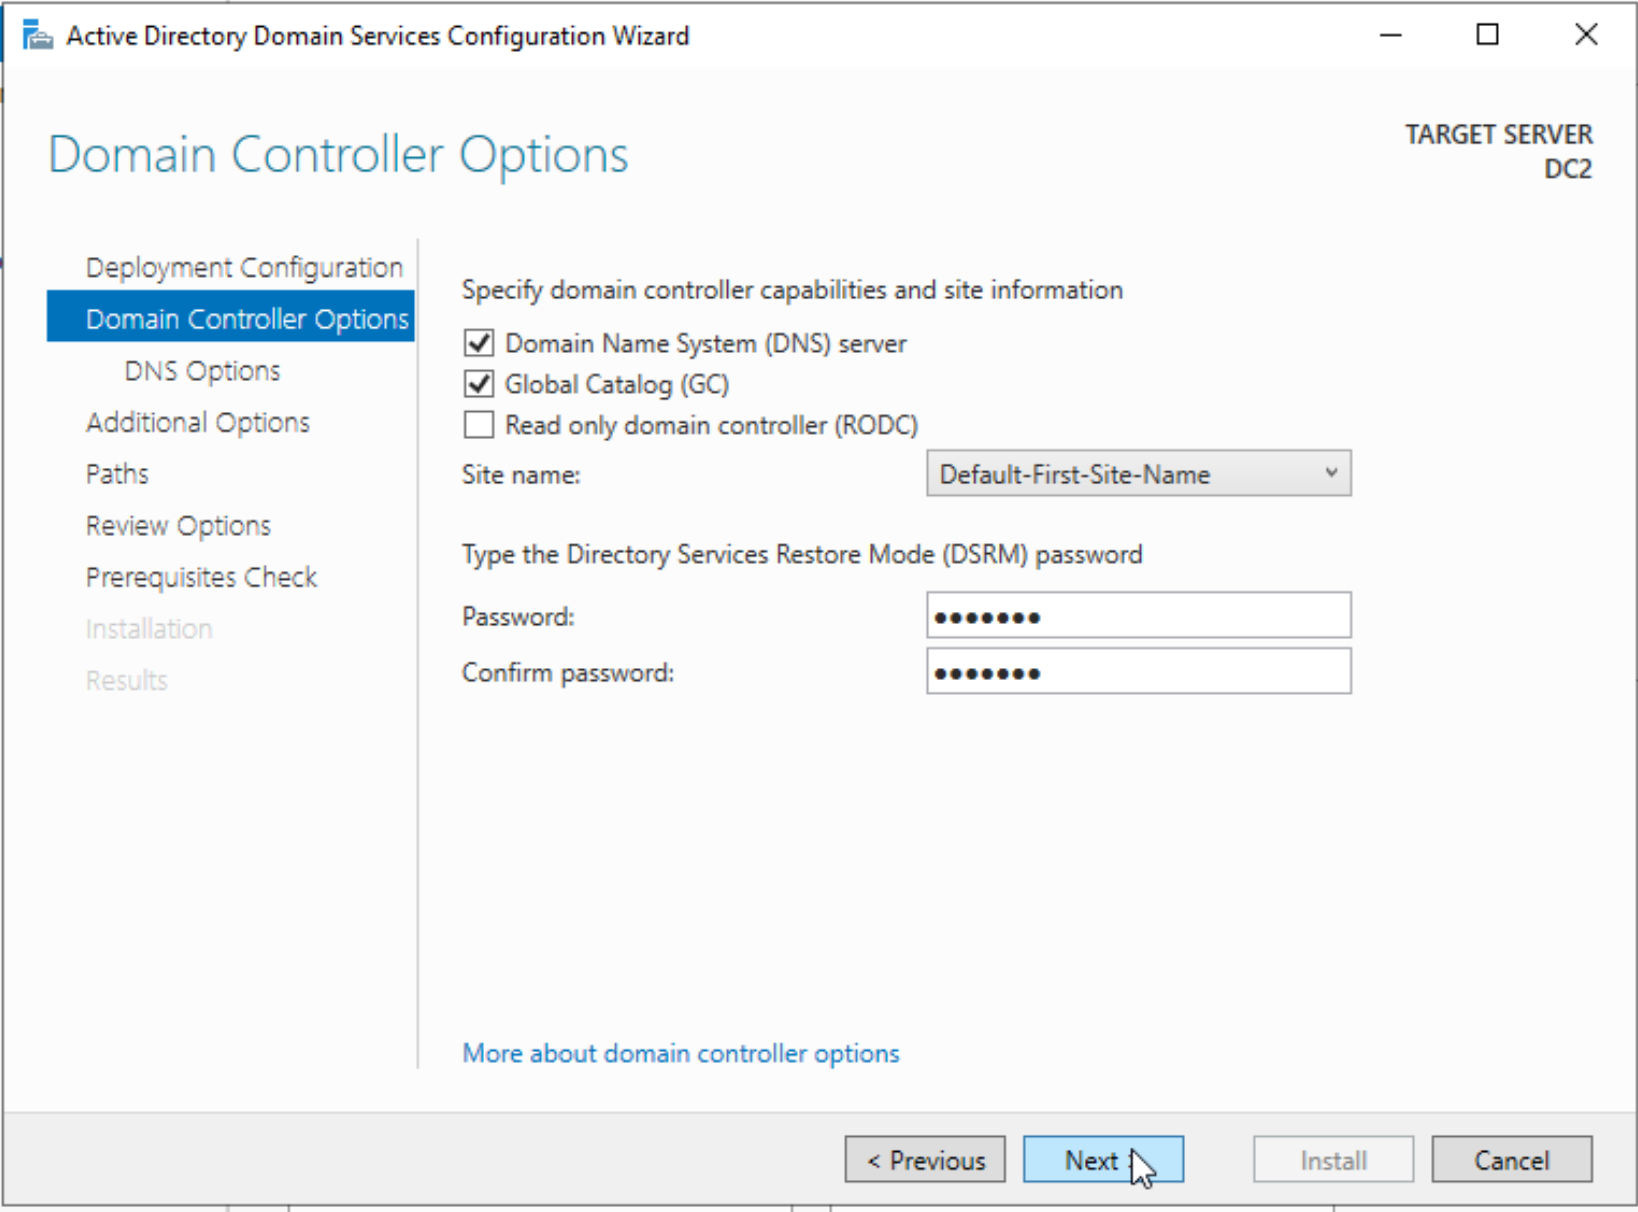
Select server as DNS server and Global Catalog – this is extremely important for later states. Site name is in my case Default, and of course you should know your DSRM password and type it in. DSRM password is extremely important in case there is a problem with your domain.
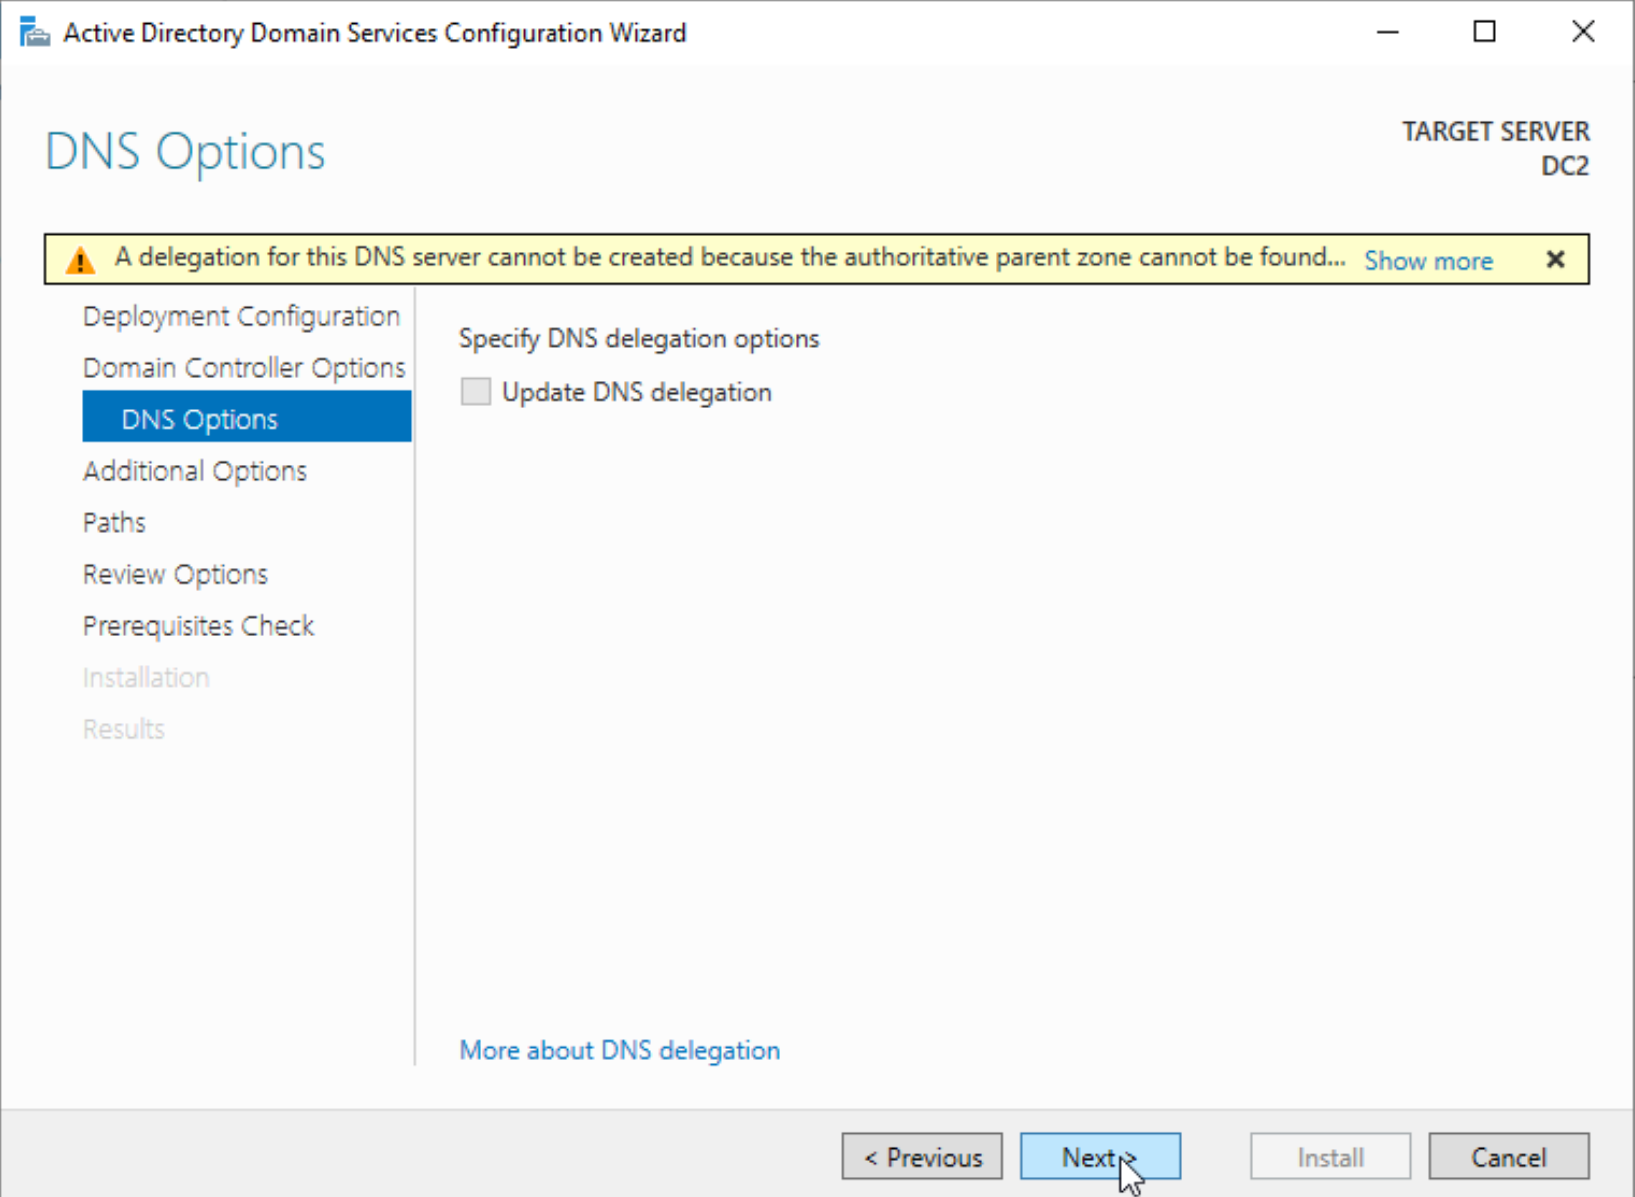
Next
Next
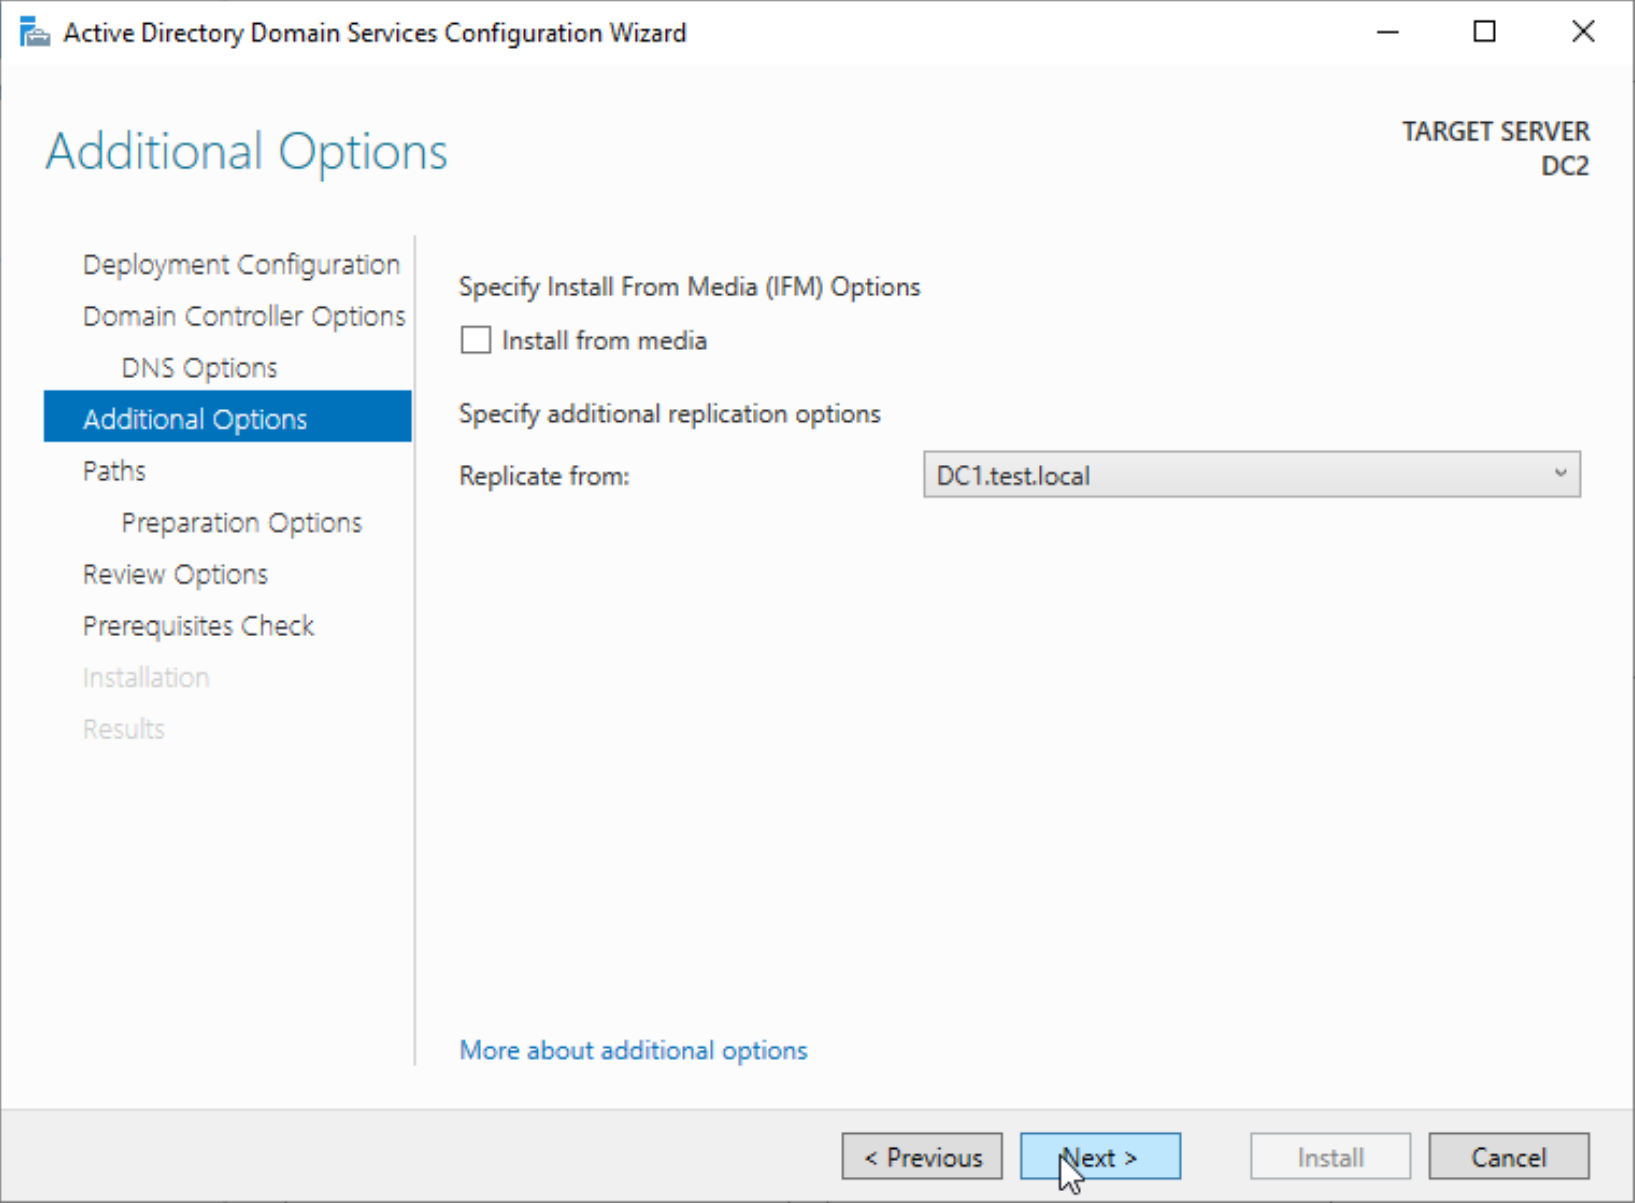
I will select to Replicate from DC1.test.local since that is only DC I have in test.local domain. You can set this as you see fit for your environment. IFM Options is unchecked in my environment.
Next
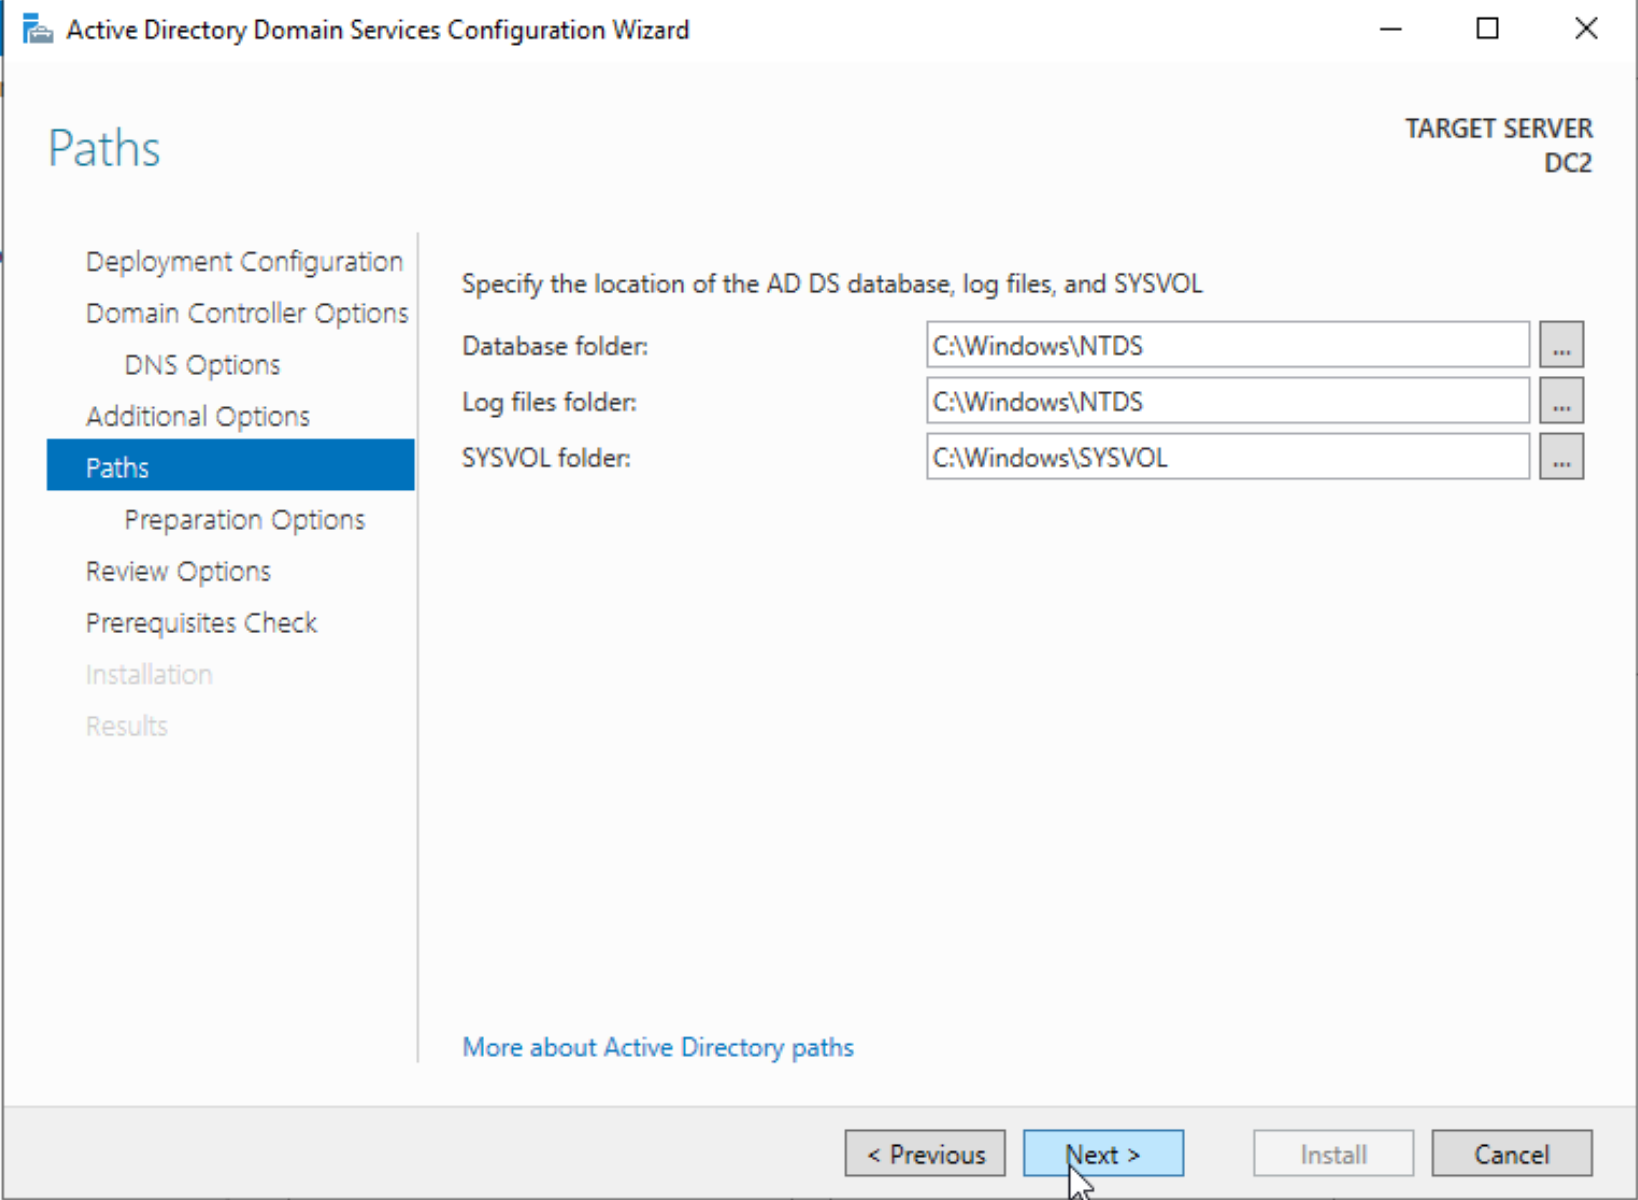
Default DB, logs, locations are ok for this scenario – Next
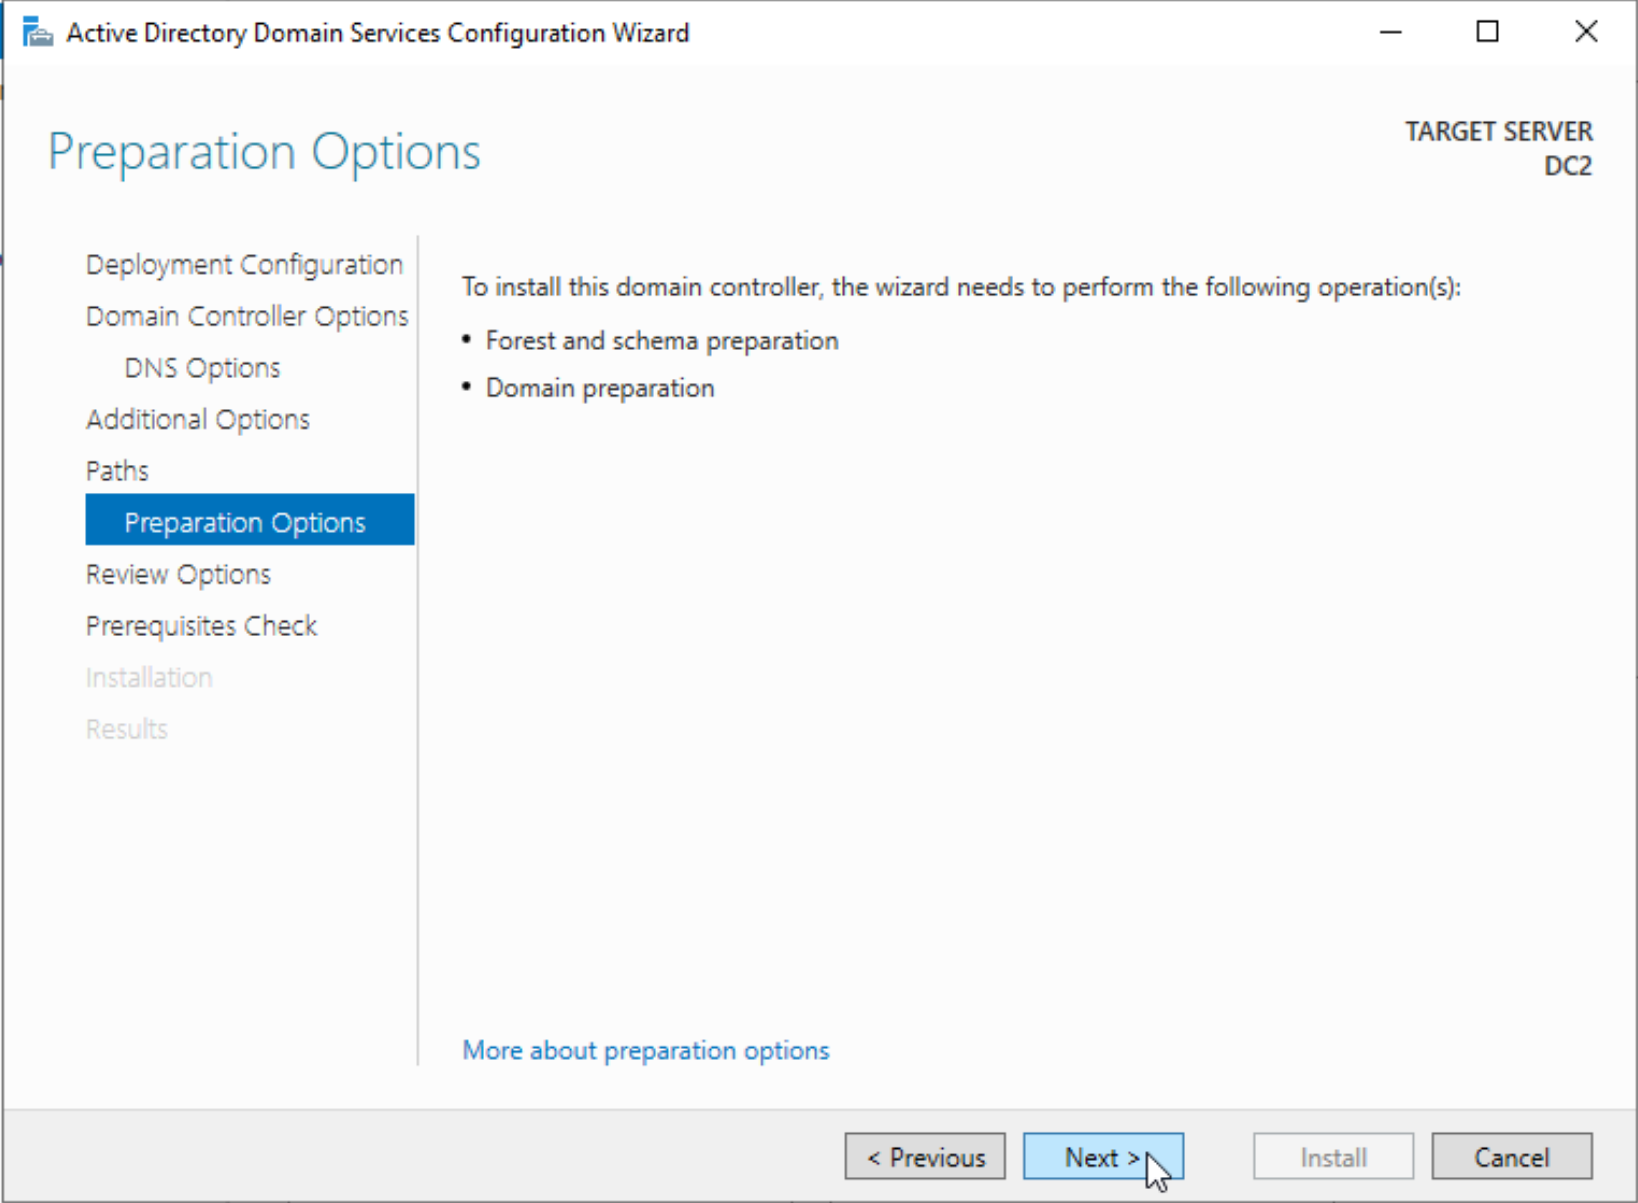
Wizard will do Forest, schema and domain prep, you don’t have to do it manually. In my experience, this works ok. Next
Review
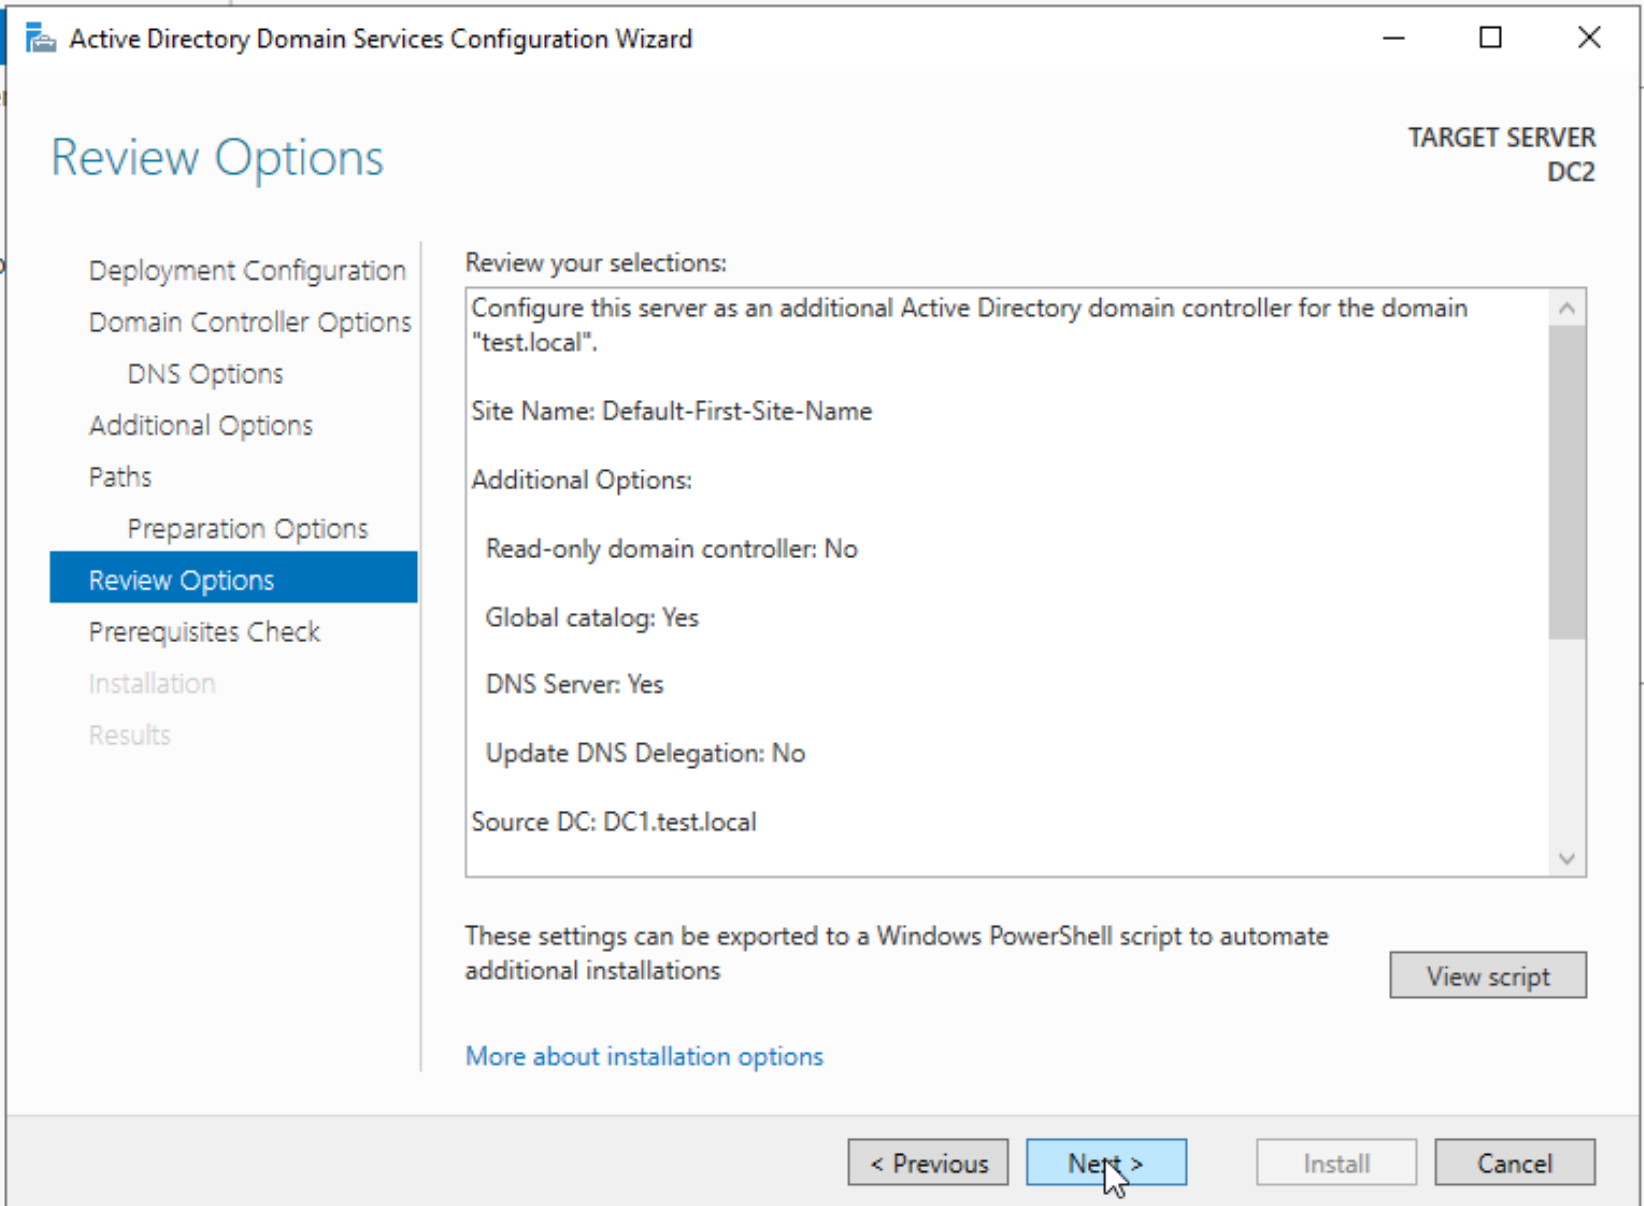
You will get some warnings, but all is good, proceed with the Installation by clicking install.
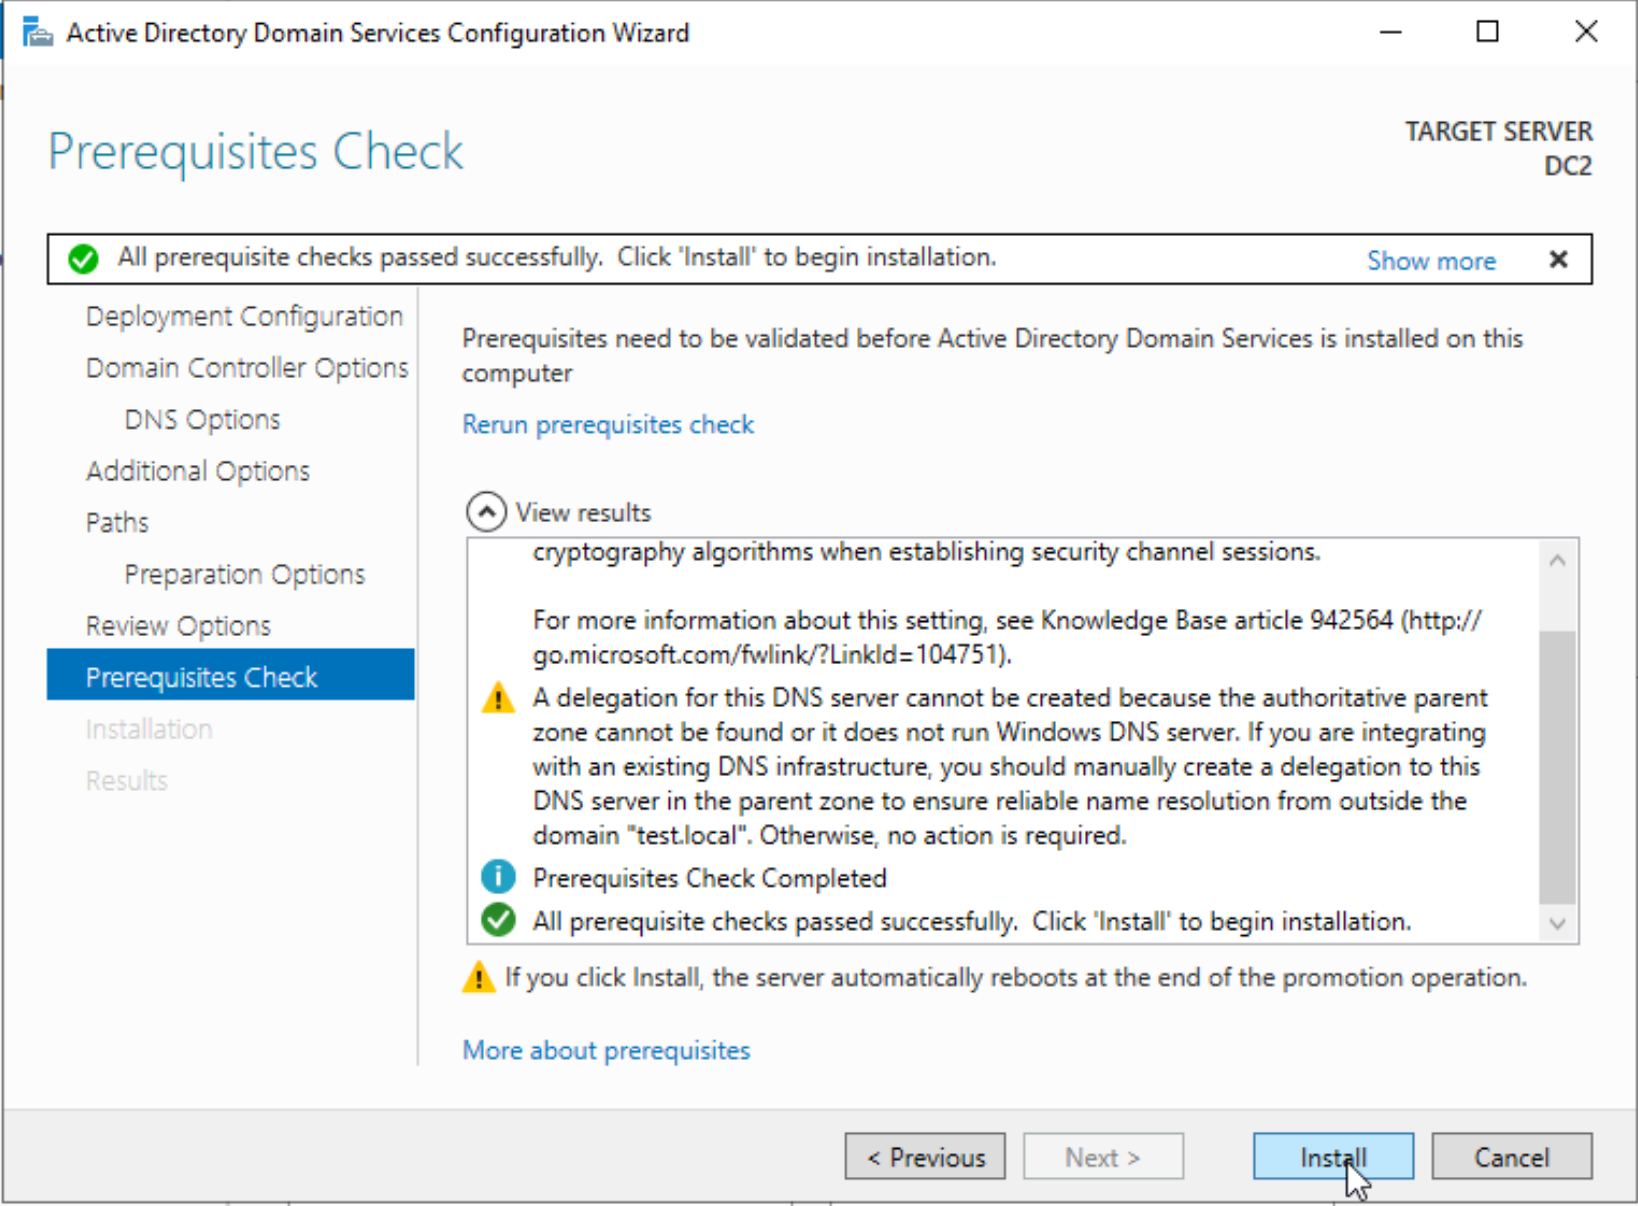
Installation dialog will start, ig everything is OK your WS 2019 machine should reboot and be promoted to DC to test.local domain.
Check if WS2019 is added properly to test.local domain
Ok, before we go further we need to establish that our WS 2019 is added properly to domain test.local as domain controller.
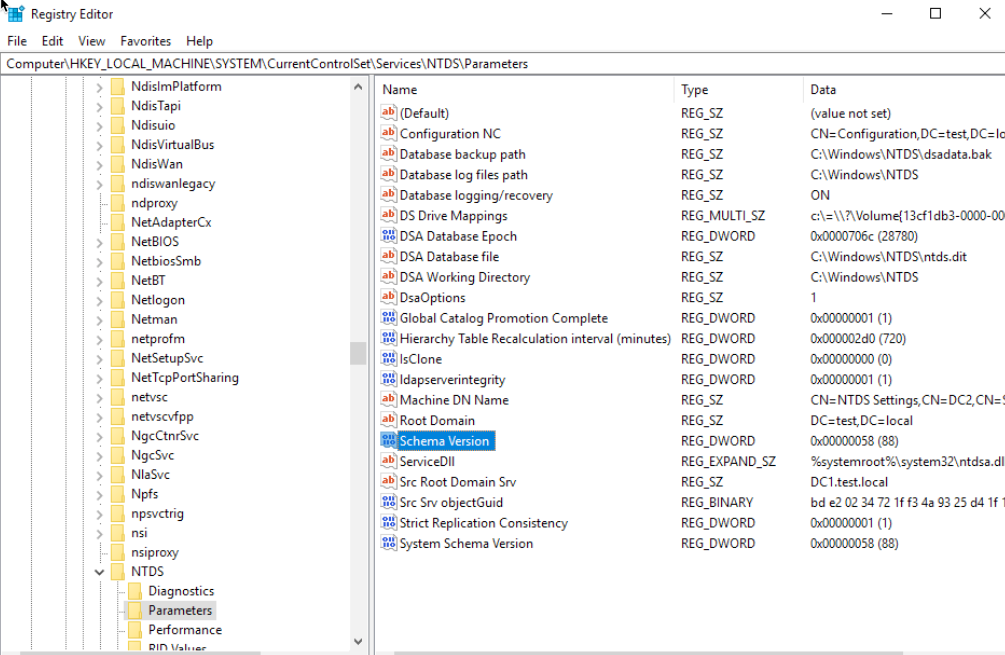
Since WS 2019 did automatically prepared our forest, schema and domain, we will check if the Schema versions are same on both DC1 (WS2012 R2) and DC2 (WS 2019)
Registry check
To do so, we will need to start registry, by typing in regedit into search
Next, when registry is opened, navigate to Computer\HKEY_LOCAL_MACHINE\SYSTEM\CurrentControlSet\Services\NTDS\Parameters and read the Schema Version Value
Ok, on both DC1 and DC2 Schema Version is 88, so all is good.
We will verify on few more places, I will do this check on DC1 (WS2012 R2)
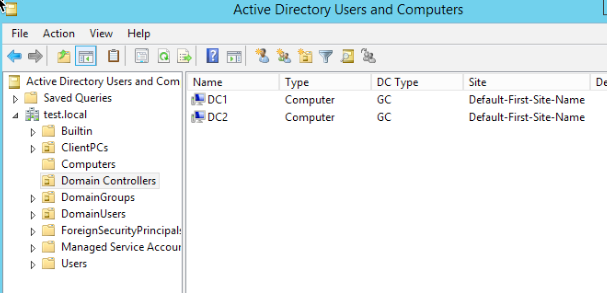
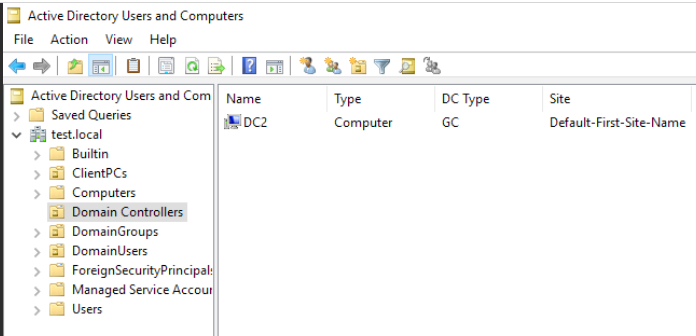
Start | Administrative Tools | Active Directory Users and Computers | from menu on left side choose current domain and click on Domain Controllers. I see both of DCs.
Ok, both machines are DCs, and both have on it Global Catalog.
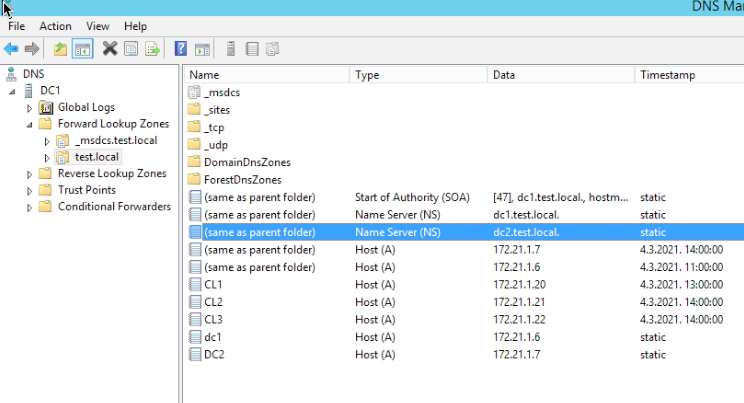
Start | Administrative Tools | DNS Manager under Forward Lookup Zones and local Domain check if your WS 2019 installation is listed as Name Server
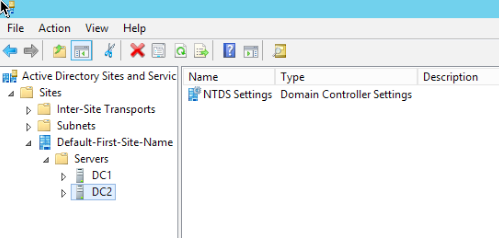
One more place to check is Start | Administrative Tools | Active Directory Sites and Services. Under Sites | Default First Site |Servers both servers should be listed
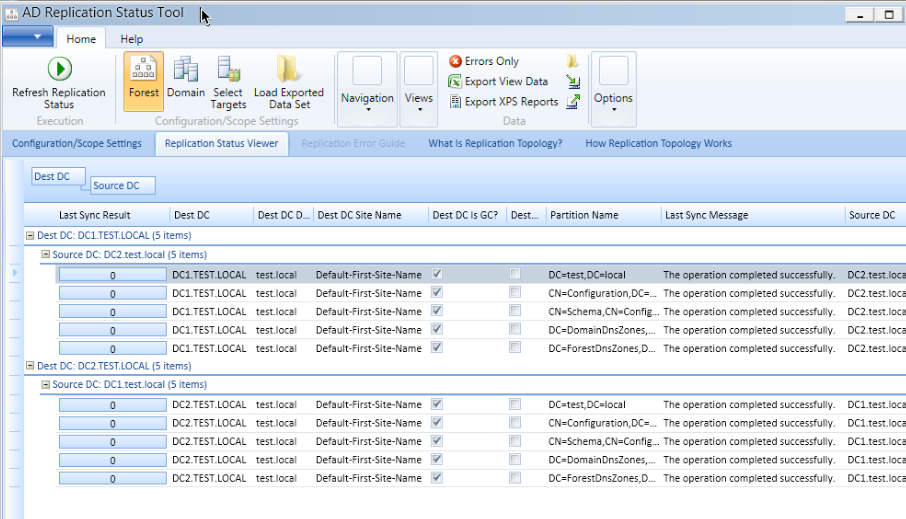
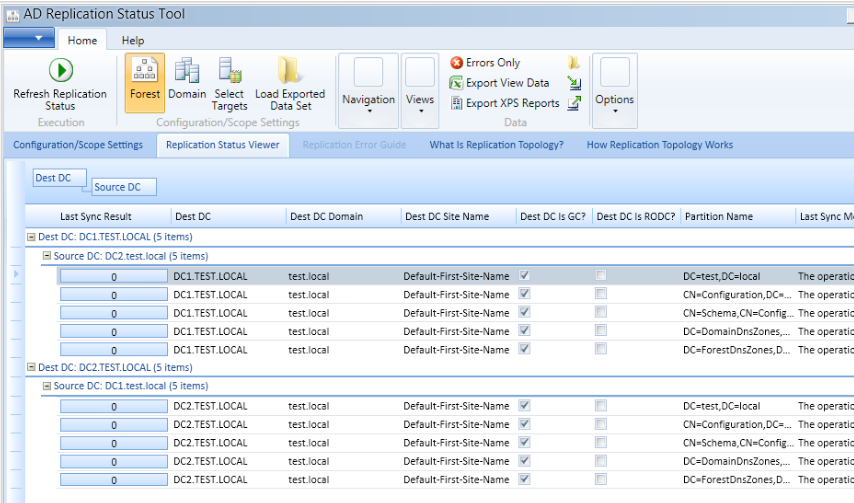
At last, there is also one great tool called Active Directory Replication Status Tool It will give you insight if Replication between your DCs is ok. This is very important, because replication has to check out and be in order, because we need all Active Directory data on both DCs. If the replication does not work properly, then it would be wise to explore why is that.
You will probably get errors on this if you check soon after you added new WS 2019 install as DC to your domain.
I also don’t like to force replication, I wait for the replication to “naturally” occur, I’m not sure anymore what the interval is, but I wait a solid hour to check if everything is ok, and replication works.
This is the result you are looking for
Ok, we established that everything is in order, now we can move on.
Transfer FSMO Roles
Before you start this, make sure that both of your DCs – old WS 2012 R2 and new WS 2019 are Global Catalog servers.
Ok, so at the heart of the domain, active directory and domain controllers are five roles
Schema Master, Naming Master, PDC, RID Master and Infrastructure Master.
I hope I haven’t forget something, otherwise we will have bad times :D
These roles currently reside on DC1 (WS 2012 R2) and we need to transfer them to DC2 (WS 2019) so we can shut down DC1 (WS2012 R2)
On DC1 (WS 2012 R2) start Command Prompt as Administrator and type in following
netdom query fsmo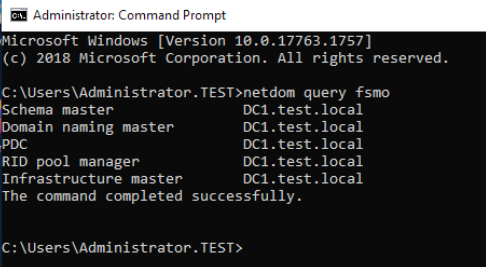
Ok, so all our roles are currently on DC1 (WS 2012 R2). Let’s go and transfer them.
Following command we need to type in is
ntdsutilThen
rolesand when fsmo maintenance appears, type in
connectionsand press enter.
Server connections dialog will appear.
Type
connect to server DC2.test.local (your WS 2019 DC goes here)After than type
quitscreen will say fsmo maintenance again.
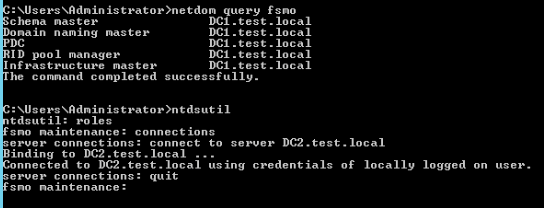
At any time, if you need help, type in ?
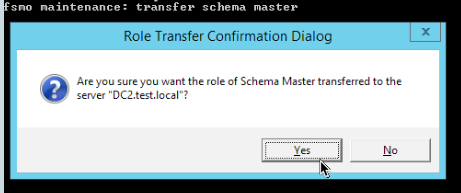
Ok, let’s transfer roles
Type in
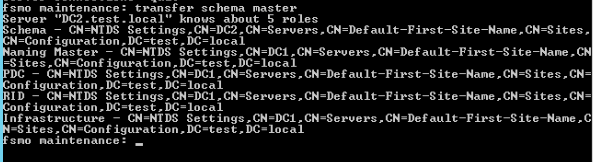
transfer schema masterWe will select Yes
Result follows
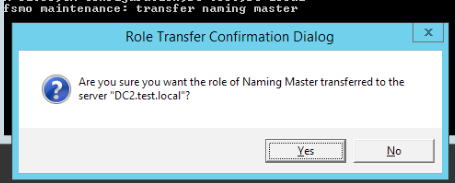
We will now proceed and do this for the rest of the roles – naming master, PDC, RID master and infrastructure master.
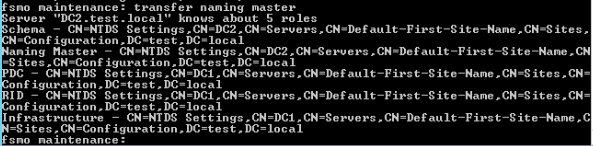
transfer naming masterYes
Result
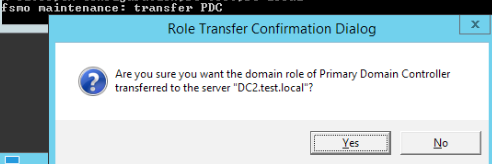
PDC Role Transfer
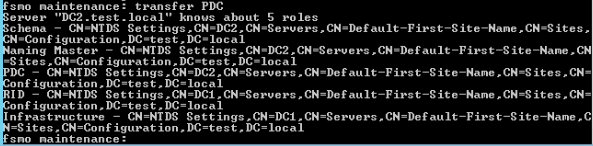
transfer PDCYes
Result
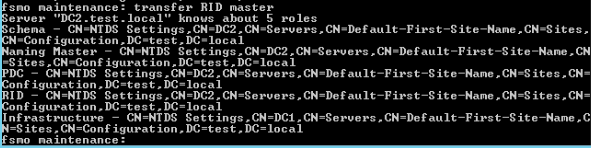
RID Master Transfer
transfer RID master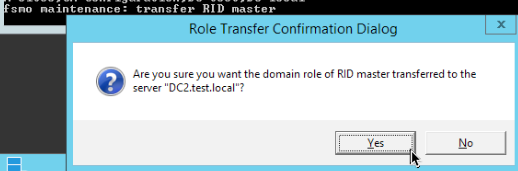
Result
Transfer Infrastructure Master
transfer infrastructure master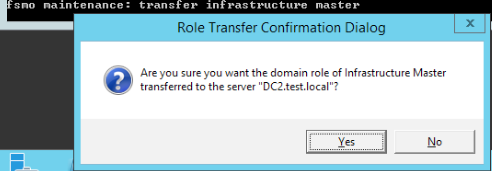
Result
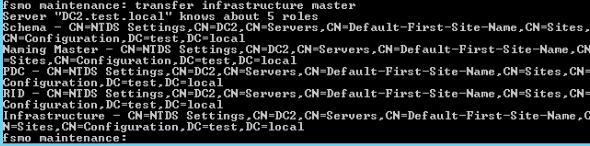
Let’s now see where our roles are
netdom query fsmoWe will now type in twice quit to exit
quit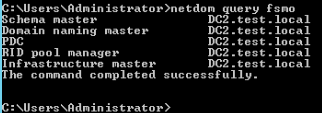
Ok, we did good, all roles are now on DC2 (WS 2019).
__________________________________________________
Check Role Transfer through GUI – you can skip this if you wish
So, this is just to check that everything went ok with commands we executed in Command Prompt.
I will do it on DC1 (WS 2012 R2)
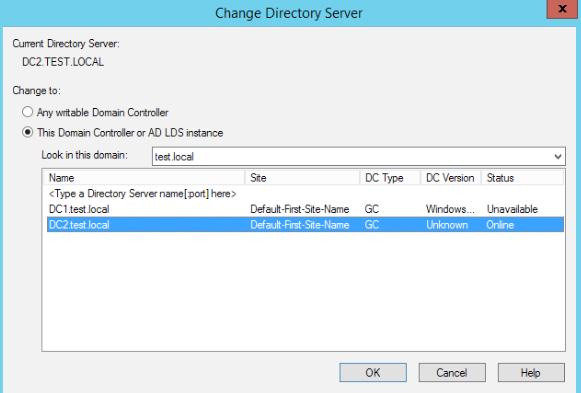
Active Directory Domains and Trusts | Right click on Active Directory Domains and Trusts | select Change Active Directory Domain Controller
DC2.test.local should be Active
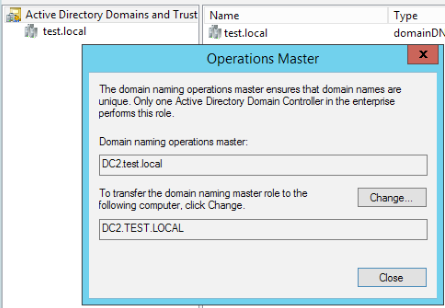
Go back to Active Directory Domains and Trusts | Right click on Active Directory Domains and Trusts | select Operatins Master
DC2.test.local should be listed (in your case, your WS 2019 DC)
Ok, we are done here.
Next, open Command Promt as Administrator and type in
regsvr32 schmmgmt.dllIn search bar type in mmc. Select File | Add/Remove Snap-ins | Add Active Directory Schema | Select OK
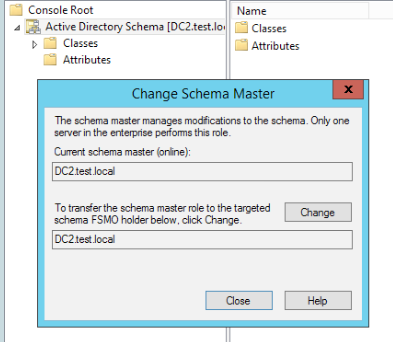
Right Click on Active Directory Schema and select Change Active Directory Domain Controller
Again, DC2.test.local should be current and online server.
Close the current window.
Right Click on Active Directory Schema and select Operations Master
DC2 should be Schema Master
That is it, you don’t have to save anything, you can just close windows.
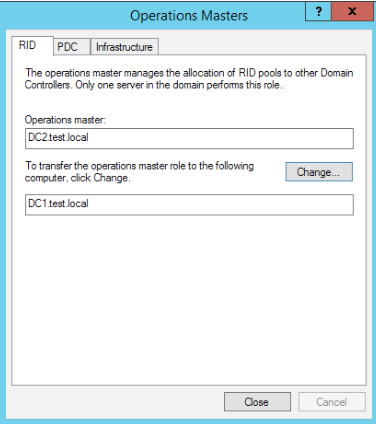
Last step would be to go to Active Directory Users and Computers, right click on domain name, in my case I will right click on test.local and select Operations Masters
RID tab should display DC2
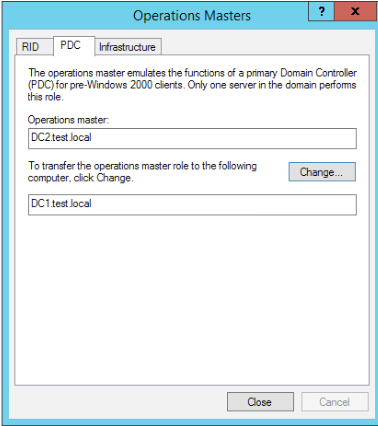
PDC and Infrastructure should do the same
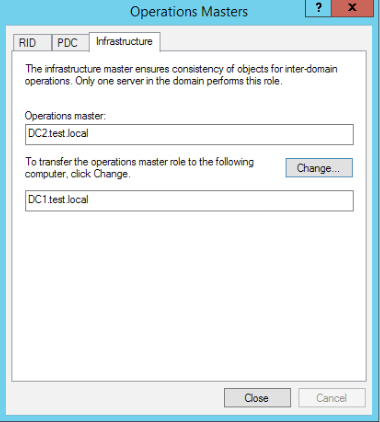
All is great, we also established through GUI that the roles are transferred. You can also transfer roles through GUI, by visiting locations I showed above.
End of Check Roles Transfer through GUI part
__________________________________________
Demote Windows Server 2012 R2 Domain Controller
Ok, now to the last part. In production, it would be wise to have a backup before doing this and let two DCs coexist few days, with DC1 (WS2012 R2) eventually shut down, just so you can see that all of your services work.
Before we demote WS2012 R2 DC1 we need to check again that replication is ok and that all the data is transfered properly between DCs.
Again, we will use Active Directory Replication Status Tool .
Replication status has to be flawless
Start command prompt as administrator and run
dcdiag /e /c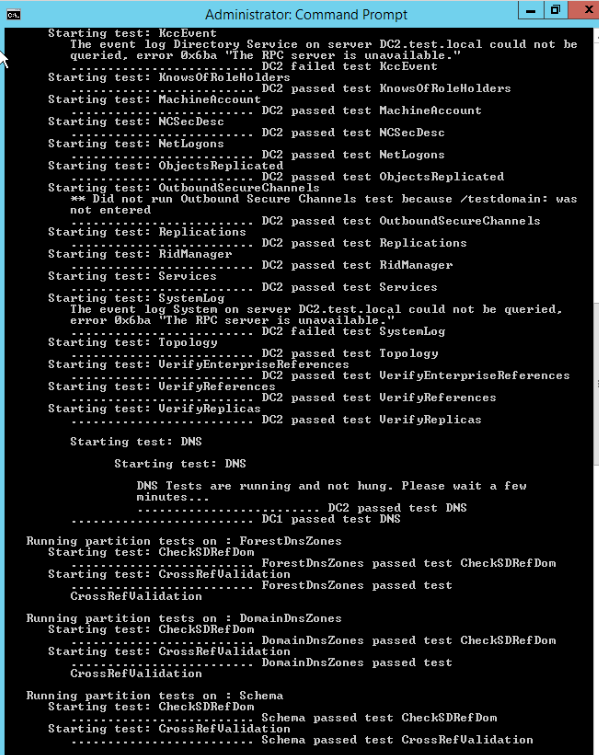
All tests, especially DNS should be passed on this test. If something fails, check to see if you can repair it, let it through FIREWALL, or live without it (RODC functionality may not be needed for example)
- Check DNS settings under DHCP service, and change them for DHCP clients
- Change Authoritative Time Server for Domain if it was DC that you are demoting.
- Global Catalog should be on new DC before demoting old one
I usually fail DFSREvent check, but I haven’t had any issues with that failing.
Next step I will do on my DC2 (Windows Server 2019 DC)
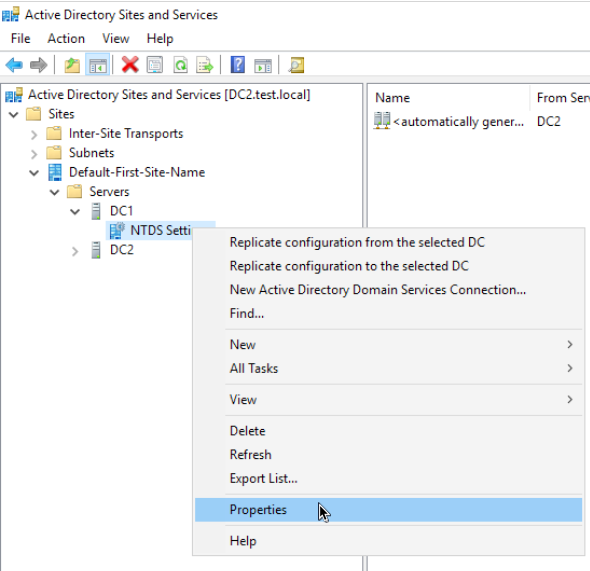
Open Active Directory Sites and Services – Expand Default-First-Site-Name | Servers | DC1 (that is my Windows Server 2012 R2 install I wish to demote) | Right click on NTDS Settigns and select Properties
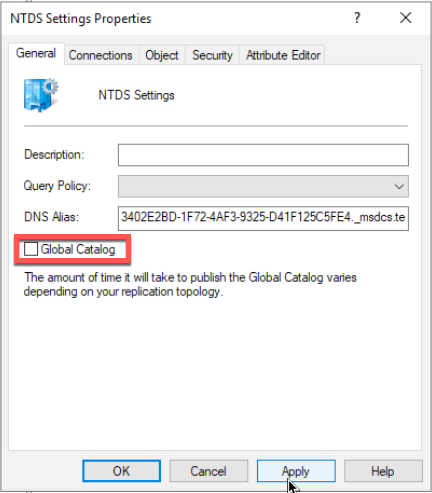
Uncheck Global Catalog | Apply | OK
On Windows Server 2019 (DC2) go to Network settings and edit DNS Server addresses – only IP address of the DC2 (WS 2019) should be available – 172.21.1.7
Also, make sure you update DHCP server with new DNS settigns if you have one!
Ok, let’s now switch to Windows Server 2012 R2 (DC1) and start demote process.
You can do it through Server Manager – it would be reverse process of adding domain controller, or you can do it through powershell. We will do it through powershell.
Run Powershell as Administrator
Type in following command
Uninstall-ADDSDomainController -DemoteOperationMasterRole –RemoveApplicationPartition
You will need to enter local admin password and confirm that you wish to demote domain controller
Process will take a while…

Server will reboot in the end.
After Windows Server 2012 R2 rebooted I checked Domain Controllers inside Active Directory Users and Computers. DC2 is now only one we have. That is good.
Windows Server 2012 R2 named DC1 is now dismounted. We will have just one more step to do on it.
When it boots back, login into your machine. I logged in with local administrator account DC1\Administrator (so, not with the test.local account)
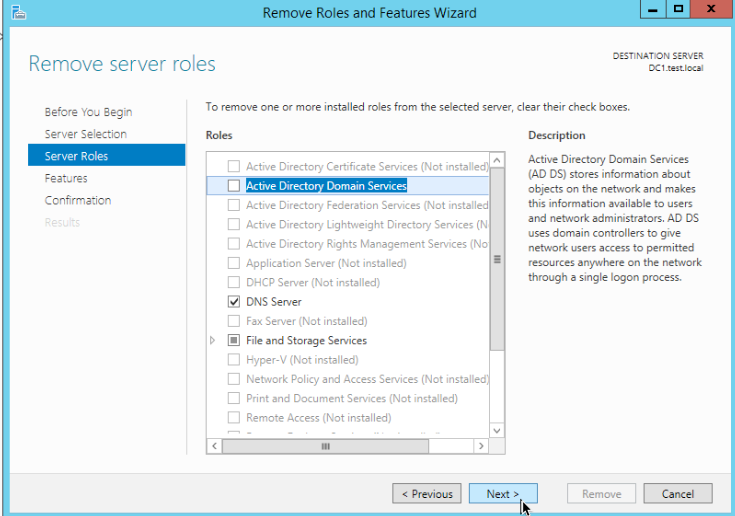
Head to the Server Manager | Manage | Remove Roles and Features
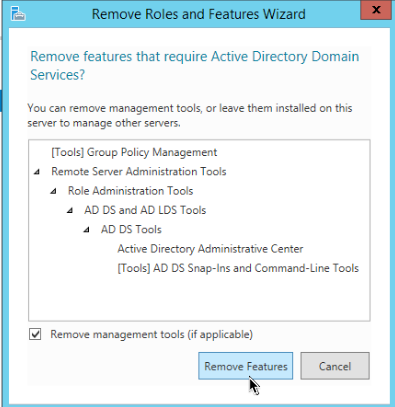
Uncheck Active Directory Domain Services
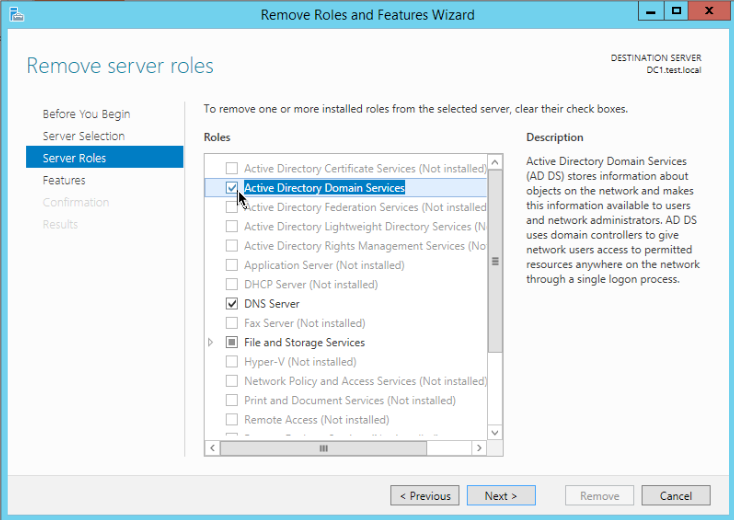
Confirm Remove Features
Next
After removal is done, reboot server.
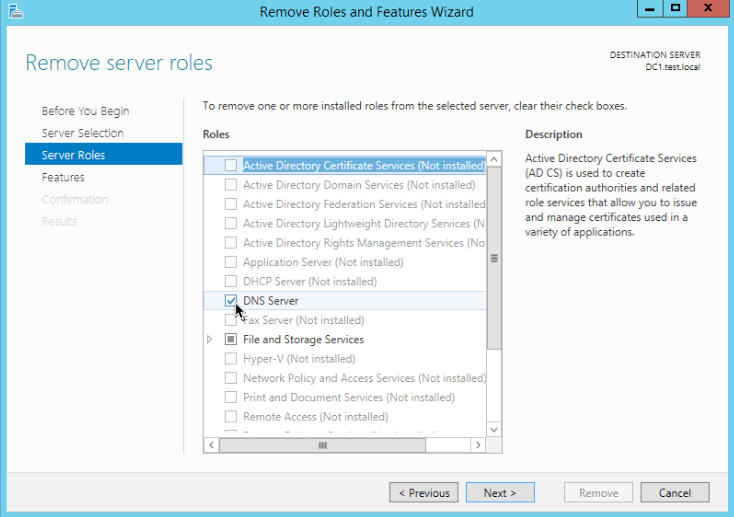
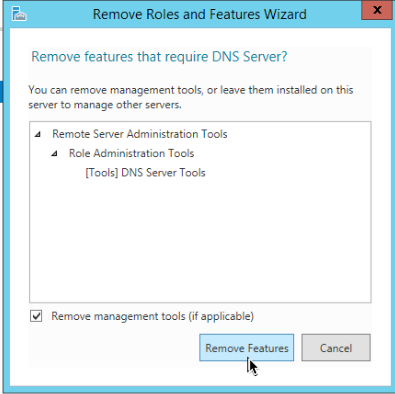
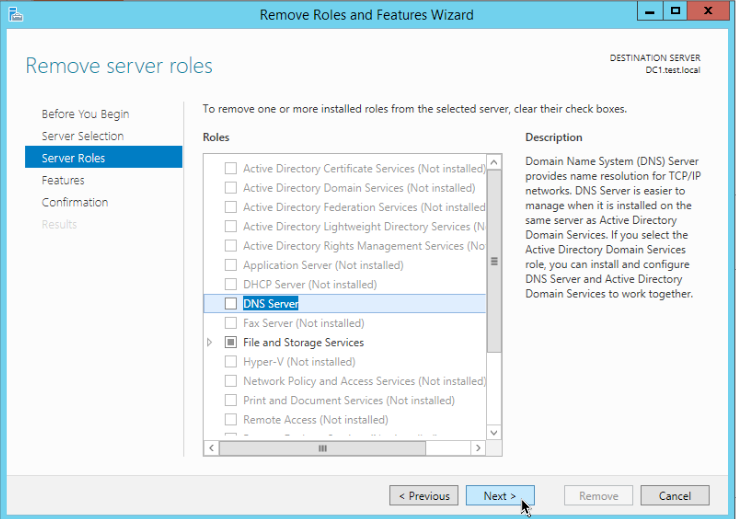
Repeat the steps above and remove DNS server
Remove Features
Reboot again.
Make sure you set DC2 IP as DNS server in your network settings on WS 2012 R2!!
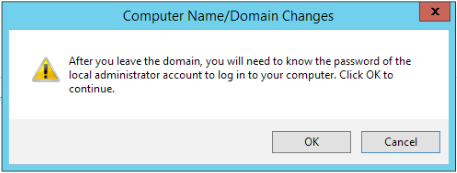
Additionally, you can completely remove DC1 (WS 2012 R2) from your domain, by going to Control Panel on WS 2012 R2 | System | Change Settings | on Computer Name tab select Change | Member of – click on Workgroup and enter workgroup name
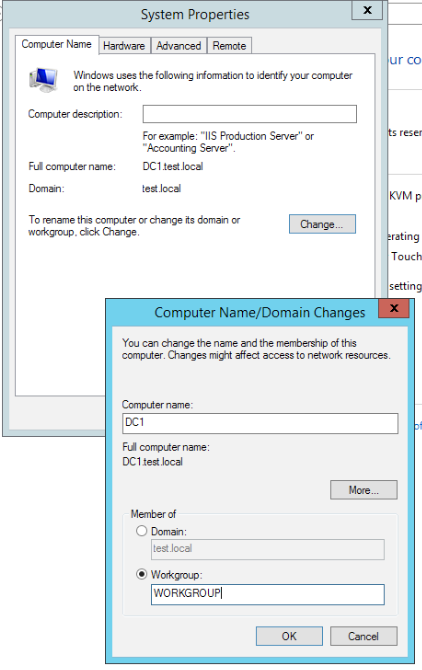
You will be reminded that you need to have local account details to be able to login again. OK
We managed to join workgroup
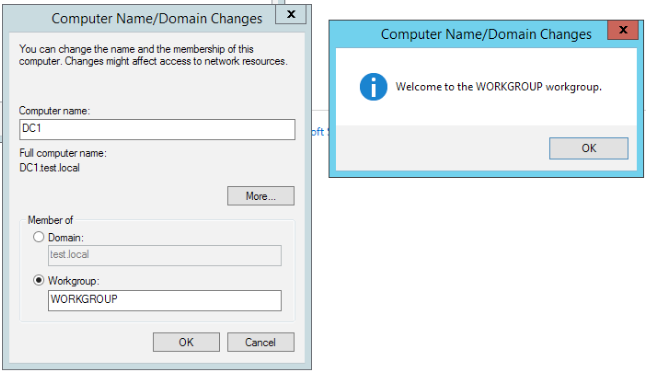
Your WS 2012 R2 will reboot, and it will no longer be part of the domain.
If you still see DC1 in Computers in Active Directory Users and Computers, you can remove it.
Ok, we are done now with Windows Server 2012 R2, it is completely removed from our domain.
Raise Domain Functional Level
Ok, last thing we will do in this guide is – raise domain functional level so we can use some new features that are not available on older Windows Server versions.
Ok, let’s begin.
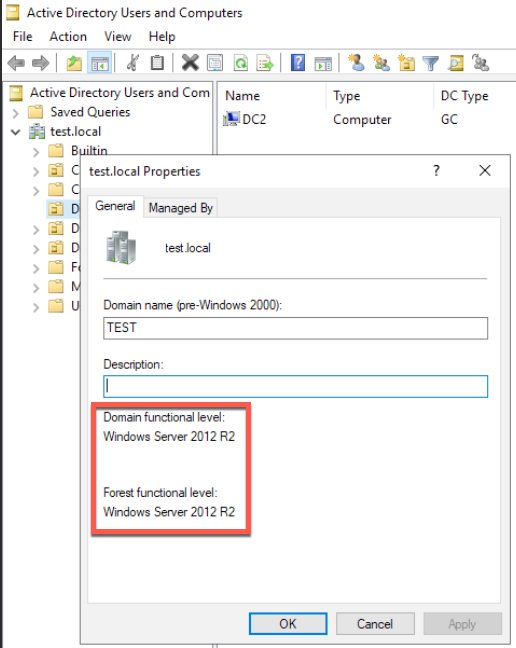
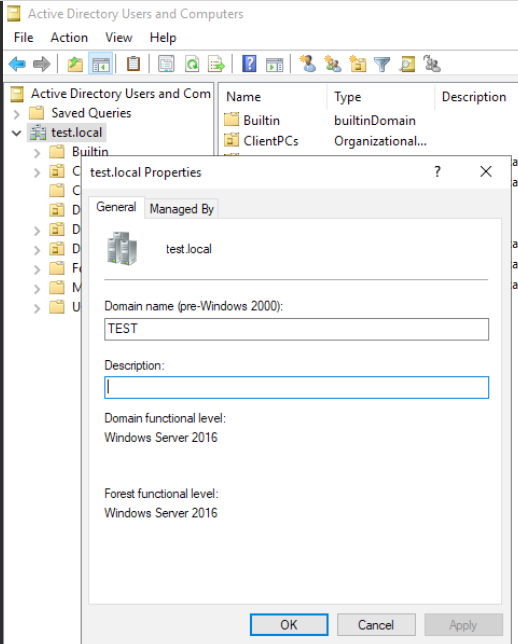
Go to Active Directory Users and Computers, right click on your domain name, I will click on test.local and select Properties
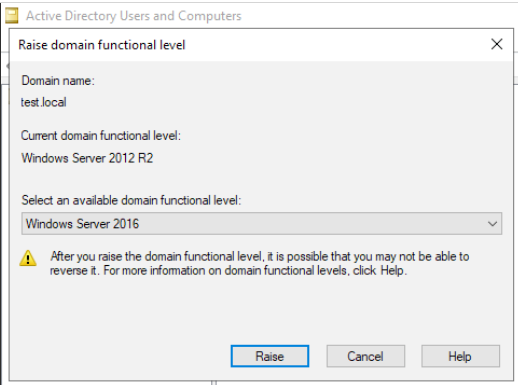
On General tab you can see that our Domain and Forest Functional Level is Windows Server 2012 R2
Since we are moving entirely to Windows Server 2019 DCs, we can raise domain/forest functional level.
Close Properties window.
Right click again on domain name inside Active Directory Users and Computers and select Raise domain functional level…
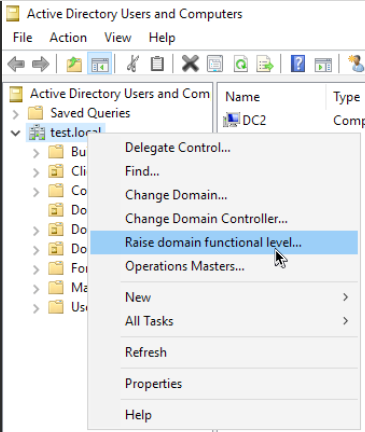
Windows Server 2016 is the only level we are able to raise to. Select it and click on Raise
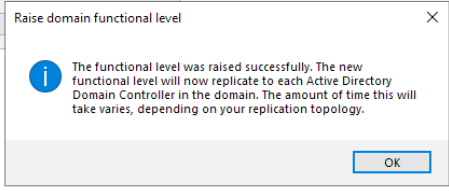
OK

OK
Ok, let’s now raise Forest functional level.
Open Active Directory Domains and Trusts, right click on Active Directory Domains and Trusts and select Raise Forest Functional Level…
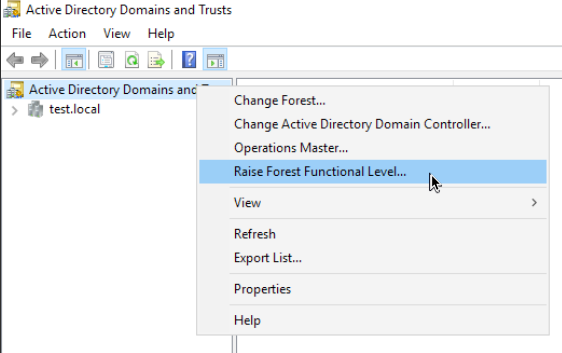
Again ,select Windows Server 2016 and click on Raise.
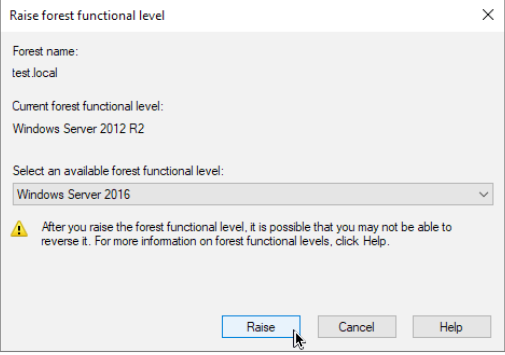
The same two dialogs as the one above will appear, confirm them with OK.
Now, if we go back to the Properties of the Active Directory Users and Computers we will see that Windows Server 2016 is our domain/forest functional level.
With that done, I will reboot my WS 2019 DC and that would be it.
Before we end, I restarted one of the clients that is associated to the test.local domain – it successfully logged back on to domain.
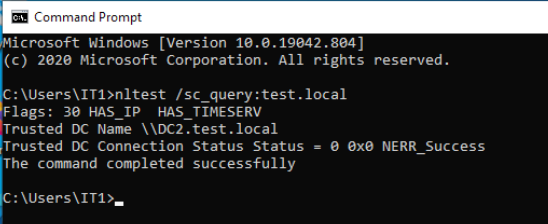
To be sure that it is really logged in and in communication with the DC2, I opened Command Prompt on that client and issue following command
nltest /sc_query:test.localMachine returned that it is ok, and it has established trust with domain via DC2.
We successfully finished our domain transition from Windows Server 2012 R2 to Windows Server 2019.