We went through the installation and simple configuration proces for Nakivo, in which we added our Hyper-V host to Inventory of Nakivo. In this guide I will cover backup job creation for Active Directory, File Server, SQL server and Exchange Server.
Before we begin
This guide will cover how to configure backup jobs for every type of the VM you wish to backup. It will also cover all the necessary prerequisites so we can successfully recover these machines. This guide will cover Hyper-V.
Here is the detailed documentation for backup creation on Hyper-V with Nakivo – https://helpcenter.nakivo.com/display/NH/Creating+Hyper-V+Backup+Jobs
Here you can also find detailed user guide – https://www.nakivo.com/hyper-v-backup/hyper-v-backup-user-guide.pdf
Detailed requirements for VMs you are going to backup can be found here – https://helpcenter.nakivo.com/display/NH/Feature+Requirements
All this is done on Windows Server 2019, Exchange Server 2019 and SQL Server 2017 installations.
Prerequisites
All the machines are in the same subnet, and members of the domain.
I will be covering backup of the Active Directory, File Server, SQL server and Exchange Server. In this scenario, these services are not in any type of HA.
Now, there are few things you need to do on every VM you wish to backup, in order for your backup (and recovery) to go smooth.
We will also do all the necessary steps here so our recover procedures work flawlessly.
First, the thing I usually don’t like to do, but are necessary for modern backup solutions – enable Production Checkpoints for your VM inside Hyper-V Manager, on Settings of every VM you wish to backup.
Checkpoints
Click on VM you wish to backup inside Hyper-V Manager | select Settings | select Checkpoints under Management | Enable checkpoints | Production checkpoints!! It is very important for you to select Production checkpoints – not Standard ones
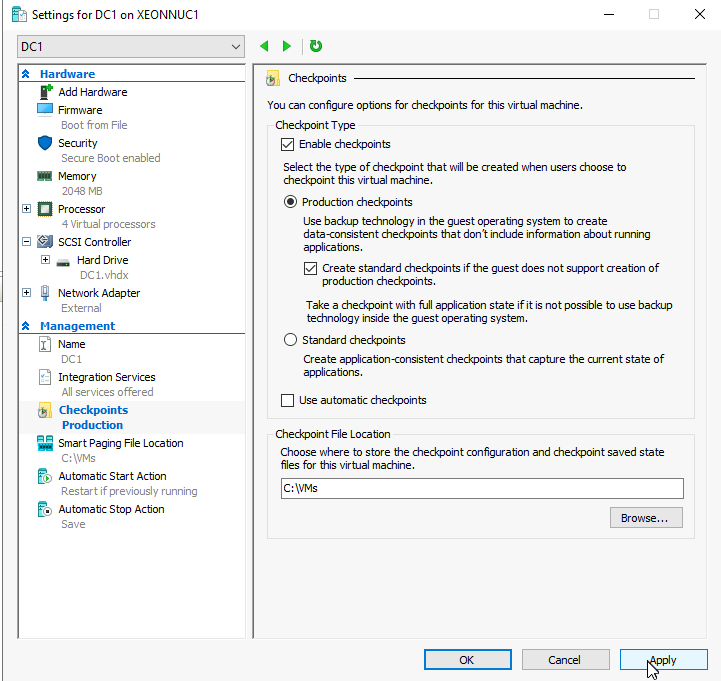
Otherwise, after you do your first backup job, you will be greeted with “Source host could not create temporary checkpoint required to backup up the “XY” VM.”

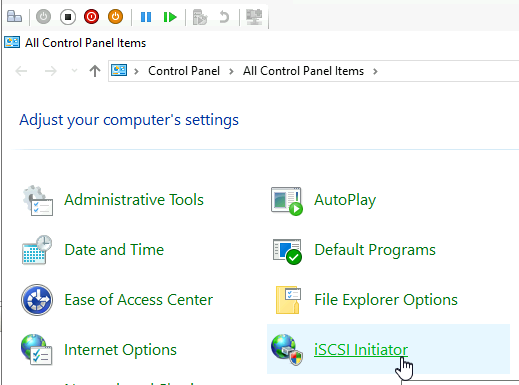
ISCSI Initiators
You will also need to enable ISCSI initator on all the VMs you wish to backup.
Control Panel | click on ISCSI initiator
Yes
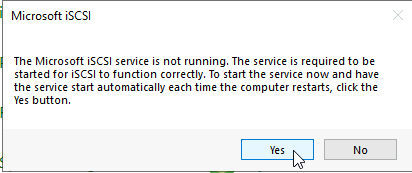
Otherwise, every recovery task you wish to start, will quickly end with following error ” The “ISCSI Initiator” service is not running on the recovery server.”

Turn on File and Printer Sharing
Go to Control Panel | Network and Sharing Center | Change Advanced Sharing Settings | Turn on file and printer sharing
Almost all of the backup jobs need access to default file shares, so this is also important for that reason.
There were many vague errors, which disappeared after I turned on file and printer sharing (please be very careful with this and make sure your machine is secure and not exposed to the internet).
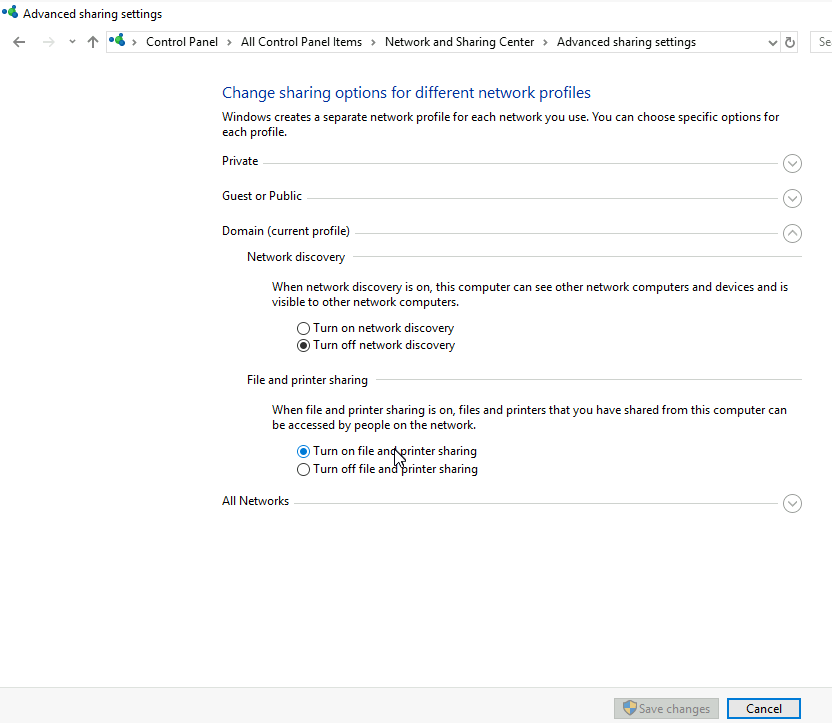
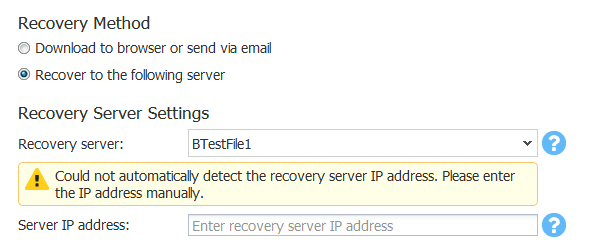
Often I would get this error if File and Printer sharing is turned off. Of course, you can enter your IP address manually of the machine you wish to recover, but that also introduced some bugs sometimes.
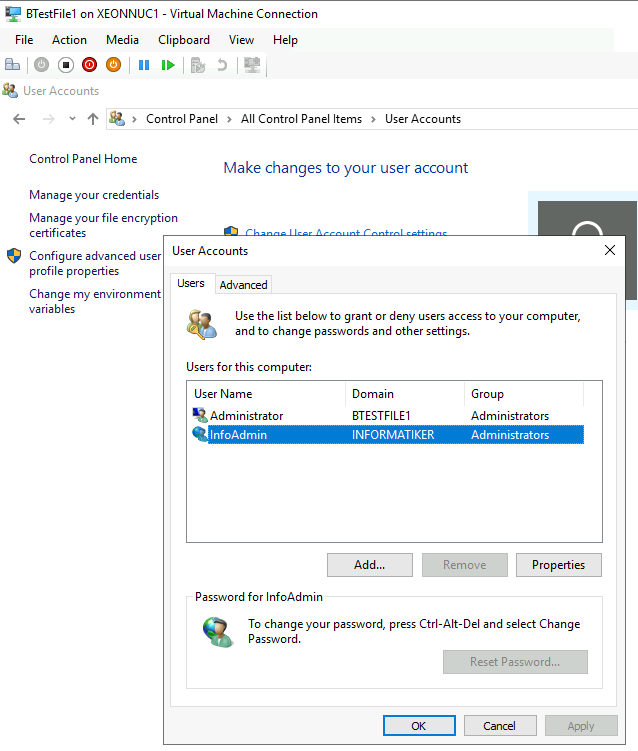
User Accounts
For these backup scenarios I will use two accounts – InfoAdmin for Active Directory, File Server and Exchange Server backup and sqldbadmin1 for SQL Server backup.
Accounts that you use for Nakivo backup should be members of local Administartors group on the VM you are planing to backup. On domain I also added these accounts to Backup Operators group.
I recommend creating separate OU inside your AD only dedicated to backup software, and inside it, defining users for the backup process and their rights. That way, if there is some kind of security risk, you can easily disable or change them, because only backup software depends on them and not your entire domain or all the services.
We will also need to add these users in Nakivo during backup/recovery process, but we will do that later.
These are some general guidelines for all the VMs you plan to backup. I will go through backup/recovery setup for each type of files/databases separately, so we can configure all the prerequisites as needed.
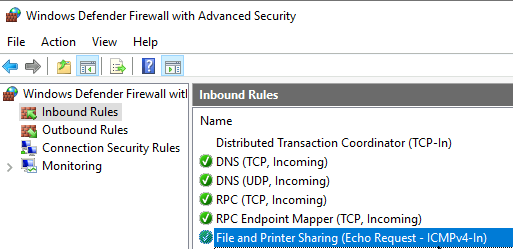
Enable ICMP in Firewall
In Inbound rules of the VM you wish to backup, enable “File and Printer Sharing (Echo Request – ICMPv4-In)
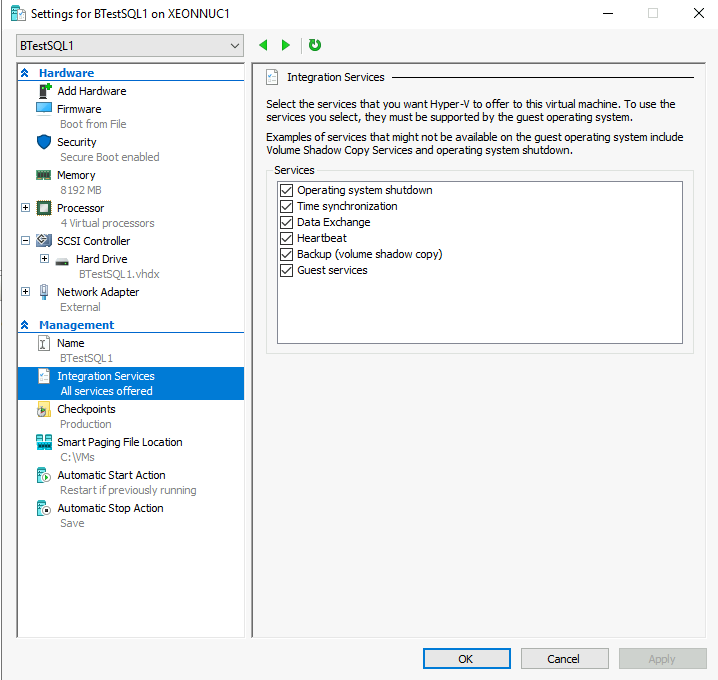
All Hyper-V integration services need to be enabled
For every VM you plan to backup, all integration services need to be enabled. You can find Integration services under Settings of the VM inside Hyper-V Manager.
Install Hyper-V Integration Services
If you have older Windows inside Hyper-V you will need to install Hyper-V integration services inside your Windows VM. Windows Server 2019 have these integrated by default.
Create Backup jobs
Backup job creation wizard is more or less the same for every type of file/db you do, so I will go through entire process on Active Directory sample, and highlight only differences for other job types, because most of the process is the same.
I will also list all the prerequisites so that we can recover files or DBs successfully.
You can find more details here – https://helpcenter.nakivo.com/display/NH/Feature+Requirements
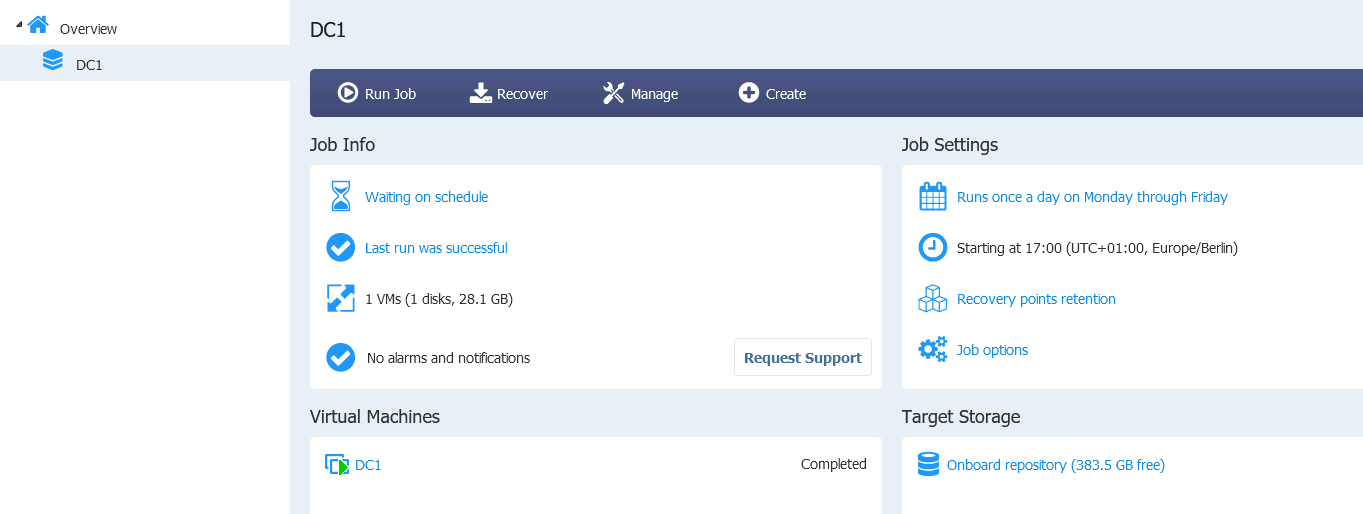
Active Directory (DC)
In order for backup/recovery functions as expected, you need to do the following on your Active Directory VM (that is DC1 in my example).
Prerequisites
Follow prerequisites section and do all that is described there on your AD VM.
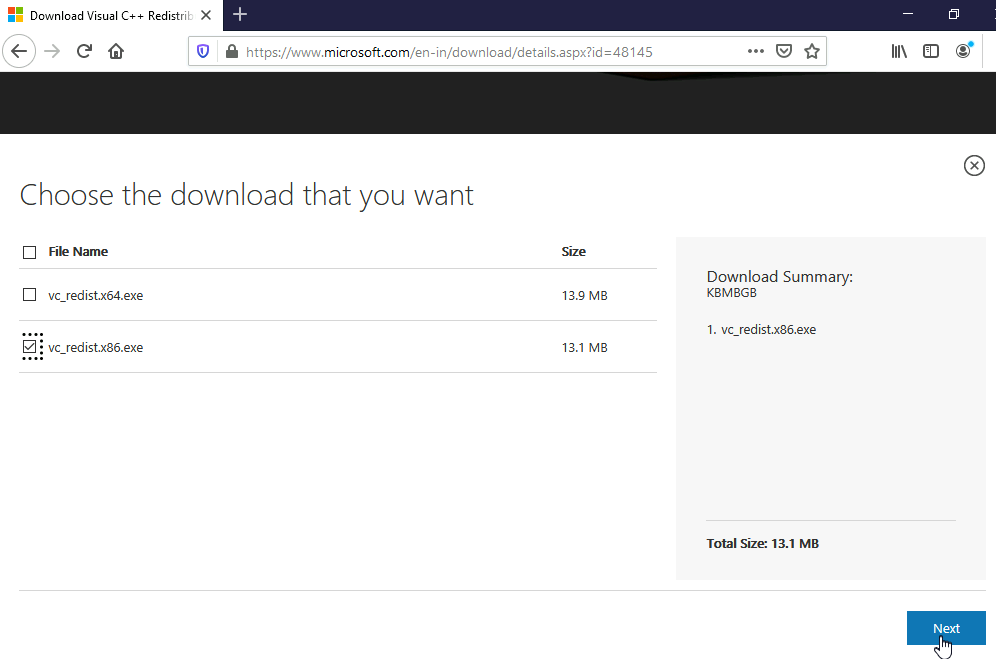
Additionally we need to install vc_redist.x86.exe (v 2015). It can be found here – https://www.microsoft.com/en-in/download/details.aspx?id=48145
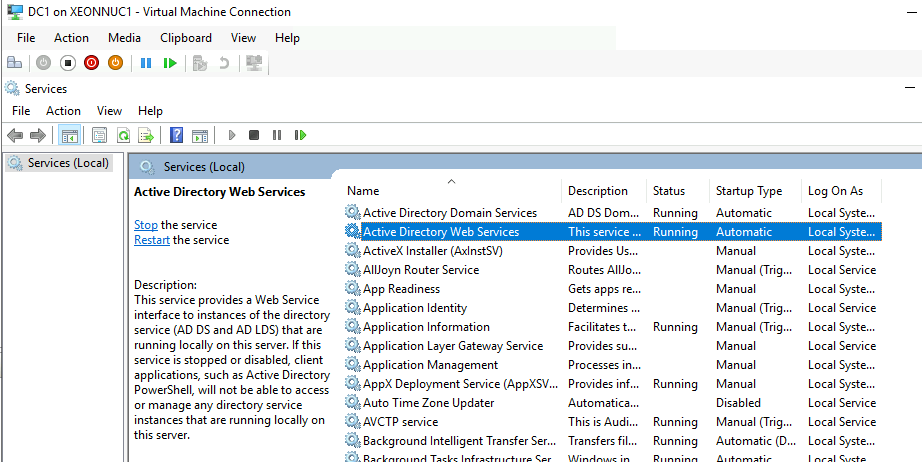
Check that Active Directory Web Services – service – is running
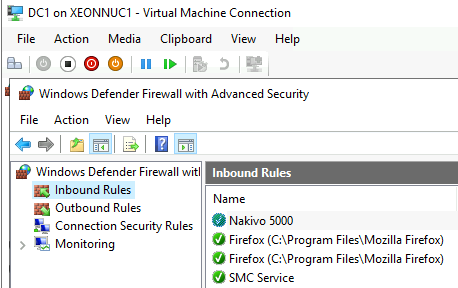
We also need to open port TCP 5000 in inbound rules of the firewall. This port should not be used by other services.
Create Backup Job
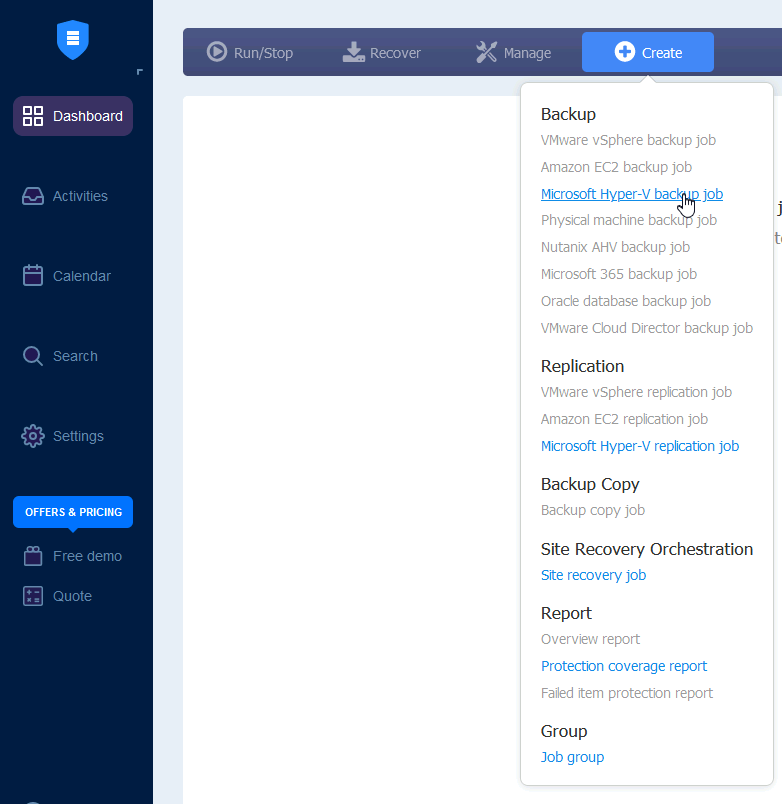
In Nakivo management web console, in Dashboard section click on Create
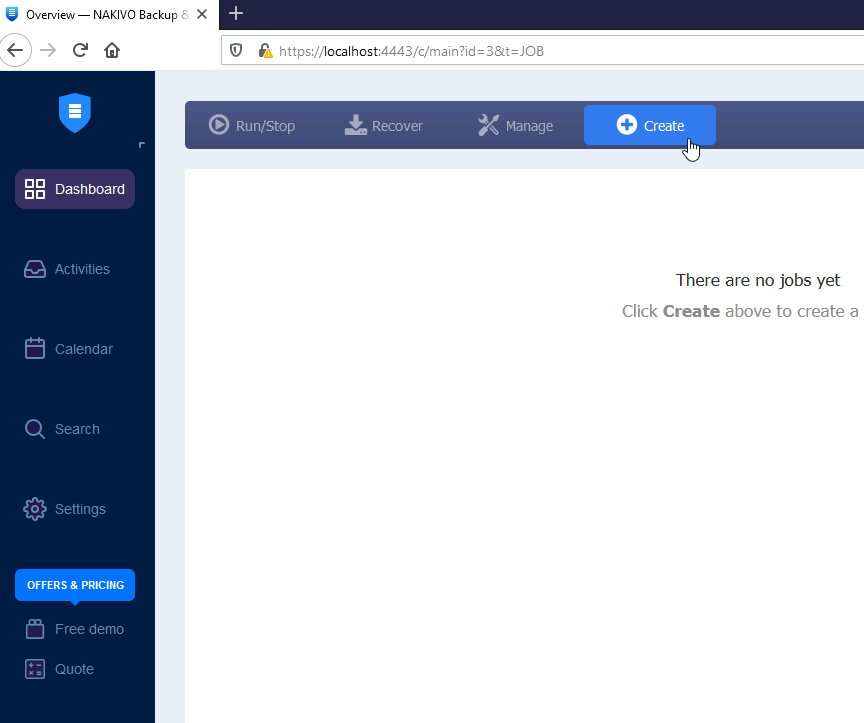
Click on Microsoft Hyper-V backup job
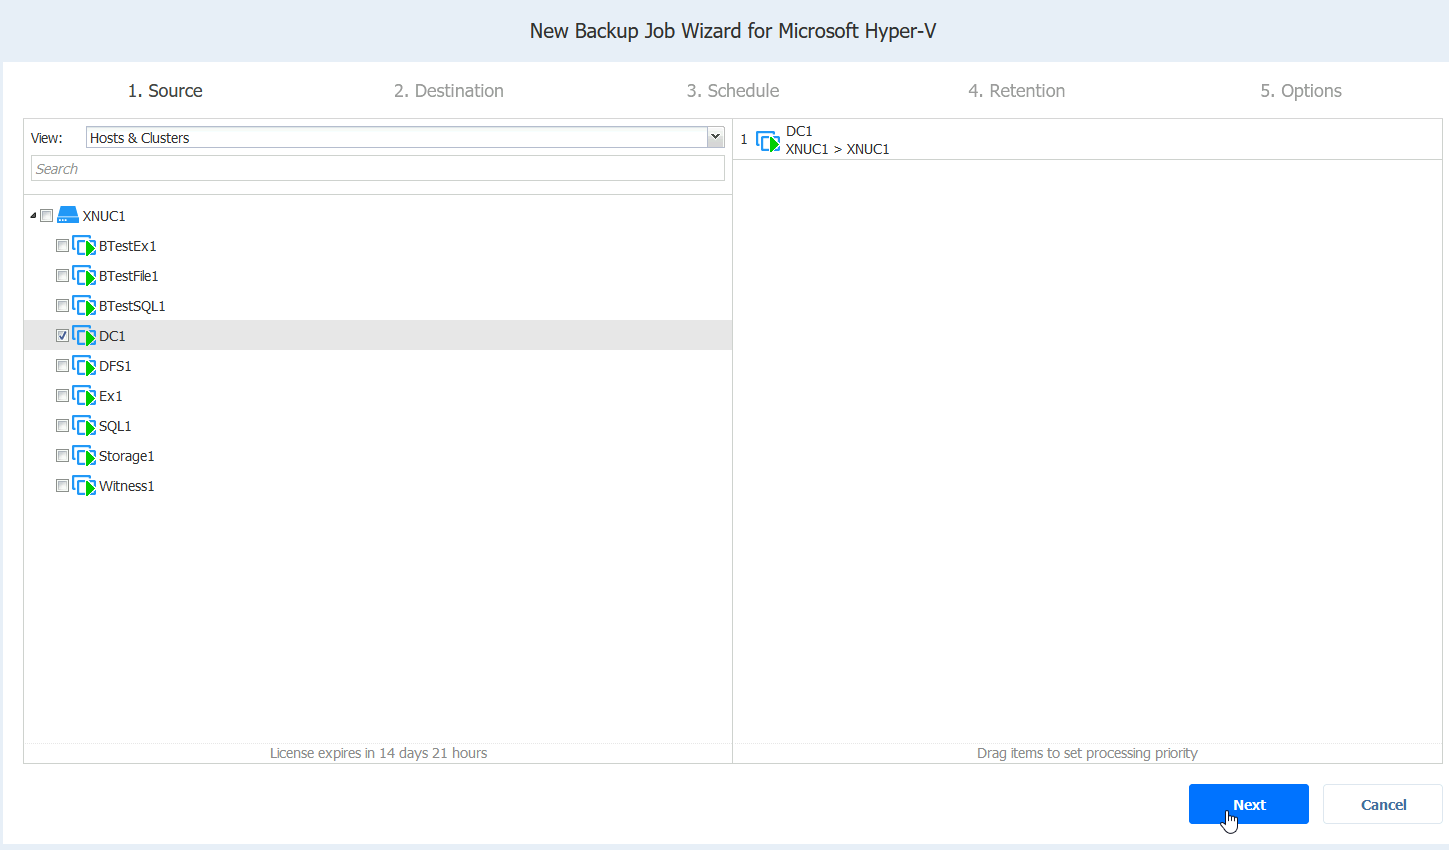
On the 1.Source screen, select the VM you wish to backup – I will backup DC1 (later on we will select SQL1, File1 and Ex1 machines here). Next
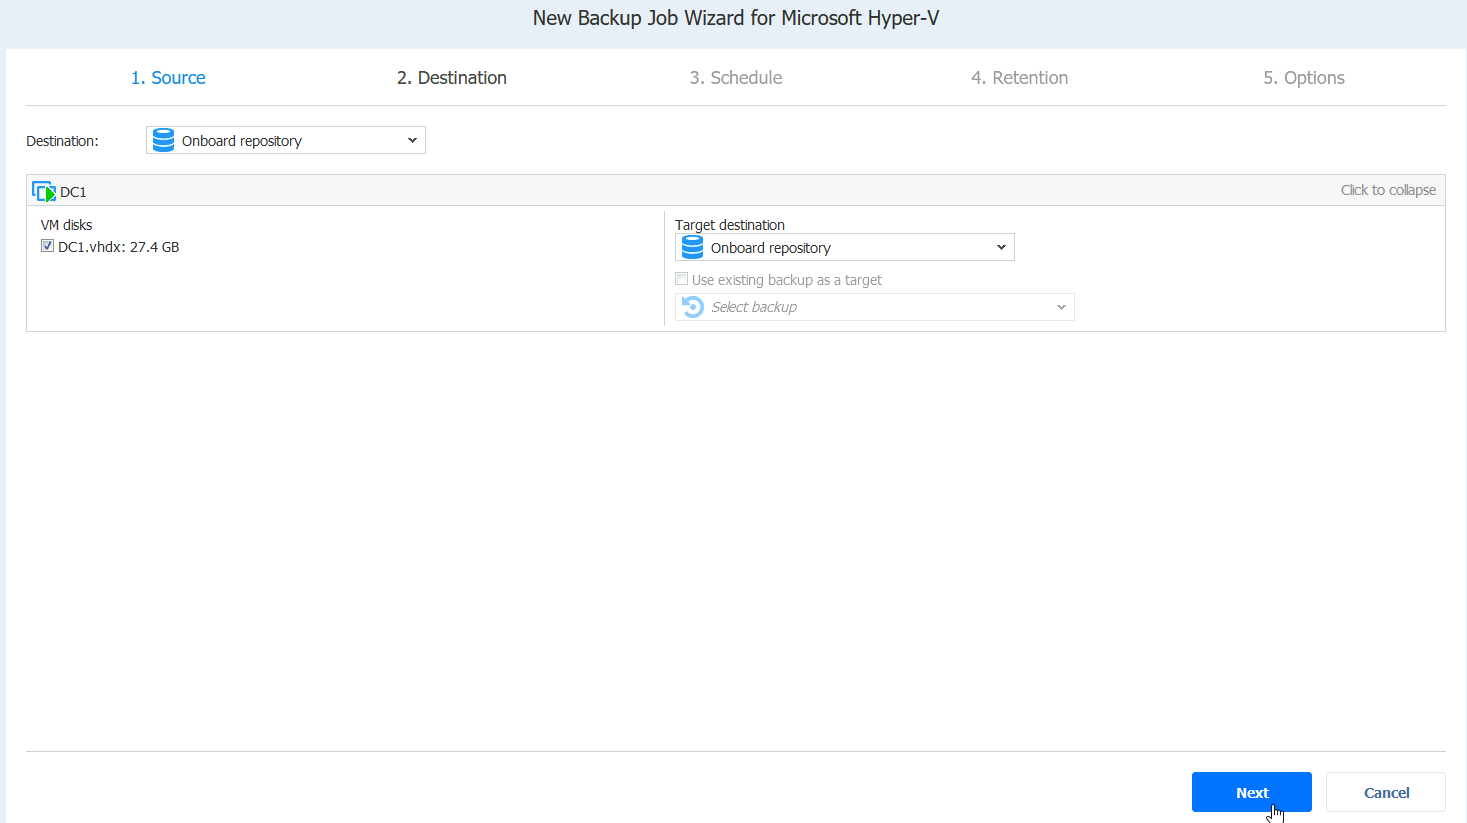
On 2.Destination, we will select Backup repository we defined earlier. If you select “Advanced Setup” you can select VM drives you wish to backup. In this whole guide, I will backup all disks of all VMs.
Next
On 3.Schedule, you will define how often you want to backup VM we just selected. I cannot really guide you very well here. It all depends on your internal policies and RTO and RPO for the company. If you don’t have frequent changes on the data inside VM you can select daily/weekly backup schedule, however, if you are not allowed to loose more than half an hour of work, you will need to select periodical schedule…
Next
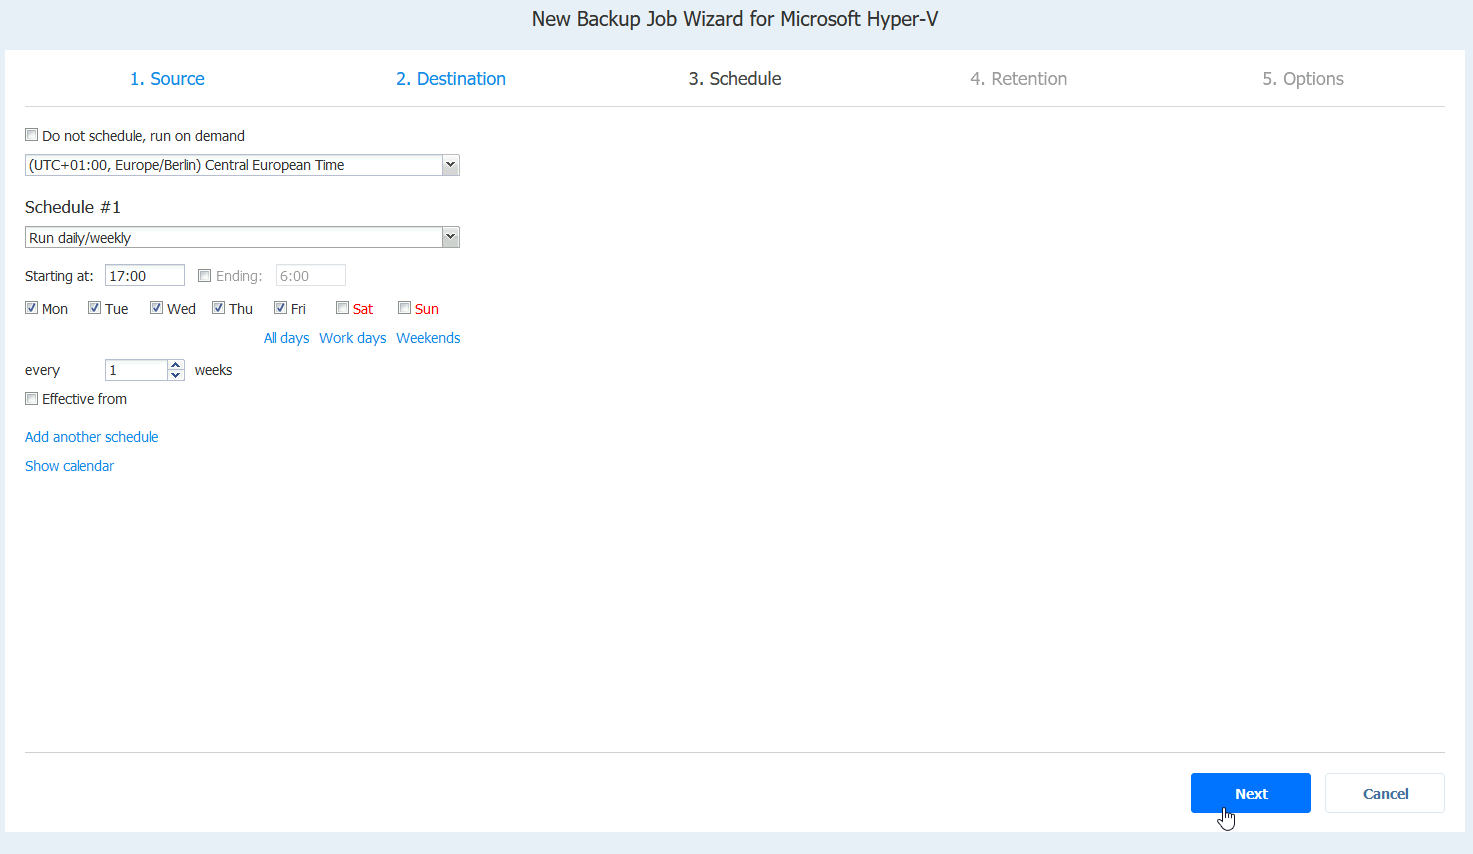
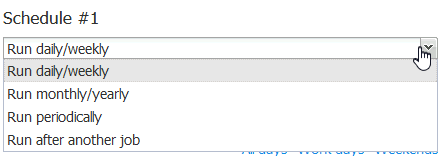
These are all the schedule options…
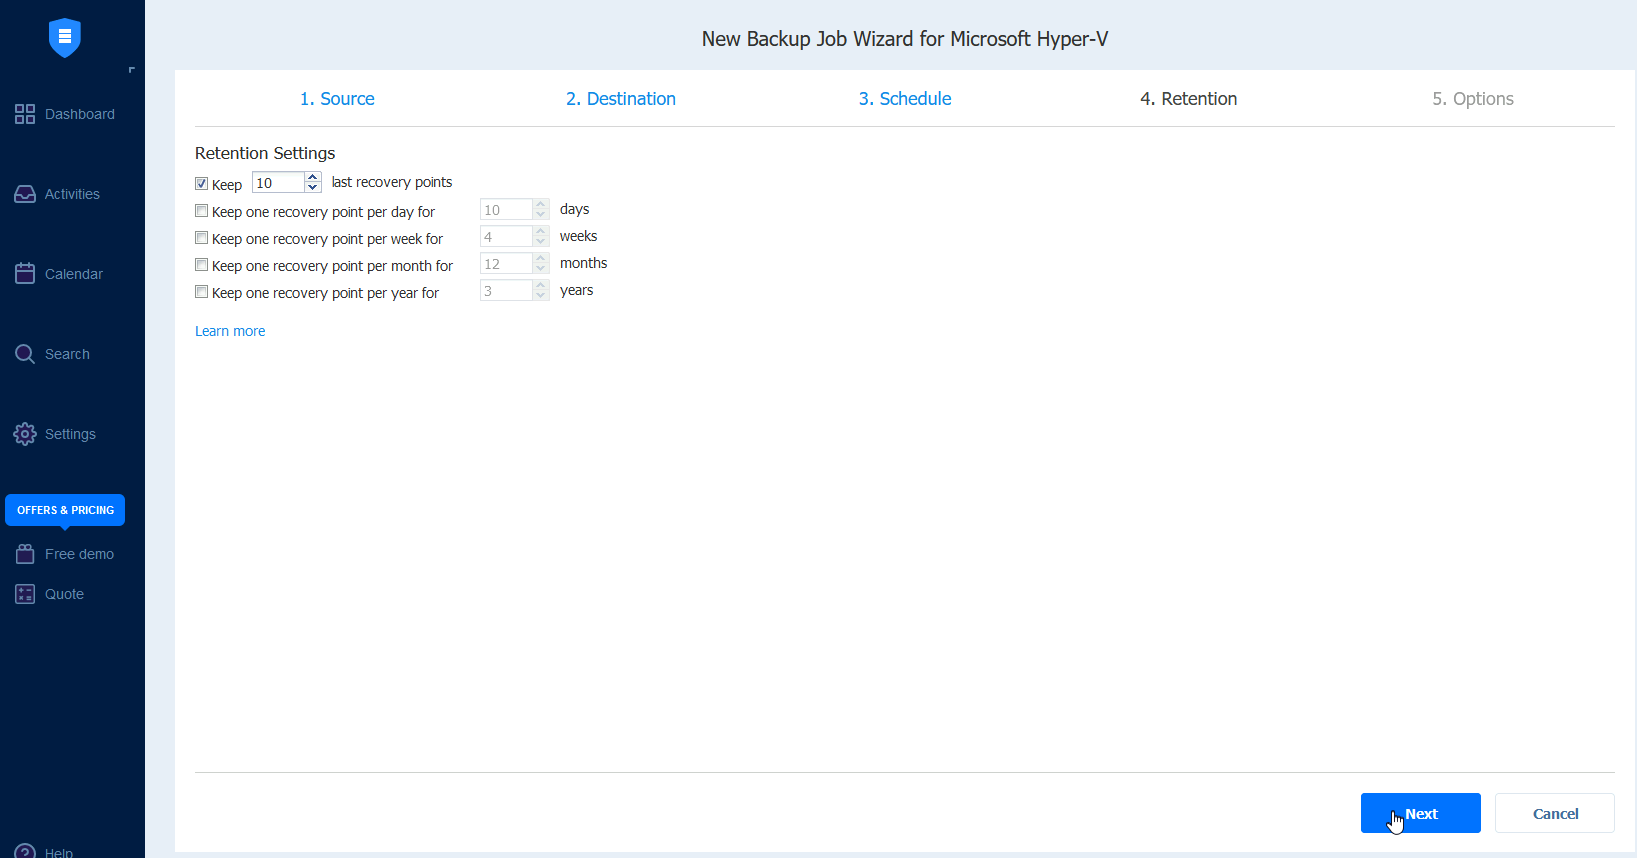
4.Retention – if you have policy that you need to keep monthly, yearly, or backups for multiple years, this is where you will be defining it. Also, make sure you calculate your disk space correctly, so that your backups fit to your drives and tapes with the policy you select. We will select to keep last 10 recovery points. Next
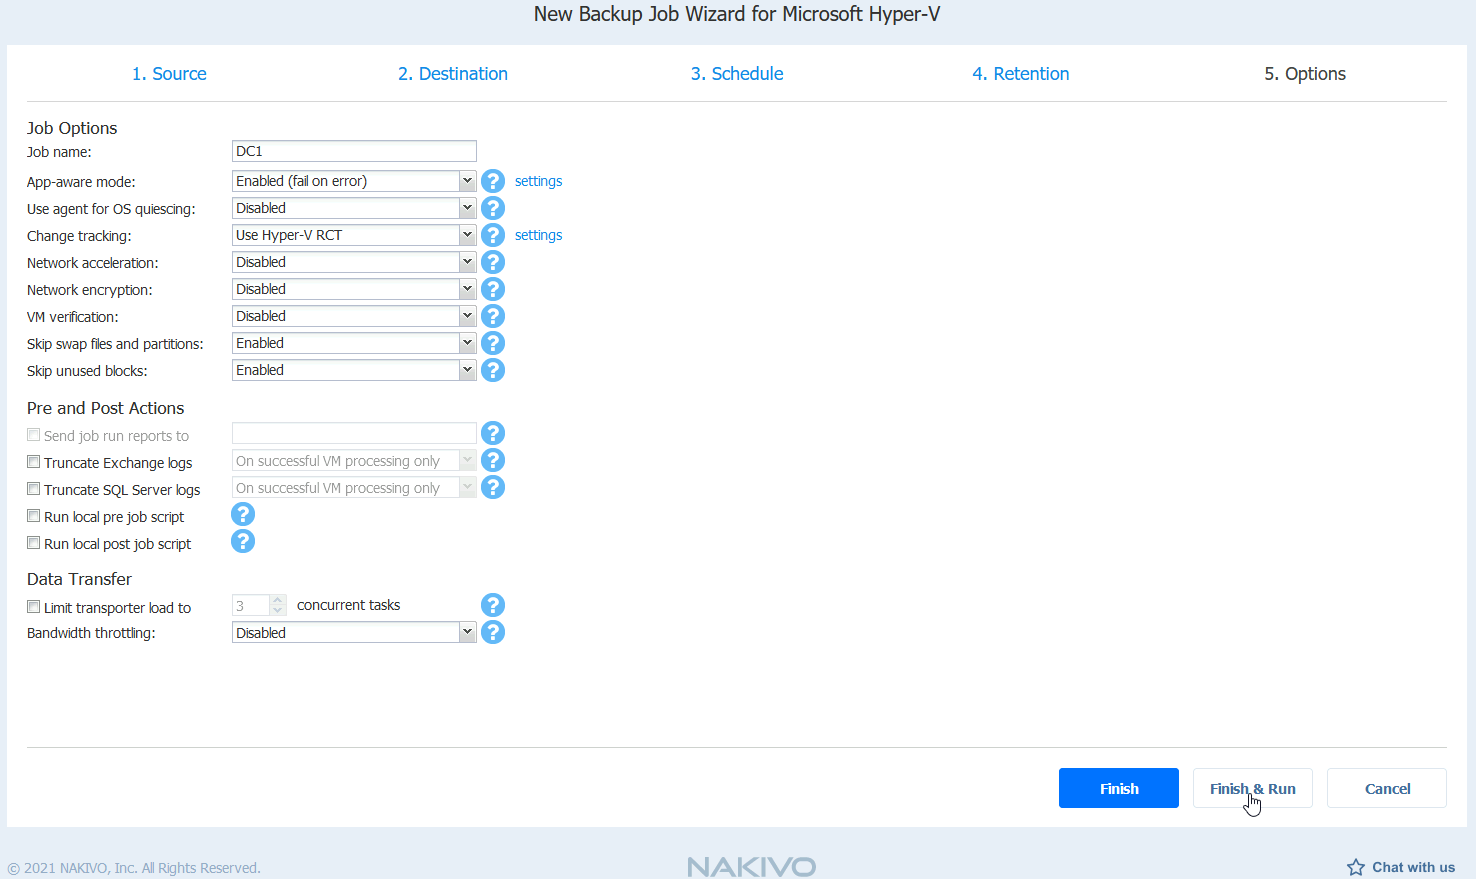
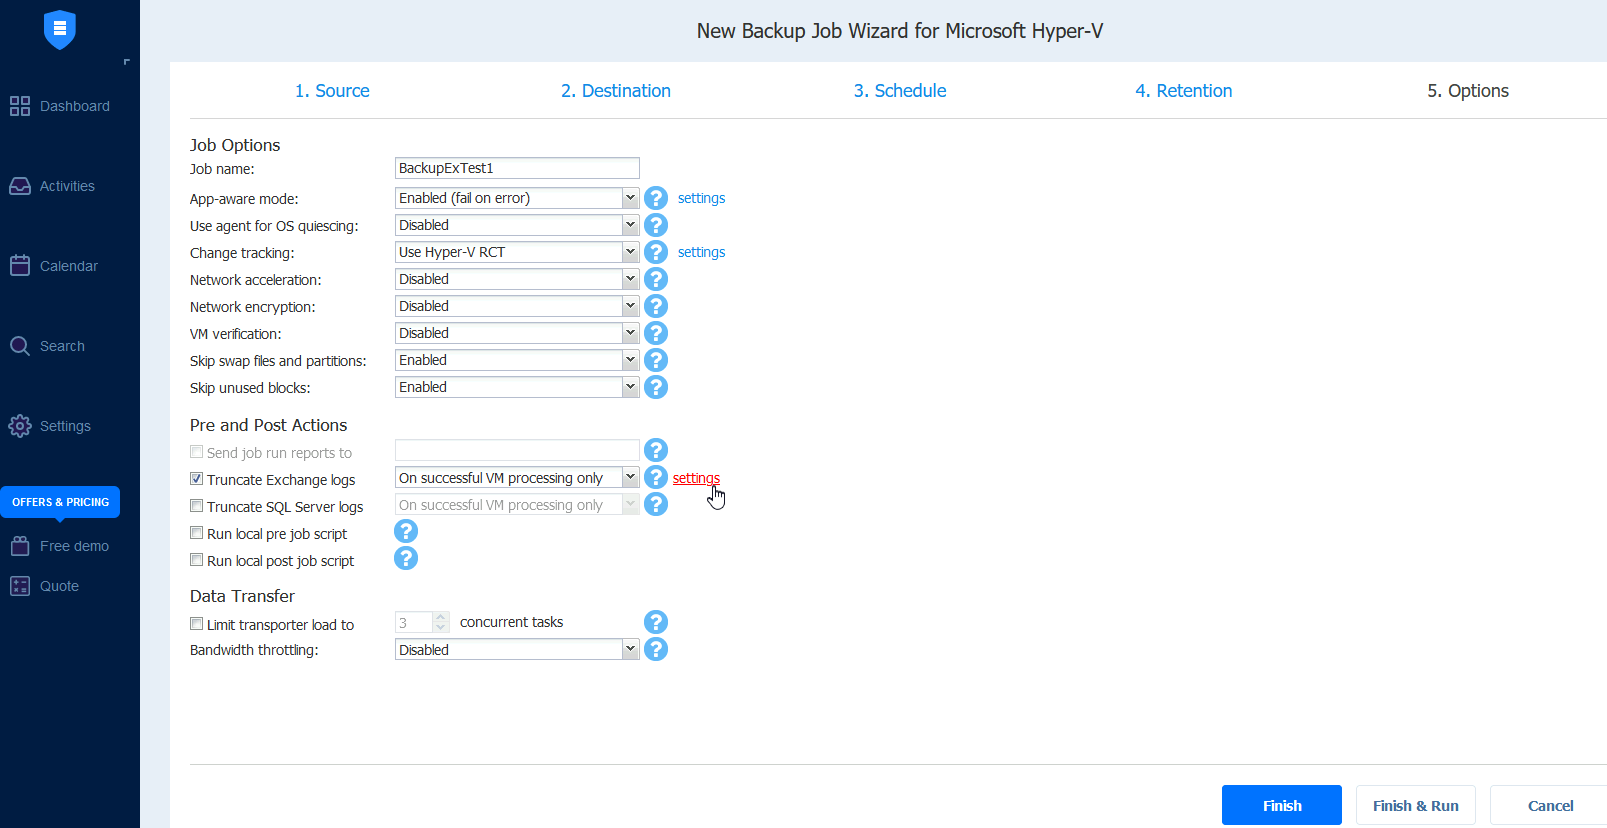
5.Options – Enter job name – I’m here backuping VM named DC1, so I will name this job DC1. Again, some of the options you can only decide if you need or not.
Only thing we will need throughout this guide is “App-aware mode” – I selected it as Enabled (fail on error). App-aware mode will enable us to recover individual data from the VMs.
I also tried to enable “Use agent for OS quiescing” – but I couldn’t get that to work, backup would be stuck at 19.1% for every VM I tried it on (and I’m doing this whole new lab on fresh Hyper-V install).
Other than that, I left all the options default. Network encryption is for example useful if you are doing backup over WAN without VPN.
Also Truncate SQL and Exchange Logs option is needed for SQL and Exchange VMs – we will go with these options when we cover those VMs.
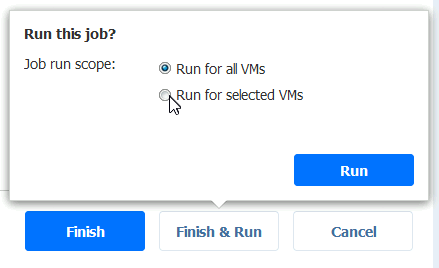
Finish & Run
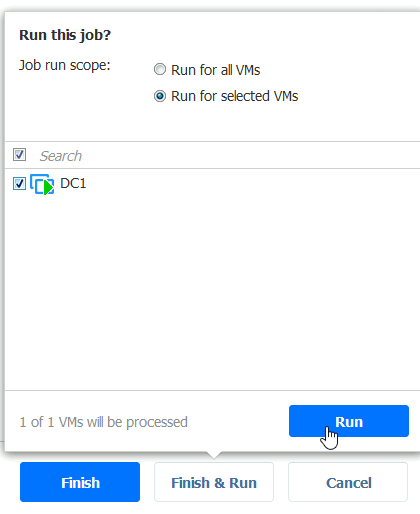
Select “Run for selected VMs“
Select VM we just created job for, and click on Run
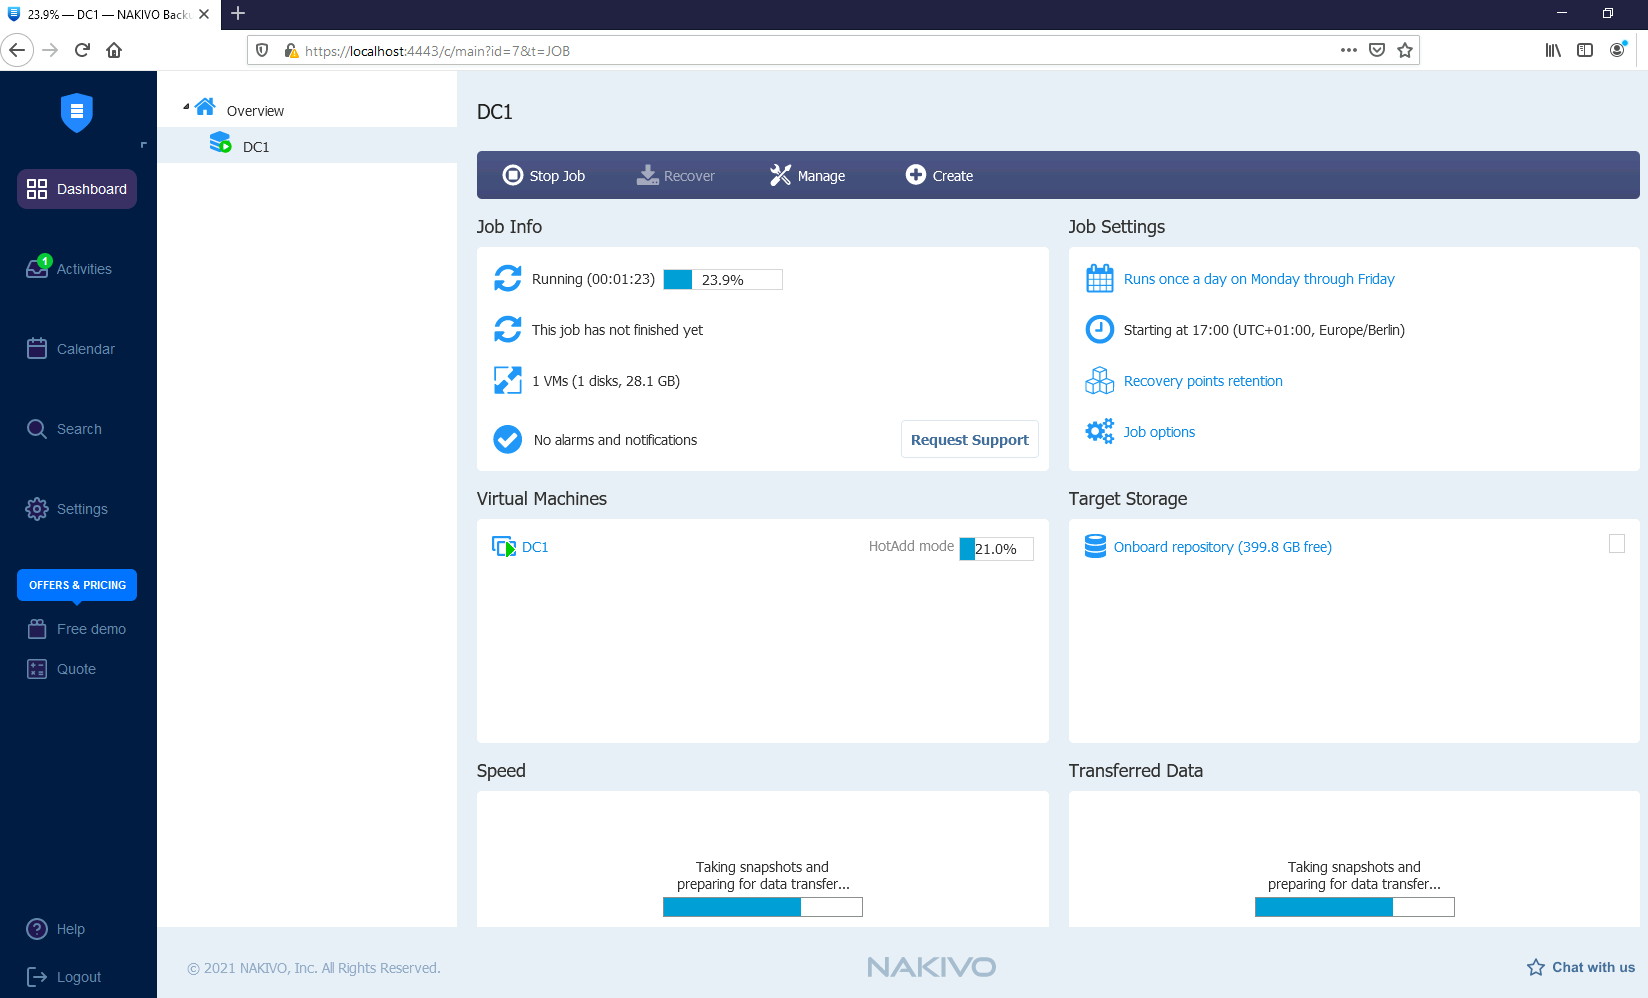
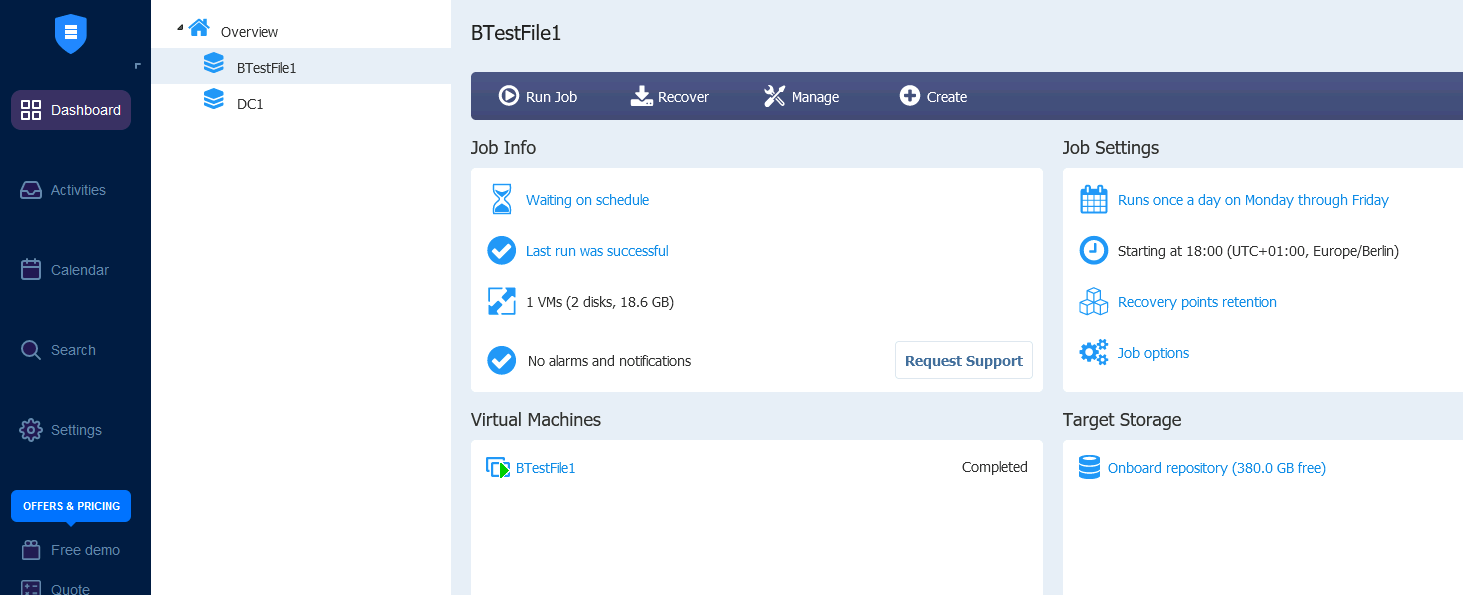
Ok, backup is running…
You can also open Activities tab and watch your activities here…
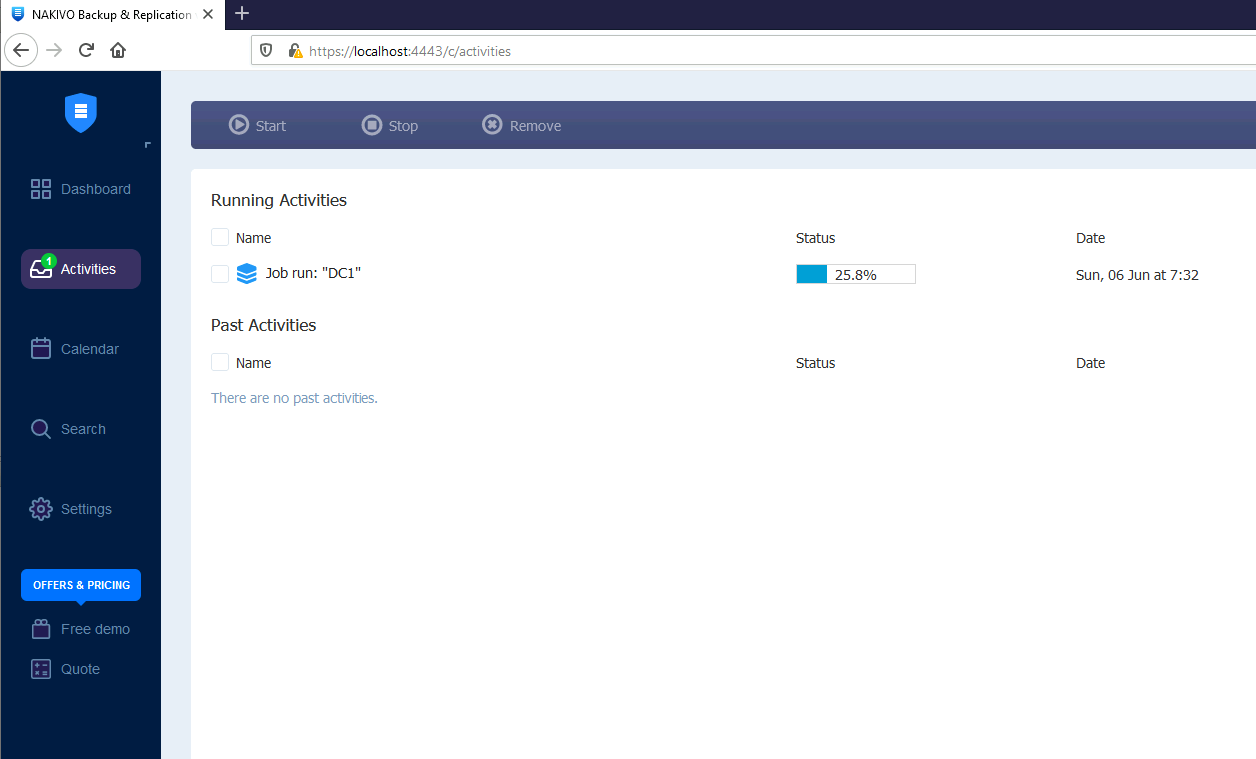
We have our first backup job successfully done!
Ok, so more or less process is the same for every backup job you create, exceptions are SQL and Exchange jobs, and I will detail differences for those.
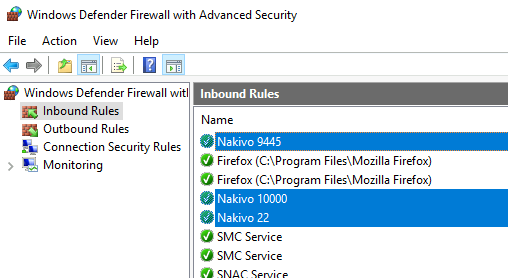
File server
Prerequisites
First, do all the general prerequisites we already specified at the beginning of the article.
Next, we need to enable TCP ports 9445, 22 and 10000 in Inbound Firewall rules
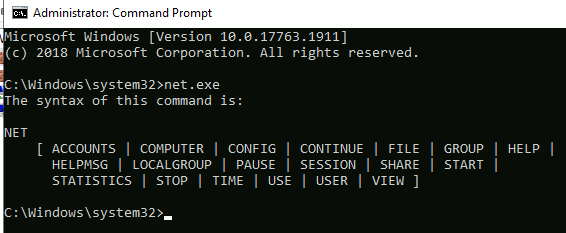
There is also one item in Nakivo documentation which states you should have “Net security package” installed – but I honestly have no clue what is that. They haven’t provided any links or details about this.
net.exe is preinstalled on the Server. You can check it out by just typing net.exe inside cmd
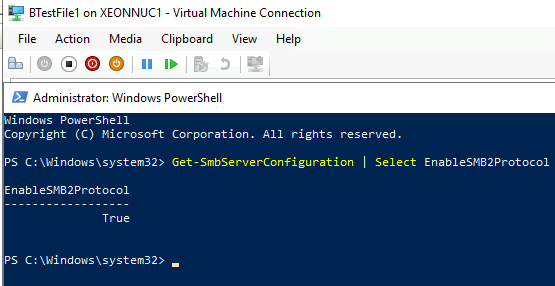
SMB2 should be enabled.
You can check if SMB2 is enabled by typing in following to Powershell
Get-SmbServerConfiguration | Select EnableSMB2ProtocolIt is enabled on my file server
If by any change SMB2 is not enabled, you can enable it by typing in
Set-SmbServerConfiguration -EnableSMB2Protocol $trueIf you set value to $false, you will disable it.
User you are going to use needs to be local administrator on the VM you are backing up, and should have rights on the folders, files you plan to backup/recover.
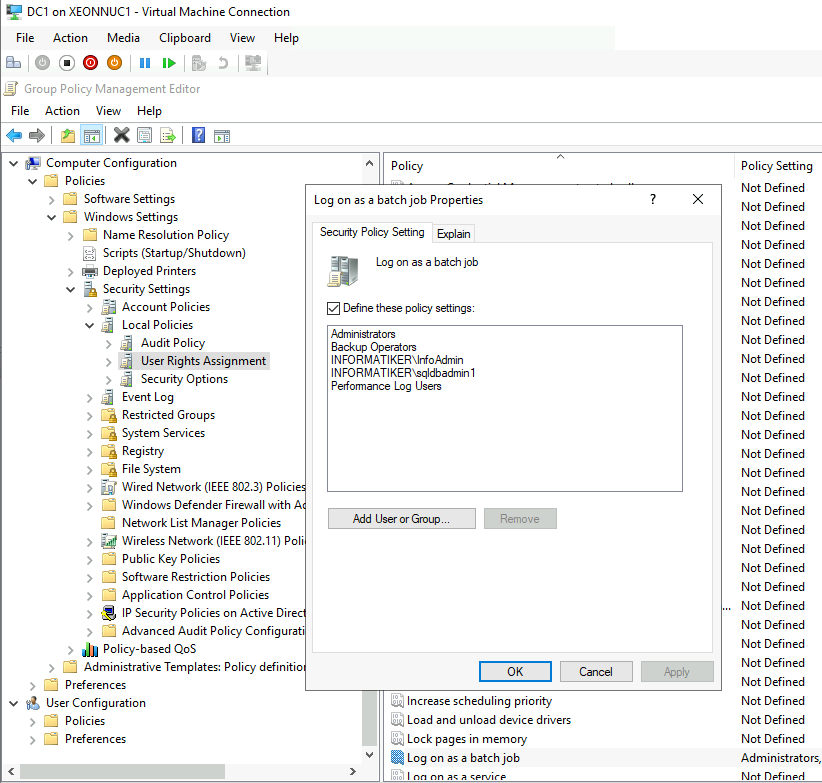
User should have “Logon as batch job” permission
Here are more details on that – https://docs.microsoft.com/en-us/windows/security/threat-protection/security-policy-settings/log-on-as-a-batch-job
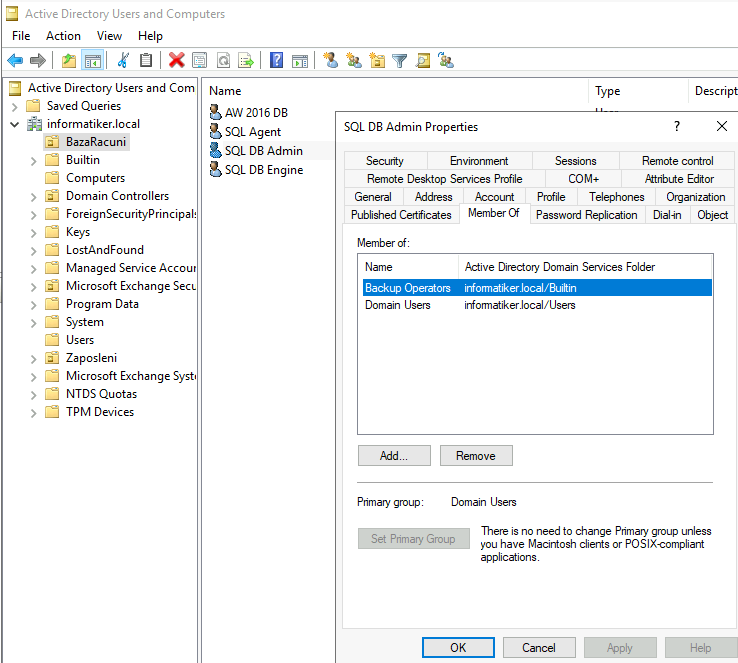
I’ve done it through group policy on domain level. You can set this on Group Policy Management Editor on your DC | Computer Configuration | Windows Settings | Security Settings | Local Policies | User Rights Assignment | Log on as a batch job – I added InfoAdmin and sqldbadmin1 users, but i nreality, it is enough to put these users in Backup Operators group.
Backup job
Backup job creation procedure is the same as for Active Directory, just specify different frequency, retention policy… Also, adapt job completely to your needs.
Backup job is success!
Exchange Server
Prerequisites
Again, all the things from general prerequisites apply to Exchange server.
Account you use for backup/recovery should have local administrative rights +be in Administrators group + domain users + organization management
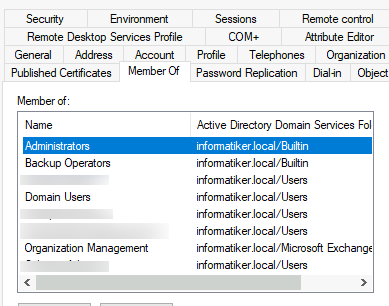
Although not security savvy practice, I find that domain admin account is needed here, because in most of the cases, recovery and backup will not function as intended.
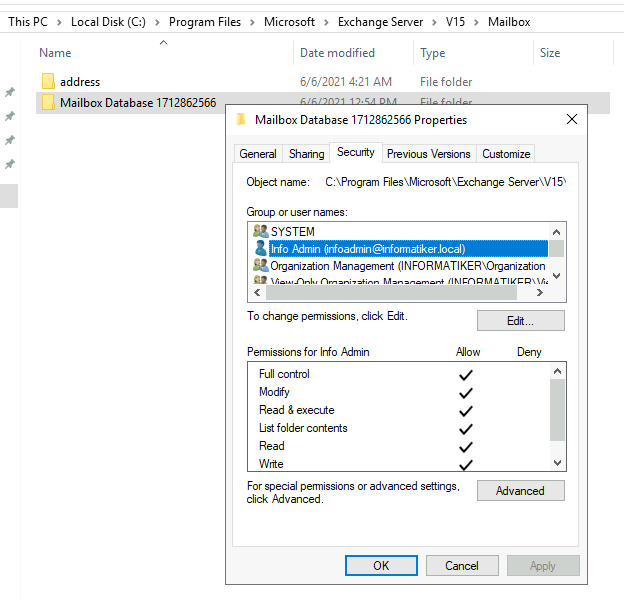
User that you are going to use needs to have Full Access permissions on folder where Exchange database is located. I went so far as to grant user full permissions on the DB itself.
Other than that, there are no special firewall needs or additional software installs.
Backup job
The whole procedure is more or less the same as the initially described Active Directory job, with one difference.
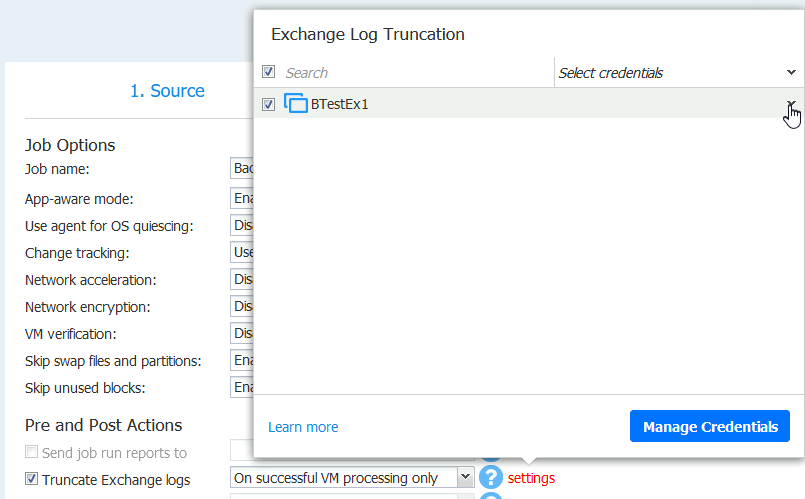
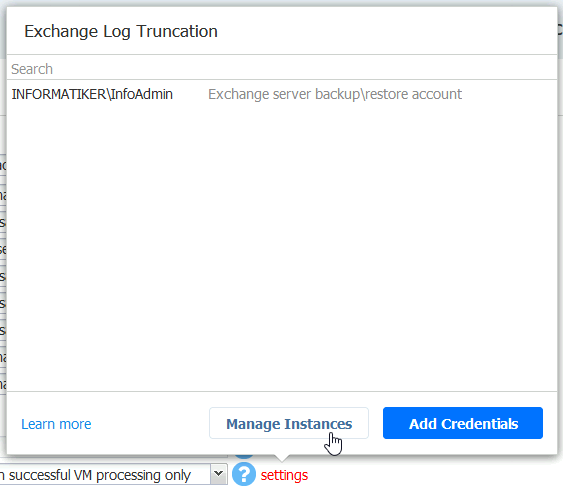
On step 5.Options, under Pre and Post options we need to enable “Truncate Excange Logs”. I will enable this option with option “On successful VM processing only”. setting beside that line will be red after you select it. Click on setting
Select BTestEx1 and under “Select credentials” we have no defined credentials, so we need to define credentials that have sufficient rights to manage our Exchange installation. Click on Manage Credentials
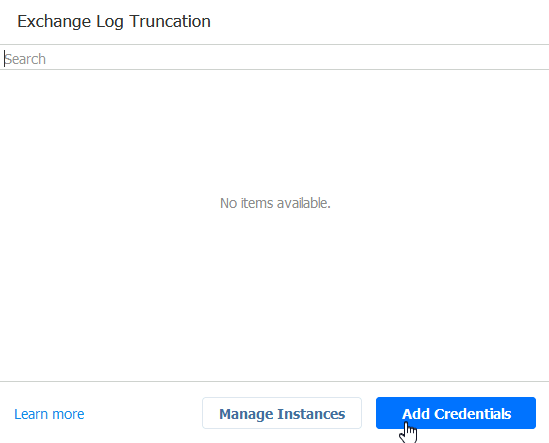
Since we have no credentials defined, we will select Add Credentials
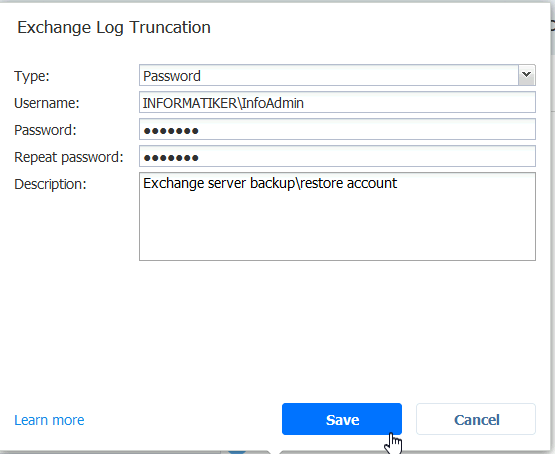
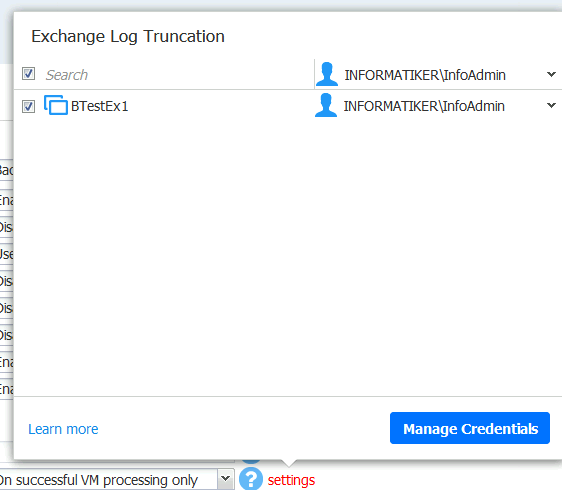
I will define user InfoAdmin, enter domain credentials (password) and select Save
Select “Manage Instances”
Now, finally for the selected BTestEx1 VM backup job, we can select InfoAdmin user. To close this window, simply click somewhere outside this window, there is no ok, apply button.
Run backup job for the VM and hope we did good.
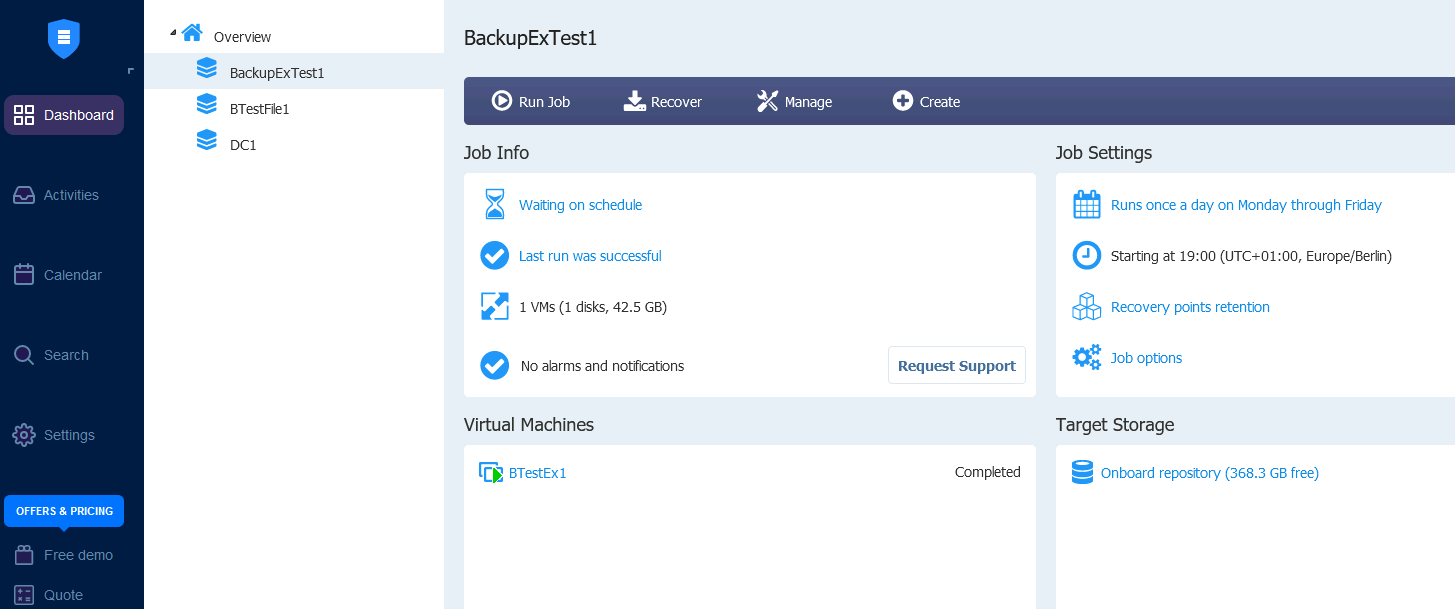
We did, backup is done, no errors!
SQL Server
Prerequisites
Besides general prerequisites there are also a few more we need for SQL backup/recovery to work.
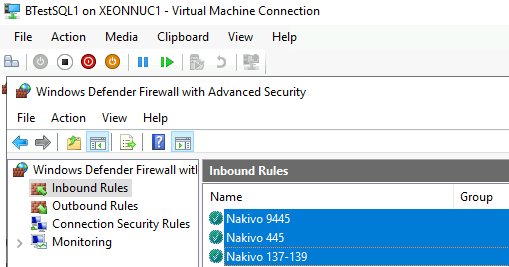
Firewall
Following TCP Inbound ports should be enabled
137-139
445
9445
sqlcmd utility should be installed – https://docs.microsoft.com/en-us/sql/tools/sqlcmd-utility?view=sql-server-ver15
I download and install x64 version usually.
SMB2 should be enabled – I already shown details for this checkup on File Server example
Get-SmbServerConfiguration | Select EnableSMB2Protocol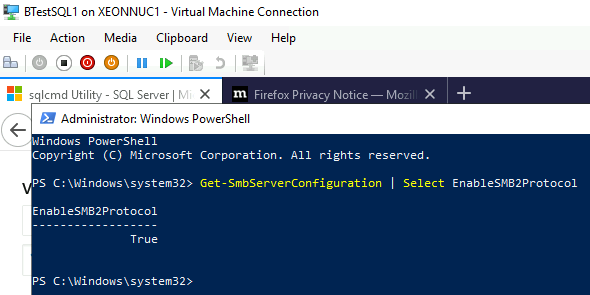
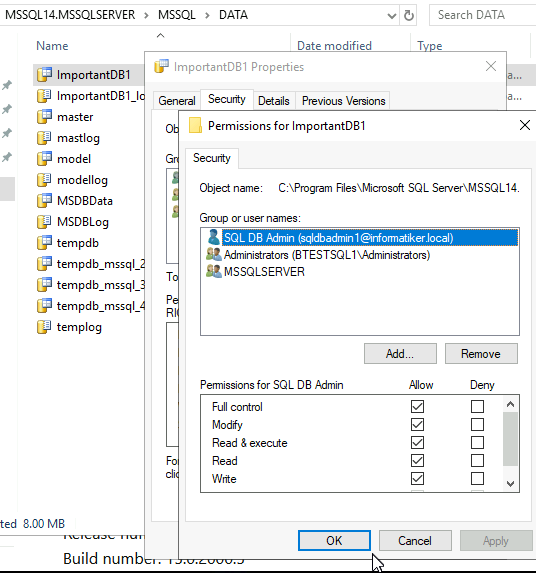
User you are going to use needs to have full permissions on DATA folder or other folders where your databases are.
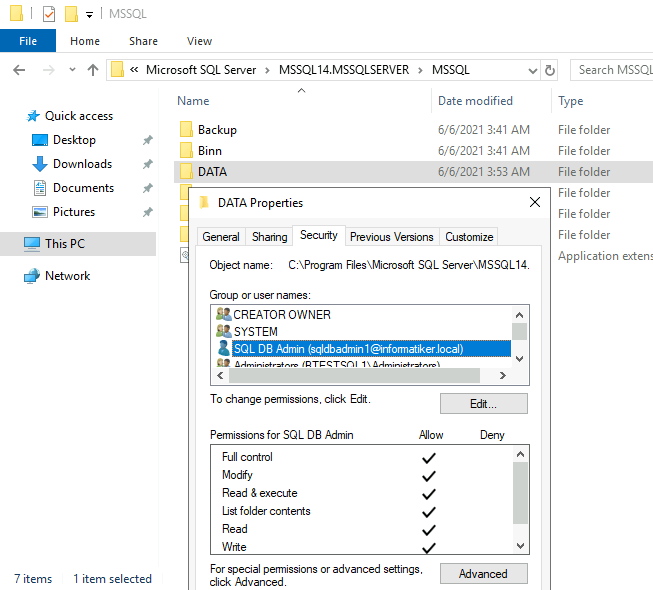
I also give that user full permissions on DB and log of the DB
Inside SQL Management, user you plan to use for backups/recovery should have Sysadmin rights
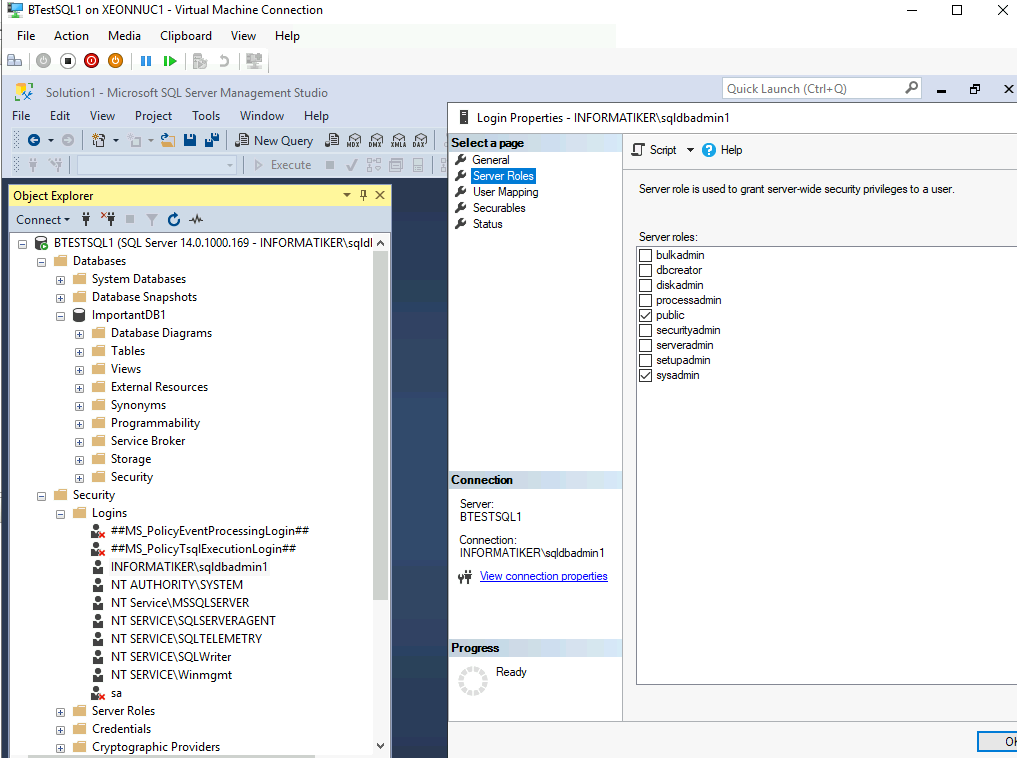
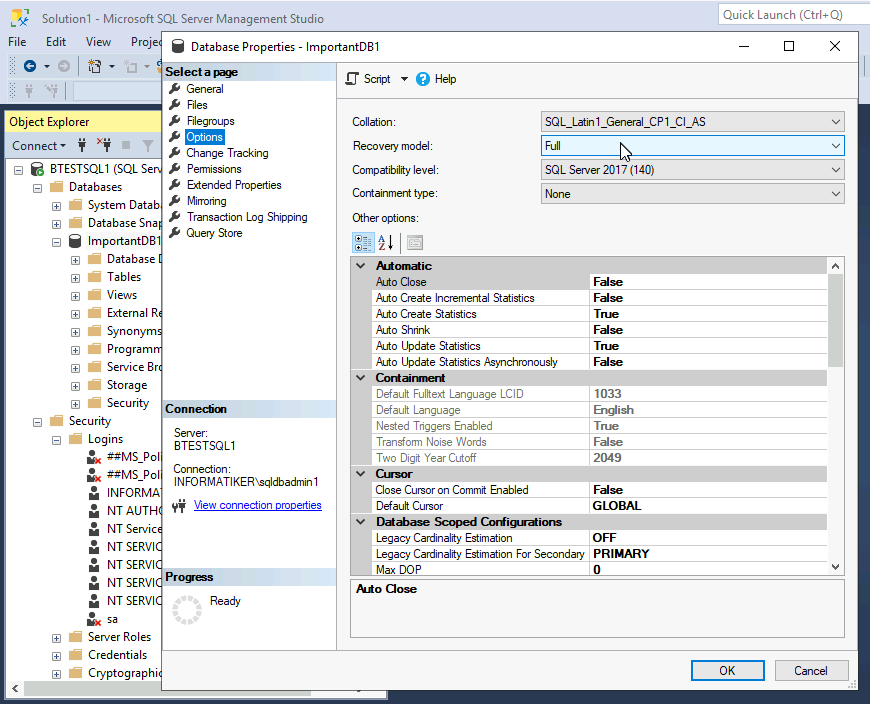
Database should have Full Recovery Model
User should have Log on as a batch job permissions. sqldbadmin1 account is already inside Backup Operators group, but I also added the user.

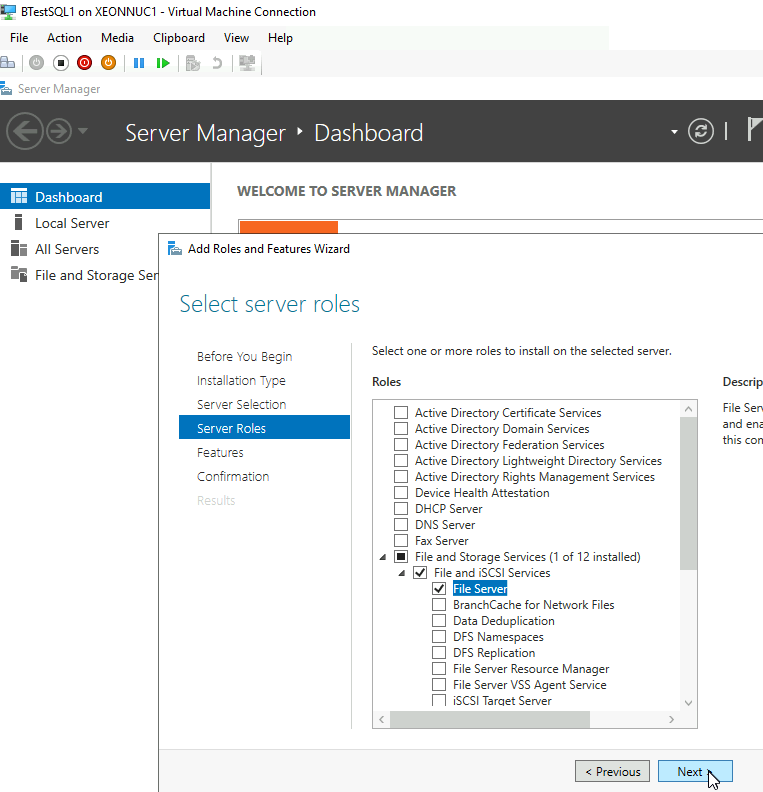
File Server Role should be enabled on SQL Server VM you wish to backup
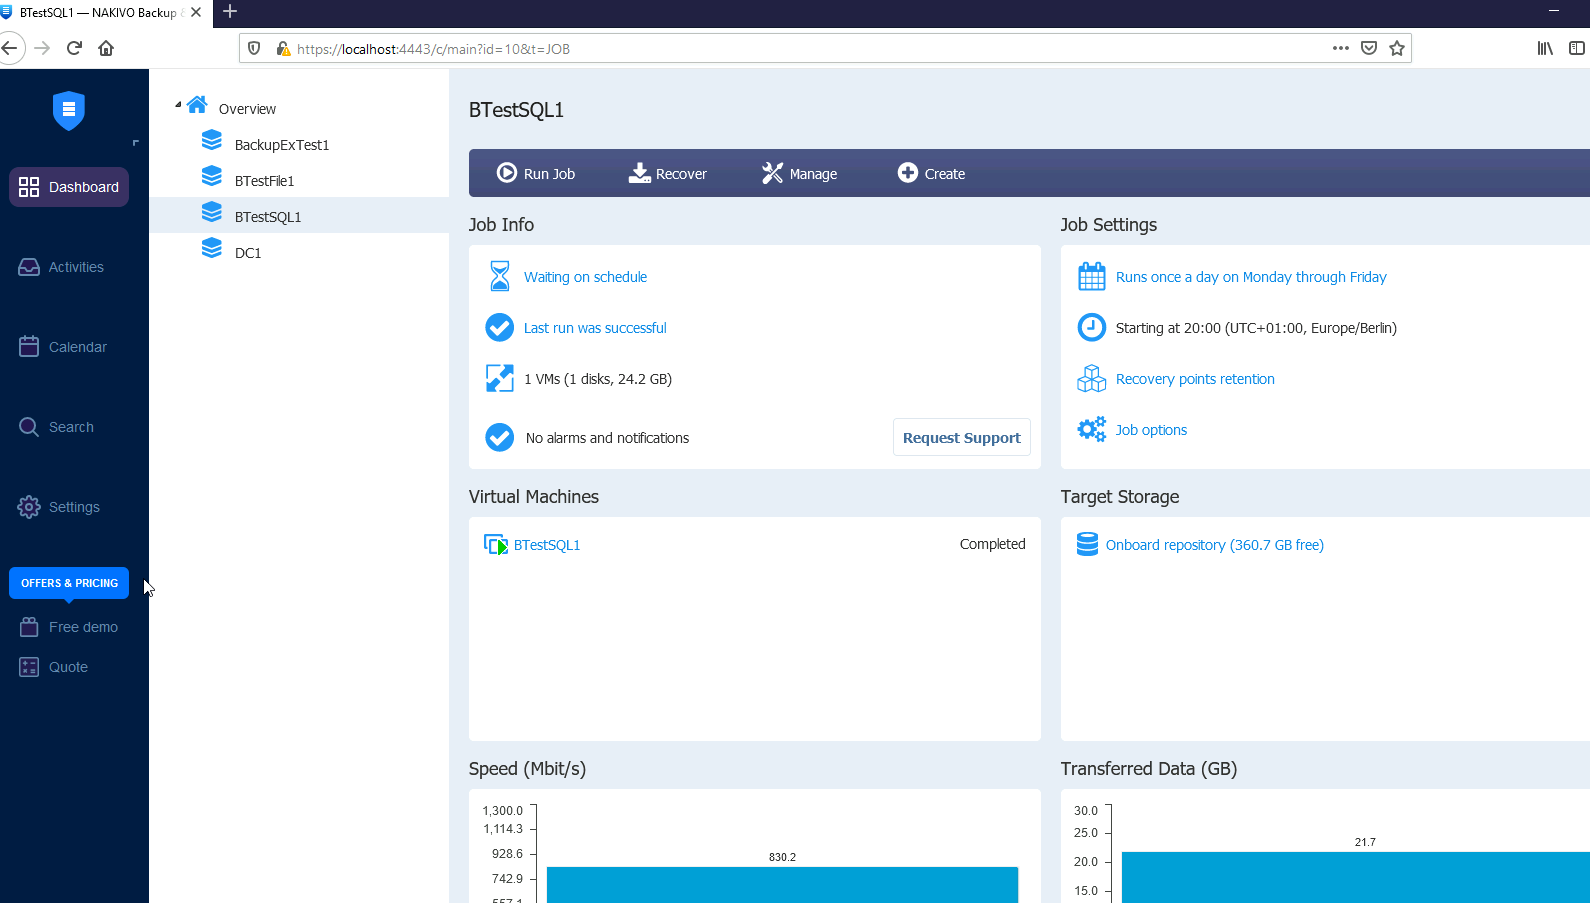
Backup job
All is the same as with Active Directory procedure I described in details, there is one exception on screen no 5. Options
We will select Truncate SQL Server logs. If you need to add user (I needed to add sqldbadmin1) refer to the procedure I already described for Exchange.
When you are done – Finish & Run

Backup is success!!
With SQL backup job created, we finished our backup guide for Nakivo. I tried to cover most crucial parts of every company with this backup guide. Guide is already too long, so we will finish here.
Conclusion
We successfully configured and prepared our VMs for backup jobs. We also set all the prerequisites for the VMs to be successfully recovered. I will be covering recovery in separate article, because it is topic for itself.